
In an era where sustainable fashion and conscious consumerism are more important than ever, the art of upcycling has emerged as a powerful way to refresh our wardrobes and home decor without contributing to textile waste. It’s a movement that celebrates creativity, individuality, and environmental responsibility. Recently, I stumbled upon a captivating video on social media that perfectly encapsulated this spirit. It featured a talented individual transforming pre-loved clothing from a thrift store into strikingly unique and trendy pieces, which she then sold online. Her designs were truly one-of-a-kind, each garment thoughtfully customized and imbued with a distinct personality. What struck me most was her humble beginning: driven by a passion for fashion design but limited by budget, she ingeniously sourced her materials from second-hand shops. Her friends, captivated by her eye-catching creations, were astonished to learn they were all handmade. This story wasn’t just inspiring; it was a powerful testament to how creativity can thrive even with limited resources, proving that style doesn’t have to come at a high cost or environmental expense.
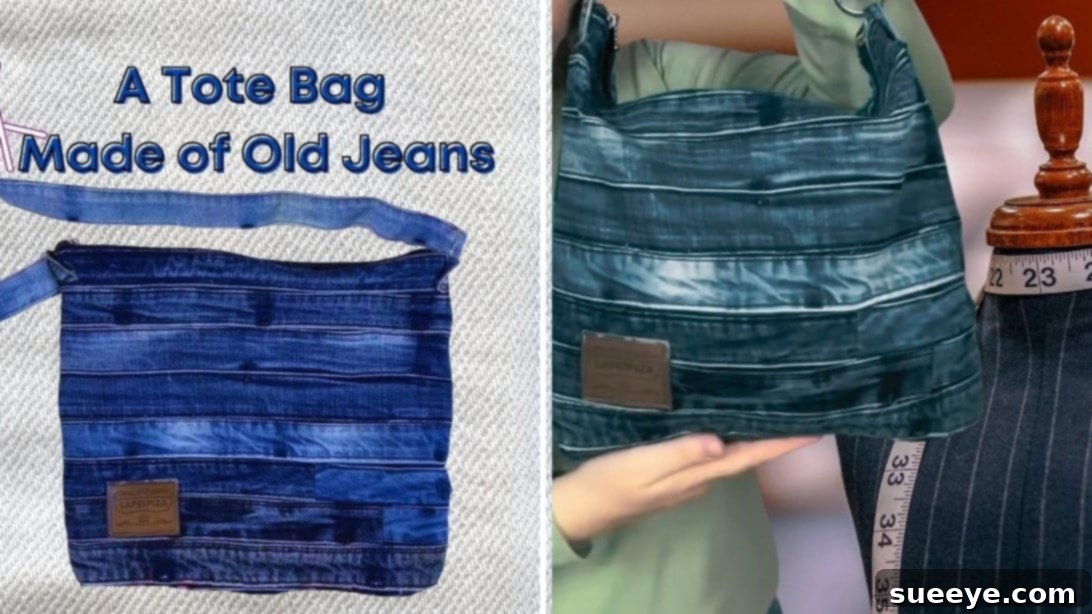
Her innovative approach immediately resonated with me, sparking a desire to embark on my own upcycling adventure. I found myself rummaging through my closet, eyeing old clothes with newfound potential, wondering what treasures lay hidden within. With newfound enthusiasm, I turned to YouTube, a treasure trove of DIY ideas, during my free time. It wasn’t long before I discovered an incredibly engaging tutorial from the channel Sewing Ideas. The video showcased a brilliant hack: transforming the belt loops and waistbands of old jeans into a stylish and surprisingly chic tote bag. This project felt like the perfect entry point into the world of sustainable crafting – practical, fashionable, and remarkably resourceful.
Excitement bubbling, I sprang from my bed, eager to begin. I gathered all the necessary materials and tools, ready to dive into this creative endeavor. The prospect of giving new life to forgotten denim, turning it into a functional and fashionable accessory, was incredibly motivating. It’s not just about making a bag; it’s about making a statement, embracing sustainability, and unleashing personal creativity.
Why Upcycle Your Old Jeans? The Benefits of Denim Transformation
Upcycling old jeans isn’t just a fun craft; it’s a practice brimming with numerous benefits, both personal and environmental. Denim production is notoriously resource-intensive, requiring vast amounts of water, pesticides, and dyes. By repurposing existing jeans, we significantly reduce our ecological footprint and divert textiles from landfills, contributing to a more circular economy. Furthermore, DIY upcycling empowers you to save money that would otherwise be spent on new accessories, all while creating something truly unique that reflects your personal style. Each stitch and embellishment transforms a common item into a distinctive fashion statement, ensuring you’ll never encounter someone else with the exact same bag. It’s an opportunity to develop new skills, nurture your creativity, and experience the immense satisfaction that comes from making something beautiful with your own hands. Embracing denim upcycling is a small but impactful step towards a more sustainable and personalized lifestyle.
Before You Begin: Essential Preparations for Your DIY Denim Tote
Successful DIY projects often hinge on proper preparation. Before you cut into your cherished old jeans, take a moment to set yourself up for success. First, select the right denim. Look for sturdy jeans, preferably those with robust waistbands and belt loops, as these will form the core structure of your bag. Avoid overly stretchy or thin denim if you want a durable, long-lasting tote. Ensure your jeans are clean and dry before you begin. Next, gather all your materials and tools. Having everything organized and within reach will make the process smoother and more enjoyable. Lastly, prepare a clear, well-lit workspace. A clean surface prevents misplaced tools and allows you to focus solely on your craft. Remember, patience is key in any sewing project; enjoy the process of bringing your creative vision to life.
Materials You’ll Need:
- Old Jeans: You’ll need at least five pairs of old jeans to collect enough belt loops and waistbands for a substantial tote bag. Choose jeans of similar weight for consistency.
- Sharp Fabric Scissors: Essential for clean, precise cuts through tough denim. Dull scissors can fray edges and make the work difficult.
- Electric Iron: Crucial for pressing seams, straightening fabric, and bonding interfacing for a professional finish.
- Sewing Machine: While hand-sewing is possible, a sewing machine will ensure strong, durable seams necessary for a functional tote bag.
- Basic Sewing Kit Tools: This includes a seam ripper (absolutely essential for this project!), pins, measuring tape, and good quality thread that matches or complements your denim.
- Zipper: Approximately 30-40 cm in length, depending on your desired bag opening. Choose a heavy-duty zipper for durability.
- Non-woven Interfacing or Dublerin: This material, often called fusible interfacing, is vital for adding structure and rigidity to your denim strips, ensuring your bag holds its shape beautifully.
Step-by-Step Guide: Crafting Your Denim Belt Tote Bag
Here’s how to turn those forgotten jeans into a stunning accessory:
Step 1: Preparing Your Denim Belts
The foundation of your tote bag starts with the waistbands of your old jeans. Using sharp fabric scissors, carefully cut off the entire belt part from each pair of jeans. Aim to get as much length as possible from the waistband, including the button closure and belt loop areas. For a sturdy and adequately sized tote bag, you’ll need at least five full waistbands. Ensure your cuts are clean and straight to facilitate easier sewing later on. Take your time with this step, as it forms the primary material for your bag’s exterior.
Step 2: Disassembling the Belts
Once you have your collection of waistbands, the next crucial step is to “dissolve” them, meaning to carefully open them up into flat strips of denim. Use a seam ripper to gently pry off two to three stitches at a time, working along the seams of the waistband. This meticulous process allows you to completely pull out the thread, unfolding the waistband into a wider, flat piece of fabric. Repeat this step for all the denim belt sections you’ve cut. Patience is key here; a careful approach will prevent any damage to the denim and ensure you have smooth, usable strips for your bag.
Step 3: Straightening and Reinforcing the Denim Strips
After carefully disassembling all your denim belts, you’ll have a collection of long, somewhat creased denim strips. Use an electric iron to thoroughly press and straighten these strips. This step is vital for achieving a clean, professional finish and making them easier to work with. Next, you need to reinforce these strips to give your tote bag much-needed structure and durability. Cut strips of non-woven interfacing (dublerin) to match the size of your denim strips. Using your electric iron, carefully glue the interfacing to the wrong side of each denim strip, following the manufacturer’s instructions. This will prevent your bag from sagging and ensure it maintains its shape. Finally, cut these reinforced strips to a uniform length, approximately 40 centimeters. This length will determine the width of your finished tote bag panels.
Step 4: Assembling the Bag Panels
Now it’s time to assemble the main body of your tote bag. Lay out your reinforced denim strips into two separate piles, ensuring each pile contains an equal number of strips. These two piles will form the front and back panels of your bag. You can arrange them in a random, patchwork-like order, or create a more symmetrical design, depending on your aesthetic preference. Once you’re happy with the arrangement, take two strips and place them right sides together. Using your sewing machine, stitch them together along one long edge, at least one centimeter from the edge, creating a strong seam. Repeat this process, joining all the strips in each pile to form two distinct denim panels. After sewing each seam, press it open with your electric iron. This flattens the seams, prevents bulk, and gives your finished panels a much smoother and more natural appearance, mimicking a woven texture.
Step 5: Shaping and Lining Your Tote
With your two denim panels sewn, it’s time to give your bag its distinctive shape and add the crucial lining. First, fold each denim panel in half lengthwise. From the folded edge, cut the bottom corners into a gentle semicircle. This creates a rounded bottom for your tote bag, giving it a softer, more elegant silhouette. Do this on both the front and back denim panels, ensuring they are symmetrical. Next, cut two pieces of sturdy cotton fabric to the exact same shape and size as your denim panels. This cotton fabric will serve as the internal lining of your bag, providing a clean finish and protecting your belongings. Piece the two cotton lining sections together along the sides and bottom, leaving the top open, just as you would with the denim panels. This creates a complete inner shell for your tote.
Step 6: Personalizing and Finishing Touches
Now for the exciting part – customization! Before fully assembling your bag, consider adding pockets to your lining for extra functionality. Cut pocket linings from your cotton fabric and sew them into place on the inside of your main lining pieces. You can create open pockets, or even add zippers for secure compartments. This is also the perfect stage to personalize the exterior of your bag. Consider adding decorative zippers, iron-on patches, intricate embroidery, or fabric paint designs to make your tote truly your own. Once all your customizations are complete, you can proceed with connecting the denim exterior to the cotton lining, sewing them together along the top edge, leaving an opening for turning. Securely attach your chosen handles – whether they are shorter, over-the-shoulder straps made from leftover denim, or longer, cross-body straps crafted from leather or webbing. Ensure the handles are triple-stitched for maximum durability. After everything is sewn and turned right side out, give your finished tote one last press with the iron for a crisp, polished look.
And there you have it – a fantastic, unique tote bag crafted from your old jeans! The result, as I discovered, can be absolutely fantastic with a little patience and creativity. If you prefer visual guidance, you can also watch the easy-to-follow, step-by-step video on the Sewing Ideas channel. I personally customized my tote bag with a collection of adorable patches I salvaged from an old shirt, giving it a playful and personal touch. To make it truly ‘extra,’ I finished it off with a quirky keychain, adding another layer of individuality.
Embrace Your Unique Style: The Impact of Your Handmade Denim Tote
Your new upcycled denim tote bag is more than just an accessory; it’s a statement. It represents a commitment to sustainable living, a celebration of creativity, and a testament to your resourcefulness. Each time you carry it, you’re showcasing a unique piece of fashion that tells a story – a story of transformation, purpose, and personal flair. These bags are not only stylish but also incredibly durable, perfect for daily errands, a trip to the market, or simply carrying your essentials with a touch of handmade charm. Expect compliments and questions, as your one-of-a-kind bag is sure to be a conversation starter.
Beyond the Tote: More Creative Denim Upcycling Ideas
The world of denim upcycling extends far beyond tote bags! Once you’ve mastered this project, consider exploring other exciting ways to repurpose your old jeans. Transform them into chic denim shorts or skirts, stylish aprons, or even unique home decor items like patchwork rugs, coasters, or storage bins. Denim can also be crafted into smaller accessories such as wallets, headbands, or even pet toys. The robust nature of denim makes it incredibly versatile for a wide range of creative projects, limited only by your imagination. Keep experimenting and discovering new ways to give your old denim a second life.
Conclusion: Your Journey into Sustainable Crafting
Embarking on this DIY journey to create an upcycled denim tote bag is a rewarding experience on multiple levels. Not only do you gain a stylish and practical accessory, but you also contribute positively to environmental sustainability, reduce waste, and express your unique sense of style. It’s an empowering way to engage with fashion, proving that incredible style doesn’t have to be mass-produced or environmentally costly. We encourage you to gather your materials, unleash your creativity, and dive into the satisfying world of upcycling. Share your finished creations, inspire others, and continue to explore the endless possibilities that lie within your old clothes. Happy crafting!
How To Make A Tote Bag Made of Belts from Old Jeans