
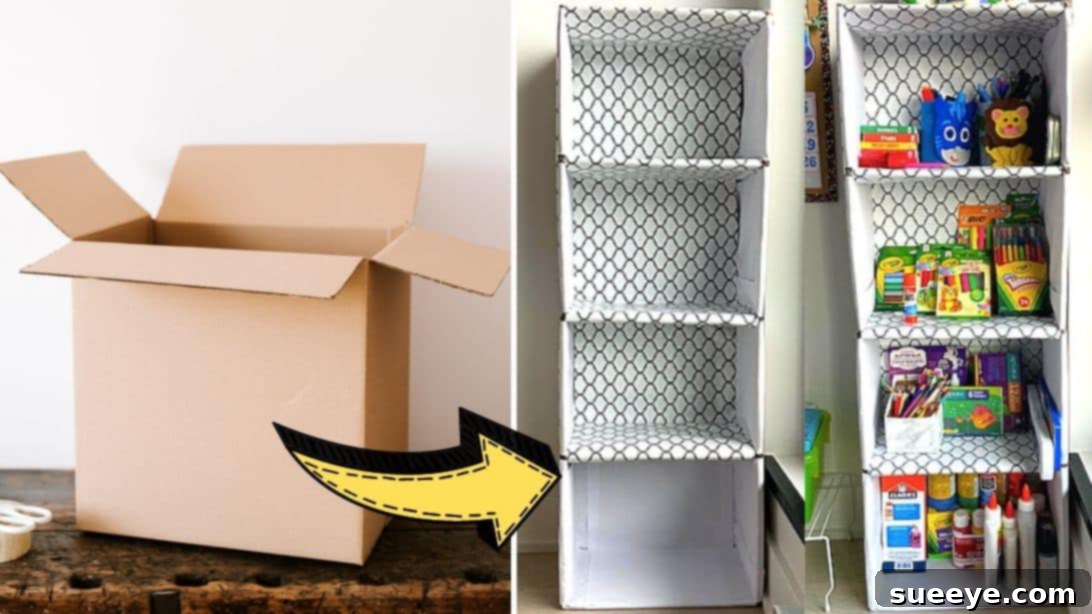
Craft Your Own Custom Storage: Easy DIY Cardboard Box Shelf Organizer
Are you struggling with a room overflowing with craft supplies, a growing collection of books, or simply too much clutter with nowhere to store it all? Do you envision a perfectly organized space but find the high cost of new shelving units daunting? Look no further! This ingenious and incredibly budget-friendly DIY project, inspired by the creative insights of Tripta on YouTube, offers an ideal solution. By repurposing readily available cardboard boxes, you can construct a sturdy, customizable, and aesthetically pleasing shelf organizer that not only helps declutter your home but also champions sustainable living.
This project is perfect for a wide audience: from passionate crafters needing dedicated storage for their materials, to students seeking affordable book organization, or anyone aiming to bring order to their living space without making a significant financial investment. It’s remarkably cheaper than purchasing pre-made shelves, yet it performs its organizational duty with surprising efficiency and a touch of personal charm. With just a few common household tools and a stack of cardboard boxes, you’ll be well on your way to creating a more organized, functional, and inspiring environment. We’ve broken down the process into easy-to-follow instructions below, and we encourage you to watch Tripta’s original video tutorial for a comprehensive visual guide. Prepare to transform your chaotic clutter into a beautifully arranged display that reflects your creativity!
Materials You’ll Need:
Before embarking on any DIY endeavor, having all your materials ready is key to a smooth and enjoyable crafting experience. For this eco-conscious shelf organizer, you’ll primarily need items that are often found around the house or are very inexpensive to acquire, making it a truly accessible project.
- Cardboard Boxes: These are the fundamental building blocks of your shelves. Prioritize sturdy, clean, and ideally uniform boxes. Large appliance boxes (e.g., from televisions or small refrigerators) are excellent for the outer framework due to their robust construction, while various smaller boxes can be repurposed for internal dividers and modules. The thicker the cardboard, the sturdier your final shelf will be.
- Cutter or X-acto Knife: An indispensable tool for achieving precise and clean cuts through cardboard. A sharp blade is paramount not only for accuracy but also for safety, as dull blades require more force and can slip.
- Scissors: Useful for a variety of tasks, including making smaller, intricate cuts, trimming excess wrapping paper, or performing minor adjustments where a larger cutter might be unwieldy.
- Duct Tape: This will be your primary adhesive and reinforcing agent. Opt for a strong, wide duct tape to ensure maximum stability and durability of your joints. If you plan to leave parts of the tape exposed, selecting a clear or a color-matching tape for your chosen wrapping paper can contribute to a more seamless finish.
- Wrapping Paper: The decorative element that will transform your utilitarian cardboard structure into an attractive piece of furniture. Choose a design, color, or pattern that harmonizes with your room’s existing decor. As an alternative, consider using self-adhesive contact paper, fabric scraps (applied with spray adhesive), paint, or even leftover wallpaper for a truly unique and personalized touch.
- Ruler or Straight Edge: (Highly Recommended for accuracy) Absolutely crucial for drawing straight lines and ensuring accurate measurements, which are vital for a professional-looking and structurally sound finished product. Precision here will prevent wobbly or ill-fitting components.
- Pencil or Marker: (Highly Recommended) Essential for marking cut lines, measuring points, and making any necessary notations on your cardboard before cutting.
Essential Tools and Safety Tips
While the list of materials is straightforward, understanding how to handle your tools safely and effectively is paramount. Not only will it ensure a better outcome for your project, but it will also prevent potential accidents. Always prioritize your safety when working with sharp instruments.
- Safe Use of Your Cutter/X-acto Knife: Always perform cuts on a protected surface, such as a self-healing cutting mat, a thick piece of scrap cardboard, or an old cutting board. When cutting, always direct the blade away from your body. Apply steady, even pressure. For thicker cardboard, it’s often safer and more effective to make multiple shallow passes rather than attempting to cut through in a single, forceful stroke. Always keep your fingers and any other body parts clear of the blade’s path.
- Scissors Etiquette: Ensure your scissors are adequately sharp for cutting cardboard. Using dull scissors can result in jagged, uneven edges and can be frustrating to work with.
- The Golden Rule of Measurement: The adage “Measure twice, cut once” is a cornerstone of successful DIY projects. Precision in measurement is critical for ensuring that all your cardboard pieces fit together snugly, creating a stable structure and a neat, professional appearance.
- Optimizing Your Workspace: Work in a well-lit, spacious area where you can comfortably spread out all your materials without feeling cramped or obstructed. A clean and organized workspace contributes to both efficiency and safety.
Step-by-Step Instructions: Building Your Cardboard Shelf Organizer
Follow these detailed steps carefully to construct your custom cardboard shelf organizer. This modular design offers excellent flexibility, allowing you to easily adjust the size and configuration of your final shelving unit to suit your exact needs.
Step 1: Creating the Inner Module Units
The core strength and structure of your shelf organizer depend on the creation of sturdy, individual box modules. These reinforced units will interlock to form the larger, multi-compartment structure. Each module is essentially a double-walled half-box, designed for enhanced durability.
- Prepare the Main Cardboard Box: Select a medium to large cardboard box that will form the primary building block. Carefully use your cutter or X-acto knife to remove all the top and bottom flaps. Your goal is to create an open-ended rectangular or square tube of cardboard.
- Cut the Box in Half Crosswise: Lay the prepared box flat. Accurately measure its length and mark the exact midpoint along both of the longer sides. Using your ruler as a guide, carefully cut the box crosswise along this marked line into two equal, identical halves. You will now have two open-ended cardboard sections.
- Reinforce One Half (Outer Shell): Take one of these two halves. This piece will serve as the outer shell for your first internal module. Set it aside, keeping it intact in its box shape.
- Prepare the Inner Reinforcement Piece: Now, take the other half of the cut box. This piece is destined to be inserted into the first half to provide significant structural integrity and rigidity. To prepare it, you’ll need to disassemble or “open up” the box. Carefully locate and separate the factory-glued or taped seam on one of the corners so that the box can lie completely flat as a single sheet of cardboard.
- Trim and Re-form the Reinforcement: From this flattened piece of cardboard, carefully trim away the bottom flaps (these are the smaller side flaps that typically fold in to form the box’s base). The objective is to make this flattened piece slightly smaller in overall circumference than the intact box half from step 3. This slight reduction will allow it to slide smoothly and snugly inside. Once trimmed, gently re-form it back into an open-ended box shape (without the flaps).
- Assemble the First Module: Carefully slide this newly trimmed and re-formed box piece into the intact half you set aside earlier. It should fit very snugly, creating a robust, double-layered wall for significantly enhanced strength. Adjust its position until it sits perfectly flush within the outer piece.
- Secure with Duct Tape: Once the two layers are perfectly aligned, apply generous amounts of strong duct tape to secure all the sides together. Focus on taping both internally (where accessible) and externally along the seams and corners. The more securely you tape, the more stable and durable this individual module will be. This completes one robust, reinforced small box module.
- Repeat for Additional Modules: For the next step of assembly, you will require a total of two such small box modules. Therefore, repeat the entire process from step 1 through 7 to create a second identical reinforced module. Ensure both modules are equally sturdy.
Step 2: Assembling the Shelf Units and Applying Finishing Touches
With your individual reinforced modules now complete, it’s time to assemble them into larger shelf units and then give your creation a polished, decorative finish that integrates seamlessly with your home decor.
- Prepare the Outer Shell for a Larger Unit: Select another whole cardboard box. This box will serve as the main housing for two of your previously constructed small modules. As before, carefully trim away both its top and bottom flaps completely, creating a larger, open-ended rectangular sleeve or tube.
- Insert the Small Modules: Gently place your two reinforced small box modules side-by-side inside this larger outer box. It’s crucial that they fit snugly, minimizing any empty space or “wiggle room.” If there appears to be a noticeable gap between them, the next step will address this.
- Add a Central Support Piece: To significantly enhance the overall stability of the unit and create a clearly defined, robust divider between the two modules, cut a piece of sturdy cardboard. This piece should fit precisely in the gap between the two small boxes and extend from the top edge to the bottom edge of the outer box. This central reinforcement will prevent the unit from collapsing or sagging under the weight of stored items, making it much more durable.
- Secure the Entire Unit: Once all components – the outer box, the two inner modules, and the central support – are perfectly aligned and positioned, use generous amounts of strong duct tape to securely fasten everything together. Tape along all internal and external seams, ensuring that the entire structure feels rigid and robust. The more diligently you tape the internal joints and contact points, the sturdier your completed shelf unit will be.
- Construct Additional Units: To create a multi-tiered or multi-column shelving system, you will need to construct three more identical sets of this completed unit (each comprising an outer box, two inner modules, and a central support). This means you will ultimately have a total of four such modular units, all ready for their final combination.
- Combine the Units into a Complete Shelf: Once you have all four of your modular units, arrange them in your desired configuration. You have the flexibility to stack them vertically for a tall, narrow shelf, arrange them horizontally for a longer console, or even create a unique L-shaped unit. Use strong duct tape to securely join these individual units to each other. Ensure all connecting sides are taped together firmly, creating a stable, integrated, and cohesive shelf structure.
- Wrap and Decorate for Style: Now for the most exciting part – transforming your functional cardboard structure into a stylish and personalized piece of furniture! Carefully wrap the entire assembled shelf unit with your chosen wrapping paper, contact paper, or fabric. Take your time to smooth out any bubbles or wrinkles, and neatly fold and tape the edges for a clean, professional finish. As an alternative, you could paint the entire unit with a primer and then your desired color, cover it with fabric using spray adhesive, or even use decoupage techniques with old maps, comic books, or decorative paper for a truly bespoke and artistic look.
- Fill and Organize Your Space: Once the wrapping is complete and any adhesives or paints have thoroughly dried, your DIY cardboard shelf organizer is ready to be put to use! Start filling it with books, craft supplies, decorative items, or anything else that needs a designated spot. Step back and enjoy your newly decluttered, organized, and beautifully personalized space!
Why Choose a DIY Cardboard Shelf Organizer?
Beyond the immense satisfaction of completing a successful DIY project, these cardboard shelves offer a myriad of practical and environmental benefits that make them an exceptionally smart choice for modern living:
- Unbeatable Affordability: This is arguably the most compelling advantage. You are primarily utilizing materials that would otherwise be discarded as waste, drastically reducing the cost associated with acquiring new storage solutions. It’s an incredibly budget-friendly way to organize your home.
- Eco-Friendly and Sustainable: By actively engaging in upcycling cardboard boxes, you are directly contributing to waste reduction and extending the lifecycle of materials. This makes your DIY shelf an excellent, conscious choice for an environmentally responsible home.
- Completely Customizable to Your Needs: Unlike the rigid, fixed dimensions of store-bought options, this DIY approach allows you to precisely tailor the size, shape, and number of compartments to perfectly fit your unique space and specific storage requirements. Need taller shelves for binders? Wider ones for fabric bolts? The design is entirely flexible!
- Lightweight and Effortlessly Portable: Cardboard shelves are incredibly light, making them easy to move, rearrange, or even transport if you frequently redecorate your space or anticipate moving homes. This flexibility is a significant advantage over heavy, cumbersome traditional furniture.
- Personalized Aesthetics: With an almost infinite array of wrapping paper, paint, fabric, or other decorative options, you have the creative freedom to match your shelves exactly to your room’s existing decor or to introduce a bold new style. This makes them a true reflection of your personal taste and creativity.
- Accessible Project for All Skill Levels: This project requires minimal specialized tools or advanced crafting skills, making it wonderfully achievable and enjoyable for both beginners taking their first steps into DIY and seasoned crafters looking for a quick and satisfying build.
Tips for Maximizing Your Cardboard Shelf: Durability and Style
To ensure your cardboard shelf organizer not only stands the test of time but also looks fantastic and functions optimally, consider incorporating these additional tips into your construction and decoration process:
- Select the Strongest Cardboard: Understand that not all cardboard possesses the same strength. For the main structural components of your shelves, always prioritize double-walled or corrugated cardboard. Large appliance boxes (e.g., from refrigerators, washing machines, or large electronics) are frequently made from this robust type of cardboard and are often ideal choices.
- Reinforce Key Stress Points: Beyond the initial taping in the assembly steps, consider strategically adding extra layers of duct tape, or even thin strips of additional cardboard, to the edges and corners that will bear the most weight or are likely to experience frequent impact. These reinforcements will significantly enhance the shelf’s longevity.
- Consider Waterproofing (Optional but Recommended for Some Areas): For shelves intended for use in moisture-prone areas like a laundry room, garage, or even a kitchen pantry, or simply for an added layer of protection, you can line the inside of the compartments with self-adhesive contact paper or even a layer of clear, wide packing tape before you apply your final decorative covering. This provides a barrier against spills and humidity.
- Distribute Weight Evenly: While surprisingly sturdy for its material, cardboard does have weight limitations. Avoid concentrating excessively heavy items onto a single shelf or compartment. Instead, distribute heavier items across multiple compartments or, ideally, place them on the bottom-most shelves for maximum stability.
- Unleash Your Creativity with Decoration: Do not feel limited to just wrapping paper! Explore other creative finishing techniques. You can paint your shelves, cover them with leftover wallpaper, fabric scraps (using spray adhesive for a smooth finish), or even create a unique mosaic design using magazine cutouts, old maps, or sheet music for a truly one-of-a-kind look. Adding decorative labels to each compartment can also elevate both style and organization.
- Add a Backing for Enhanced Stability: For additional structural stability and to prevent items from accidentally falling out the back of your shelves, consider cutting a large, single piece of cardboard. Tape this piece securely to the entire back of the assembled shelf unit before you proceed with the final decorative wrapping. This will give your shelf a more enclosed, finished appearance.
Variations and Customization Ideas
The true brilliance of this DIY project lies in its remarkable adaptability. The modular nature of the design invites endless possibilities for customization and variation, allowing you to create a storage solution that is perfectly tailored to your space and personal style. Here are some inspiring ideas to spark your creativity:
- Flexible Modular Arrangements: Instead of building one large unit, construct several smaller two-compartment units. These can then be arranged and rearranged as desired to fit evolving needs – stack them vertically to create a tall, narrow tower, line them up horizontally for a long, low console table, or even configure them into a unique L-shaped unit to fit a corner.
- Integrate Hidden Drawers: For discreet storage of smaller items or to simply add a touch of sophistication, create smaller cardboard boxes that fit snugly into some of the compartments. These can then serve as functional pull-out drawers. Enhance their usability by adding a fabric loop, a decorative knob, or a simple cut-out handle.
- Tailor for Specific Purposes: Design your shelves with a particular function in mind:
- Craft Room Organizer: Dedicate individual compartments for organizing specific craft supplies such as skeins of yarn, fabric scraps, bottles of paint, various glues, or specialized tools.
- Kids’ Room Storage: These shelves are ideal for lightweight toys, children’s books, or art supplies. Decorate them with bright, playful, and child-friendly patterns to make organization fun.
- Entryway Solution: Create custom-sized cubbies specifically for shoes, hats, scarves, gloves, or small bags to keep your entryway neat and welcoming.
- Pantry Organization: Perfect for bringing order to a chaotic pantry, these shelves can neatly organize lightweight dry goods, snacks, spice jars, or various cooking supplies, making everything easily accessible.
- Experiment with Different Finishes: Don’t limit your aesthetic choices! Experiment with a wide range of decorative materials – different types of patterned paper, textured fabrics, or various paint finishes. This allows you to match your shelves to virtually any interior design style, from rustic farmhouse to sleek minimalist, vibrant bohemian to modern industrial.
This fantastic DIY project, so thoughtfully shared by the innovative Tripta via YouTube, brilliantly demonstrates that functional, beautiful, and personalized home organization does not have to come with a hefty price tag. By embracing the powerful principles of upcycling, creative problem-solving, and hands-on effort, you can truly transform ordinary, discarded cardboard boxes into extraordinary, custom-made storage solutions that enhance your living space. If you found this project inspiring and empowering, we wholeheartedly recommend visiting Tripta’s YouTube channel for an abundance of other brilliant DIY ideas and comprehensive tutorials. Give her channel a visit and subscribe to unlock a world of creative possibilities! We’d absolutely love to see your finished cardboard shelf organizers – please share your results and inspire others in our thriving DIY community!