
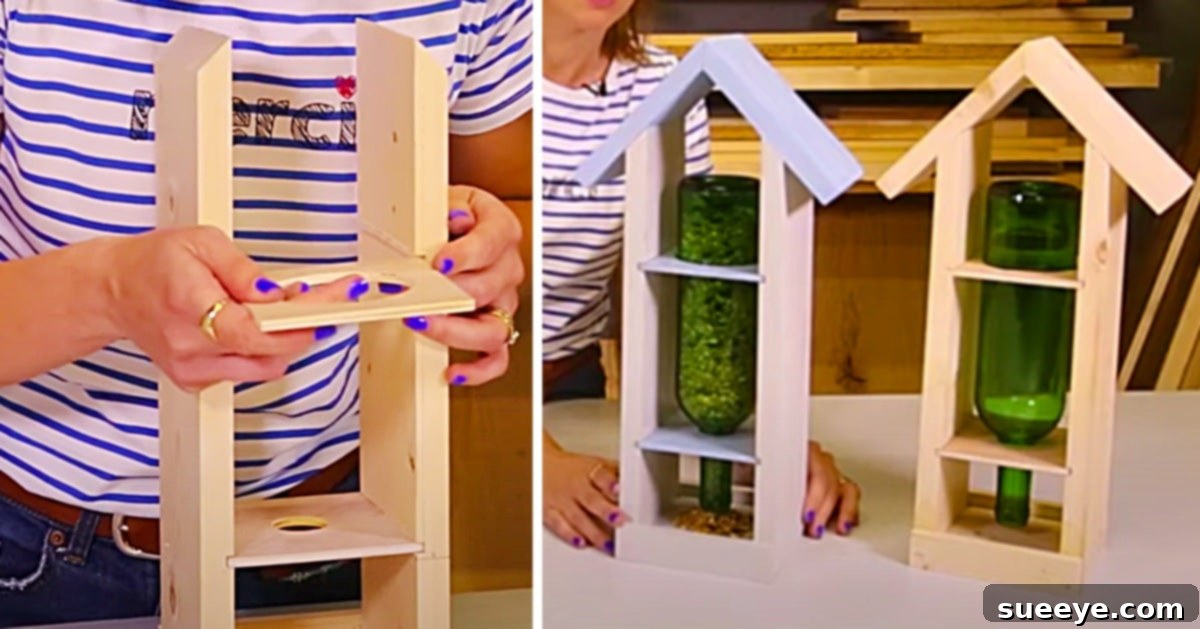
How To Make A Wine Bottle And Pine Bird Feeder: A Delightful DIY Project for Your Garden
Moving into a new home often brings a fresh perspective and new opportunities to connect with nature. For our family, the highlight of our new property was undoubtedly the enchanting back garden. It was a dream come true, providing a serene escape where we could spend hours simply observing the local wildlife. The sheer variety of birds visiting our garden instantly captivated my daughter. Her fascination quickly spread to all of us, igniting a shared desire to attract even more feathered friends to our outdoor space and transform it into a vibrant bird sanctuary.
In our quest to become better bird hosts, I embarked on a search for creative and sustainable solutions. That’s when I stumbled upon an absolute gem: an amazing bird feeder idea by Silverline Tools on YouTube. The tutorial detailed how to construct a functional and aesthetically pleasing bird feeder using just a few pieces of wood and, ingeniously, a recycled wine bottle. The moment I shared the video with my family, their enthusiasm was palpable! We knew instantly this was our next family project. Armed with some old softwood pine we found in the garage, we wasted no time in beginning our journey to craft the perfect recycled wine bottle bird feeder.
This project wasn’t just about building a feeder; it was about creating a shared experience, learning new skills, and contributing to the local ecosystem. The satisfaction of transforming simple materials into something beautiful and beneficial for nature is truly rewarding. Join us as we explore the steps, materials, and joys of making your very own DIY wine bottle bird feeder, a sustainable way to bring life and melody to your backyard.
Why Build Your Own DIY Bird Feeder?
There are numerous compelling reasons to embark on a DIY bird feeder project, especially one as resourceful as using a recycled wine bottle. Firstly, it’s incredibly cost-effective. Store-bought feeders can be expensive, and crafting your own often utilizes materials you already have on hand or can source affordably. Secondly, it offers immense satisfaction. The pride of creating something functional and beautiful with your own hands is unparalleled, and watching birds enjoy your creation is a truly heartwarming experience.
Beyond personal gratification, a homemade bird feeder is a wonderful way to teach children about wildlife, sustainability, and basic woodworking skills. It transforms into a family bonding activity, encouraging teamwork and creativity. Furthermore, by repurposing a wine bottle, you’re actively engaging in upcycling, giving new life to an item that would otherwise be discarded. This commitment to environmental responsibility is a small but significant step towards a more sustainable lifestyle. A DIY feeder also allows for complete customization, letting you design a feeder that perfectly complements your garden’s aesthetic while catering to the specific needs of local bird species.
Materials and Tools Needed for Your Project:
Gathering the right materials and tools is the first essential step for any successful DIY project. This wine bottle bird feeder design is quite versatile, allowing for substitutions where needed, especially concerning the type of wood. Here’s what you’ll typically need:
- Softwood pine (or any wood you have on hand): Pine is easy to work with and readily available. Repurposed wood from old pallets or scrap pieces can also be an excellent, eco-friendly option.
- A tape measure: Crucial for accurate measurements, ensuring all your pieces fit together perfectly.
- A wooden mallet: Useful for gently tapping pieces into place without damaging the wood.
- A thin chisel: For precise cuts, cleaning out joints, or refining edges.
- A pin hammer: Ideal for driving small nails or pins for delicate assembly.
- Nails: Various sizes might be needed for different parts of the feeder’s structure, providing strong, lasting connections.
- Wood clamps: Essential for holding pieces securely in place while cutting, gluing, or drilling, ensuring safety and precision.
- A jigsaw: Perfect for making intricate cuts and curves, particularly useful for shaping the roof or any decorative elements.
- A regular saw (hand saw or miter saw): For straight, clean cuts of your larger wood pieces.
- A drill: Necessary for creating pilot holes for screws, mounting points, or any openings for the feeder mechanism.
- A carpenter’s square: To ensure all your angles are perfectly square, which is vital for a sturdy and well-aligned structure.
- A sanding block or sandpaper: For smoothing rough edges and surfaces, making the feeder safe for birds and pleasant to handle.
- Paintbrushes (if you choose to paint/seal the bird feeder): To apply protective finishes or add a decorative touch.
- Wood glue: For reinforcing joints and ensuring a strong, durable construction.
- A wine bottle (empty and clean): The star of our upcycling project, serving as the seed reservoir. Ensure it’s thoroughly washed and dried.
Always remember to prioritize safety when working with tools. Wear appropriate protective gear, such as safety glasses, and ensure you understand how to use each tool correctly before starting.
Directions: The Crafting Journey to Your Backyard Bird Feeder
While this project offers a fantastic opportunity for hands-on creation, the wonderful video tutorial by Silverline Tools remains the ultimate guide, taking you through a precise step-by-step process to construct this recycled wine bottle bird feeder. However, we can outline the general exciting stages you’ll embark on:
1. Preparing Your Wood Pieces: Precision and Purpose
The initial phase involves meticulous measuring and cutting of your selected wood. You’ll learn how to mark and cut the various wooden components that will form the base, sides, and roof of your bird feeder. This includes creating the specific cuts and grooves required to securely hold the wine bottle feeder mechanism. Accuracy here is key, as well-fitting pieces ensure both the feeder’s stability and its aesthetic appeal.
2. Crafting the Base and Bottle Holder: The Heart of the Feeder
The core of this design revolves around the clever integration of the wine bottle. The tutorial guides you through constructing the base framework and the small, precisely cut wooden pieces designed to cradle the wine bottle. These pieces are engineered to allow the bottle to easily slide in and out for refilling, while securely holding it in place to dispense seeds effectively. The beauty of this design lies in its simplicity and efficiency, relying on gravity to keep the seed tray continuously stocked.
3. Assembling the Structure: Bringing it All Together
With your pieces cut and prepared, the next stage is assembly. Using wood glue, nails, and possibly screws, you’ll join the various parts to form the main body of the feeder. This includes attaching the side panels to the base, forming the support structure for the roof, and ensuring the bottle mechanism components are firmly integrated. Wood clamps will be invaluable here, holding pieces in alignment while the glue sets and fasteners are applied.
4. Building the Attractive Roof: Protection and Style
A well-designed roof isn’t just for aesthetics; it plays a crucial role in protecting the birdseed from rain, snow, and excessive sun, keeping it dry and fresh for your feathered visitors. The video will demonstrate how to cut and assemble the roof pieces, often involving angled cuts to create a classic pitched roof design. This adds a charming finishing touch and significantly enhances the feeder’s durability and functionality, ensuring the seeds remain accessible and unspoiled.
5. Finishing Touches: Sanding, Sealing, and Personalization
Once the main structure is complete, take the time to sand all surfaces and edges smooth. This not only improves the feeder’s appearance but also prevents splinters and sharp edges that could harm birds. If you choose to paint or stain your feeder, ensure you use non-toxic, outdoor-safe products to protect the wood from the elements and add a personal touch. This final step transforms your crafted pieces into a polished, resilient bird feeder, ready for its purpose.
Placing and Maintaining Your Wine Bottle Bird Feeder
The successful attraction of birds to your garden doesn’t end with building the feeder; its placement and ongoing maintenance are equally crucial. Choose a location that offers birds a sense of security from predators, ideally near a tree or shrub where they can quickly take cover. Ensure it’s visible from your home so you can enjoy the birdwatching, but also accessible for you to refill and clean.
When it comes to filling, a variety of seeds will attract a wider range of birds. Black oil sunflower seeds are a universal favorite, while millet and nyjer seeds appeal to smaller species like finches. The wine bottle feeder mechanism ensures a steady supply of seeds, as gravity automatically replenishes the tray as birds consume the seed. Regular cleaning is paramount to prevent the spread of diseases among birds. Aim to clean your feeder every one to two weeks, especially during peak feeding seasons. Use a mild soap solution, thoroughly rinse, and allow it to dry completely before refilling. This simple routine ensures your bird feeder remains a healthy and popular spot for your feathered visitors.
The Joy of a Bird-Filled Garden
Our family derived immense pleasure from creating this recycled wine bottle bird feeder. It was more than just a project; it was an investment in our shared space and a contribution to the local wildlife. The immediate success was incredibly gratifying – the birds absolutely love it! Watching a constant stream of finches, sparrows, chickadees, and even occasional woodpeckers visit our garden has brought an unparalleled sense of peace and wonder.
The sounds of chirping and singing have become the daily soundtrack to our new home, creating a vibrant and lively atmosphere. My daughter, in particular, continues to be captivated, learning to identify different species and observing their behaviors. This DIY bird feeder has not only enhanced our backyard but has also deepened our family’s connection to nature and each other. We highly recommend this project to anyone looking for a rewarding, sustainable, and family-friendly activity that brings lasting beauty and life to their outdoor sanctuary. Get ready to enjoy the delightful spectacle of nature right outside your window!