
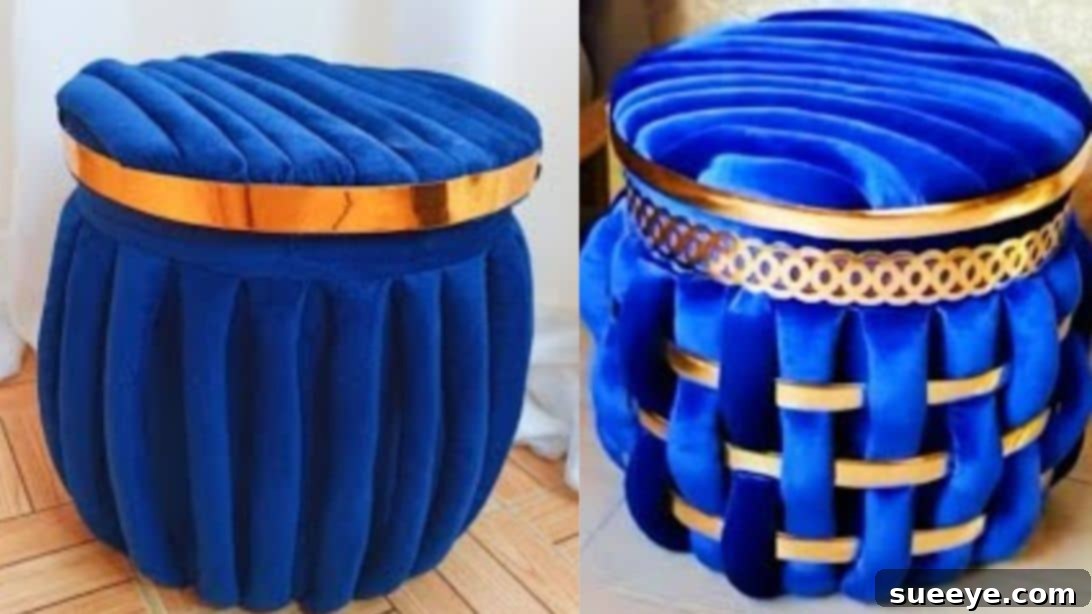
Transform a Simple Bucket into a Stylish Storage Ottoman: Your Ultimate DIY Guide
Are you searching for an affordable yet functional decor piece to enhance your living space, perhaps one that can also discreetly store some of your everyday items? Instead of spending a fortune at a furniture store, imagine creating a beautiful and practical ottoman with storage right in your home! This comprehensive guide will walk you through the process of crafting a DIY storage ottoman using an ordinary bucket, turning a simple container into a chic, multi-purpose furnishing.
This fantastic project, inspired by a brilliant tutorial from Christine Nore on YouTube, is not only incredibly budget-friendly but also a fun and rewarding weekend activity. Perfect for beginners and experienced DIYers alike, you’ll be amazed at how easily you can add a touch of handmade charm and clever storage to any room.
Creating your own ottoman means you have complete control over the design, allowing you to match it perfectly with your existing decor. Choose fabrics, colors, and embellishments that reflect your personal style, making your new ottoman truly unique. Let’s gather our materials and dive into this exciting project!
Why Build Your Own Storage Ottoman?
Beyond the undeniable satisfaction of a DIY project, there are numerous compelling reasons to embark on crafting your own bucket ottoman:
- Cost-Effective Decor: Furniture can be expensive, especially pieces that offer dual functionality. By upcycling a simple bucket and using readily available materials, you can create a high-quality ottoman for a fraction of the cost of buying a new one. This makes stylish home decor accessible on any budget.
- Clever Storage Solution: In modern homes, space is often at a premium. An ottoman with hidden storage is a game-changer for decluttering. It’s perfect for stashing blankets, magazines, remote controls, children’s toys, or craft supplies, keeping your living area tidy and organized without sacrificing style.
- Personalized Style: When you DIY, you’re not limited by mass-produced designs. You can select fabrics, textures, and decorative accents that perfectly complement your home’s aesthetic, from minimalist modern to cozy farmhouse. This allows for a truly bespoke piece that reflects your personality.
- Eco-Friendly Upcycling: Reusing an old bucket gives it a new lease on life and keeps it out of landfills. This sustainable approach reduces waste and promotes responsible consumption, making your DIY project good for your home and the planet.
- Versatile Functionality: Your finished ottoman won’t just be for storage. It can serve as an extra seat when guests visit, a comfortable footrest after a long day, or even a small side table (with a sturdy tray on top). Its versatility makes it an invaluable addition to any room.
Materials You’ll Need:
Before we begin, ensure you have all your materials ready. Having everything at hand will make the crafting process smooth and enjoyable.
- A Sturdy Bucket: The foundation of your ottoman. A 5-gallon plastic bucket is ideal due to its size and robust structure. Ensure it’s clean and free from any residue.
- Durable Fabric: You’ll need enough fabric to cover both the bucket’s exterior, interior, and the lid. Choose a durable upholstery fabric that can withstand daily use, like canvas, denim, velvet, faux leather, or a thick cotton blend. Consider patterns and colors that match your decor.
- Sharp Scissors: Essential for precise fabric cutting. Good quality fabric scissors will make the job much easier.
- Stuffing/Foam: For the padded top and internal cushioning. Options include upholstery foam sheets, poly-fil stuffing, or even old pillows cut to size. The goal is to create a comfortable and supportive surface for the lid.
- Hot Glue Gun and Glue Sticks: For secure and instant adhesion of fabric layers, especially around edges and details.
- Staple Gun (Gun Tacker) and Staples: Crucial for firmly attaching fabric to the bucket, providing a strong and lasting hold, particularly for the outer covering.
- Reflective Paper (Optional): The original tutorial suggests reflective paper for a decorative edge on the lid. Alternatively, you can use decorative trim, ribbon, piping, or even paint for a personalized touch.
- Sewing Machine (or Needle and Thread): For creating neat seams on your fabric strips and covers. Hand-sewing is possible but will take more time.
Step-by-Step Guide to Crafting Your Ottoman:
Step 1: Preparing Your Bucket
The first step is to prepare your bucket for its transformation. Carefully remove the metal handle from the bucket. Most handles can be unclipped or gently pried open at the attachment points. Once the handle is off, you’ll need to trim the top rim of the bucket. Using a utility knife or sturdy scissors, cut away the very top edge of the bucket, making sure the cut is as straight and even as possible. This creates a cleaner, smoother edge, which will make covering it with fabric much easier and give your ottoman a professional finish.
Step 2: Fabric Measurement and Initial Cuts
Next, it’s time to measure and cut your fabric. Wrap your chosen main fabric around the bucket, ensuring it covers the entire height from top to bottom, with a little extra allowance for folding over the edges. Measure this dimension and cut your fabric accordingly. This piece will be the main outer cover. Then, cut a second, slightly larger piece of fabric. This second piece will be used for the inner lining of the bucket, ensuring a neat finish inside as well as out. A bit of extra fabric here will allow for secure gluing or stapling.
Step 3: Crafting the Decorative Strips
To add a touch of sophistication and comfort, we’ll create some padded fabric strips. Cut several strips of fabric, each about 3-4 inches wide and long enough to comfortably wrap around the circumference of the bucket (plus seam allowance). Take each strip and fold it in half lengthwise, with the right sides of the fabric facing each other. Sew along the raw edge, creating a tube. Once sewn, carefully flip each fabric tube right side out, so the seam is hidden on the inside. These tubes will later be stuffed to create a soft, rounded edge for your ottoman.
Step 4: Stuffing and Assembling Fabric Components
Now, fill each of the fabric tubes you just made with your chosen foam or stuffing material. Ensure they are evenly stuffed to create a consistent plumpness. Once all tubes are stuffed, sew them securely onto the top edge of the larger fabric piece that you cut in Step 2 – this is your main outer cover. Position them evenly around the perimeter. After attaching the padded strips, sew the two shorter ends of the larger fabric piece together to form a seamless cylinder, which will snugly fit around your bucket. This careful assembly ensures a smooth and polished look for your ottoman.
Step 5: Securing the Bucket Cover
Carefully insert the smaller fabric piece (the inner lining) into the bucket. Position it so that the top edge of the fabric aligns with the newly cut rim of the bucket. Apply hot glue generously to the bottom inside of the bucket and press the fabric lining down firmly, ensuring it adheres smoothly and securely. For the outer cover, slip the assembled fabric cylinder (with the padded strips) over the bucket. Pull it taut and ensure the padded strips sit nicely around the top edge. Use your staple gun (gun tacker) to firmly attach the fabric to the bottom edge of the bucket, stapling every inch or so for a strong, lasting hold. This will give your ottoman a clean, professional finish.
Step 6: Creating the Ottoman’s Base
To provide stability and a finished look to the bottom of your ottoman, attach several pieces of foam to the very bottom exterior of the bucket. These can act as small feet or provide a soft base that won’t scratch floors. Secure these foam pieces firmly with your staple gun. Next, cut a large circle from your remaining fabric – this circle should be big enough to fully cover the entire bottom surface of the ottoman and slightly overlap the lower edges of the bucket. Using your hot glue gun, carefully attach the edges of this fabric circle to the bottom of the bucket, making sure it covers all staples and raw edges for a neat and tidy base.
Step 7: Designing the Padded Lid
Now, let’s create the comfortable, padded lid. Take your bucket lid and cover it smoothly with a piece of your chosen fabric. Secure the fabric to the underside of the lid with hot glue or staples, pulling it taut to avoid wrinkles on the top surface. Once the lid is covered, cut pieces of upholstery foam to the exact size and shape of the lid. You might need one thick piece or several thinner layers to achieve your desired level of padding and comfort. Use your staple gun to firmly attach these foam pieces to the fabric-covered lid, ensuring they are well-secured and create a soft, plush top for your ottoman.
Step 8: Final Touches and Embellishment
The final step is to add a decorative touch to the lid. As per the original tutorial, glue a strip of reflective paper around the entire circumference of the lid’s edge. This adds a subtle glimmer and a finished look. If reflective paper isn’t your style, consider other embellishments such as a decorative ribbon, a contrasting fabric trim, piping, or even painting the edge for a different effect. Ensure all edges are neat and any stray threads are trimmed. Stand back and admire your brand new, custom-made storage ottoman!
Customization Ideas for Your Unique Ottoman
The beauty of DIY lies in personalization. Here are some ideas to make your bucket ottoman truly one-of-a-kind:
- Fabric Fantasies: Experiment with different fabric types. Luxurious velvet or faux fur can add a glamorous touch. Durable denim or canvas offers a more casual, rustic vibe. Patterned fabrics can introduce a pop of color and visual interest. Consider using a removable, washable slipcover for easy cleaning and seasonal changes.
- Legs and Feet: Instead of just foam pads, consider adding small furniture legs or caster wheels to your ottoman. Wooden bun feet can elevate its look, while caster wheels make it easy to move around your space. Ensure any added legs are securely attached to the bucket’s base.
- Button Tufting: For an elegant, upholstered look, try button tufting the lid. This involves threading upholstery buttons through the foam and fabric, creating classic indentations.
- Trim and Tassels: Embellish the edges of your lid or the base of the ottoman with decorative trim, fringe, piping, or tassels. These small details can significantly enhance the overall aesthetic.
- Painted Finish: If you prefer a non-fabric look or want to add a base color, you can paint the bucket directly with an appropriate primer and paint for plastic, then add fabric only to the lid.
- Multi-functional Lid: Consider creating a reversible lid. One side could be padded for seating, and the other side could be a flat wooden surface, turning your ottoman into an instant side table for drinks or snacks.
Maintenance and Care Tips
To ensure your DIY storage ottoman remains beautiful and functional for years to come, here are a few maintenance tips:
- Spot Cleaning: For minor spills or marks, spot clean your fabric with a mild detergent and a damp cloth. Always test on an inconspicuous area first.
- Vacuuming: Regularly vacuum the fabric to remove dust and debris, especially if you have pets.
- Protection: If your ottoman will be in a high-traffic area or used frequently, consider applying a fabric protector spray to repel stains.
- Lid Care: Handle the lid gently when opening and closing to preserve the integrity of the fabric and foam.
Your Handmade Masterpiece Awaits!
Congratulations! You’ve successfully transformed a simple, overlooked bucket into a stylish, functional, and personalized storage ottoman. This project is a testament to how creative thinking and a few basic materials can yield impressive results, saving you money and adding unique character to your home.
Whether it becomes a cozy footrest, extra seating, or your secret weapon against clutter, your DIY ottoman is sure to be a conversation starter. We hope this detailed guide has empowered you to tackle this project with confidence and inspired you to explore more possibilities for upcycling and creative home decor. Share your creations and enjoy the comfort and convenience of your new handmade masterpiece!