
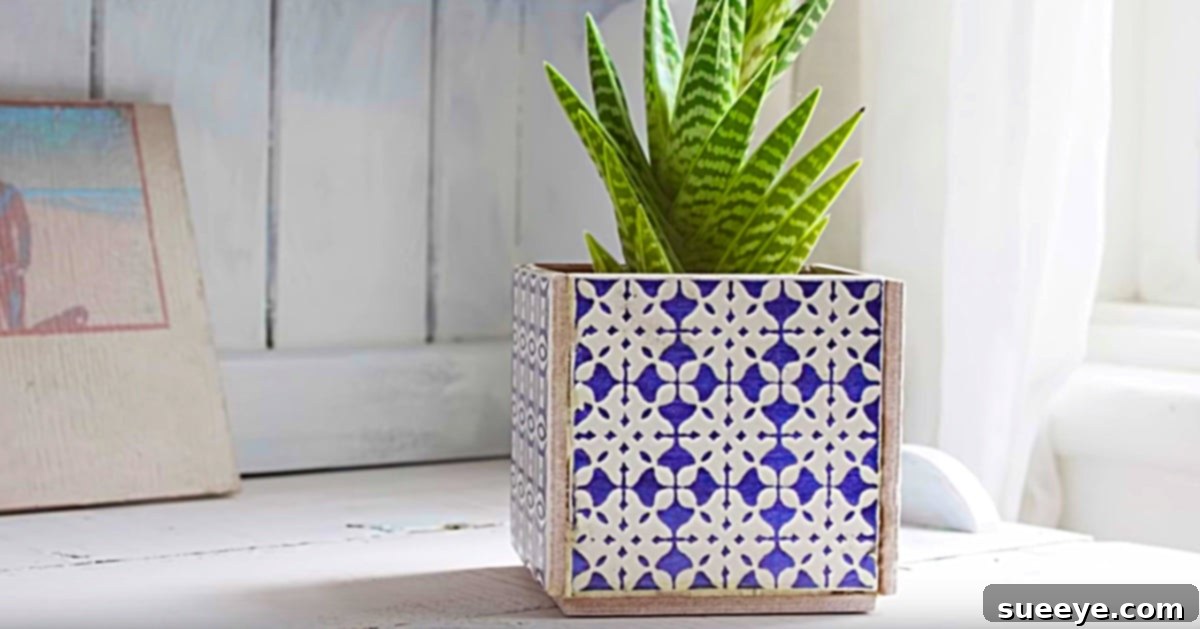
DIY Tile Planter: Craft a Beautiful Succulent Oasis from Leftover Tiles
Home renovation projects often leave us with a common dilemma: beautiful, high-quality materials, like exquisite tiles, that are too precious to discard but not enough for another large-scale undertaking. Recently, after completing an extensive fireplace redesign, I found myself in this exact situation. The tiles I had chosen were truly special – ornate and quite expensive imports from Italy. Determined to give these treasured remnants a second life, I began a quest for creative upcycling ideas. My search led me to an ingenious project on YouTube: a small box planter crafted from just five tiles, assembled with remarkable simplicity.
This discovery was nothing short of serendipitous. I had just received a collection of vibrant succulent plants for my birthday, making the timing absolutely perfect. The idea of transforming those elegant Italian tiles into charming homes for my new succulents felt like a match made in heaven. What struck me most about the five-tile planter project was its straightforward design. Even with just one glance, I could tell that this nifty little creation would practically build itself. The real magic, however, lay in the aesthetic potential: these handmade planters, fashioned from the very same tiles as my fireplace, would seamlessly integrate into my living space. Placed on the mantle, they would create a cohesive and sophisticated look, tying the entire room together with a unique, personal touch.
The Art of Upcycling: Transforming Leftovers into Treasures
Upcycling isn’t just a trend; it’s a mindful approach to consumption that transforms waste into valuable, often more beautiful, items. When you repurpose materials like leftover tiles, you’re not only reducing landfill waste but also unleashing your creativity. Every piece of tile, no matter how small, holds potential for a new story.
Why DIY? More Than Just Saving Money
Engaging in DIY projects offers a multitude of benefits beyond cost savings. It provides a profound sense of accomplishment and the unique satisfaction of creating something with your own hands. A handmade tile planter, for instance, carries a personal narrative that mass-produced items simply cannot replicate. It reflects your taste, your effort, and your commitment to sustainable living. Furthermore, DIY allows for unparalleled customization, ensuring your finished piece perfectly aligns with your home’s aesthetic and your personal style.
The Perfect Pairing: Tiles and Succulents
Succulents have soared in popularity, and for good reason. These resilient, low-maintenance plants thrive on neglect, making them ideal for busy individuals or novice gardeners. Their diverse shapes, textures, and vibrant colors offer endless styling possibilities. Pairing them with a tile planter creates a visually stunning contrast: the rigid, geometric lines and smooth surface of the tile beautifully complement the organic, flowing forms of the succulents. This combination adds a touch of modern elegance to any space, whether it’s a minimalist desk or a rustic bookshelf.
Materials You’ll Need for Your Elegant Tile Planter
Gathering your materials before you begin ensures a smooth and enjoyable crafting experience. Here’s a breakdown of what you’ll need and considerations for each item:
- 5 Tiles (per planter): This is the core of your project. The size of your tiles will directly determine the dimensions of your finished planter.
- Gorilla Glue (or a similar strong, waterproof adhesive): Essential for creating durable, lasting bonds between the tiles.
- A Glass of Water: Used for a specific technique to clean glue edges, ensuring a professional finish.
- Painter’s Tape (or Masking Tape): Crucial for holding the tiles in place while the adhesive cures.
Choosing Your Tiles Wisely
While this project is perfect for repurposing leftover tiles, you can also purchase new ones specifically for this craft. Consider the type of tile: ceramic, porcelain, or even natural stone can work, each offering a different aesthetic and weight. The texture and color will significantly impact the planter’s final look. Smooth, glossy tiles offer a modern feel, while textured or matte tiles can provide a more organic or rustic appeal. Ensure all five tiles are of the same size and uniform edges for the best fit. If using leftover tiles, verify they are clean and free of any old grout or adhesive residue.
The Power of a Strong Adhesive
The choice of adhesive is paramount for the longevity of your tile planter. Gorilla Glue is highly recommended for its strength and waterproof properties, making it ideal for a planter that might eventually house real plants. When applying, remember that a little goes a long way. Too much glue can squeeze out and create a messy finish. For an even stronger hold, or if you prefer a different type of adhesive, construction adhesive or epoxy glues designed for ceramics and masonry are also viable options. Always ensure the adhesive is suitable for the material of your tiles and can withstand moisture if intended for live plants.
Essential Supporting Tools: Water and Tape
The glass of water serves a surprisingly important purpose: dipping your finger in water before smoothing glue allows you to wipe away excess adhesive cleanly without it sticking to your skin, resulting in crisp, tidy seams. Painter’s tape, or masking tape, is your temporary assistant. Its role is to securely hold the tile pieces together during the crucial drying period. Opt for painter’s tape as it generally leaves less residue upon removal compared to some masking tapes, protecting the pristine surface of your tiles. Ensure you have enough tape to wrap around your entire planter for maximum stability.
Step-by-Step Guide: Crafting Your Five-Tile Planter
Creating your tile planter is a rewarding process that comes together quickly once you understand the simple steps. Follow these instructions carefully for the best results:
Preparation is Key
Before you begin assembling, take a moment to prepare your workspace. Lay down a protective sheet or newspaper to prevent any glue spills from damaging your surfaces. Ensure your tiles are perfectly clean and dry. Have all your materials, including your Gorilla Glue, glass of water, and painter’s tape, within easy reach. Safety first: you might consider wearing gloves to keep your hands clean, though the water-dipped finger technique often suffices.
Step 1: Preparing Edges and Initial Adhesion
Begin by taking one tile to serve as the base and another for one of the sides. Apply a thin, consistent bead of Gorilla Glue along one edge of the base tile where the side tile will connect. Immediately after applying the glue, dip a bare finger into your glass of water and gently run it over the edges of the tiles you intend to join. This crucial step helps to soften the glue slightly and allows you to wipe away any immediate excess, ensuring clean, sharp lines. Carefully fit the side tile onto the glued edge of the base tile, pressing firmly to create a strong initial bond. You want the edges to meet flush, forming a perfect 90-degree angle. Hold them in place for a moment, allowing the glue to begin setting.
Step 2: Assembling the Planter Box Structure
Once your first two tiles are securely joined, continue the process by adding the remaining three tiles to form the sides of your planter. Apply glue to the connecting edges, use your water-dipped finger to clean up, and press each new tile firmly into place. Imagine you are building a box with an open top. You’ll be attaching two longer side pieces and two shorter end pieces to the base, ensuring each joint is tight and flush. Work methodically around the base, building up the walls of your planter. As you add each tile, apply gentle, consistent pressure to ensure the adhesive spreads evenly and bonds strongly. Take your time to align everything perfectly; precision here makes a big difference in the final appearance of your planter.
Step 3: Securing and Curing Your Masterpiece
After all five tiles have been successfully glued together, forming your open-top box, it’s time to secure the entire structure with painter’s tape. Wrap the tape around the planter, both horizontally and vertically, ensuring every seam is held firmly in place. The tape acts as a clamp, providing constant pressure while the Gorilla Glue cures. Do not skimp on the tape; the more secure the tiles are during this critical phase, the stronger your planter will be. Once taped, place your planter in a safe, undisturbed location and allow it to dry completely for at least twenty-four hours. For best results, especially with thicker adhesives, a full 48-hour cure time is often recommended. Avoid touching or moving the planter during this period to prevent disturbing the adhesive bonds.
Personalizing Your Tile Planter
Once your planter is fully cured and the tape is removed, you’ll be left with a beautiful, functional piece. But the customization doesn’t have to stop there!
Beyond the Basic Box: Creative Enhancements
While the natural beauty of your tiles might be enough, consider adding personal touches. You could paint the edges, apply metallic accents, or even create a mosaic effect on the exterior using smaller tile pieces or beads. Stenciling patterns onto the sides, or adding decorative feet made from small wood blocks or felt pads, can further elevate its design. The possibilities are endless, allowing you to tailor the planter to perfectly match your home decor.
Planting Your Greenery: A Guide to Success
When it comes to planting, you have a couple of options. For direct planting of succulents, it’s crucial to address drainage. If your tiles allow, you could drill a small drainage hole in the center of the base tile *before* assembly (exercise extreme caution and use appropriate drill bits for tile). Alternatively, and more simply, use your tile planter as a “cachepot” – a decorative outer pot for a smaller, already potted plant with its own drainage. This allows you to easily swap plants and avoids the need for drilling. For succulents, a well-draining soil mix is vital regardless of your chosen method.
Enjoying Your Handcrafted Decor
This planter truly lived up to all my hopes and dreams, and the ease of making it was an added bonus. It stands as one of the neatest and most satisfying projects I have ever completed.
Ideal Placement and Styling Tips
The finished tile planter is incredibly versatile. It looks spectacular on a fireplace mantle, where it can echo the original tiles, but it’s equally at home on a windowsill, a desk, a bookshelf, or as a centerpiece on a coffee table. Group multiple planters of different sizes or tile designs for an impactful display, or let a single planter shine as a focal point. Its clean lines and sturdy construction make it a timeless addition to any room.
Longevity and Care for Your Tile Planter
To ensure your beautiful tile planter lasts for years, simple care is needed. For cleaning, a damp cloth is usually sufficient to wipe away dust or soil. If you’ve used it for direct planting, be mindful of overwatering, which can lead to standing water and potential long-term damage to the adhesive, even if it’s waterproof. With proper care, your DIY tile planter will remain a cherished piece of decor, showcasing your creativity and resourcefulness.