
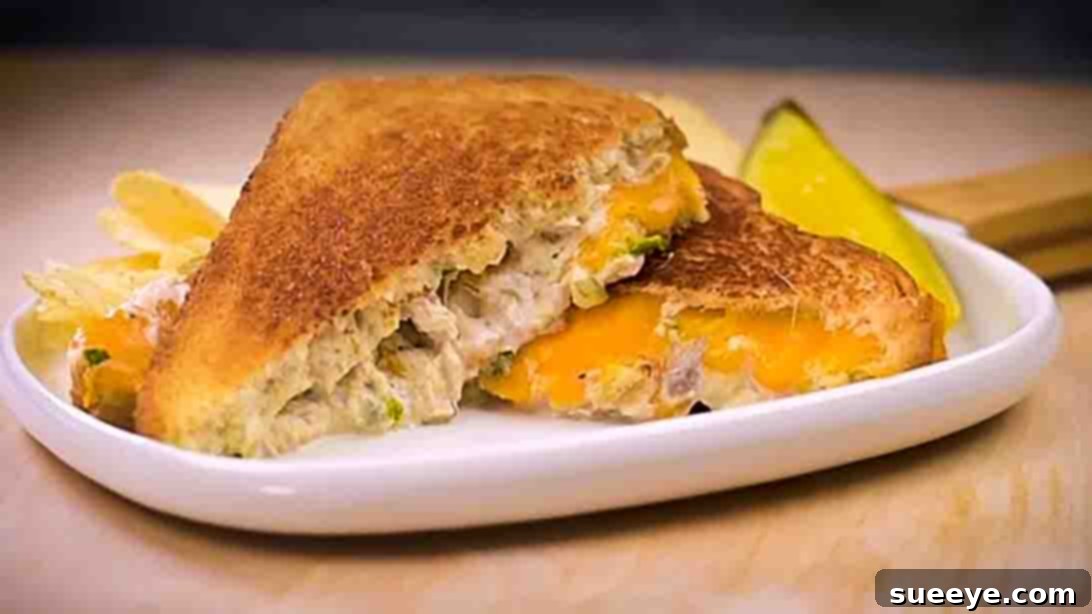
Welcome to the ultimate guide for crafting the perfect **Classic Tuna Melt Sandwich** – a dish celebrated for its comforting embrace and irresistible flavor. If you’re on the hunt for a recipe that’s not only incredibly simple but also delivers a gourmet experience with every bite, you’ve landed in the right place. This recipe, inspired by the culinary wisdom of marcy inspired on YouTube, takes the humble tuna melt and elevates it to a whole new level of deliciousness. It’s a staple for a reason: quick to prepare, satisfyingly cheesy, and bursting with fresh flavors that will have you coming back for more. Imagine a golden-brown, crispy exterior giving way to a warm, gooey cheese layer hugging a savory tuna salad – pure bliss!
The tuna melt is more than just a sandwich; it’s a nostalgic journey back to simpler times, a quick lunch hero, and a go-to comfort food that never disappoints. Whether you’re a seasoned home cook or just starting your culinary adventures, this recipe is designed to be effortlessly straightforward. You’ll discover how easy it is to whip up this classic using ingredients you likely already have in your pantry. We’ll delve into the nuances that make this particular tuna melt stand out, ensuring each sandwich you create is nothing short of perfection. So, get ready to transform simple ingredients into an extraordinary meal that’s perfect any time of day, from a hearty breakfast to a late-night snack.
RELATED: Looking for other ways to enjoy this classic? Discover the convenience and deliciousness of an Air Fryer Tuna Melt Sandwich for an even quicker preparation method!
This comprehensive guide will walk you through each step, from preparing the luscious tuna salad to achieving that perfectly golden, cheesy grilled sandwich. While you can certainly follow along with the detailed video tutorial from marcy inspired, this written procedure offers additional tips, insights, and expansions to help you master the art of the tuna melt. Prepare to impress your taste buds and those of your loved ones with this timeless classic that’s guaranteed to become a regular fixture in your recipe rotation. Let’s dive in and create the ultimate tuna melt!
Essential Ingredients for Your Tuna Melt Masterpiece:
Crafting an exceptional tuna melt begins with selecting the right ingredients. Each component plays a vital role in building the layers of flavor and texture that make this sandwich so beloved. Here’s what you’ll need, along with some insights into why these choices are key to success:
- 1 (12 oz) can of Tuna in Water, Drained: The foundation of our sandwich! Opting for tuna packed in water rather than oil keeps the salad lighter and allows you to control the fat content. Draining it thoroughly is crucial to prevent a watery or soggy sandwich. Light tuna or albacore tuna both work wonderfully, offering slightly different textures.
- Quality Bread: The unsung hero! While any bread can technically be used, a good quality white or sourdough bread holds up best to grilling and provides that satisfying crust. Medium-thick slices are ideal – not too thin to fall apart, not too thick to overwhelm the filling.
- Finely Chopped Onion: Adds a delightful crunch and a pungent, fresh kick that brightens the entire tuna salad. Red onion can offer a milder, slightly sweeter flavor if preferred, while yellow onion provides a sharper bite. Ensure it’s very finely chopped to distribute the flavor evenly without overpowering the tuna.
- Diced Hamburger Pickles (or Dill Pickles): These introduce a tangy, briny contrast that cuts through the richness of the mayonnaise and cheese. Their crunch adds another layer of texture. If you don’t have hamburger pickles, any good quality dill pickle will do the trick – just make sure to dice them small.
- 3 Tablespoons Mayonnaise: The binding agent that brings the tuna salad together, adding creaminess and richness. You can adjust the amount to your preference for a wetter or drier salad. For a lighter option, consider using light mayonnaise or a blend of mayo and Greek yogurt.
- Fresh Lemon Juice: A squeeze of fresh lemon juice is a game-changer. It brightens the flavors of the tuna and vegetables, adding a necessary zest that prevents the salad from tasting flat. Always opt for fresh over bottled for the best results.
- Fresh Parsley, Chopped: Fresh herbs are essential for elevating simple dishes. Parsley adds a fresh, herbaceous note and a pop of color. Flat-leaf (Italian) parsley generally has a stronger flavor than curly parsley.
- Salt & Freshly Ground Black Pepper: Seasoning is vital! Salt enhances all the other flavors, while black pepper adds a subtle warmth and spice. Adjust to taste, remembering that pickles and tuna can already contribute some saltiness.
- Sliced Cheese (Not listed but essential for Tuna Melt!): While not explicitly listed in the original, cheese is the defining characteristic of a “tuna melt”! Classic choices include American, Cheddar, Swiss, or Provolone. Choose a cheese that melts well and complements the savory tuna. We will assume this is implicitly included for a “melt” recipe.
- Softened Butter (Not listed but essential for grilling): Again, implicitly crucial for grilling. Spreading softened butter on the outside of your bread ensures a golden, crispy crust and helps prevent sticking to the pan.
Gathering these ingredients is the first step towards creating a tuna melt that’s not just good, but truly unforgettable.
Step-by-Step Directions to Your Perfect Tuna Melt:
Follow these detailed instructions to create a classic tuna melt that boasts a perfectly seasoned filling and a wonderfully grilled, cheesy exterior.
Step 1: Crafting the Flavorful Tuna Salad Filling
The heart of any great tuna melt is its filling. This step focuses on creating a balanced and delicious tuna salad that will serve as the core of your sandwich.
Begin by taking your can of tuna. It’s crucial to **drain the water thoroughly** from the can to ensure your tuna salad isn’t watery, which could lead to a soggy sandwich. Use a fork or the can lid to press out as much liquid as possible. Once drained, transfer the tuna into a medium-sized mixing bowl.
Using a fork, **gently break the tuna apart** until it’s flaky but still has some texture. Avoid mashing it too finely; a little chunkiness adds to the mouthfeel. Next, add the finely chopped onion. The smaller the dice, the better it will integrate into the salad, providing flavor without overwhelming individual bites. Follow this with a generous handful of chopped fresh parsley, which adds a vibrant color and fresh, herbaceous note. Then, incorporate the diced hamburger pickles (or dill pickles), ensuring they are chopped to a similar size as the onion for even distribution and crunch.
Now it’s time to **season your tuna salad**. Sprinkle with salt and freshly ground black pepper. Remember to start with a moderate amount and taste before adding more, as the pickles and tuna can already contribute some saltiness. Squeeze in fresh lemon juice from half a lemon; this brightens all the flavors and adds a welcome tang. Finally, add 3 tablespoons of mayonnaise. For a richer salad, you can add a little more, or for a lighter version, slightly less.
**Mix everything together thoroughly** until all ingredients are well combined and the tuna is evenly coated with the mayonnaise and seasonings. Take a moment to taste and adjust the seasoning if necessary – perhaps a pinch more salt, a grind of pepper, or a splash more lemon juice could elevate it further. This perfectly prepared tuna salad is now ready to be the star of your melt.
Step 2: Assembling and Grilling Your Golden Tuna Melt
With your delicious tuna salad ready, the next step is to assemble and grill your sandwich to golden, cheesy perfection. This stage requires a bit of attention to detail to achieve that irresistible crispy exterior and wonderfully melted interior.
Grab two slices of your chosen bread. Take one piece of bread and **generously spread some softened butter on one side**. This buttered side will be facing outwards when grilling, creating that beautiful golden-brown crust. Now, flip that same piece of bread over so the unbuttered side is facing up.
On the unbuttered side, **spread a generous amount of your prepared tuna mixture**. Don’t be shy; a good layer ensures a satisfying filling in every bite. Aim for an even spread that reaches close to the edges.
Next, it’s time for the “melt” aspect! **Add a nice layer of your favorite cheese** slices directly on top of the tuna mixture. For the best melt, choose a cheese like American, cheddar, or provolone. Layer it evenly so you get gooey cheese in every bite.
Take your second slice of bread and **butter one side of it as well**. Place this slice, buttered-side up, on top of the cheese and tuna mixture to complete your sandwich assembly.
Preheat a skillet or frying pan over medium heat. Once warm, carefully **place the assembled sandwich into the skillet**. Immediately **cover the skillet with a lid**. This is a crucial step! The lid traps heat and steam, which helps the cheese melt quickly and evenly without over-browning the bread.
**Grill each side for a couple of minutes**, typically 3-5 minutes per side, or until the bread is golden brown and crispy, and the cheese inside is completely melted and gooey. Keep an eye on the heat to prevent burning; if it’s browning too quickly, lower the heat slightly. Use a spatula to carefully flip the sandwich, ensuring it holds together. Once both sides are beautifully golden and the cheese is oozing, your tuna melt is ready!
Remove the sandwich from the skillet, slice it diagonally for that classic presentation, and serve immediately. Enjoy the satisfying crunch, the creamy tuna, and the warm, melted cheese – a truly perfect classic tuna melt!
Tips for the Ultimate Classic Tuna Melt:
While the recipe itself is straightforward, a few expert tips can elevate your tuna melt from good to absolutely legendary.
- Choose Your Bread Wisely: Don’t underestimate the power of good bread. Sourdough offers a tangy contrast, rye adds a robust flavor, and a classic white sandwich bread provides a soft interior with a crisp crust. A slightly thicker slice will hold up better to the filling and grilling.
- The Perfect Cheese Pull: For the ultimate melt, use a good melting cheese. American, sharp cheddar, provolone, or even Swiss are excellent choices. For extra stringiness, a blend of different cheeses works wonders. Shredded cheese can also be used for a more even melt.
- Preventing Soggy Bread: Thoroughly draining your tuna is the first step. Additionally, ensure your skillet isn’t too hot, which can burn the bread before the cheese melts. Using butter or mayonnaise on the exterior of the bread also creates a barrier, helping to prevent sogginess.
- Mastering the Grill: Medium heat is key. Too high, and the outside burns; too low, and the bread dries out without getting truly crispy. The lid is your best friend here, creating a steamy environment that melts the cheese perfectly. Don’t be afraid to press down gently with a spatula during grilling to ensure maximum contact with the pan and a flatter, more even crust.
- Flavor Boosters for Tuna Salad: Feel free to experiment! A dash of Dijon mustard can add a subtle tang. A pinch of celery salt or a touch of smoked paprika can introduce new layers of flavor. For a bit of heat, a tiny amount of sriracha or a pinch of red pepper flakes can be incorporated. Finely chopped celery or bell peppers can also add extra crunch and freshness.
Variations and Serving Suggestions:
The beauty of the tuna melt lies in its versatility. Once you’ve mastered the classic, don’t hesitate to experiment!
Customizing Your Tuna Salad:
- Veggie Boost: Add finely diced celery, bell peppers (red or green), shredded carrots, or even corn kernels for added texture and nutrients.
- Herbaceous Twist: Beyond parsley, try fresh dill, chives, or a hint of tarragon for different aromatic profiles.
- Spicy Kick: Mix in a touch of sriracha, a pinch of cayenne pepper, or a finely chopped jalapeño for those who love a bit of heat.
- Tangy Additions: Capers or finely chopped sun-dried tomatoes can introduce a delightful briny or savory depth.
- Creamy Alternatives: Substitute some of the mayonnaise with Greek yogurt for a lighter, tangier salad, or use avocado for a rich, healthy twist.
Different Cheeses to Explore:
- Beyond the classics, consider Pepper Jack for a spicy kick, Gruyere for a nutty flavor, or a sharp Provolone for robust taste.
Alternative Cooking Methods:
- Air Fryer Tuna Melt: As mentioned, this method offers incredible crispiness with less oil. Typically, you’d cook at 350°F (175°C) for 8-10 minutes, flipping halfway.
- Oven-Baked Tuna Melt: For a hands-off approach, bake your assembled sandwich on a baking sheet at 375°F (190°C) for 10-15 minutes, or until golden and melted.
- Panini Press: A panini press creates beautiful grill marks and ensures even heating and melting, usually in just a few minutes.
What to Serve with Your Tuna Melt:
A classic tuna melt is a meal in itself, but it pairs wonderfully with a variety of sides:
- Tomato Soup: The ultimate comfort food pairing, perfect for dipping.
- Crisp Side Salad: A light, refreshing green salad with a vinaigrette dressing provides a healthy contrast.
- Potato Chips: A classic crunchy companion that never fails.
- Coleslaw or Pickles: Adds extra tang and crunch to complement the rich sandwich.
- Fresh Fruit: Sliced apples or grapes offer a sweet and juicy counterpoint.
Storage and Reheating Advice:
While tuna melts are best enjoyed fresh, you can prepare the tuna salad in advance and store components separately.
- Tuna Salad: The prepared tuna salad can be stored in an airtight container in the refrigerator for up to 3-4 days. This makes for quick assembly when cravings strike!
- Assembled Sandwiches: It’s generally not recommended to store assembled, uncooked sandwiches as the bread can get soggy.
- Reheating Cooked Tuna Melts: If you have leftovers, the best way to reheat a cooked tuna melt is in a skillet over medium-low heat or in a toaster oven. This helps restore some of the crispiness. Microwaving is not recommended as it will make the bread soggy.
Why This Classic Tuna Melt Recipe Stands Out:
This specific recipe isn’t just another tuna melt; it’s a carefully balanced symphony of flavors and textures that hits all the right notes. The emphasis on fresh ingredients like lemon juice and parsley brightens the traditional rich tuna salad, preventing it from being too heavy. The precise steps for grilling, especially the use of a lid, guarantee that coveted combination of a crispy, golden exterior and a perfectly melted, gooey cheese interior. It’s a testament to how simple ingredients, handled with care and attention, can create something truly extraordinary. This recipe promises not just a meal, but an experience – a moment of pure comfort and satisfaction that makes it a timeless favorite.
We encourage you to try this recipe and discover for yourself why it has become a beloved classic. It’s more than just food; it’s a slice of culinary comfort that brings joy to any table.
Classic Tuna Melt Recipe: Your New Favorite Comfort Food!
There you have it – the ultimate guide to creating a truly spectacular Classic Tuna Melt. From selecting the freshest ingredients to mastering the perfect golden grill, every detail has been covered to ensure your success. This recipe is a testament to the power of simple, wholesome ingredients transforming into something truly magical. Whether you’re looking for a quick and satisfying lunch, a comforting dinner, or a nostalgic snack, this tuna melt delivers on all fronts.
So, what are you waiting for? Head to your kitchen, gather your ingredients, and embark on this delicious culinary adventure. You’ll be amazed at how effortlessly you can create a sandwich that rivals your favorite diner’s version. Share your creations, experiment with variations, and most importantly, savor every single bite of this timeless comfort food. Happy cooking!