
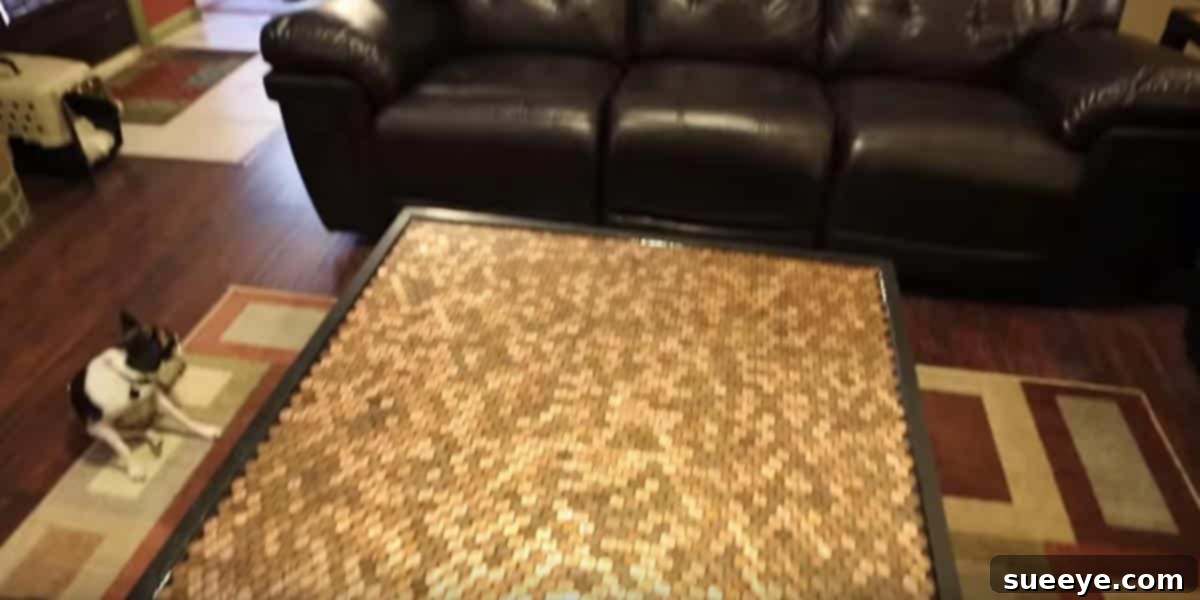
Craft Your Own Unique Penny Table: The Ultimate DIY Guide
Are you searching for a unique, eye-catching, and incredibly budget-friendly way to revitalize your home decor? Look no further! The DIY penny table project offers an extraordinary opportunity to transform an ordinary, perhaps even forgotten, piece of furniture into a dazzling focal point. Imagine the gleam of hundreds, or even thousands, of pennies meticulously arranged to create a bespoke tabletop that tells a story and sparks conversation. This project is more than just a craft; it’s an artistic endeavor that yields a stunning, durable piece of functional art, all while giving new purpose to those loose coins gathering dust in your jars.
Whether you’re an experienced DIY enthusiast or a complete beginner, creating a penny table is surprisingly accessible. It requires patience and attention to detail, but the techniques are straightforward, and the satisfaction of seeing your vision come to life is immense. We’ll guide you through every step, from selecting the perfect base table to sealing your masterpiece for lasting beauty. Get ready to break out those pennies and embark on a creative journey that promises a truly remarkable outcome!
Why Choose a Penny Table for Your Home?
Beyond its undeniable aesthetic appeal, a penny table offers a myriad of benefits that make it an exceptional choice for any home:
- Unmatched Uniqueness: No two penny tables are ever exactly alike. The unique patina of each coin, your chosen layout, and the finishing touches ensure your table is a one-of-a-kind creation that reflects your personal style.
- Budget-Friendly Decor: If you have a collection of pennies or can acquire them easily, the cost of materials for the tabletop itself is remarkably low. You’re essentially using currency as art supplies! Combine this with an upcycled base table, and you have an incredibly affordable decor solution.
- Conversation Starter: Prepare for compliments and questions! A penny table is an instant conversation starter, inviting guests to admire the intricate details and ponder the history behind each coin.
- Durability and Longevity: When properly sealed with a high-quality resin or epoxy, a penny tabletop is incredibly durable, resistant to scratches, spills, and daily wear and tear. It can last for many years, enduring as a cherished piece in your home.
- Eco-Friendly Upcycling: This project is a fantastic way to give new life to an old or thrifted table, reducing waste and contributing to sustainable living practices.
- A Rewarding DIY Experience: The process of creating a penny table is a meditative and rewarding experience. It’s a project you can tackle over several evenings or weekends, allowing you to unwind and unleash your creativity.
Essential Materials You’ll Need
Before you begin, gather all your supplies. Having everything on hand will make the process smoother and more enjoyable:
- A Base Table: A sturdy table with a flat, smooth surface is ideal. Coffee tables, end tables, dining tables, or even bar tops can be transformed. Thrift stores, garage sales, or existing furniture are great sources.
- Pennies: This is the star of the show! The quantity will depend on your table’s size. A good rule of thumb is approximately 150-180 pennies per square foot (approx. 0.09 square meters), considering slight gaps. Start collecting them now!
- Adhesive: A strong, clear-drying adhesive is crucial. Options include E6000, construction adhesive, or even wood glue for smaller tables. Ensure it dries clear and provides a strong bond.
- Epoxy Resin Kit (Recommended) or Sealer: For a durable, glossy, and protective finish, a two-part epoxy resin kit is highly recommended. Alternatively, multiple coats of clear polyurethane varnish can be used, though it may not offer the same level of depth or durability as epoxy.
- Painter’s Tape: Essential for masking off edges and protecting areas not meant for epoxy.
- Silicone Caulk (optional but recommended): For sealing the edges of your table if using epoxy, preventing leaks.
- Cleaning Supplies: Denatured alcohol or acetone for surface prep and cleanup, rags or paper towels.
- Drop Cloths or Plastic Sheeting: To protect your work area from glue and epoxy spills.
- Gloves: Nitrile or latex gloves for working with adhesives and epoxy.
- Stirring Sticks and Measuring Cups: For mixing epoxy resin accurately.
- Foam Brush or Spreader: For applying epoxy.
- Heat Gun or Torch (for epoxy): To remove air bubbles from the epoxy surface.
- Level: To ensure your table is perfectly level before applying epoxy.
- Optional: Penny Cleaner: If you want all your pennies to have a uniform shine.
Step-by-Step Guide: How to Create Your Stunning Penny Table
Step 1: Prepare Your Tabletop
Thorough preparation is key to a flawless finish. Start by thoroughly cleaning your base table. Remove any dust, grime, or old finishes. If the table has a rough or uneven surface, sand it down to create a smooth, clean canvas for your pennies. For laminate or slick surfaces, a light sanding will help the adhesive adhere better. Wipe down the entire surface with denatured alcohol or acetone to remove any remaining residues and ensure it’s completely dry before proceeding.
Step 2: Gather and Sort Your Pennies
This is where the fun begins! Start accumulating your pennies. You can use a mix of old and new pennies for varied textures and colors, or sort them by shine for a more uniform look. Some crafters like to clean their pennies to achieve a brilliant, consistent copper glow using vinegar and salt or commercial cleaners. Others prefer the aged patina for a rustic appeal. Decide on your aesthetic and prepare your coins accordingly. Ensure they are dry and free of any dirt or residue.
Step 3: Plan Your Penny Layout and Design
Before you start gluing, experiment with different layouts. This is a crucial step to visualize your design and ensure you have enough pennies. Popular patterns include:
- Straight Rows: A classic, organized look.
- Diagonal Rows: Adds a dynamic visual interest.
- Spiral Pattern: Starting from the center and working outwards, creating a mesmerizing effect.
- Random Placement: For a more organic, mosaic-like appearance.
- Alternating Heads and Tails: To create subtle texture and pattern.
Lay out a section of pennies without glue to get a feel for the spacing and how they fit together. Consider how you’ll handle the edges of the table – will the pennies overhang slightly, or will you create a clean border? Use a ruler and pencil to mark out guidelines on your tabletop if you’re aiming for a precise pattern.
Step 4: Adhering the Pennies to the Tabletop
Working in small sections, begin gluing your pennies. Apply a small dot of adhesive to the back of each penny or spread a thin layer of glue over a small area of the tabletop. Carefully place each penny onto the table, aligning it with your chosen pattern. Press down firmly to ensure good contact. It’s often best to start from one corner or the center and work your way outwards, maintaining consistent spacing between coins.
Take your time with this step, as accuracy here will significantly impact the final look. If you make a mistake, carefully pry up the penny and wipe away excess glue before reapplying. Allow the adhesive to cure fully according to the manufacturer’s instructions, typically 24 hours, before moving to the next step. Ensure all pennies are firmly attached and none are loose.
Step 5: Sealing Your Penny Table with Epoxy Resin (Highly Recommended)
For a durable, glassy, and truly stunning finish, epoxy resin is the superior choice. This step protects your pennies, provides a smooth surface, and enhances their metallic luster.
- Prepare the Edges: If your table has a lip or raised edge, you may not need to build a dam. However, if your table is flat, you’ll need to create a temporary dam around the perimeter using painter’s tape or a thin strip of wood and silicone caulk to contain the epoxy. Ensure it’s completely sealed to prevent leaks.
- Level the Table: Use a spirit level to ensure your table is perfectly horizontal. If it’s not level, the epoxy will cure unevenly.
- Mix the Epoxy: Carefully follow the instructions on your two-part epoxy resin kit. This usually involves mixing precise ratios of resin and hardener for a specific amount of time. Inaccurate mixing can lead to improper curing. Mix thoroughly but avoid whipping air into the mixture.
- Pour the Epoxy: Slowly and evenly pour the mixed epoxy over your penny surface, starting from the center and allowing it to spread. Use a foam brush or spreader to guide the epoxy to the edges and ensure an even coat across the entire surface. Aim for a thickness of about 1/8 to 1/4 inch (3-6mm).
- Remove Air Bubbles: Within 10-20 minutes of pouring, use a heat gun or propane torch (held several inches above the surface and continuously moving) to gently pop any surface air bubbles. Be careful not to overheat the epoxy or scorch the pennies.
- Cure Time: Cover your table with a plastic sheet (tent-style, so it doesn’t touch the epoxy) to protect it from dust while it cures. Allow the epoxy to cure fully as per the manufacturer’s instructions, which can range from 24-72 hours for a hard cure and up to 7 days for a full chemical cure.
If you opt for a polyurethane sealer instead of epoxy, apply multiple thin coats (3-5 or more) with light sanding in between coats for maximum durability and a smooth finish.
Step 6: Final Touches and Enjoyment
Once the epoxy is fully cured (or your sealer is dry), carefully remove any dams or tape from the edges. Inspect your table for any imperfections. You might gently sand and polish the edges if needed. Now, your extraordinary penny table is ready to be admired and used! Place it in your living room, entryway, or any space that could benefit from a touch of handmade elegance and unique character. Celebrate your accomplishment and enjoy the beauty you’ve created.
Tips for a Perfect Penny Table
- Practice First: If you’re new to epoxy, consider doing a small test piece on scrap wood before tackling your main table.
- Work in a Well-Ventilated Area: Especially when using adhesives, sealers, and epoxy.
- Keep it Clean: Dust is the enemy of a smooth finish. Ensure your workspace and pennies are as clean as possible.
- Patience is a Virtue: Don’t rush any step, especially the gluing and curing processes. Each stage requires proper time to set.
- Edge Treatment: If you’re not using a dam for epoxy, consider painting the edges of your table a dark color (like black or dark brown) before adding pennies. This will minimize the appearance of gaps or minor imperfections at the perimeter.
- Consider Different Coin Types: While pennies are traditional, you could experiment with other coins (dimes, quarters) for different effects, though the cost would increase significantly.
- Maintenance: Once sealed, your penny table is easy to clean with a damp cloth and mild soap. Avoid harsh chemical cleaners that could damage the finish.
Penny Table Design Inspiration
Your penny table is a blank canvas! While a simple grid is elegant, here are a few ideas to spark your creativity:
- Geometric Patterns: Create diamonds, chevrons, or even a checkerboard by alternating cleaned and uncleaned pennies, or heads and tails.
- Image or Monogram: With careful planning, you can use pennies to form initials, simple shapes, or even a silhouette. This requires more precision in penny placement.
- Incorporating Other Elements: Consider adding a border of wood or metal around the pennies, or integrating small tiles or glass beads into the design for added sparkle and texture.
- Gradient Effect: Arrange pennies from darkest to lightest (or vice versa) to create a subtle ombré or gradient effect across the table.
Frequently Asked Questions About Penny Tables
- How many pennies do I need for a table?
- Approximately 150-180 pennies per square foot, depending on spacing. Measure your table’s surface area in square feet and multiply by this estimate to get a good approximation.
- Can I use regular glue instead of special adhesive?
- While some standard glues might work, a strong, clear-drying adhesive like E6000 or construction adhesive is recommended for its durability and firm bond, especially important before pouring heavy epoxy.
- Is epoxy resin difficult to work with?
- Epoxy resin requires precise mixing and attention to detail, but it’s not inherently difficult. Following the manufacturer’s instructions carefully is key. The biggest challenges are proper mixing ratios, avoiding bubbles, and ensuring a level surface.
- Will the pennies tarnish under the epoxy?
- No, once encased in epoxy, the pennies are protected from oxidation and will retain their appearance. If you clean them, they will stay shiny; if they are tarnished, they will remain tarnished.
- How long does a penny table last?
- With proper construction and a good epoxy seal, a penny table can last for many years, acting as a highly durable and unique piece of furniture.
Conclusion: Unleash Your Inner Artisan!
Creating a DIY penny table is a project that truly embodies the spirit of crafting: ingenuity, patience, and the joy of creating something beautiful with your own hands. It’s an accessible way to add significant character and personality to your living space without breaking the bank. So, gather your pennies, prepare your workspace, and get ready to transform an ordinary table into an extraordinary work of art. The journey is as rewarding as the stunning end result, and you’ll have a story to tell every time someone admires your unique, handmade masterpiece. Don’t hesitate – embrace your creativity and start building your own penny table today!