
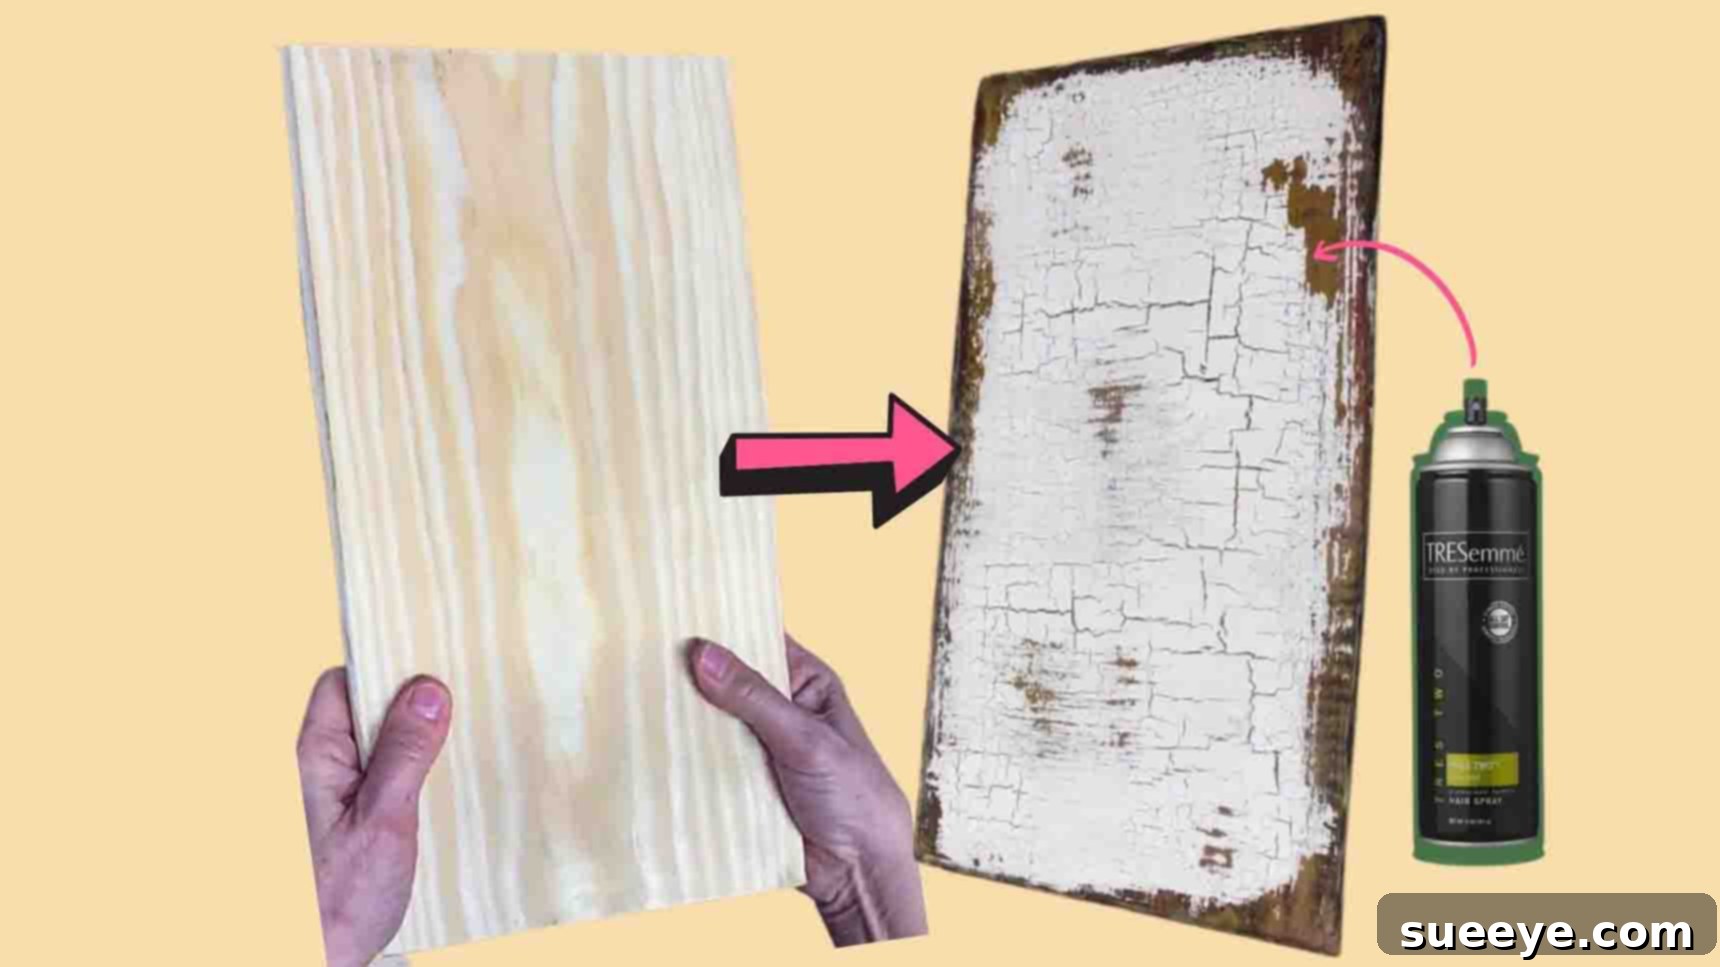
Master the Art of Aging Wood: The Ultimate Hairspray Distressing Guide
Are you captivated by the timeless allure of rustic decor? That enchanting aesthetic where every piece tells a story, adorned with worn-out textures, chipped paint, and the undeniable character of aged wood? If so, prepare to embark on an exciting DIY journey that will empower you to transform ordinary, new wood into extraordinary, vintage-inspired masterpieces. Forget complex techniques or expensive supplies; the secret to achieving that coveted old-wood look might already be lurking in your bathroom cabinet: hairspray!
In this comprehensive guide, inspired by the ingenious methods shared by creators like Our Upcycled Life on YouTube, we’ll delve into a surprisingly simple yet incredibly effective distressing technique. You’ll learn how to harness the humble power of hairspray to create an authentic chippy, aged finish on any wooden surface. This project is not only easy and quick but also remarkably affordable, making it the perfect weekend endeavor for anyone eager to infuse their home with charming, farmhouse, or shabby chic vibes. Get ready to unleash your creativity and give new life to your wood projects!
Why Embrace the Aged Wood Aesthetic?
The appeal of distressed wood lies in its ability to evoke a sense of history, warmth, and authenticity. In a world often dominated by sleek, modern designs, incorporating aged elements can add a much-needed touch of character and soul to any space. Whether you’re aiming for a cozy farmhouse look, a romantic shabby chic sanctuary, or an eclectic vintage vibe, distressed wood fits seamlessly into a myriad of interior design styles.
- Adds Character and Depth: New, unadorned wood can sometimes appear flat or sterile. Distressing techniques, especially those that create layers of color and texture, instantly imbue a piece with personality and visual interest.
- Mimics Natural Wear: The chippy paint, worn edges, and subtle imperfections of aged wood reflect years of gentle use and exposure, creating a story without saying a word. This authenticity is highly sought after in design.
- Versatile Decor Element: From small decorative signs and picture frames to larger furniture pieces like coffee tables or shelves, distressed wood can elevate almost any item, making it a focal point or a harmonious accent.
- Eco-Friendly and Sustainable: By upcycling or transforming new, inexpensive wood into something unique and beautiful, you’re embracing a sustainable approach to home decor, reducing waste, and giving items a longer, more cherished life.
- Unique and Personalized: No two distressed pieces will ever be exactly alike, ensuring that your creations are truly one-of-a-kind. This hands-on approach allows for a deeply personal expression in your home.
The Unexpected Magic of Hairspray for Distressing
You might be wondering, “Hairspray? Really?” Yes, really! This everyday beauty product is a secret weapon in the world of DIY distressing, offering a surprisingly effective and easy alternative to more traditional methods like waxing or using specialized crackle mediums. The magic lies in hairspray’s chemical composition and its ability to act as a temporary resist layer.
When applied between layers of paint, particularly between a base coat and a top coat, the hairspray creates a barrier. While the top layer of paint will adhere to the hairspray, it won’t firmly bond to the underlying paint or wood. This means that when activated with water, the hairspray layer becomes pliable and allows the top coat to be easily manipulated, chipped, or wiped away, revealing the base colors beneath. This process results in that perfectly imperfect, chippy, and worn look that is characteristic of truly aged wood.
For best results, a strong-hold hairspray is generally recommended, as it creates a more robust and effective resist layer. This technique offers a level of control that allows you to customize the amount of distressing, making it as subtle or as dramatic as you desire.
Materials You’ll Need:
Before you begin, gather all your supplies. Having everything at hand will make the process smooth and enjoyable. You might be surprised by how few items you need to achieve such a stunning transformation!
- Wood Piece: Any piece of new, unfinished, or previously painted wood will work. This could be a plank, a small cabinet door, a picture frame, or a decorative sign.
- Hairspray: A strong-hold aerosol hairspray is ideal for creating an effective resist layer.
- Cutter/Utility Knife: Used for creating initial chips and worn edges. Exercise caution when using.
- Chalk Paint: Choose a neutral or dark color for your base coat, as it provides excellent adhesion and a matte finish.
- Other Acrylic or Latex Paints: Select colors that you want to show through as layers beneath your final top coat. Terracotta, yellow, or earthy tones work wonderfully for a rustic feel.
- Paint Brushes: Various sizes for applying paint.
- Spray Bottle with Water: Essential for reactivating the hairspray and facilitating the distressing process. Warm water can sometimes be more effective.
- White Acrylic Paint: Or any light color you wish for your final top coat.
- Stencil Brush with a Flat Bottom: This type of brush is perfect for gently scrubbing and wiping away paint to reveal the distressed layers.
- Sandpaper: Various grits (e.g., 120-220 grit) for smoothing edges and light distressing.
- Protective Sealer (Optional but Recommended): Clear wax, polycrylic, or a clear matte topcoat to protect your finished piece.
Step-by-Step Guide: How to Achieve an Aged Wood Finish with Hairspray
Follow these detailed steps to transform your new wood into a beautifully aged piece. Remember, patience and experimentation are key to perfecting your technique!
Step 1: Prepare Your Wood for an Authentic Look
The first step in creating an authentically aged piece is to give your new wood some initial character. New wood often has perfectly smooth, sharp edges that betray its age. To mimic natural wear and tear, you’ll want to soften these. Using a cutter or utility knife, carefully chip away small pieces around the edges of your wood. Don’t aim for perfection; natural wear is irregular. Focus on corners and areas that would typically experience more friction. After you’ve created some desired imperfections, use sandpaper to lightly smooth these chipped areas and the entire surface of the wood. This ensures a better paint adhesion and a more refined texture.
Step 2: Build the Base Layers with Paint
Now, it’s time to add the foundational colors that will peek through your distressed top coat. Begin by applying a coat of chalk paint in a color of your choice. A neutral or darker shade often works best as a base. Chalk paint is excellent for this technique due to its matte finish and strong adhesion. Allow this layer to dry completely.
Next, layer in your first accent color, for example, a terracotta-colored paint. The trick here is not to achieve full coverage. Instead, lightly run your brush over the wood, allowing some of the base color to show through and creating an uneven, textured look. This mimics how old paint wears down in varying degrees. Let this layer dry completely. Once dry, repeat the process with another accent color, such as yellow, again applying it sparingly and unevenly. The goal is to build up layers of color that will create depth and interest when the top coat is distressed. Ensure each layer is thoroughly dry before proceeding to the next.
Step 3: Apply the Hairspray Resist Layer
This is where the magic truly begins! Once all your base paint layers are completely dry, take your strong-hold hairspray. Liberally coat the entire surface of your wood with hairspray. Don’t be shy; a thick, even coat is crucial for the hairspray to function effectively as a resist. Pay particular attention to the edges and any areas where you want a significant amount of chipping to occur. The more hairspray, the easier it will be to remove the top layer of paint later. Once applied, let the hairspray dry completely. This is vital; if it’s still tacky, the next paint layer won’t adhere correctly.
Step 4: The Top Coat and the Reveal
With the hairspray layer dry, it’s time for your final top coat. Apply a coat of white acrylic paint (or your chosen top color) evenly over the entire piece. Spread it smoothly with your brush, ensuring it covers all the underlying colors and the hairspray layer. Allow this white paint layer to dry completely. This might take a few hours, depending on the paint and humidity. Once dry, fill a spray bottle with warm water. Lightly mist the corners and edges of your wood piece first. The warm water reactivates the hairspray, making the top paint layer pliable.
Immediately after spraying, take your stencil brush with a flat bottom and gently begin to wipe, scrub, and rub away the wet white paint. You’ll notice the paint starting to lift and chip, revealing the colorful layers beneath. Continue spraying small sections with warm water and gently distressing until you achieve your desired look. Focus on areas that would naturally show wear, like edges, raised details, and corners. You have control over how much paint you remove, so you can make it as subtly or dramatically chippy as you like.
Step 5: Seal Your Masterpiece (Optional but Recommended)
Once you are happy with the distressed look, allow your piece to dry completely for several hours, or even overnight, to ensure all moisture has evaporated. To protect your beautiful aged finish and ensure its longevity, it’s highly recommended to apply a protective sealer. Options include a clear wax (for a soft, matte finish), a polycrylic (for more durability, especially on furniture), or a clear matte spray sealer. This final step will guard against future chips and spills, preserving your hard work and making the piece suitable for everyday use and display.
Tips for Achieving the Best Distressed Results
- Practice on Scrap Wood: Before tackling your main project, test the technique on a small piece of scrap wood. This allows you to experiment with paint layers, hairspray application, and distressing pressure without fear of ruining your main piece.
- Layer Colors Thoughtfully: The colors you choose for your base layers will significantly impact the final look. Consider colors that complement your chosen top coat and the overall aesthetic you’re aiming for. Earthy tones beneath a white top coat create a farmhouse feel, while brighter colors can achieve a more vibrant vintage look.
- Don’t Over-Distress: There’s a fine line between tastefully distressed and excessively worn. Start with light distressing and gradually add more if needed. You can always remove more paint, but it’s harder to put it back on naturally.
- Consider Wood Type: While this technique works on most wood, softer woods might chip more easily around the edges, enhancing the distressed effect.
- Ensure Adequate Drying Times: Rushing the drying process between paint coats and the hairspray layer can lead to patchy results or paint that doesn’t distress properly. Patience is a virtue in distressing!
- Ventilation is Key: When working with aerosol hairspray and paints, ensure you are in a well-ventilated area to protect your health.
Creative Applications for Your Distressed Wood
The beauty of this hairspray distressing technique is its versatility. Once you’ve mastered it, a world of creative possibilities opens up. Here are just a few ideas for applying your newfound skill:
- Wall Art and Signs: Create custom rustic signs with meaningful quotes or family names. Distressed wood makes for an excellent backdrop for stenciled or hand-painted lettering.
- Picture Frames: Transform plain, inexpensive frames into charming vintage pieces that beautifully highlight your favorite photographs.
- Small Furniture Pieces: Upcycle old crates, shelves, small tables, or even drawer fronts to add a touch of farmhouse chic to any room.
- Decorative Boxes and Trays: Perfect for organizing clutter while adding a decorative element to your coffee table or entryway.
- Coasters and Trivets: Add a unique, handmade touch to your kitchen or dining area with distressed wood coasters.
- Holiday Decor: Craft unique holiday ornaments or seasonal signs with an aged, weathered look.
Maintaining Your Distressed Wood Pieces
Once your project is complete and sealed, caring for your distressed wood is relatively simple. For general cleaning, simply wipe the surface with a soft, dry cloth or a slightly damp cloth if necessary. Avoid harsh chemical cleaners, as they can potentially damage the paint or sealer. If you notice any significant wear or dullness over time, especially on high-traffic items, you can always reapply a fresh coat of wax or sealer to refresh and protect the finish.
There you have it – a simple, effective, and incredibly rewarding method for transforming new wood into pieces brimming with vintage charm and character. This hairspray distressing technique is a testament to how everyday items can be repurposed to create stunning home decor. So, gather your materials, embrace your inner artist, and get ready to add that coveted aged wood aesthetic to your home. We encourage you to experiment with different color combinations and levels of distressing to create pieces that are uniquely yours. Happy crafting!