
Transform Your Textiles: The Ultimate Guide to Printing on Fabric with Freezer Paper
Unleash your creativity and personalize almost any fabric item with a simple yet incredibly effective technique: printing directly onto fabric using freezer paper. This ingenious method, championed by experts like Super Crafty Gal on YouTube, makes custom fabric designs accessible to everyone, regardless of their crafting experience. Imagine turning your favorite digital images, meaningful quotes, or unique patterns into tangible fabric art for personalized gifts, home decor accents, or even custom apparel. This comprehensive guide will walk you through every step, ensuring you achieve professional-looking results right from your home printer.
Whether you’re looking to create bespoke tote bags, add a unique touch to a throw pillow, or design custom patches for clothing, freezer paper printing offers an affordable and straightforward solution. It’s a fantastic way to elevate your DIY projects and add a personal flair that stands out. This technique eliminates the need for expensive specialized equipment, utilizing materials you likely already have on hand or can easily acquire.
RELATED: Easy DIY Custom Print Shirts Using An Iron
Dive into the detailed step-by-step instructions below, and for a visual walkthrough, be sure to watch the accompanying video tutorial. You’ll be amazed at how simple it is to bring your digital designs to life on fabric. Let’s get started on your journey to mastering fabric printing!
Why Choose Freezer Paper for Fabric Printing?
Freezer paper is a household staple often found in kitchen aisles, but its unique properties make it an unsung hero in the crafting world, especially for fabric printing. The magic lies in its two distinct sides: one is dull and papery, and the other is shiny and coated with a thin layer of plastic (polyethylene). When heat is applied, this plastic coating creates a temporary, yet strong, bond with fabric. This bond transforms your chosen fabric into a sturdy, printable sheet, allowing it to pass smoothly through a standard inkjet printer without jamming or fraying.
Unlike other transfer methods that might leave a thick or rubbery feel on the fabric, direct printing with freezer paper integrates the ink directly into the fabric fibers, resulting in a softer, more natural finish. This method is incredibly versatile, compatible with a wide range of light-colored, natural fabrics and offering unparalleled creative freedom for your projects.
Essential Materials for Freezer Paper Printing:
Gathering your supplies is the first step towards successful fabric printing. Most of these items are readily available, making this a budget-friendly craft. Here’s what you’ll need:
- Freezer paper: Look for it in the baking or food storage aisle of your grocery store. Ensure it’s authentic freezer paper with one shiny, plastic-coated side.
- Fabric: Opt for light-colored, tightly woven natural fabrics like 100% cotton, linen, or silk. These absorb ink best and yield vibrant results. Pre-wash and thoroughly dry your fabric to prevent shrinkage and remove any sizing that might interfere with ink absorption.
- Ruler: For precise measurements when cutting your fabric and freezer paper.
- Marking pen or pencil: To mark cutting lines on your fabric.
- Fabric scissors: Sharp scissors are essential for clean, straight cuts to prevent fraying and ensure a smooth feed into the printer.
- Iron and ironing board: Crucial for fusing the freezer paper to the fabric and for setting the ink.
- Computer and printer: An inkjet printer is necessary for this technique. Laser printers use toner, not ink, and will not work. Your computer will be used to design and prepare your chosen image or text.
- Design software (optional): Any basic image editing software or even a word processor can be used to prepare your image.
How to Print on Fabric Using Freezer Paper: A Step-by-Step Guide
Follow these detailed steps carefully to achieve stunning custom prints on your fabric:
Step 1: Preparing Your Fabric and Freezer Paper for Printing
Preparation is key to a flawless print. Begin by ensuring your fabric is clean, dry, and free of wrinkles. Pre-washing your fabric is highly recommended to remove any sizing or factory finishes that could repel the ink, and to pre-shrink the material. Once dry, press your fabric thoroughly with a hot iron until it is perfectly smooth and flat. This creates an even surface for both the freezer paper adhesion and the subsequent printing process.
Next, take a piece of freezer paper and cut it precisely to the standard size of a piece of printer paper (typically 8.5 x 11 inches or A4, depending on your printer’s specifications). Accuracy here is important to prevent paper jams in your printer. Lay your pre-ironed fabric flat on your ironing board, then place the cut piece of freezer paper on top of it with the shiny, plastic-coated side facing down onto the fabric. This shiny side is the adhesive side that will temporarily bond with your fabric.
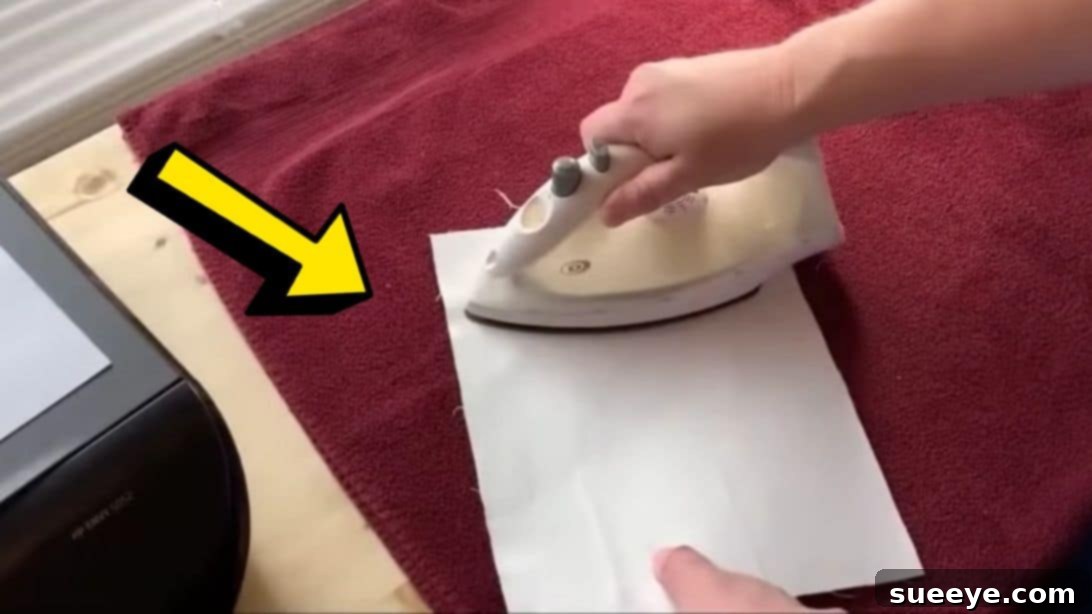
Using a hot, dry iron (no steam), press the freezer paper firmly onto the cotton fabric. Move the iron slowly and evenly over the entire surface, applying consistent pressure. You’ll notice the paper adhering to the fabric as the plastic coating melts and fuses. Continue ironing until the paper is completely and smoothly bonded to the fabric, with no air bubbles or loose edges. This strong bond is crucial for the fabric to feed correctly through your printer.
Once fused, use your fabric scissors to carefully cut along the exact edges of the freezer paper, trimming away any excess fabric. It’s vital to make these cuts as straight and clean as possible. Inspect the edges for any stray threads or fibers from the fabric; these must be meticulously trimmed to prevent them from catching in the printer’s rollers. Finally, give the entire freezer paper and fabric composite another quick press with the iron to ensure the bond is robust and all edges are securely sealed. This final press helps to create a rigid, paper-like sheet that your printer will recognize.
Step 2: Preparing Your Design and Printing on Fabric
With your fabric-backed freezer paper ready, it’s time to prepare your digital design. Open the image or text you wish to print on your computer. Before sending it to the printer, consider a few important points:
- Image Quality: For the best results, use high-resolution images. Low-resolution images can appear pixelated on fabric.
- Color and Contrast: While vibrant colors are possible, remember that inkjet ink on fabric can sometimes appear slightly less saturated than on paper, especially on natural fibers. High-contrast designs tend to stand out beautifully.
- Mirroring (if applicable): For designs that are text-heavy or require specific orientation (like iron-on transfers, though this is direct print), you generally wouldn’t mirror for direct printing. However, if you are planning to use this technique for a subsequent transfer method, then mirroring would be necessary. For direct printing, print as you see it.
- Printer Settings: Access your printer’s settings. Crucially, set your printer to the “best quality” or “photo quality” print option. This instructs the printer to deposit the maximum amount of ink possible, resulting in richer, more durable colors on your fabric. Some printers also allow you to select a “paper type” – choosing a heavier paper or photo paper setting can sometimes help with ink saturation.
Now, carefully load the fabric and freezer paper piece into your printer’s paper tray. Pay close attention to the orientation: the fabric side must be facing the direction of the printing. If your printer feeds paper face down, load the fabric side up. If it feeds face up, load the fabric side down. A good test is to mark an “X” on a regular sheet of paper, load it, print a test page, and see which side the “X” appears on. This ensures the ink lands directly onto your fabric, not the freezer paper backing.
Once loaded and settings confirmed, initiate the print job. Watch as your design comes to life on the fabric! After printing, carefully remove the fabric sheet from the printer. To help set the ink, gently press the printed fabric with a warm iron (again, no steam) on both the front and back sides. This helps to bond the ink to the fabric fibers, enhancing its permanence. Allow the ink to dry completely before peeling off the freezer paper backing. This usually takes a few minutes, but for darker prints, it’s wise to let it sit for a bit longer.
Gently peel the freezer paper from the fabric. You’ll be left with a beautiful, custom-printed piece of fabric. The freezer paper can sometimes be reused if it’s still clean and sufficiently sticky for another small project.
Important Note on Washability and Durability:
It’s crucial to understand a key limitation of inkjet printing on fabric using this method: inkjet ink will typically fade when washed. The dyes in standard inkjet cartridges are water-soluble and not designed to withstand repeated laundering. Therefore, this technique is best suited for projects that do not require frequent washing, such as:
- Decorative wall hangings or art pieces
- Quilt blocks (where the entire quilt might be hand-washed gently)
- Accent pieces on clothing that can be spot cleaned
- Embellishments on bags or accessories
- Memory keepsakes or framed fabric art
While there are fabric-specific inkjet inks and sprays available that promise better wash fastness, this tutorial focuses on the basic, accessible method using standard inks. For items that need to be regularly washed, consider specialized fabric transfer papers or other professional fabric printing techniques.
Tips for Successful Freezer Paper Fabric Printing
To ensure your projects turn out perfectly every time, keep these expert tips in mind:
- Choose the Right Fabric: Light-colored, smooth, tightly woven 100% cotton works best. Loosely woven or dark fabrics won’t hold the ink as well or show colors as vibrantly.
- Pre-wash and Press: Always pre-wash your fabric to remove sizing and prevent future shrinkage. Ironing until perfectly smooth is non-negotiable for a clean print.
- Precise Cutting: Any unevenness or stray threads on the edges of your fabric-paper composite can cause jams in the printer. Cut meticulously.
- Test Print: If you’re unsure about printer settings or orientation, do a test print on a regular sheet of paper first to ensure your design is positioned correctly.
- Allow Ink to Dry: Give the printed fabric ample time to dry after printing to prevent smudging, especially before handling or peeling the freezer paper.
- Iron to Set Ink: A final, gentle press with a warm, dry iron after printing can help to set the ink and potentially improve its adherence to the fibers, though it won’t make it truly washable.
- Printer Maintenance: Ensure your printer heads are clean for crisp, clear images. Run a cleaning cycle if you notice streaks or faded areas.
- Storage of Unused Fabric: If you prepare multiple sheets of fabric-backed freezer paper, store them flat to prevent curling, which can cause feeding issues.
Creative Project Ideas for Your Freezer Paper Prints
The possibilities are endless once you master this simple fabric printing technique. Here are a few ideas to spark your imagination:
- Personalized Gifts: Create custom tote bags, aprons, or tea towels for friends and family. A unique design or a sentimental quote makes for a truly thoughtful present.
- Home Decor: Design your own throw pillow covers, wall hangings, or framed fabric art. Match your prints to your interior design style.
- Quilting Blocks: Integrate custom printed blocks into your quilt designs for personalized touches, such as family photos or unique patterns.
- Apparel Embellishments: Print small designs for patches on jackets, pockets on shirts, or decorative elements on skirts. Remember the washability note for clothing items.
- Craft Projects: Use your printed fabric for doll clothes, journal covers, unique bookmarks, or elements in mixed-media art.
- Seasonal Decorations: Create holiday-themed banners, placemats, or ornaments with custom prints for a festive touch.
Troubleshooting Common Issues
While the freezer paper method is straightforward, you might encounter a few hurdles. Here’s how to tackle them:
- Printer Jams: This is often due to unevenly cut fabric or loose threads. Ensure your fabric-paper composite is perfectly trimmed and adheres smoothly. Check your printer for any obstructions.
- Smudged Prints: This can happen if the fabric is too damp, the ink is still wet, or if you’ve touched the printed area too soon. Allow ample drying time and handle with care. Setting the printer to a “normal” or “draft” quality for a test print might help identify if over-saturation is an issue.
- Faded or Uneven Prints: This usually points to low ink levels, clogged printer heads, or incorrect printer settings. Check ink cartridges, run a head cleaning cycle, and ensure “best quality” print settings are selected.
- Freezer Paper Not Sticking: Your iron might not be hot enough, or you might not be applying enough pressure. Ensure you are using the shiny side down and apply firm, even heat until completely fused.
Unlock Your Creativity with Custom Fabric Printing
The freezer paper fabric printing technique is a testament to how simple household items can unlock a world of creative possibilities. It’s an empowering method that allows you to translate your digital visions into beautiful, tangible fabric creations without investing in expensive equipment. From unique gifts to personalized home accents, the ability to print custom designs directly onto fabric opens up endless avenues for expressing your individuality and crafting skills.
Embrace the ease and versatility of this hack. Experiment with different fabrics, colors, and designs to discover your favorite applications. While mindful of its washability limitations for certain projects, the joy and satisfaction of seeing your designs come to life on fabric are truly rewarding. So, fire up your printer, grab your freezer paper, and start transforming ordinary textiles into extraordinary works of art today!
*All these images are credited to Super Crafty Gal via YouTube. Give her channel a visit and subscribe for more amazing DIY tutorials!