
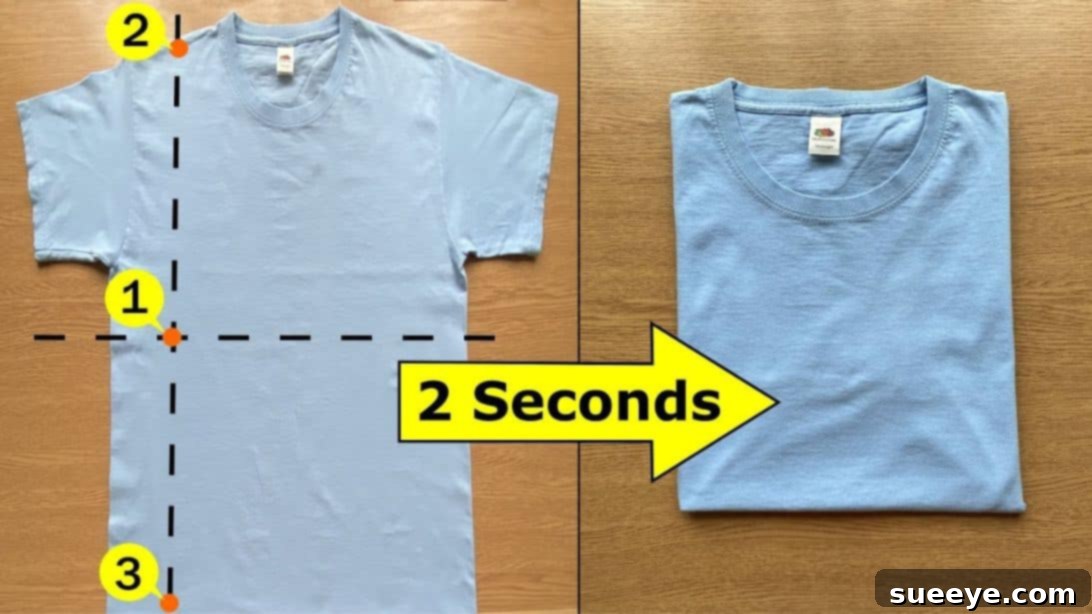
Master the 2-Second Shirt Fold: The Ultimate Laundry Organization Hack
Do you often find yourself staring at a mountain of clean laundry, dreading the time it will take to fold each garment neatly? In our fast-paced lives, the chore of folding clothes can feel like an insurmountable task, often leading to garments being hastily stuffed into drawers or left in piles on the sofa. We understand the struggle – who has the energy to perfectly fold every single item after a long day? What if we told you there’s a revolutionary, lightning-fast method that can transform your laundry routine and keep your wardrobe impeccably organized with minimal effort?
Imagine being able to fold a shirt in just two seconds. Sound like a fantasy? It’s not! This viral folding technique has taken the internet by storm, promising to cut down your laundry time dramatically and leave you with perfectly folded, compact clothes every single time. While achieving the “2-second” speed might take a little practice, the core method is incredibly simple and surprisingly effective. Say goodbye to messy drawers and hello to a perfectly tidy closet with this game-changing hack.
Why This Quick Folding Hack Will Change Your Life
Beyond the sheer satisfaction of a neatly folded stack of shirts, mastering this quick technique offers a multitude of benefits that extend far beyond laundry day:
Reclaim Your Time
Time is a precious commodity. If you spend even a few extra seconds on each shirt, those minutes quickly add up. Over weeks and months, the time saved using this 2-second fold can amount to hours you can dedicate to more enjoyable activities, hobbies, or simply relaxing. This hack isn’t just about folding; it’s about optimizing your entire routine.
Achieve Perfect Organization and Space Efficiency
Neatly folded clothes are a cornerstone of a well-organized wardrobe. When shirts are folded uniformly, they take up less space in drawers and closets, allowing you to maximize your storage capacity. No more struggling to close overstuffed drawers or rummaging through chaotic piles. This method results in compact, consistent rectangles, making it easy to see all your options and maintain a clean, orderly system.
Reduce Clutter and Stress
A tidy home contributes to a tidy mind. The visual clutter of unfolded clothes can be a source of subconscious stress. By making the folding process quick and painless, you’re more likely to tackle laundry promptly, preventing piles from accumulating and creating a more serene living environment. Enjoy the peace of mind that comes with an organized space.
Extend the Life of Your Garments
Properly folded clothes are less prone to wrinkling, stretching, and damage compared to items that are crumpled or haphazardly tossed aside. This technique helps maintain the shape and fabric integrity of your shirts, meaning your favorite garments will look better and last longer, saving you money in the long run.
This ingenious trick, popularized by channels demonstrating quick life hacks, like the one from How to tie a tie, has become a favorite for anyone seeking efficiency in their home routines. While the video specifically focuses on tying a tie, it effectively showcases this incredible shirt-folding method that once mastered, will revolutionize your laundry day forever.
Preparation: The Foundation of a Perfect Fold
Before diving into the quick folding steps, a little preparation goes a long way to ensure the best results:
Choose Your Workspace Wisely
Select a clean, flat surface for folding. A sturdy table, a bed, or even a clean countertop will work perfectly. Ensure you have enough space to lay the shirt completely flat without it hanging over the edges. A smooth surface helps to prevent new wrinkles from forming as you fold.
Smooth Out Initial Wrinkles
For the neatest possible fold, quickly smooth out any major wrinkles from your shirt before you begin. You don’t need to iron it, but a quick sweep of your hands across the fabric will ensure a crisper result.
Position Your Shirt
Lay your shirt face up on your chosen surface. Ensure the collar is facing either towards or away from you, as long as it’s consistently the same way for all your shirts. Consistency is key for uniform results.
Step-by-Step Guide: Mastering the 2-Second Shirt Fold
Step 1: Lay Your Shirt Flat
Begin by laying your shirt completely flat on your chosen surface. Take a moment to smooth out any creases or bumps, ensuring the fabric is as flat as possible. This initial flattening is crucial for a clean, crisp final fold. Make sure the shirt is spread out fully, with no part bunched up.
Step 2: Visualize Your Folding Lines
This is where the magic begins. Mentally (or even lightly with your fingers) identify three critical points on your shirt that will guide your folding. Imagine these as invisible lines:
- Line A (Horizontal): Runs across the middle of the shirt, roughly halfway between the collar and the hem.
- Line B (Vertical): Runs from the top of the shoulder straight down to the hem, positioned about one-third of the way in from the side edge of the shirt.
- Point 1: Where Line A intersects the shoulder line (near the collar).
- Point 2: Where Line A intersects Line B (the middle point).
- Point 3: Where Line B intersects the bottom hem of the shirt.
These imaginary lines are your blueprint. Understanding their placement is key to executing the fold quickly and accurately. The beauty of this method lies in these precise, yet easily identifiable, reference points.
Step 3: The Three-Point Pinch and Pull
Now, let’s put those imaginary lines into action. This is the core movement of the 2-second fold:
- First Pinch: Using your dominant hand, pinch the fabric at Point 1 (where the shoulder line meets the imaginary vertical line B).
- Second Pinch: With your other hand, pinch the fabric at Point 2 (the middle point where horizontal Line A and vertical Line B intersect).
- Cross and Pull: While still holding Point 2 with your second hand, bring your dominant hand (holding Point 1) straight down towards Point 3 (the bottom hem on Line B). You’ll essentially be crossing the top part of the shirt over the middle.
- The Final Pinch and Shake: As your dominant hand reaches Point 3, pinch the fabric there, effectively gathering Point 1 and Point 3 together. Now, while holding Point 2 with one hand and Point 1/3 with the other, lift the shirt and give it a gentle shake to help the fabric fall into place and flatten.
This sequence creates the initial neat fold, bringing the shirt into a more manageable, elongated shape. It might feel a bit awkward at first, but with a few tries, the motion will become fluid and intuitive.
Step 4: The Final Fold
You’re almost there! With the shirt now elongated and folded once from the previous step, simply fold it in half one last time. This typically means bringing the top edge down to meet the bottom edge, or folding it inwards if the sleeve is still extended. Smooth it down, and voilà! You are done. You’ll be left with a perfectly rectangular, compact shirt, ready for your drawer or shelf.
Tips for Perfection and Speed
Practice Makes Perfect
Don’t get discouraged if your first few attempts aren’t exactly 2 seconds or perfectly neat. Like any skill, this technique requires practice. Try it on a batch of shirts and you’ll quickly get the hang of it. You’ll soon find your rhythm and improve your speed and precision.
Maintain Consistency
Using the same surface, visualizing the same lines, and executing the same movements each time will help build muscle memory, making the process faster and more automatic.
Adapting for Different Shirt Types
- T-shirts and Polos: This method works flawlessly for most standard t-shirts and polo shirts.
- Long-Sleeved Shirts: Before starting Step 1, lay the shirt flat, then fold the long sleeves inwards across the back of the shirt, or along the sides, so they don’t interfere with the main body fold. Then proceed with the 4 steps as usual.
- Sweaters and Hoodies: While the core principle applies, thicker fabrics might require a slightly looser pinch and more smoothing. The final fold might also be a bit bulkier, but still more organized than stuffing.
Troubleshooting Common Issues
If your shirt isn’t looking neat, check these points:
- Are your initial lines accurate? Ensure your imaginary vertical and horizontal lines are consistent.
- Is your grip firm enough? A secure pinch at each point is essential.
- Are you smoothing enough? A quick flattening before and during the process helps.
Beyond Shirts: Optimizing Your Entire Laundry Routine
While this particular hack focuses on shirts, the mindset of efficient folding can be applied to other garments. Explore other space-saving techniques for different items to achieve ultimate laundry mastery:
- 36 DIY Storage Baskets For Organizing Everything: Discover creative solutions for storing all kinds of items around your home.
- Space Saving Towel Folding Technique: Learn how to fold towels to maximize linen closet space.
- How to Fold a Fitted Sheet (Easy and Fast): Conquer the notoriously tricky fitted sheet with simple, effective methods.
How to Fold a Shirt in 2 Seconds
Transforming your laundry routine doesn’t have to be a daunting task. By adopting the 2-second shirt folding technique, you’re not just learning a new way to fold; you’re embracing a more efficient, organized, and stress-free approach to household chores. This simple yet powerful hack will save you valuable time, maximize your closet space, and keep your clothes looking their best. Give it a try on your next laundry day – you’ll be amazed at how quickly you can master it and enjoy the rewarding feeling of a perfectly organized wardrobe!
Share your folding triumphs with us! What other laundry hacks have changed your life?