
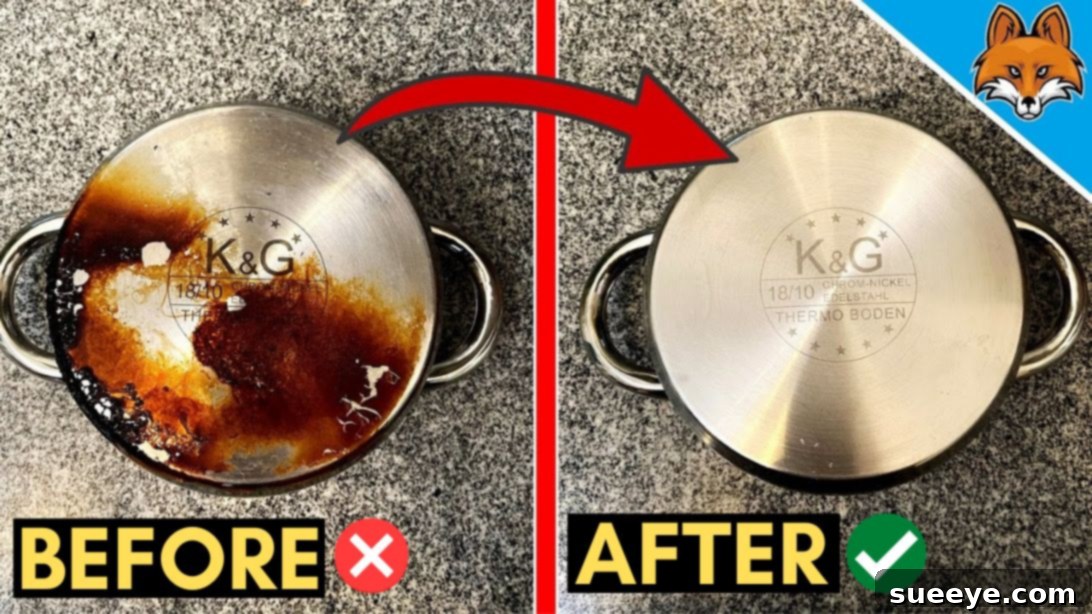
The Ultimate Guide to Cleaning Burnt Pots: Effortless Removal of Stubborn Residue
Cooking is often a joyous and creative endeavor, but let’s be honest: it can also be a messy affair. Splashes, spills, and sticky residue are common occurrences in any active kitchen. Yet, among all the culinary mishaps, few are as frustrating and seemingly insurmountable as a severely burnt pot or pan. That unsightly, charred layer of food fused to the bottom of your favorite cookware can feel like a permanent fixture, defying traditional scrubbing methods and demanding an incredible amount of time, effort, and elbow grease to remove.
Many of us have spent countless hours in a futile battle against these stubborn stains, often resorting to abrasive scrubbers that scratch and damage our precious pots, or resigning ourselves to the idea of replacing them entirely. The good news is, you don’t have to anymore! What if we told you there’s a surprisingly effective, quick, and easy method to banish those burnt bits, restoring your pots to their former sparkling glory with minimal effort? This isn’t just another old wives’ tale; it’s a game-changing hack that leverages an unexpected household item, turning a daunting chore into a simple task.
The secret to effortlessly cleaning even the most heavily burnt pots and pans comes from a brilliant video tutorial by Smart Fox on YouTube. After trying this ingenious technique myself, I was genuinely amazed at how quickly and easily it dissolved years of accumulated grime and stubborn burnt food. This method utilizes a readily available cleaner that you can find at any local grocery or hardware store, transforming your approach to kitchen cleanup. If you’re ready to reclaim your cookware and save yourself from hours of scrubbing, read on for the full instructions and insights into this incredible hack.
Why Burnt Pots Are Such a Challenge
Before diving into the solution, it’s helpful to understand why burnt food adheres so stubbornly to cookware. When food burns, the sugars and proteins undergo a process called carbonization. This creates a hard, black, carbonized layer that is incredibly resistant to water and detergents. Traditional scrubbing often only manages to remove the top layer or scratch the surface of the pot, leaving the deep-seated char intact. Aggressive scraping can permanently damage the non-stick coating or stainless steel finish, making the pot even more prone to sticking in the future. This is why a chemical approach, which targets the molecular bonds of the burnt residue, often proves more effective than purely mechanical abrasion.
Introducing the Game-Changing Solution: An Unexpected Cleaner
The core of this ingenious hack lies in using a product designed for heavy-duty cleaning: oven cleaner spray. While typically used for tackling baked-on grease and carbon deposits inside ovens, its powerful degreasing and carbon-dissolving properties make it incredibly effective on burnt pots and pans. The active ingredients in most oven cleaners, such as lye (sodium hydroxide) or other strong alkaline agents, work by breaking down the chemical bonds of the burnt food particles, essentially dissolving them into a more manageable, scrubbable form. This allows for a swift and easy removal that traditional dish soap and water simply cannot achieve.
Materials You’ll Need:
- Oven cleaner spray (ensure it’s a heavy-duty degreasing formula)
- Water (for rinsing)
- Durable rubber gloves (essential for protection)
- Non-abrasive dishwashing sponge or brush
- Optional: An old towel or newspaper to protect your work surface
Step-by-Step Directions to Restore Your Cookware:
- Prepare Your Workspace: Find a well-ventilated area, preferably outdoors or near an open window. Lay down an old towel or several layers of newspaper to protect your work surface from the oven cleaner.
- Position the Pot: Take your burnt pot or pan and flip it upside down. This exposes the burnt bottom or sides, allowing for direct application of the cleaner. Ensure the surface you’re treating is dry.
- Apply the Oven Cleaner: Shake the oven cleaner spray well before use. Holding the can about 6-8 inches away, generously spray the entire burnt area with an even layer of the oven cleaner. Do not be shy; ensure all charred bits are thoroughly coated.
- Let it Work Its Magic: Allow the oven cleaner to sit and penetrate the burnt residue for approximately 5 to 10 minutes. For extremely stubborn burns, you might extend this to 15-20 minutes, but avoid letting it dry completely. During this time, the powerful chemicals are actively breaking down the carbonized food particles.
- Don Your Gloves: This step is crucial. Before touching the treated pot, put on a pair of durable rubber gloves to protect your hands from the strong chemicals.
- Start Scrubbing: With your gloves on, take your non-abrasive dishwashing sponge or brush and begin scrubbing the treated area. You will immediately notice a significant difference: the burnt particles, once rock-hard, will now be loosened and much easier to wipe away. Apply gentle to moderate pressure; you shouldn’t need excessive force.
- Rinse Thoroughly: Once you’ve scrubbed away the majority of the burnt bits, give the pot a thorough rinse under running water. Ensure all traces of the oven cleaner and dissolved residue are completely washed away.
- Repeat if Necessary: For very heavy or long-standing burns, you might find that a single application removes most but not all of the residue. If needed, repeat the entire process (steps 3-7) until your pot is sparkling clean.
- Final Wash: After the burnt marks are gone, wash your pot as you normally would with dish soap and water to ensure any residual cleaner is completely removed before use.
Safety First: Important Considerations When Using Oven Cleaner
While incredibly effective, oven cleaner is a strong chemical and must be handled with care. Always prioritize safety:
- Ventilation: Use in a well-ventilated area to avoid inhaling fumes.
- Gloves: Always wear durable rubber gloves to protect your skin. Oven cleaner can cause irritation or chemical burns upon contact.
- Eye Protection: Consider wearing safety glasses to protect your eyes from splashes.
- Surface Protection: Protect your countertops, floors, and surrounding areas from overspray, as it can damage certain finishes.
- Read Instructions: Always refer to the specific safety instructions and warnings on your oven cleaner product label.
- Not for All Materials: Oven cleaner is generally safe for stainless steel, cast iron (without seasoning), and glass cookware. However, avoid using it on aluminum (it can cause discoloration), non-stick surfaces (it can strip the coating), or other delicate materials. Always test on an inconspicuous area first if unsure.
- Rinse Thoroughly: Ensure all chemical residue is completely rinsed off before using the pot for cooking.
Beyond the Burn: Prevention and Maintenance Tips
While this hack is a lifesaavor for existing burns, preventing them in the first place is always the best approach. Here are some tips to keep your pots and pans pristine:
- Match Heat to Cookware: Use appropriate heat levels for your cooking. High heat is not always necessary and can lead to burning, especially with thin-bottomed pans.
- Don’t Overload Pans: Overcrowding a pan can lower its temperature unevenly, leading to some parts burning while others cook slowly.
- Use Enough Fat: Ensure you have sufficient oil, butter, or liquid when cooking to prevent food from sticking and burning to the bottom.
- Stir Frequently: For dishes prone to sticking (like rice, sauces, or stews), stir regularly to prevent ingredients from settling and burning at the bottom.
- Soak Immediately: After cooking, if you notice any stuck-on food, fill the pot with warm water and a bit of dish soap and let it soak for an hour or overnight. This often prevents food from hardening into a stubborn burn.
- Clean Regularly: Don’t let residue build up over time. Regular cleaning prevents minor stains from becoming major burnt-on problems.
This “1-Minute Burnt Pot Cleaning Hack” (referring to the quick dissolving action rather than the total time) is a testament to clever problem-solving. It transforms a task that many dread into something manageable and surprisingly satisfying. The satisfaction of seeing a once-hopelessly burnt pot gleaming again is truly rewarding.
Many traditional methods, such as boiling water with baking soda or vinegar, while somewhat effective for minor stains, often fall short against truly charred residue. This oven cleaner technique, however, tackles the toughest burns head-on, proving its worth as a superior solution for serious kitchen emergencies.
Conclusion: Reclaim Your Cookware with This Simple Hack
Say goodbye to the days of endlessly scrubbing, resorting to harsh abrasives, or throwing away perfectly good but burnt cookware. This remarkable hack using oven cleaner spray is a true game-changer for anyone who has ever faced the frustration of a burnt pot. It’s fast, incredibly effective, and surprisingly simple, bringing new life back to your kitchen essentials.
We encourage you to try this technique the next time you encounter a stubborn burn. You’ll be astonished by the results and wonder why you hadn’t discovered it sooner. A huge thank you to Smart Fox via YouTube for sharing this brilliant insight and for all the inspiring images used in this guide. If you found this hack as helpful as we did, be sure to visit their channel for more ingenious tips and subscribe to their content!