
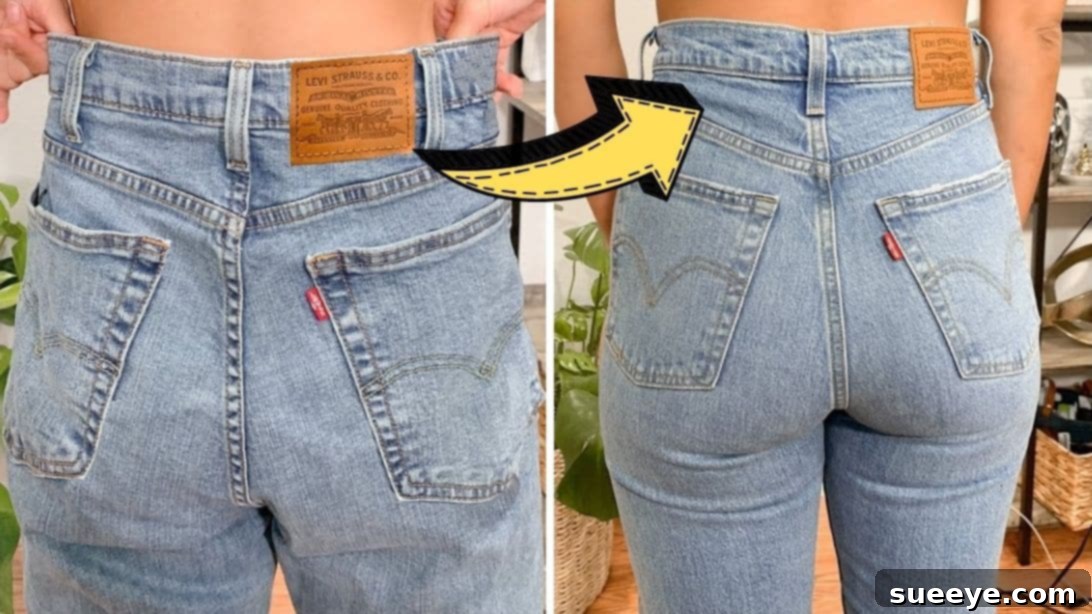
Effortless DIY: How to Easily Take In Loose Jeans at the Waist for a Perfect Fit
Do you have a favorite pair of jeans that are just a little too loose around the waist? Perhaps your body has changed, or you bought a size that turned out to be less-than-perfect. Instead of donating them, buying new ones, or spending a fortune on tailoring, imagine effortlessly transforming them into a perfectly fitting pair right at home!
This comprehensive guide, inspired by the brilliant video tutorial from Alegria Jimenez, will walk you through an incredibly simple yet effective method to alter your jeans. The best part? You don’t need to be a sewing expert, nor do you require any fancy equipment. With just a few basic materials and these easy-to-follow instructions, you can give your beloved denim a new lease on life. This hack is perfect for anyone looking to save money, embrace sustainability, and enjoy the comfort of a custom-fitted waistband.
We’ll delve into the common problem of ill-fitting jeans, discuss why this DIY solution is a game-changer, and provide detailed, step-by-step instructions to ensure your success. Get ready to reclaim your wardrobe and wear your jeans with confidence!
Why Your Jeans Might Be Loose and Why This DIY Fix is Ideal
It’s a common scenario: you love your jeans, but the waist just doesn’t sit right. This could be due to various reasons. Weight fluctuations, whether up or down, often affect waist size before other areas. Sometimes, jeans stretch out over time with wear, or perhaps you purchased them online and the sizing was slightly off. Regardless of the reason, a loose waistband can be uncomfortable, unflattering, and often leads to constantly pulling up your pants.
Traditional solutions often involve expensive trips to a tailor, which can quickly add up, or simply discarding the jeans, contributing to textile waste. This DIY elastic waistband alteration offers a sustainable and budget-friendly alternative. It’s a quick fix that doesn’t require permanent changes unless you want them, making it versatile for future adjustments. By taking matters into your own hands, you gain control over the fit and learn a valuable skill that can be applied to other garments.
Essential Materials: Gathering Your Tools for the Perfect Fit
Before you begin, ensure you have all the necessary items at hand. Having everything ready will make the process smooth and efficient. Each material plays a crucial role in achieving a professional-looking and comfortable alteration.
- 1-inch Roll of Elastic: This specific width is generally ideal as it provides good tension without being too narrow (which can dig into your skin) or too wide (which might be difficult to thread through the waistband). Choose a durable elastic that will hold its stretch over time.
- Safety Pins: These are indispensable for two main reasons. First, they act as a “needle” to guide the elastic through the waistband tunnel. Second, they can be used for a temporary or semi-permanent securement of the elastic ends, especially if you opt for a no-sew method.
- Buttons (Optional, but Recommended for Adjustability): If you choose the adjustable method (which we highly recommend), you’ll need two buttons. Select flat buttons that won’t create bulk and match the style of your jeans, or choose contrasting ones for a subtle design element.
- Needle and Matching Thread (For Buttons): While the core hack is largely no-sew, attaching buttons securely does require a basic needle and thread. Choose a strong thread that matches your jeans or the buttons for a discreet finish.
- Scissors: A good pair of sharp fabric scissors will make clean cuts on both the elastic and the jeans’ waistband, preventing fraying and ensuring a neat result.
- Your Loose Jeans: Of course, the star of the show! Make sure your jeans are clean and dry before you start.
Step-by-Step Directions: Transforming Your Loose Jeans
Follow these detailed steps carefully to ensure a successful and comfortable alteration. Take your time with each stage, especially if this is your first time trying a sewing hack like this.
Step 1: Measuring Elastic and Preparing the Waistband Holes
This initial step is crucial for determining the correct length of elastic and creating the entry points for threading.
- Measure the Elastic: Grab a strip of elastic directly from the roll. Wrap it comfortably around your natural waist area where your jeans typically sit. This will give you a rough idea of the circumference needed. Once you have this measurement, subtract a couple of inches (approximately 2-4 inches, depending on how much tension you desire and the stretchiness of your elastic). This reduction is vital because the elastic needs to be under tension to gather the fabric and effectively take in the waist. Snip off the excess elastic from the roll at this point. It’s always better to start with slightly more and trim later than to have too little.
- Prepare Your Jeans: Turn your jeans inside out. This makes it easier to work on the inner waistband and ensures that any cuts or stitches are discreetly hidden.
- Create Entry Holes: On each side of the waistband, measure about 2 inches away from the front button or zipper area. This placement is strategic: it’s far enough from the button to avoid interfering with its function, but close enough to effectively gather the front of the waistband. Carefully snip two small holes, one on each side, through the inner layer of the waistband fabric. The holes should be wide enough that you can comfortably fit your finger through them – this width is important for easily inserting and guiding the safety pin and elastic. Use sharp scissors for a clean cut to minimize fraying.
Step 2: Threading the Elastic and Securing Your Custom Fit
Now comes the ingenious part – threading the elastic through the waistband tunnel. This step offers both a permanent and an adjustable securing method.
- Attach the Safety Pin: Take one end of the elastic strip you measured in Step 1. Securely attach a small safety pin to this end. This safety pin will act as your guide, allowing you to easily push the elastic through the enclosed channel of the waistband.
- Thread the Elastic: Insert the safety-pinned end of the elastic into one of the snipped holes on the waistband. Gently push and wiggle the safety pin through the waistband tunnel, gathering the fabric as you go. Keep pushing until the safety pin and the elastic emerge from the snipped hole on the opposite side of the waistband. Take care not to twist the elastic inside the waistband; keep it flat for maximum comfort and an even gather.
- Check Tension and Trim: Once both ends of the elastic are protruding from the holes, try on the jeans. Adjust the elastic until you achieve your desired level of tightness and comfort. Make sure the gathers are evenly distributed around the back of the waistband. Once satisfied with the tension, cut off any excess elastic, leaving about an inch or two on each side beyond the snipped holes for securing.
- Secure the Elastic (Choose Your Method): You have two excellent options here:
- Option A: Permanent Fix (Using Safety Pins or Basic Stitching): For a simple, non-adjustable fix, you can use the safety pins. Securely pin each end of the elastic to the inside of the waistband, making sure the pins won’t poke your skin. For a more robust and permanent solution, you can hand-stitch or machine-stitch each end of the elastic directly to the inner seam of the waistband, ensuring it’s firmly anchored. This creates a fixed waist size.
- Option B: Adjustable Fit (Using Buttons – Highly Recommended): This method provides fantastic flexibility, allowing you to loosen or tighten your jeans as needed.
- Sew on Buttons: On the inside of the waistband, directly above each snipped hole (where the elastic emerges), securely sew a button. Ensure the buttons are placed in a way that aligns with the elastic ends. Use a strong thread and make several passes through the buttonholes and fabric for durability.
- Create Buttonholes on Elastic: On each end of the elastic, create a small buttonhole or a slit (using your scissors or a seam ripper) that is just large enough to fit over your chosen buttons. You can create multiple buttonholes on each end if you desire even more adjustability.
- Attach Elastic to Buttons: Once the buttons are sewn and the elastic ends have buttonholes, simply loop the elastic ends over the buttons. This allows you to easily adjust the tightness by using different buttonholes or by simply unbuttoning the elastic when you don’t need the extra cinching. This method is incredibly versatile and prolongs the life of your alteration.
Tips for a Flawless Jean Alteration
To ensure your newly altered jeans look and feel great, consider these additional tips:
- Pre-Wash Your Jeans: Always work with clean, pre-shrunk denim. This prevents any surprises in fit after the first wash.
- Reinforce Holes (Optional): If you’re concerned about the snipped holes fraying over time, you can add a few hand stitches around their edges with matching thread, or even use a dab of fabric glue for extra durability.
- Distribute Gathers Evenly: Once the elastic is threaded and secured, take a moment to evenly distribute the gathered fabric around the back of the waistband. This ensures a smooth look and comfortable feel.
- Test the Fit Thoroughly: Don’t just try on the jeans; move around in them. Sit, stand, and walk to ensure the elastic doesn’t pull uncomfortably and that the fit remains good during various activities.
- Consider Elastic Quality: Invest in good quality elastic. Cheap elastic can lose its stretch quickly, meaning you’ll have to redo the alteration sooner.
Maintaining Your Newly Fitted Jeans
After all your hard work, proper care will help maintain the longevity of your alteration. If you opted for the adjustable button method, you might consider unbuttoning the elastic before washing to prevent unnecessary strain on the buttons and the elastic itself. Wash and dry your jeans according to their care label, and periodically check the elastic for wear or stretching, especially if it’s a frequently worn pair.
Conclusion: Enjoy Your Perfectly Fitted Jeans!
There you have it – a straightforward, accessible, and incredibly effective way to take in the waist of your loose jeans. This clever hack not only saves you money and reduces waste but also gives you the satisfaction of a DIY project well done. No more constantly adjusting your waistband or feeling uncomfortable in ill-fitting denim. You’ve transformed your jeans into a custom-fitted garment, all without needing advanced sewing skills or expensive tools.
A huge thank you to Alegria Jimenez via YouTube for sharing this fantastic technique and inspiring countless individuals to tackle their wardrobe woes with confidence. If you found this tutorial helpful, we encourage you to visit her channel for more brilliant DIY tips and tricks!
Now, go forth and rock your perfectly tailored jeans!