
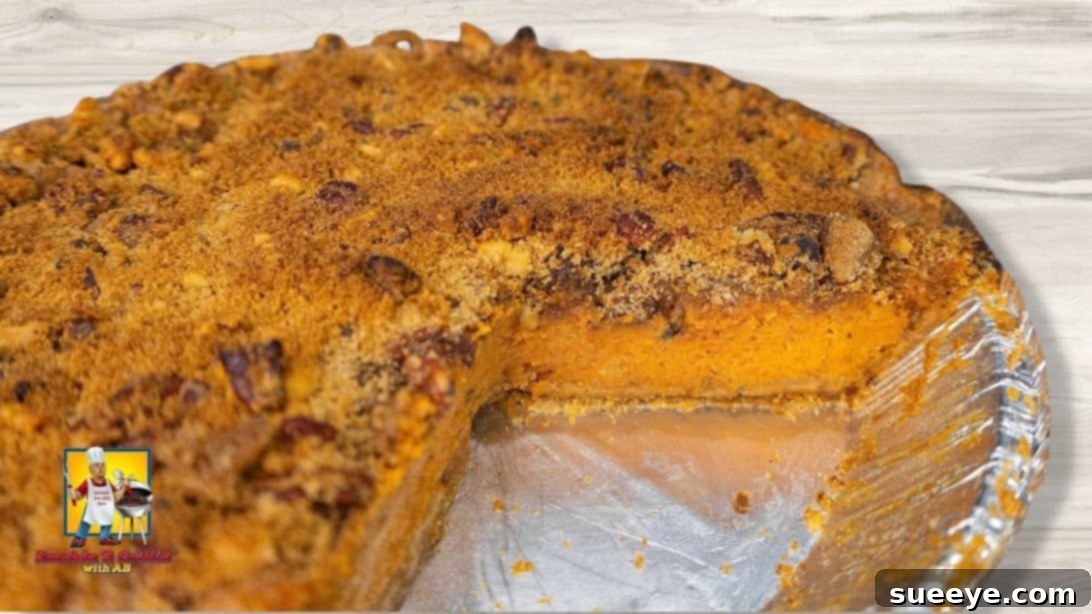
As the leaves turn golden and a crisp chill fills the air, nothing quite captures the essence of the autumn and holiday seasons like a perfectly baked sweet potato pie. This isn’t just any pie; it’s a testament to classic comfort, a dessert that brings warmth, nostalgia, and pure culinary delight to any gathering. We’re thrilled to share the ultimate sweet potato pie recipe, inspired by the masterful techniques of Smokin’ & Grillin With AB. This particular recipe stands out for its harmonious blend of textures: a beautifully crispy and crumbly crust that cradles a filling so rich and creamy, it’s utterly irresistible. Forget complicated desserts; this is one of the easiest and most rewarding treats you can whip up this fall and holiday season. It’s destined to become a staple on your Thanksgiving table, a festive centerpiece at Christmas, or simply a comforting indulgence on a cozy evening. Prepare to impress your family and friends with a pie that truly embodies homemade goodness and the spirit of the season.
The Classic Sweet Potato Pie: A Seasonal Delight
Sweet potato pie holds a cherished spot in American culinary traditions, particularly in the South, where it’s a beloved staple for holiday feasts. More than just a dessert, it represents comfort, family, and celebration. This pie offers a unique flavor profile that sets it apart from its pumpkin counterpart – a slightly sweeter, earthier note, complemented by a delicate spice blend. Our featured recipe elevates this classic to new heights, ensuring a pie that is not only delicious but also a joy to prepare. From the moment the warm, spicy aroma fills your kitchen, you’ll know you’re creating something truly special. This homemade sweet potato pie recipe is perfect for beginners and seasoned bakers alike, promising a show-stopping dessert with minimal fuss.
Ingredients for Your Perfect Sweet Potato Pie
Crafting the ultimate sweet potato pie begins with selecting quality ingredients. Each component plays a vital role in achieving that rich flavor and perfect texture that makes this dessert so memorable. Pay attention to the details, and your efforts will be rewarded with a pie that tastes like it came straight from a gourmet bakery.
For the Irresistible Crust:
- 1 pre-made refrigerated pie crust or graham cracker crust: While a homemade crust adds an extra layer of love, a quality pre-made crust is a fantastic time-saver, especially during busy holiday preparations. Ensure it’s thawed according to package instructions if frozen. If you opt for a graham cracker crust, ensure it’s sturdy enough to hold the creamy filling.
For the Creamy, Flavorful Filling:
This is where the magic truly happens, transforming simple ingredients into a luxurious, spiced sweet potato dream.
- 1/2 stick of unsalted butter (melted): Butter is key for richness and a smooth mouthfeel. Using unsalted butter allows you to control the overall sodium content of the pie.
- 1/2 cup of granulated sugar: Provides the foundational sweetness. Adjust to your preference, but this amount strikes a perfect balance with the natural sweetness of the potatoes.
- 2 large eggs: Essential binders for the filling, ensuring it sets beautifully and achieves that desirable creamy custard texture.
- 3/4 can of evaporated milk (approximately 9-10 ounces): Evaporated milk, denser and creamier than regular milk, contributes significantly to the filling’s velvety texture and richness without adding excess moisture.
- 2 cups of sweet potato (cooked and mashed): The star of our show! Look for vibrant orange-fleshed sweet potatoes, such as Jewel or Garnet varieties, which offer a naturally sweet and moist texture. Ensure they are thoroughly cooked and mashed smoothly for a lump-free filling.
- 2 teaspoons of pure vanilla extract: A cornerstone of many desserts, vanilla extract enhances and deepens all the other flavors, adding a warm, aromatic note.
- 1/2 teaspoon of ground cinnamon: The quintessential fall spice, cinnamon adds warmth and a classic, comforting aroma to the pie.
- 1/2 teaspoon of ground nutmeg: Nutmeg brings a slightly pungent, sweet, and woody flavor that perfectly complements sweet potatoes and cinnamon, defining the traditional sweet potato pie taste.
For the Delightful Crumb Topping:
This optional but highly recommended topping adds an extra layer of texture and sweetness, elevating the pie from great to truly extraordinary.
- 1 cup of light brown sugar (packed): Brown sugar contributes a deeper, molasses-rich sweetness and helps create that desirable moist, crumbly texture.
- 1/2 stick unsalted butter (melted): Binds the topping ingredients together, ensuring a rich, buttery crumble.
- 1/3 cup of all-purpose flour: Provides structure to the topping, helping it form distinct crumbs when baked.
- 1/2 cup of pecans (chopped): Adds a delightful crunch and nutty flavor that pairs wonderfully with sweet potatoes and spices.
- 1/2 cup of walnuts (chopped): Similar to pecans, walnuts contribute another layer of texture and earthy nuttiness, making the topping even more complex and satisfying.
Choosing high-quality ingredients, from the freshest sweet potatoes to aromatic spices, will make a noticeable difference in the final taste and texture of your homemade sweet potato pie. This careful selection ensures that every bite is a celebration of flavor.
Step-by-Step Instructions for Your Ultimate Sweet Potato Pie
Follow these detailed steps carefully to achieve a sweet potato pie that’s flawlessly creamy, perfectly spiced, and utterly delicious. Precision in each stage ensures a successful and impressive dessert.
Step 1: Preparing Your Sweet Potatoes
Begin by thoroughly washing your sweet potatoes. Place them in a large pot and cover them with cold water, ensuring they are fully submerged. Bring the water to a boil, then reduce the heat to a simmer and cover the pot with a lid. Allow the sweet potatoes to cook until they are fork-tender, which usually takes between 20 to 40 minutes, depending on their size. You can check for doneness by easily piercing them with a toothpick or fork. Once cooked, carefully remove the sweet potatoes from the pot and let them cool for a few minutes until they are comfortable enough to handle. The skins should then peel off effortlessly; discard the skins.
Step 2: Preheat Your Oven for Optimal Baking
While your sweet potatoes are cooling, preheat your oven to 350 degrees Fahrenheit (175 degrees Celsius). This ensures the oven reaches the correct temperature before you place the pie inside, promoting even baking and a perfectly set crust and filling.
Step 3: Mashing the Sweet Potatoes
Once peeled, transfer the cooked sweet potatoes to a large bowl. Using a potato masher, fork, or even a hand mixer on a low setting, thoroughly mash the sweet potatoes until they are smooth and free of any lumps. Measure out exactly 2 cups of the mashed sweet potatoes; this precise measurement is crucial for the correct consistency of your pie filling.
Step 4: Preparing and Pre-baking the Pie Crust
Lightly flour a clean work surface. If using a pre-made refrigerated pie crust, carefully unroll it onto the floured surface. Using a rolling pin, gently roll the crust out a little further, just enough to slightly enlarge it and ensure it will fit comfortably into your pie pan with a slight overhang. Lightly grease your chosen pie pan with a small amount of butter to prevent sticking. Carefully transfer the rolled-out crust into the prepared pan, gently pressing it against the bottom and sides. Trim any significant excess crust that hangs over the edge, leaving about a 1/2-inch overhang, which you can then crimp for a decorative finish. Prick the bottom of the crust several times with a fork to prevent it from puffing up during baking. Place the pie crust in the preheated oven and bake for 10 to 15 minutes. This step, known as pre-baking or blind baking, helps to create a crispy bottom crust and prevents it from becoming soggy once the filling is added.
Step 5: Crafting the Creamy Sweet Potato Filling
To the bowl containing your 2 cups of mashed sweet potatoes, add the granulated sugar, ground cinnamon, ground nutmeg, eggs, melted butter, and evaporated milk. Begin mixing all these ingredients on a low setting with a hand mixer. This gentle start helps to combine everything without splattering. Once the ingredients are partially incorporated, increase the speed of the hand mixer to a medium-high setting and continue mixing until the filling is completely smooth, creamy, and well combined. Ensure there are no lumps of sweet potato remaining. Carefully pour this luscious mixture into your pre-baked pie crust, using a spatula to gently flatten the top for an even surface. Your pie is now ready for the delightful topping!
Step 6: Preparing and Adding the Crumb Topping
In a separate medium-sized bowl, combine all the ingredients for the topping: the packed brown sugar, melted butter, all-purpose flour, chopped pecans, and chopped walnuts. Use a fork or your fingertips to mix these ingredients until they are thoroughly combined and form a crumbly mixture. The texture should be similar to wet sand with visible clumps of nuts. Evenly sprinkle this delicious crumb topping over the surface of the sweet potato filling in the pie crust. Distribute it gently to cover the entire top, ensuring every slice gets a taste of this wonderful addition.
Step 7: Baking, Cooling, and Serving Your Masterpiece
Carefully place the pie into your preheated oven. Bake for approximately 50 to 60 minutes. The pie is done when the edges are set, and the center is mostly set with a slight jiggle. The crumb topping should be golden brown and fragrant. To prevent over-browning of the crust edges, you may loosely cover the pie with aluminum foil during the last 15-20 minutes of baking if needed. Once baked, remove the pie from the oven and place it on a wire rack to cool completely. This cooling period is crucial; it allows the filling to fully set, preventing it from collapsing when sliced. Sweet potato pie tastes best when allowed to cool for at least 2-3 hours, or even overnight. Once cooled, slice into generous portions and serve. This ultimate sweet potato pie is delightful on its own, or you can elevate it further with a dollop of whipped cream, a scoop of vanilla ice cream, or a sprinkle of extra cinnamon. Enjoy the rich, comforting flavors of your homemade masterpiece!
Expert Tips for Sweet Potato Pie Perfection
Achieving the perfect sweet potato pie involves a few key techniques and considerations. These tips will help ensure your pie turns out beautifully every time, with a smooth filling, a crisp crust, and an unforgettable flavor.
- Choose the Right Sweet Potatoes: Opt for orange-fleshed varieties like Beauregard, Jewel, or Garnet. These are naturally sweeter and moister, yielding a richer, more flavorful pie filling. Avoid white or purple sweet potatoes, as their flavor and texture are different.
- Cook Sweet Potatoes Thoroughly: Ensure your sweet potatoes are cooked until they are very tender. This makes them easy to mash into a smooth, lump-free consistency, which is essential for a creamy filling. Roasting or baking whole sweet potatoes in their skins can also concentrate their sweetness and flavor even more than boiling.
- Achieve a Smooth Filling: After mashing, you can use a fine-mesh sieve or a food processor to ensure your sweet potato puree is incredibly smooth. This extra step guarantees a silky-smooth texture, free from any fibrous bits, which is a hallmark of a truly great sweet potato pie.
- Don’t Overmix the Filling: While you want the ingredients well combined, overmixing can incorporate too much air, leading to cracks in the surface of your pie as it cools. Mix until just smooth and combined.
- Prevent a Soggy Crust: Pre-baking (or blind baking) the pie crust as directed is vital. This sets the crust before the wet filling is added, preventing it from becoming soggy. You can also brush the bottom of the pre-baked crust with a thin layer of egg white before adding the filling and baking, which creates an extra barrier against moisture.
- Avoid Cracks in Your Pie: Rapid temperature changes can cause pies to crack. To prevent this, allow the pie to cool slowly in the oven with the door slightly ajar for about 15-20 minutes after baking, before transferring it to a wire rack. This gradual cooling helps the custard set without cracking.
- The Water Bath Technique (Optional): For an ultra-creamy, crack-free custard, consider baking your pie in a water bath (bain-marie). Wrap the bottom of your pie plate securely in aluminum foil, place it in a larger baking dish, and pour hot water into the larger dish until it reaches halfway up the sides of the pie plate. This gentle, moist heat helps the custard cook evenly.
- Test for Doneness: The pie is done when the edges are set, and the center still has a slight jiggle when gently shaken. An inserted knife or toothpick into the center (about an inch from the edge) should come out clean.
- Cool Completely: Resist the urge to slice into your sweet potato pie too early! It needs ample time to cool and set, at least 2-3 hours at room temperature, or even overnight. This ensures clean slices and a perfectly firm, creamy texture.
Serving and Storage Suggestions
Once your ultimate sweet potato pie has cooled and set, it’s ready to be enjoyed! Here are some suggestions to make the most of this delicious dessert:
- Classic Toppings: A dollop of freshly whipped cream is a timeless accompaniment, adding a light, airy contrast to the rich filling. A scoop of vanilla bean ice cream also makes for a delightful pairing, especially if the pie is still slightly warm.
- Spiced Enhancements: Dust the top of each slice with a pinch of extra cinnamon or nutmeg for an added aromatic flourish. A drizzle of caramel or a sprinkle of toasted pecans can also elevate the presentation and flavor profile.
- Beverage Pairings: Sweet potato pie pairs wonderfully with a hot cup of coffee, a robust black tea, or even a glass of sparkling cider or a sweet dessert wine for a sophisticated touch.
- Storage: Leftover sweet potato pie should be covered loosely with plastic wrap or aluminum foil and stored in the refrigerator. It will stay fresh and delicious for 3-4 days.
- Reheating (Optional): If you prefer your pie warm, you can gently reheat individual slices in the microwave for 15-30 seconds, or in a low oven (around 250°F / 120°C) for 10-15 minutes, until just warmed through. Be careful not to overheat, as this can dry out the filling.
- Freezing: Sweet potato pie freezes well! Allow the pie to cool completely, then wrap it tightly in several layers of plastic wrap, followed by a layer of aluminum foil. You can freeze the entire pie or individual slices for up to 2-3 months. Thaw overnight in the refrigerator before serving.
Why This Ultimate Sweet Potato Pie Recipe is a Must-Try
This sweet potato pie recipe isn’t just another dessert; it’s an experience. Its appeal lies in its simplicity combined with an extraordinary flavor profile. The genius of Smokin’ & Grillin With AB shines through in creating a recipe that is both approachable for the home cook and delivers results worthy of a gourmet bakery. The balance of warm spices, the velvety smoothness of the filling, and the delightful crunch of the optional, yet highly recommended, crumb topping create a symphony of textures and tastes. It’s a pie that celebrates the humble sweet potato, transforming it into a decadent treat perfect for any occasion, from a casual family dinner to a grand holiday feast. Its inviting aroma alone is enough to bring smiles and anticipation to your kitchen. Make this sweet potato pie once, and you’ll find yourself adding it to your regular rotation of cherished recipes, year after year.