
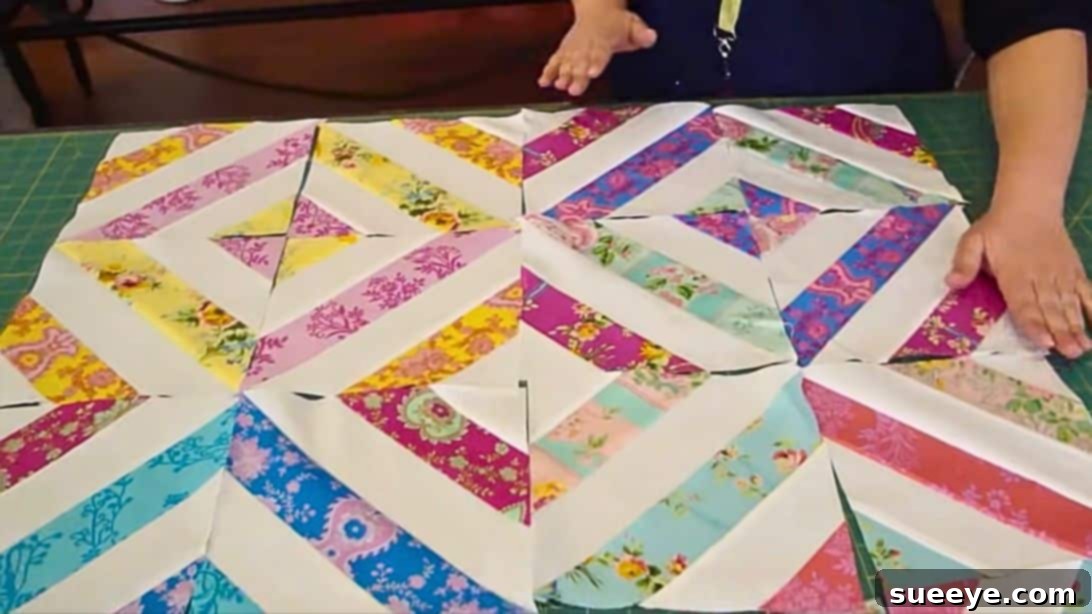
Embark on a delightful quilting journey with the “Summer in the Park” quilt pattern, a truly beginner-friendly project designed to bring vibrant charm and a sense of accomplishment to your home. If you’re new to the world of quilting or seeking a quick and satisfying make, this pattern, utilizing convenient jelly rolls, is an absolute gem. Known for its elegant double hourglass design, this quilt combines simplicity with stunning visual impact, making it a favorite among quilters of all skill levels. With guidance inspired by the experts at Missouri Star Quilt Company, you’ll discover just how easy it is to transform fabric strips into a masterpiece. This detailed guide will walk you through every step, ensuring you create a beautiful quilt top with confidence and joy.
The beauty of the “Summer in the Park” quilt lies in its clever construction, which starts with sewing just a few strips together. You’ll create two distinct sets of strip units, join them, and then, with a few precise cuts, unlock the enchanting double hourglass motif. Arranging these newly formed blocks into a classic four-patch layout will reveal a dynamic design that’s both traditional and fresh. Not only is this project incredibly rewarding, but it also offers a fantastic opportunity to experiment with color and pattern, transforming a simple collection of jelly roll strips into a cherished textile art piece. Let’s gather our materials and dive into the wonderful world of jelly roll quilting!
Essential Materials for Your Summer in the Park Quilt
Before you begin your quilting adventure, ensure you have all the necessary supplies readily available. Using quality materials will not only make the process more enjoyable but also contribute to the longevity and beauty of your finished quilt. Here’s what you’ll need:
- 1 pack of printed jelly roll: These pre-cut 2.5-inch fabric strips are a quilter’s best friend, saving you valuable time on cutting and allowing you to jump straight into sewing. Choose a pack with a coordinating color scheme that evokes the “summer in the park” feel – think bright florals, playful geometrics, or serene pastels.
- 1 pack of white jelly roll (or solid background color): A contrasting solid color, traditionally white or cream, will help your printed fabrics pop and define the intricate hourglass design. Ensure your solid jelly roll is of good quality to maintain consistency in your quilt.
- Square ruler (at least 12.5 inches recommended): A high-quality square ruler is indispensable for accurate cutting, especially when creating the diagonal cuts that form the hourglass shape. Look for one with clear markings and a non-slip grip.
- Rotary cutter and self-healing mat: While not explicitly listed, these are essential tools for any quilter. A sharp rotary cutter ensures clean, precise cuts, and a self-healing mat protects your work surface.
- Sewing machine: A reliable sewing machine with a quarter-inch foot attachment will be invaluable for maintaining consistent seam allowances.
- Thread: Choose a high-quality cotton thread that matches or blends with your fabrics. A neutral color like white, cream, or light grey is often a good choice for piecing.
- Iron and ironing board: Proper pressing is crucial for flat seams and accurate block construction.
- Fabric clips or pins: To hold your fabric strips in place while sewing.
Step-by-Step Guide to Creating Your Summer in the Park Quilt
Now that you have all your materials ready, let’s begin the exciting process of piecing together your beautiful “Summer in the Park” quilt. Remember, precision in cutting and sewing will lead to a more polished final product, but don’t be afraid to enjoy the journey and embrace any unique quirks along the way!
Step 1: Constructing Your First Strip Set
The foundation of our double hourglass block begins with assembling two distinct strip sets. For your first set, you’ll want to highlight your beautiful printed fabrics. Start by selecting one strip from your white (or solid background) jelly roll. This will be your center strip. Next, choose two complementary printed jelly roll strips. These will flank the background strip, one on each side. The beauty of jelly rolls is in their coordinated collections, allowing you to mix and match patterns effortlessly. Lay them out to visualize your color placement before sewing.
With your chosen strips, place one printed strip right sides together with one edge of the white center strip. Pin or clip them securely. Using a precise quarter-inch seam allowance, sew them together along the length. Repeat this process with the second printed strip, attaching it to the opposite side of the white center strip, again with right sides together and a quarter-inch seam. Once sewn, carefully press your seams. For this first set, pressing the seams towards the darker (printed) fabric is often recommended, as it helps prevent “shadowing” of darker fabrics through lighter ones. Ensure your strip unit lies perfectly flat.
Step 2: Creating Your Second Strip Set
For your second strip set, we’ll reverse the color placement to create a contrasting unit. This time, select one vibrant printed jelly roll strip to be your center. Then, choose two strips from your white (or solid background) jelly roll to place on either side of the printed center strip. This contrasting arrangement is key to making the double hourglass design truly stand out.
Just as in Step 1, align one white strip right sides together with one edge of your printed center strip. Sew along the length using a consistent quarter-inch seam allowance. Attach the second white strip to the remaining side of the printed center strip, again ensuring a precise quarter-inch seam. After sewing, press these seams carefully. For this set, pressing seams towards the darker (printed) center strip will again help achieve a flat unit and minimize bulk where seams meet later. Consistency in pressing direction, while not always critical, can make subsequent steps easier.
Step 3: Joining the Two Strip Sets Together
Now it’s time to bring your two carefully constructed strip sets together. This step is where the magic truly begins to take shape. Place your first strip set (white center, printed sides) on top of your second strip set (printed center, white sides), ensuring they are right sides together. Take care to align the raw edges as best as possible. The goal here is to sew them along their long edges.
Using your quarter-inch seam allowance, sew along both of the long outer edges. You’ll essentially be creating a larger, combined strip unit. Don’t worry if the fabric lines don’t match up perfectly in the middle – the beauty of this technique is that you’ll be cutting diagonally through these seams later, which often disguises minor misalignments. The most important aspect at this stage is to maintain a consistent quarter-inch seam allowance on both sides, ensuring your combined unit remains straight and even. Once sewn, press this combined unit flat. You can press the seams open to reduce bulk, or press to one side, depending on your preference and how the fabric feels. The goal is a smooth, flat surface for the next crucial cutting step.
Step 4: The Transformative Diagonal Cuts
This is the most exciting and transformative part of the process, where your simple strip sets reveal the intricate double hourglass blocks. For this step, a large square ruler (at least 12.5 inches, or larger if your strips create a wider unit) is indispensable for accuracy. Place your sewn, combined strip unit onto your self-healing cutting mat.
Take your square ruler and position it diagonally on top of the sewn strips. Align one of the diagonal lines on your ruler perfectly with one of the horizontal seams (the seam lines you just sewed in Step 3). This alignment is critical for achieving a true bias cut. Carefully make your first diagonal cut with your rotary cutter. This will establish one side of your first block.
Next, without moving your fabric, shift your ruler. To create a block, you’ll need another diagonal cut parallel to the first. For a standard 2.5-inch jelly roll, the resulting block often measures around 6.5 inches square (untrimmed). So, position your ruler’s diagonal line at the desired width (e.g., 6.5 inches) from your first cut, again aligning the diagonal with the seam line. Make your second diagonal cut. This creates your first “double hourglass” block! Repeat this process along the entire length of your combined strip unit, carefully lining up your ruler for each subsequent block. You will essentially be cutting a series of parallelograms that, when arranged, form the hourglass. Once all blocks are cut, gently open them up and press them flat. You’ll be amazed at the clear hourglass shapes that emerge.
Step 5: Assembling Your Quilt Blocks into a Four-Patch Design
With your individual double hourglass blocks now cut and pressed, it’s time to arrange them into the iconic four-patch layout that defines the “Summer in the Park” quilt. This step brings the entire design to life, creating a mesmerizing pattern of alternating colors and shapes.
Select four of your freshly cut blocks. Lay them out on a design wall or a flat surface to experiment with their orientation. To achieve the classic double hourglass effect, you’ll need to alternate the direction of the hourglass within each set of four. Imagine a 2×2 grid. Place the first block in the top-left corner. For the top-right block, rotate it 90 or 180 degrees so that its hourglass lines create a continuation or a contrast with the first. Do the same for the bottom-left and bottom-right blocks, ensuring that when all four are together, they form a cohesive and visually pleasing larger hourglass or propeller-like pattern.
Once you are happy with your arrangement, pick up the blocks in pairs (top-left with top-right, and bottom-left with bottom-right) and sew them together with a quarter-inch seam allowance. When joining these pairs, “nesting” your seams (pressing seams in opposite directions so they interlock) can help reduce bulk and create perfectly matched points. Then, join the two resulting rows together to form your complete four-patch block. Press this larger block open, ensuring all seams lie flat and crisp. Repeat this process with all your remaining blocks until you have a sufficient number of four-patch units to create your desired quilt size. Take your time with this step, as careful alignment will result in beautiful, crisp points in your final quilt top.
Bringing Your Quilt Top Together and Finishing
Once you’ve created all your individual four-patch blocks, the next exciting phase is to assemble them into the complete quilt top. Lay out all your blocks on a design wall or the floor to finalize your arrangement. This allows you to see the overall flow of colors and patterns and make any last-minute adjustments. You might choose to arrange them in straight rows and columns, or experiment with more complex layouts.
Assembling Rows and Quilt Top: Begin by sewing your blocks together into rows, maintaining that consistent quarter-inch seam allowance. Again, nesting seams between blocks within a row will help ensure your points line up beautifully. Press the seams for each row, alternating the pressing direction for adjacent rows (e.g., press seams in row 1 to the right, row 2 to the left) to allow for easier nesting when joining the rows. Once all rows are sewn, join the rows together, carefully pinning at seam intersections to align points. Sew them together, press, and admire your finished quilt top!
Adding Borders (Optional but Recommended): For a more polished look and to help square up your quilt, consider adding borders. Borders can frame your design and provide an opportunity to introduce another fabric or color. Measure your quilt top through the center both horizontally and vertically to get accurate border lengths. Cut your border strips and attach them, usually starting with the side borders, then the top and bottom.
Quilting Your Project: With the quilt top complete, you’ll need backing fabric and batting. Create your quilt sandwich: backing fabric (right side down), batting, and quilt top (right side up). Baste the layers together using safety pins, basting spray, or thread basting. Now comes the quilting! You can choose to machine quilt (straight lines, free motion, or a walking foot design) or hand quilt. The “Summer in the Park” pattern lends itself well to simple grid quilting, stitch-in-the-ditch, or even an all-over meandering pattern.
Binding Your Quilt: The final step in finishing your quilt is adding the binding. This not only protects the raw edges but also adds a beautiful frame. Cut binding strips, sew them together to form one long strip, press in half lengthwise, and then attach to the perimeter of your quilt. You can machine stitch one side and hand stitch the other for a traditional finish, or machine stitch both sides for a quicker approach.
Tips for a Successful Jelly Roll Quilt
- Consistent Seam Allowance: A quarter-inch seam allowance is paramount in quilting. Practice on scraps to ensure your machine’s setting is accurate.
- Pressing Matters: Don’t underestimate the power of a good press. Flat seams lead to accurate blocks and a smoother quilt top.
- Sharp Tools: Use a sharp rotary cutter blade and a fresh needle in your sewing machine. This prevents skipped stitches and frayed edges.
- Design Wall: A simple design wall (even a flannel sheet tacked to a wall) helps immensely in arranging blocks and visualizing your layout before sewing.
- Take Breaks: Quilting should be enjoyable! If you feel frustrated, step away for a bit and come back with fresh eyes.
- Embrace Imperfection: Especially for beginners, remember that handmade items have character. Don’t strive for absolute perfection, but for personal satisfaction.
Personalizing Your Summer in the Park Quilt
While the “Summer in the Park” pattern is beautiful as is, there are many ways to make it uniquely yours. Consider these ideas:
- Color Palette Variations: Instead of traditional “summer” colors, explore a winter wonderland theme with blues and whites, or a rich autumn palette with browns, oranges, and deep reds.
- Fabric Choices: Experiment with different types of jelly rolls – batiks for a vibrant, painterly look, or solids for a modern, minimalist aesthetic.
- Sashing and Cornerstones: Introduce sashing (strips of fabric between blocks) to give the eye a resting place and cornerstones for an added design element.
- Block Size: While jelly rolls yield a standard block size, you could adapt the cutting steps to create larger or smaller hourglass units if you’re using wider fabric strips.
- Quilting Designs: The quilting itself offers a huge opportunity for personalization. From intricate custom quilting to simple geometric lines, your quilting choices can dramatically alter the final feel of the quilt.
Conclusion: Your Beautiful Summer in the Park Quilt Awaits!
Congratulations! You’ve navigated the delightful journey of creating a “Summer in the Park” quilt using the wonderfully versatile jelly rolls. This project not only yields a stunning double hourglass quilt but also builds foundational quilting skills that will serve you well in future endeavors. From selecting your vibrant fabric strips to the satisfying final stitch of the binding, each step is a creative act that brings you closer to a beautiful, handmade treasure.
Whether you’re making this quilt for a cozy addition to your own home, a heartfelt gift for a loved one, or simply for the joy of creation, the “Summer in the Park” pattern is a testament to the fact that even complex-looking designs can be achieved with simple techniques. We hope this comprehensive guide has empowered you to embrace your inner quilter and find immense satisfaction in the process. Now, go forth and spread the joy of handmade quilts!