
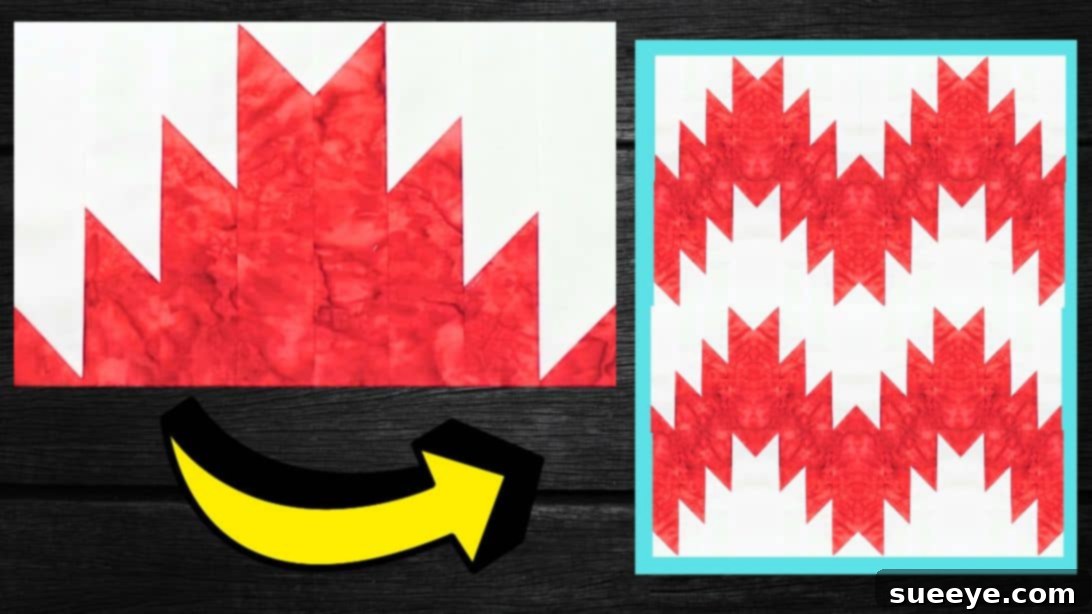
Mastering the Mountains Quilt Block: An Easy Tutorial for Beginners
Embark on your quilting journey with confidence! If you’re a beginner quilter searching for a rewarding and achievable project, the “Mountains Quilt Block” is an absolutely perfect choice. This design is not only visually striking but also incredibly straightforward to construct, allowing you to master fundamental quilting techniques without feeling overwhelmed. In this comprehensive tutorial, inspired by the clear instructions from quilting expert Carol Thelen on YouTube, you’ll learn how to create this beautiful block using just two contrasting fabrics. It’s a fantastic way to transform simple fabric squares into a dynamic and elegant design, proving that stunning results are well within reach for new enthusiasts.
The Mountains Quilt Block is celebrated for its distinctive geometric appeal, resembling a serene landscape of peaks and valleys. Its construction relies primarily on the versatile half-square triangle (HST) unit, a cornerstone of countless quilt patterns. By focusing on precision and careful pressing, you’ll find yourself able to complete a single block in surprisingly little time, building both your skills and your confidence with every stitch. Whether you’re aiming to create a beautiful throw quilt, a decorative wall hanging, or incorporate it into a larger project, this block offers endless possibilities. Let’s gather our supplies and dive into the art of quilting!
Materials and Tools for Your Mountains Quilt Block
Before we begin piecing together our magnificent Mountains Quilt Block, it’s crucial to assemble all the necessary materials and tools. Having everything at hand will ensure a smooth and enjoyable crafting experience. This project requires basic quilting supplies, making it accessible even if your stash isn’t extensive. Here’s a detailed list:
- Low-Volume Print Background Fabric: Choose a fabric with a subtle design or a solid light color. This fabric will form the “sky” or background of your mountain peaks and provide contrast to your main print. A “low-volume” print typically features understated patterns that blend rather than stand out, creating a harmonious backdrop.
- Print Fabric: Select a fabric with a more vibrant or distinct pattern that you want to highlight as your “mountains.” This could be a bold floral, a geometric print, or a rich solid color. The contrast between this fabric and your background fabric is key to making the mountain design pop. Consider coordinating colors or complementary shades for the best visual effect.
- Quilting Ruler: An essential tool for accurate cutting and marking. A clear acrylic ruler, ideally 6×12 inches or larger, with clear measurements and a non-slip grip, will be invaluable for precise straight lines and square-ups.
- Marking Pen, Pencil, or Chalk: You’ll need a tool to draw diagonal lines on your fabric. Options include a fabric marking pen (ensure it’s erasable or disappears with heat/water), a sharp pencil, or tailor’s chalk. Always test your marking tool on a scrap piece of fabric first to ensure it removes completely.
- Needle and Thread: For machine sewing, choose a good quality 50wt 100% cotton thread in a neutral color (like white, grey, or ecru) that blends with both your fabrics. Ensure your sewing machine needle is sharp and appropriate for quilting (e.g., a universal or microtex needle).
- Scissors or Rotary Cutter and a Cutting Mat: While fabric scissors work, a rotary cutter and a self-healing cutting mat are highly recommended for quilting. They allow for quick, precise, and straight cuts, which are vital for accurate piecing. A 45mm rotary cutter is a versatile choice for most quilting tasks.
- Iron, for pressing: A good iron is non-negotiable in quilting. Pressing seams correctly is as important as sewing them accurately. An iron with steam settings is ideal for crisp, flat seams that lie perfectly.
- Sewing Machine: Any basic sewing machine capable of sewing a consistent straight stitch will work. Ensure it’s in good working order, clean, and threaded correctly. A quarter-inch presser foot can be extremely helpful for achieving consistent seam allowances.
- Pattern: (Click here to download the pattern) This downloadable pattern will provide visual diagrams and any specific measurements or layout instructions that complement Carol Thelen’s video tutorial. Always refer to it for clarity.
With these materials ready, you’re well-equipped to embark on the creation of your beautiful Mountains Quilt Block. Attention to detail in gathering your supplies sets the stage for success in your quilting endeavors!
Step-by-Step Directions for Crafting Your Mountains Quilt Block
Now that your materials are organized, let’s dive into the exciting process of constructing the Mountains Quilt Block. Follow these detailed steps carefully, paying close attention to precision for the best results.
Step 1: Preparing and Marking Your Fabric Squares
The foundation of any successful quilt block lies in accurate cutting and marking. Begin by ensuring your fabrics are pre-washed and pressed flat to remove any sizing or wrinkles that could distort your measurements. This small step saves headaches later.
First, take your low-volume background fabric and your main print fabric. Cut both into 10-inch squares. If you prefer, you can use pre-cut 10-inch squares, commonly known as “layer cakes,” which are readily available at most fabric stores and can save you significant cutting time. Precision here is paramount: use your rotary cutter and quilting ruler to ensure each square is exactly 10×10 inches. Any slight inaccuracy can compound into misaligned seams later on.
Next, focus on your lighter, low-volume background fabric square. With your marking pen, pencil, or chalk, draw a single diagonal line from one corner to the opposite corner. This line will serve as a guide for your sewing. Make sure the line is visible but not too dark, especially if using a non-erasable pen. Lay this marked background fabric square on top of one of your print fabric squares, ensuring that their “right sides” (the pretty, patterned sides) are facing each other. Align all four edges perfectly, then secure the layers with a few pins to prevent shifting while you sew. This careful alignment is critical for creating perfectly sized half-square triangles.
Step 2: Creating and Sub-Cutting Half-Square Triangles (HSTs)
This step is where the magic of the Mountains Quilt Block truly begins, as we transform simple squares into dynamic half-square triangles (HSTs).
With your two fabric squares pinned together and the diagonal line marked on the top fabric, take them to your sewing machine. Instead of cutting along the line immediately, you will sew 1/4 inch seam allowances on both sides of the drawn diagonal line. Stitch a straight seam exactly 1/4 inch away from the diagonal line on one side, from corner to corner. Then, pivot your fabric and sew another straight seam exactly 1/4 inch away from the diagonal line on the other side, also from corner to corner. This method ensures robust seams and more stable HST units. After sewing these two lines, use your rotary cutter to cut the block directly along the original drawn diagonal line. You will now have two raw half-square triangle units.
Carefully separate these two units. Gently press the seams open or towards the darker fabric, depending on your preference (pressing open generally helps blocks lie flatter, reducing bulk at intersections). Once pressed, trim each HST unit to a consistent square size – typically 9.5 inches or the size required by your specific pattern. Trimming at this stage is crucial for accuracy. Use your quilting ruler to align a diagonal line on the ruler with the seam line of your HST to ensure it’s square before trimming all four sides to the correct dimension.
Now, with your perfectly trimmed HSTs, it’s time to create the “mountain” effect. Take one of your square HST units and measure it precisely. The pattern suggests re-cutting each HST into four equal sections. To do this, you will cut it horizontally and vertically. If your trimmed HST is 9.5 inches, you will make cuts at approximately 2-3/8 inches and 4-3/4 inches (if 9.5 is the *final* size after trimming to a perfect square, you would divide that by 2 for the center, and then divide again to get four equal sections). For a 9.5-inch square, you’d cut it in half both horizontally and vertically to get four smaller squares that are 4.75 x 4.75 inches. The original instruction suggests “2-3/8 inches,” which implies cutting smaller sections from a *smaller* initial HST or a different cutting method. Let’s assume you’re re-cutting to create smaller squares for the block’s intricate design. *Following the implied logic from Carol Thelen’s video and the typical “mountains” block, you will likely cut each 9.5-inch HST into four smaller squares by making one cut down the center horizontally and one cut down the center vertically, resulting in four 4.75″ squares.* Ensure these cuts are precise and equal. Repeat this process for the second HST unit as well. Now you will have a total of eight smaller square sections derived from your initial two HSTs.
Step 3: Assembling Your Mountains Quilt Block
With your smaller HST sections ready, it’s time to bring your Mountains Quilt Block to life through careful assembly. This step is like solving a puzzle, where each piece contributes to the overall design.
Lay out all eight of your newly cut HST sections on a flat surface, such as your cutting mat or design wall. Refer to the pattern diagram or Carol Thelen’s video for the precise arrangement. The “mountains” pattern typically involves rotating some sections so that the diagonal seam creates peaks and valleys. Take your time to arrange them until the mountain design is clearly visible and you are happy with the layout. This visualization step is crucial to avoid sewing pieces together incorrectly.
Once you have the desired layout, begin stitching the sections together one row at a time. For a 2×2 arrangement of the smaller squares (which is common for a single block from 2 HSTs), you’ll sew the two squares in the top row together, and then the two squares in the bottom row together. Use a consistent 1/4-inch seam allowance for all stitches. As you sew each seam, stop and press it immediately. Pressing after each seam helps to set the stitches and ensures your block remains flat and accurate. Consider “nesting” your seams (pressing seams in opposite directions when joining rows) to reduce bulk and achieve perfect points where seams meet.
After sewing the individual rows, press those seams again. Then, take your top row and your bottom row and align them carefully, matching up the seam intersections as precisely as possible. Pin generously at the intersections to ensure everything stays aligned, then sew these two rows together to complete your Mountains Quilt Block. Press this final seam open or to one side, ensuring the entire block lies flat and square.
Congratulations! You’ve just completed one beautiful Mountains Quilt Block. To create a full quilt, simply repeat these steps to make more blocks. You can create as many as you need to achieve your desired quilt size. Once you have a collection of blocks, you can arrange them according to the pattern’s full quilt diagram, or experiment with your own unique layout. Stitch these blocks together in rows, then stitch the rows together to form your quilt top. Finally, finish your quilt as desired by adding batting and backing, quilting the layers together, and binding the edges for a professional and durable finish. The versatility of this block means you can create a truly personalized and stunning quilt!
Tips for Quilting Success:
- Maintain a Scant 1/4-inch Seam Allowance: This is a cornerstone of accurate piecing. A “scant” 1/4 inch is just a thread’s width less than a true 1/4 inch. This small adjustment accounts for the thickness of the thread and the fold of the fabric, ensuring your finished block measurements are precise. Practice on scrap fabric to find your machine’s exact scant 1/4-inch.
- Pressing is Key: Always press your seams after each stitching step. Pressing doesn’t just flatten the fabric; it also “sets” the stitches, creating a crisp, professional finish. Avoid ironing back and forth, which can distort your fabric. Instead, lift and press.
- Pinning for Precision: Don’t underestimate the power of pins. Use them generously, especially when aligning multiple layers or matching up seam intersections. Pins prevent fabric from shifting, leading to more accurate points and aligned patterns.
- Take Your Time: Quilting is a journey, not a race. Especially as a beginner, allow yourself the time needed for each step. Rushing can lead to mistakes that are more time-consuming to fix. Enjoy the process!
We extend our sincere thanks to Carol Thelen via YouTube for her inspiring tutorial and all the wonderful images used here. Her clear instructions make this beautiful quilt block accessible to everyone. If you’ve enjoyed creating this Mountains Quilt Block, we highly encourage you to explore her other quilting videos. Her channel is a treasure trove of knowledge and creativity for quilters of all levels. Give her channel a visit and subscribe for more fantastic quilting projects and tips!
Conclusion: Your Journey to a Beautiful Quilt Begins Here
You’ve now learned how to construct the captivating Mountains Quilt Block, a design that looks complex but is wonderfully simple for beginners. This project not only yields a beautiful block but also hones essential quilting skills like accurate cutting, precise sewing of half-square triangles, and diligent pressing. These are the foundational techniques that will serve you well in all your future quilting endeavors. Remember, every master quilter started with a single stitch, and each block you create builds upon your growing expertise.
Don’t be afraid to experiment with different fabric combinations to create diverse landscapes for your mountains. A vibrant print against a cool blue background can evoke a sunny day, while deeper tones might suggest a dramatic sunset. The possibilities are endless, and the joy of quilting comes from bringing your unique vision to life. So, grab your fabrics, fire up your sewing machine, and embark on crafting a quilt that tells your own creative story. Happy quilting!