
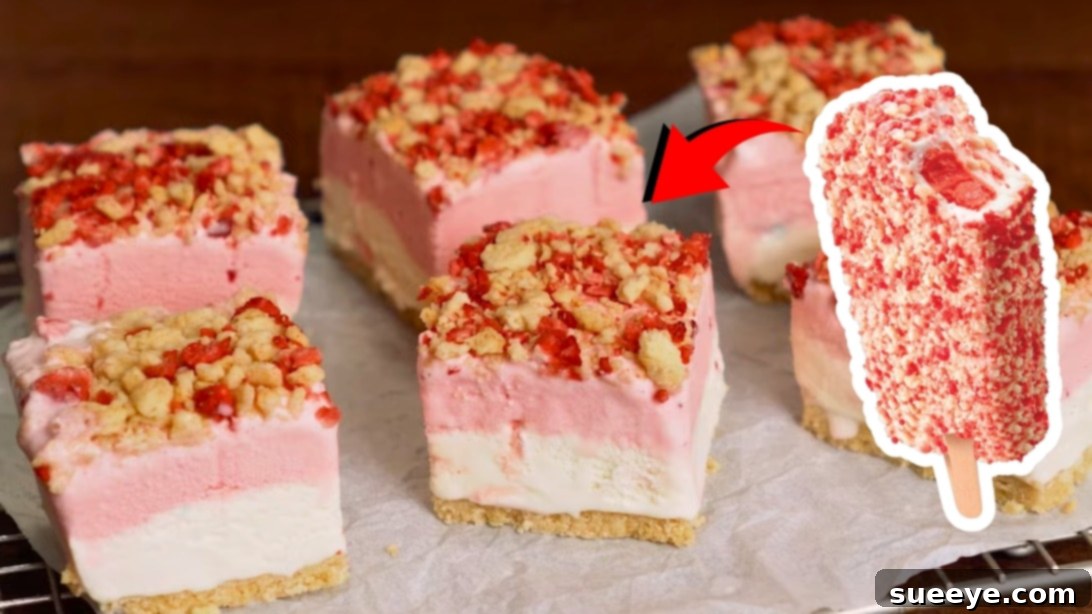
Good Humor Strawberry Shortcake Ice Cream Bars Copycat Recipe: Your Ultimate Homemade Frozen Treat!
Who can resist the delightful crunch and creamy sweetness of a Good Humor Strawberry Shortcake Ice Cream Bar? That nostalgic blend of tangy strawberry, smooth vanilla ice cream, and the iconic, crumbly shortcake coating holds a special place in many hearts. What if we told you that recreating this beloved frozen treat at home is not only possible but surprisingly easy and arguably even more delicious? Inspired by the brilliant recipe from Philip Lemoine on YouTube, this copycat recipe delivers all the classic flavors and textures you crave, right from your own kitchen. Prepare yourself for a wave of sweet nostalgia and a dessert that will disappear almost as quickly as you make it!
This recipe is designed to be straightforward and rewarding, allowing you to craft impressive, flavorful ice cream bars with minimal fuss. Forget the hunt for the ice cream truck; with a few simple ingredients and clear instructions, you’ll be enjoying fresh, homemade strawberry shortcake bars that boast a vibrant taste and perfect texture. Whether you’re planning a summer get-together, looking for a fun family activity, or simply craving a delicious cool-down treat, these homemade bars are an absolute must-try. Get ready to experience the joy of making (and devouring!) a truly iconic dessert.
Why Choose Homemade Strawberry Shortcake Ice Cream Bars?
While the original Good Humor bars are undeniably fantastic, making your own offers a host of benefits that elevate the experience from a simple snack to a truly special indulgence:
- Unmatched Freshness: When you make desserts at home, you control the quality and freshness of every ingredient. This translates to a more vibrant, authentic strawberry flavor and creamier ice cream layers that truly shine.
- Cost-Effective: Purchasing individual ice cream bars can quickly become expensive. This recipe yields a generous batch of bars, often at a fraction of the cost per serving, making it a budget-friendly way to satisfy your cravings.
- Customization to Your Heart’s Content: Love extra crumble? Prefer a specific brand of ice cream? Making it yourself means you can tweak the recipe to suit your exact preferences. Adjust the amount of crust, the thickness of the ice cream layers, or even experiment with different cookie types for the crumble.
- A Fun Activity for All Ages: The steps are simple enough that even younger family members can get involved, from crushing cookies to spreading ice cream. It’s a wonderful way to create delicious memories together in the kitchen.
- Ingredient Control: For those with dietary considerations, making your own allows you to select gluten-free cookies, dairy-free ice creams, or organic ingredients, ensuring everyone can enjoy this delightful treat.
Essential Ingredients for Your Perfect Copycat Bars
The magic of these bars comes from a short list of accessible ingredients that, when combined, create that unmistakable Good Humor flavor. Here’s what you’ll need, along with tips for selecting the best components:
- 1 Pack Golden Oreos (approx. 36 cookies): These vanilla sandwich cookies are the cornerstone of both the crust and the iconic topping crumble. Their subtle vanilla flavor and golden color perfectly replicate the shortcake element. If Golden Oreos are unavailable, vanilla wafers or other plain vanilla sandwich cookies can be substituted, though the flavor might vary slightly.
- 4 Tablespoons Melted Unsalted Butter: Butter is essential for binding the cookie crumbs into a firm, flavorful crust. Unsalted butter allows you to control the overall salt content, but if you only have salted, it will still work beautifully.
- 1 Pint High-Quality Strawberry Ice Cream: Choose a brand known for its natural fruit flavor and creamy texture. This layer delivers the crucial tangy-sweet strawberry essence. For an extra gourmet touch, consider using a premium or even homemade strawberry ice cream.
- 2 Pints High-Quality Vanilla Ice Cream: This provides the creamy, sweet foundation for your bars. Opt for a rich, full-bodied vanilla ice cream that complements the strawberry without overpowering it. Using two pints ensures a substantial and satisfying vanilla layer.
- Freeze-Dried Strawberry Slices: This is the secret ingredient for achieving the authentic strawberry-flavored crumble topping. Unlike fresh strawberries, freeze-dried ones offer an intense, concentrated flavor and a perfectly crisp texture when crushed, without adding excess moisture that could make the topping soggy. You can typically find them in the snack aisle or with other dried fruits at most grocery stores.
Pro Tip: Before you start assembling, take your ice cream out of the freezer and let it sit in the refrigerator for about 15-20 minutes (or at room temperature for 5-10 minutes). This softens it just enough to be easily spreadable, ensuring smooth, even layers without melting.
Tools and Equipment You’ll Need
Having your kitchen tools ready before you begin will make the process smooth and enjoyable. Here’s a checklist of the essential equipment for crafting your homemade ice cream bars:
- Food Processor: Your best friend for this recipe! It makes quick work of transforming Golden Oreos into fine crumbs for the crust and coarser crumbs for the topping.
- 9×9 Inch Square Baking Pan: This size is perfect for creating classic bar shapes. A similar rectangular pan (e.g., 8×12 inches) would also work, adjusting thickness slightly.
- Parchment Paper: Absolutely non-negotiable for easy removal of the frozen bars. Don’t skip this step!
- Offset Spatula or Regular Spatula: Ideal for smoothly spreading the ice cream layers and ensuring an even thickness.
- Drinking Glass with a Flat Bottom: Excellent for firmly pressing the cookie crust into the pan, ensuring it’s compact and sturdy.
- Zip-Lock Bag (Gallon Size): Useful for crushing the freeze-dried strawberries if you prefer not to use the food processor for a small amount.
- Rolling Pin or Meat Tenderizer: For crushing the freeze-dried strawberries in a zip-lock bag.
- Measuring Cups and Spoons: For accurate and consistent ingredient measurements.
- Sharp Knife: Essential for cleanly slicing the frozen bars into individual portions.
Step-by-Step Guide: Crafting Your Strawberry Shortcake Ice Cream Bars
Follow these detailed instructions carefully to ensure your homemade Good Humor copycat bars turn out perfectly:
Step 1: Prepare the Golden Oreo Crust Crumbs
Start by placing approximately 24 Golden Oreos (roughly two-thirds of a standard pack) into your food processor. Secure the lid and pulse the cookies until they are transformed into very fine, sand-like crumbs. The goal here is a uniform, powdery consistency, which will help create a solid and even crust base.
Step 2: Create the Buttery Oreo Crust Mixture
With the food processor still running (or in short pulses), slowly drizzle in the 4 tablespoons of melted butter. Continue to process for another 30 seconds to 1 minute, until the crumbs are thoroughly moistened and resemble wet sand. When you pinch a small amount, it should hold together. This butter mixture is what will bind your crust perfectly.
Step 3: Line Your Baking Pan for Effortless Removal
Take your 9×9 inch square baking pan and line it with parchment paper. It’s absolutely essential to leave a generous overhang of parchment paper on two opposite sides of the pan. These “handles” will be your lifesaver later, allowing you to easily lift the entire frozen block of ice cream bars out of the pan without any sticking or breakage.
Step 4: Press and Chill the Crust to Set
Evenly pour the buttery Golden Oreo crumbs into the bottom of the parchment-lined pan. Using a flat-bottomed drinking glass or a sturdy measuring cup, firmly press the crumb mixture across the entire base of the pan. Apply consistent pressure to create a compact, even crust layer. A well-pressed crust is crucial for the bars to hold their shape. Once pressed, transfer the pan to the freezer for at least 30 minutes. This chilling period is vital for the crust to firm up and solidify.
Step 5: Apply the Creamy Vanilla Ice Cream Layer
Once the crust is firm, remove the pan from the freezer. Take your two pints of slightly softened vanilla ice cream and evenly dollop them over the chilled crust. Using an offset spatula or the back of a spoon, gently and quickly spread the ice cream into a smooth, even layer that reaches all the way to the edges of the pan. Work efficiently to prevent the ice cream from melting excessively. Return the pan to the freezer for another 30 minutes to allow this vanilla layer to firm up completely.
Step 6: Add the Delicious Strawberry Ice Cream Layer
With the vanilla layer set, it’s time for the vibrant strawberry layer! Spread the softened pint of strawberry ice cream evenly over the vanilla layer. Again, use your spatula to create a smooth and consistent surface. Promptly place the pan back into the freezer while you prepare the irresistible crumble topping. This ensures all ice cream layers remain distinct and solid.
Step 7: Prepare the Coarse Golden Oreo Topping Crumbs
Now, to create the signature crunch! Place the remaining Golden Oreos (approximately 12 cookies) into your food processor. This time, pulse only until you achieve larger, coarse crumbs. The aim is for textural contrast – you want some discernible pieces, not a fine powder. If you prefer a very uniform topping, you can sift out any finer crumbs, but a mix of textures often adds to the charm.
Step 8: Make the Vibrant Freeze-Dried Strawberry Crumbs
Put the freeze-dried strawberry slices into a sturdy zip-lock bag. Seal the bag, pressing out as much air as possible. Using a rolling pin, the bottom of a heavy pan, or a meat tenderizer, gently yet firmly crush the strawberries until they break down into vibrant red, coarse crumbs. You could also briefly pulse them in a clean food processor if preferred, but be cautious not to over-process them into a fine dust.
Step 9: Assemble the Topping and Freeze for the Final Set
Retrieve the pan from the freezer. Evenly sprinkle the coarse Golden Oreo crumbs and the freeze-dried strawberry crumbs over the top of the strawberry ice cream layer. You can gently press them down lightly to help them adhere, but avoid compacting them too much. Once topped, return the pan to the freezer for at least 30 minutes, or ideally, overnight. An overnight chill is highly recommended for the bars to become completely firm, making them much easier to slice cleanly without melting.
Step 10: Slice, Serve, and Enjoy Your Masterpiece!
Once the bars are thoroughly frozen (preferably after an overnight chill), use the parchment paper overhangs to carefully lift the entire slab of ice cream out of the pan and transfer it to a cutting board. For clean, sharp slices, dip a long, sharp knife under hot water, wipe it dry, and then make your cuts. Re-warm and wipe the knife between each slice to prevent sticking and achieve perfect, smooth edges. Serve immediately and relish every delightful bite of your homemade Good Humor Strawberry Shortcake Ice Cream Bars!
Expert Tips for Making Perfect Homemade Ice Cream Bars
To ensure your copycat Good Humor Strawberry Shortcake Ice Cream Bars are consistently perfect, keep these essential tips in mind:
- Achieve the Right Ice Cream Softness: This is paramount. Ice cream should be soft enough to spread easily but not melted or soupy. Refrigerating for 15-20 minutes usually does the trick. Too hard, and it will be difficult to spread evenly; too soft, and layers will meld.
- Ensure Even Layers: Strive for consistency in the thickness of each ice cream layer. This not only makes the bars visually appealing but also ensures a balanced flavor profile in every bite.
- Don’t Rush the Chilling Process: Patience is key! Adequate freezing time between layers is crucial to prevent them from bleeding into each other. The final, longer chill ensures the bars are firm enough for clean slicing.
- Parchment Paper is Your Best Friend: Seriously, do not skip lining the pan with parchment paper and leaving an overhang. It’s the easiest way to remove the entire block without damage.
- Warm Knife for Clean Slices: For professional-looking bars, dip your sharp knife into hot water and wipe it dry before each cut. This creates a clean edge and prevents the ice cream from sticking and tearing.
- Work Efficiently: When handling the ice cream layers, especially during spreading, work quickly to minimize melting. Have all your tools and the next layer ready to go.
- Crumb Texture Matters: For the crust, aim for fine, sand-like crumbs. For the topping, go for coarser crumbs to provide that signature textural contrast.
Delicious Variations and Customizations for Your Bars
While the classic strawberry shortcake flavor is unbeatable, don’t hesitate to get creative and personalize your homemade ice cream bars! Here are some ideas to inspire your culinary adventures:
- Flavor Swaps for Ice Cream:
- Chocolate & Raspberry: Use chocolate Oreos for the crust/topping, with a layer of chocolate ice cream and a layer of raspberry ice cream.
- Mint Chocolate Chip Delight: Pair chocolate Oreos with a mint chocolate chip layer and a vanilla layer.
- Tropical Twist: Experiment with mango or passion fruit ice cream combined with coconut flakes in the topping.
- Peanut Butter Perfection: Use chocolate Oreos, peanut butter ice cream, and a vanilla layer, perhaps with crushed peanuts in the topping.
- Alternative Cookie Crusts and Toppings:
- Graham Cracker Crust: A traditional choice for frozen desserts, offering a slightly different flavor profile.
- Vanilla Wafers: Crushed Nilla Wafers can provide a similar, mild vanilla flavor.
- Shortbread Cookies: Crushed shortbread adds a rich, buttery depth to the crust and topping.
- Gluten-Free Option: Use gluten-free vanilla sandwich cookies or gluten-free graham crackers to accommodate dietary needs.
- Enhancements and Added Delights:
- White Chocolate Drizzle: Melt some white chocolate and drizzle it over the bars before their final freeze for an extra touch of decadence.
- Fresh Berry Garnish: While freeze-dried berries are for the topping, a few fresh strawberry slices or whole berries on the side make for a beautiful presentation when serving.
- Sprinkles: Add colorful sprinkles to the topping for a festive look, especially for celebrations.
- Toasted Coconut: Lightly toasted shredded coconut can add a lovely texture and nutty flavor to the crumble topping.
- Different Serving Shapes:
- Individual Cups: Press the crust into the bottom of muffin liners or small ramekins, layer the ice cream, and top with crumble for single-serve portions.
- Ice Cream Cake: Double the recipe and use a larger round springform pan to create an impressive ice cream cake perfect for birthdays or larger gatherings.
Storage and Make-Ahead Tips for Maximum Enjoyment
These homemade ice cream bars are not only delicious but also perfect for making in advance, ensuring you always have a delightful treat on hand:
- Proper Storage: Once the bars are sliced, it’s crucial to store them correctly to maintain their freshness and prevent freezer burn. Wrap each individual bar tightly in plastic wrap or parchment paper, then place them in an airtight freezer-safe container. This double protection is key.
- Freezer Life: When properly stored, your homemade Strawberry Shortcake Ice Cream Bars will remain fresh and delicious in the freezer for up to 2-3 weeks. Beyond this period, while still safe to eat, the texture and quality might start to decline slightly.
- Excellent Make-Ahead Dessert: This recipe is ideal for party planning or simply having a convenient dessert ready to go. You can assemble the entire pan of bars several days in advance, allowing you to simply pull them out, slice, and serve when guests arrive or when a craving strikes.
- Batch Preparation: Consider making a larger batch if you have a big family or entertain frequently. Having a stash of these delightful bars means you’re always prepared for unexpected guests or a spontaneous treat moment.
Frequently Asked Questions About Homemade Ice Cream Bars
- Can I use fresh strawberries instead of freeze-dried for the topping?
- While fresh strawberries are wonderful, they contain a high water content. Using them in the crumble topping would introduce moisture, which would make the cookie crumbs soggy and potentially lead to undesirable ice crystals in your frozen topping. Freeze-dried strawberries are specifically chosen for their intense flavor and dry, crisp texture, which is essential for the iconic shortcake crumble effect.
- My ice cream is too hard to spread. What should I do?
- If your ice cream is rock-solid, place it in the refrigerator for 15-20 minutes to allow it to soften to a spreadable consistency. Alternatively, you can microwave it on a very low power setting for short bursts (5-10 seconds at a time), stirring between each burst, until it’s pliable but not fully melted. Be careful not to over-melt it!
- How can I prevent the ice cream layers from mixing?
- The key to distinct layers is proper chilling between each step. Ensure that each ice cream layer is firm and well-frozen before adding the next one. Working quickly when spreading also helps prevent the underlying layer from softening too much.
- What if I don’t have a food processor?
- No problem! You can still make this recipe. Place the Golden Oreos in a sturdy zip-lock bag, press out the air, and then crush them with a rolling pin, a meat tenderizer, or the bottom of a heavy pot until you achieve the desired crumb consistency. It might require a bit more arm work, but the results will be just as delicious!
- Can I make this recipe dairy-free?
- Absolutely! Many brands now offer excellent dairy-free vanilla and strawberry ice creams made from almond, oat, or coconut milk. You’ll also need to ensure your Golden Oreos (or your chosen alternative cookie) are dairy-free to make the entire recipe suitable for a dairy-free diet.
Strawberry Shortcake Ice Cream Bars: Your New Go-To Frozen Dessert!
And there you have it – your comprehensive guide to recreating the iconic Good Humor Strawberry Shortcake Ice Cream Bars right in your own home! From the satisfying crunch of the Golden Oreo crust to the luscious layers of vanilla and strawberry ice cream, all crowned with that vibrant, sweet-tart berry crumble, every element of this treat is designed to delight. This recipe proves that homemade can truly surpass store-bought, offering a fresh, customizable, and incredibly delicious experience.
Whether you’re sharing them with friends and family on a warm summer day, preparing a special party dessert, or simply indulging in a quiet moment of pure bliss, these bars are guaranteed to bring smiles. So, don’t hesitate! Gather your ingredients, follow these easy steps, and prepare to savor the magic of homemade goodness. Enjoy the process, relish the flavors, and create new, delicious memories, one perfect Strawberry Shortcake Ice Cream Bar at a time!