
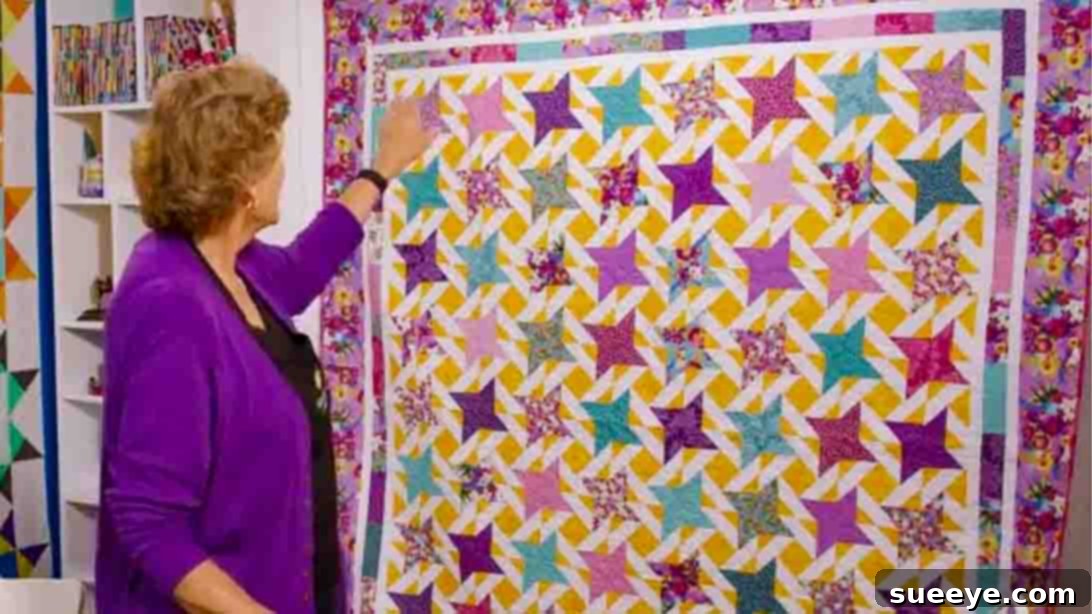
Master the Fancy Friends Quilt: A Comprehensive Guide for All Skill Levels
Embark on a delightful quilting journey with the captivating Fancy Friends Quilt pattern. This design, famously showcased by Missouri Star on YouTube, might initially appear intricate, but it is surprisingly straightforward and incredibly rewarding to create. Whether you’re a seasoned quilter or taking your very first stitches, this pattern offers an accessible path to crafting a truly stunning piece. Its geometric charm beautifully highlights bright, cheerful fabrics, making it an ideal project to infuse vibrancy and warmth into any space. Join us as we explore the steps to bring this gorgeous quilt to life, transforming simple fabric strips into a masterpiece of textile art.
Why Choose the Fancy Friends Quilt?
The Fancy Friends Quilt stands out as a beloved pattern for several compelling reasons. Its unique layout creates an illusion of complexity, yet relies on fundamental quilting techniques, making it incredibly satisfying for quilters of all experience levels. For beginners, it’s an excellent opportunity to practice precise cutting, accurate seam allowances, and careful pressing – foundational skills that will serve you well in all future projects. Experienced quilters will appreciate the speed and versatility of the pattern, allowing for endless creative interpretations with different fabric collections. The design’s adaptability means it can be customized to suit any decor, from modern minimalist to cozy farmhouse, simply by selecting a new color palette or print style. Beyond its aesthetic appeal, the process of quilt making itself is a meditative and fulfilling endeavor, connecting you to a rich tradition of craftsmanship.
Essential Materials for Your Fancy Friends Quilt Project
Before diving into the creation of your Fancy Friends Quilt, gathering all the necessary materials is crucial for a smooth and enjoyable process. This quilt utilizes pre-cut fabric strips, often referred to as “jelly rolls,” which significantly simplify the cutting phase and speed up assembly. Precision is key in quilting, so investing in quality tools and fabrics will greatly enhance your experience and the final outcome of your quilt. Below is a detailed list of what you’ll need, along with some insights into fabric selection.
- 1 Roll of 2 1/2″ Print Strips: This collection of pre-cut strips will form the vibrant core of your quilt blocks and can even extend into a pieced border for added visual interest. Opt for a roll with a cohesive color story or a diverse range of prints that you find appealing.
- 2 3/4 Yards of Accent Fabric: The accent fabric provides definition and contrast within your blocks. Choose a color that complements or strikingly contrasts with your print strips, making the intricate block design truly pop.
- 4 1/2 Yards of Background Fabric: This fabric forms the foundation of your blocks and will also be used for inner and middle borders. A solid, neutral color often works best for the background, allowing your print and accent fabrics to shine. However, a subtle tone-on-tone print can also add texture without overwhelming the design.
- 1 1/2 Yards of Outer Border Fabric: The outer border frames your entire quilt, giving it a finished and polished look. Select a fabric that ties all the other elements together or provides a bold final statement.
- 3/4 Yard of Binding Fabric: The binding fabric wraps around the raw edges of your quilt, protecting them and adding another decorative touch. It can match one of your quilt’s prominent colors or introduce a new coordinating shade.
- 8 1/2 Yards of Backing Fabric: The backing fabric forms the underside of your quilt. This is an opportunity to use a wide-back fabric or piece together standard width fabrics for a creative and cozy reverse side.
Beyond these fabric requirements, ensure you have basic quilting supplies on hand, including a rotary cutter, cutting mat, quilting ruler, sewing machine, thread, scissors, and an iron. For a complimentary and comprehensive guide to this beautiful project, remember to click here for the free pattern PDF.
Step-by-Step Fancy Friends Quilt Directions
Crafting the Fancy Friends Quilt involves a series of precise yet manageable steps. The key to a professional-looking finish lies in consistent seam allowances and careful pressing. Take your time with each stage, and you’ll be amazed at how easily these stunning blocks come together.
Step 1: Crafting the Friendship Star Units
The first step focuses on creating the foundational units that will eventually form the iconic friendship star within your blocks. Precision in cutting and sewing here will set the stage for perfectly aligned blocks.
- Prepare Your Print Strips: Begin by selecting one strip from your 2 1/2-inch roll. Fold this strip in half lengthwise to make it easier to cut. From this folded strip, carefully cut four individual pieces, each measuring 4 1/2 inches by 2 1/2 inches. These will serve as the central components of your friendship star units.
- Add Accent Corners: Take one of the 4 1/2″ x 2 1/2″ print strips. Place a 2 1/2-inch square of your accent fabric onto one of the top corners of the strip. It’s crucial to pay attention to the orientation here; ensure the square is placed in a consistent direction across all four strips. For instance, if you place it on the top-right corner, maintain this for all four pieces.
- Sew and Trim: With the accent square correctly positioned, sew a diagonal seam from corner to corner, moving from right to left across the accent square. Once sewn, carefully trim the excess fabric, leaving a 1/4-inch seam allowance. This creates a neat, finished edge.
- Press Open: After trimming, press the seam open to flatten the fabric. Pressing towards the darker fabric is a common practice, but for these units, pressing open helps to reduce bulk and create a flatter, more accurate block when assembled later. Repeat this process for all four of your 4 1/2″ x 2 1/2″ print strips, ensuring each has an accent square sewn and pressed into one corner. Keep one completed unit near you as a visual guide for consistency.
- Prepare Background Fabric Pieces: Next, turn your attention to the background fabric. From this, cut four pieces, each measuring 2 1/2 inches by 4 1/2 inches. These will form the rectangular segments that connect your friendship star points.
- Prepare Accent Fabric Squares: Finally, cut eight 2 1/2-inch squares from your accent fabric. These smaller squares will be used to create the corner “flying geese” like units in the next step, completing the star’s points.
Step 2: Assembling the Accent Blocks and Main Units
This stage brings together the background and accent fabrics to form the corner units of your larger quilt block, and then combines them with your friendship star units.
- Create Accent Corner Units: Take one of the 2 1/2-inch by 4 1/2-inch background pieces. Place a 2 1/2-inch accent square on each of the top corners. Unlike the previous step where you sewed from right to left, for these pieces, sew your diagonal seam from corner to corner, from left to right. This deliberate reversal creates the mirrored effect needed for the block’s symmetry.
- Sew and Trim Accent Corners: Sew both accent squares onto the top corners of all your background pieces in this manner. After sewing, trim the excess fabric, maintaining a 1/4-inch seam allowance, and press the seams open for a flat finish.
- Mirror the Process for Bottom Corners: Now, for the bottom corners of these same background pieces, repeat the exact same process (placing accent squares and sewing from left to right, then trimming and pressing). This will result in background rectangles with accent squares sewn onto all four corners, effectively creating four small “flying geese” units.
- Repeat for All Pieces: Continue this process until you have all the necessary background pieces transformed into these accent-cornered units. Consistency is key here to ensure all your blocks will fit together perfectly.
- Lay Out Your Block: Once all individual units are prepared, it’s time to visualize and assemble the larger block. Arrange your components: place one of your friendship star strips (from Step 1) in the center. On each side of this central strip, position one of the accent-cornered background blocks you just created. Refer to the visual aid provided in the image below for precise placement.
- Sew Units Together: Begin by sewing the central friendship star strip to the accent block on one side. Press the seam open. Then, turn this combined unit around and sew the other accent block to the remaining side of the friendship star strip. Again, press the seam open. This forms a single, larger unit comprising a friendship star flanked by accent blocks.
- Complete the Friendship Star Block: To complete the full “friendship star with accent block,” you will need two more of these larger units. Arrange and sew them in a similar fashion, creating a nine-patch layout where the central “friendship star” element is surrounded by accent blocks. The diagram below illustrates this assembly clearly.
- Create Additional Blocks: Once you’ve successfully completed one full Fancy Friends quilt block, repeat the entire process from Step 1 and Step 2 to create as many blocks as needed to achieve your desired quilt size. Remember, consistent seam allowances throughout will make the final assembly much smoother.
General Quilting Tips for Success
Achieving a beautiful, durable quilt goes beyond just following instructions. Here are some invaluable tips to enhance your quilting journey:
- Press, Don’t Iron: When quilting, “pressing” involves lifting and placing the iron, rather than sliding it. This prevents distorting your fabric pieces and keeps your blocks square.
- Consistent Seam Allowance: A perfect 1/4-inch seam allowance is the quilter’s best friend. Practice on scraps to ensure your seams are consistently accurate. This is crucial for blocks to fit together without stretching or pulling.
- Chain Piecing: To save time and thread when sewing multiple identical units, use chain piecing. Sew one unit, then feed the next unit directly under the needle without lifting the presser foot or cutting the thread.
- Squaring Up Blocks: After assembling each block, use a rotary cutter and a square-up ruler to trim it to its final, precise dimensions. This ensures all your blocks are the same size, making it much easier to piece your quilt top together.
- Quality Thread: Use a good quality 100% cotton thread that matches the weight of your quilting cotton. This will result in stronger, more durable seams.
- Take Breaks: Quilting can be intricate, and sometimes stepping away from your machine for a few minutes can help you approach a challenging step with fresh eyes.
Finishing Your Quilt: Borders, Binding, and Backing
Once you’ve created all your Fancy Friends Quilt blocks and sewn them together into a beautiful quilt top, the journey isn’t quite over! The next steps involve adding borders, preparing the backing, quilting, and finally, binding your masterpiece.
Adding Borders
Borders frame your quilt top, providing a visual resting place for the eyes and often helping to square up the quilt. The Fancy Friends Quilt pattern suggests inner, middle, and outer borders, allowing for a layered and sophisticated look. Carefully measure your quilt top through the center, both horizontally and vertically, to determine the precise length of your border strips. Attach the inner border first, then the middle, and finally the outer border, pressing seams after each addition. This multi-layered border approach adds depth and a professional finish to your quilt.
Preparing the Backing and Quilting
The backing fabric provides the reverse side of your quilt. If using standard width fabric, you’ll need to piece together multiple lengths to create a backing large enough to extend several inches beyond your quilt top on all sides. Once your backing is prepared, you’ll create a “quilt sandwich” by layering the backing fabric (wrong side up), a layer of batting, and finally your quilt top (right side up). This sandwich is then secured, often by basting, to prevent shifting during the quilting process. Quilting – the act of stitching through all three layers – can be done by hand or machine. Simple straight lines following the seams or a decorative free-motion design can add texture and durability to your quilt, holding the layers together.
Binding Your Quilt
The final step is to bind your quilt. The binding encloses the raw edges of your quilt sandwich, providing a clean, durable, and attractive finish. Prepare your binding strips by cutting them to the specified width and length, then sew them together to form one continuous strip. Attach this strip to the front edge of your quilt, then fold it over to the back and either hand-stitch or machine-stitch it in place. The binding is an opportunity to add a final pop of color or a subtle frame that perfectly complements your Fancy Friends Quilt.
Your Fancy Friends Quilt: A Masterpiece Awaits!
Congratulations! You’ve navigated the steps to create a stunning Fancy Friends Quilt. From selecting vibrant fabrics to meticulously piecing each block, you’ve witnessed the transformation of simple materials into a beautiful, functional work of art. This pattern, with its deceptive simplicity and striking visual impact, is a testament to the joy and creativity inherent in quilting. Whether this is your first quilt or your fiftieth, the sense of accomplishment in finishing such a beautiful project is truly unmatched. We encourage you to display your Fancy Friends Quilt proudly, cherish it, and perhaps even inspire others to embark on their own quilting adventures. Share your creations, experiment with different fabric combinations, and continue to explore the wonderful world of quilting!