
Master the Art of Homemade Microwave Potato Bags: A Beginner-Friendly Sewing Guide
For many, the simple joy of a perfectly baked potato—fluffy on the inside, wonderfully tender, and ready to be loaded with your favorite toppings—is an unparalleled comfort food experience. However, achieving this culinary delight often requires a significant time investment when using a traditional oven. What if we told you there’s a quick, convenient, and incredibly easy way to enjoy delicious, fluffy baked potatoes in mere minutes? Enter the humble yet ingenious microwave potato bag!
This simple sewing project is a game-changer for anyone who loves potatoes but lacks the time for conventional baking. Imagine tossing a few spuds into a specially designed fabric bag, popping it into the microwave, and in as little as 4 to 8 minutes, having perfectly cooked potatoes ready to serve. It’s not just about speed; these bags also help retain moisture, ensuring your potatoes are never dry or rubbery.
If you’re new to sewing, don’t fret! This guide provides a beginner-friendly approach to crafting your very own microwave potato bag, inspired by Caroline Dunn’s excellent YouTube tutorial. It’s a satisfying project that requires minimal materials and can be completed in an afternoon. Get ready to impress yourself and your family with homemade efficiency and delicious results!
Why Craft Your Own Microwave Potato Bag? Unlocking the Benefits
While commercially available microwave potato bags exist, making your own offers a wealth of advantages:
- Cost-Effectiveness: Save money by using readily available fabrics and a few basic sewing supplies you might already own.
- Customization: Choose your favorite colors, patterns, and designs to match your kitchen decor or personal style. The creative possibilities are endless!
- Quality Control: Ensure your bag is made from 100% cotton, which is crucial for microwave safety and optimal performance. You’ll have peace of mind knowing exactly what materials are in contact with your food.
- Eco-Friendly Choice: Reduce waste by opting for reusable, washable bags instead of disposable alternatives or energy-intensive oven baking.
- Personal Satisfaction: There’s a unique sense of accomplishment in using something you’ve made with your own hands. Plus, these bags make fantastic handmade gifts!
- Perfectly Cooked Potatoes Every Time: The cotton fabric traps steam, creating an ideal environment for potatoes to cook evenly and thoroughly, resulting in a wonderfully soft and fluffy interior.
Essential Materials for Your DIY Microwave Potato Bag Project
Before you dive into the sewing process, gathering all your materials is key to a smooth and enjoyable experience. The most critical aspect is ensuring all fabrics and batting are 100% cotton. This is paramount for microwave safety, as synthetic materials can melt or even catch fire when exposed to high heat. Always double-check labels!
- 100% Cotton Batting: This forms the insulating core of your bag, helping to trap steam and cook potatoes evenly. Look for “Warm & Natural” or similar 100% cotton quilt batting. Avoid polyester batting.
- 100% Cotton Fabric for the Exterior: This is the outer layer of your bag, where you can express your style with various prints and colors. Pre-wash and iron your fabric to prevent shrinking after your bag is complete.
- 100% Cotton Fabric for the Interior (Lining): Often referred to as “muslin” or a coordinating plain cotton, this fabric will be the direct contact layer for your potatoes. Again, pre-wash is recommended.
- Rotary Cutting Set (Cutter, Mat, Ruler): While scissors can be used, a rotary cutter, self-healing mat, and a long clear ruler provide unparalleled precision and speed for cutting fabric squares and rectangles.
- Fabric Scissors: Sharp scissors are essential for clean cuts, especially if you’re not using a rotary cutter. Keep a separate pair for fabric only!
- Pins or Fabric Clips: To hold your fabric layers securely in place while sewing, preventing shifting.
- Ruler: A standard sewing ruler or measuring tape will be needed for accurate measurements.
- Coordinating 100% Cotton Thread: Choose a thread color that blends well with your exterior fabric. Ensure it’s good quality and 100% cotton for microwave safety.
- Sewing Machine: A basic sewing machine is all you need for this project. Make sure it’s threaded correctly and in good working order.
Step-by-Step Guide: Crafting Your Microwave Potato Bag
Follow these detailed instructions to create a durable and functional microwave potato bag. Take your time with each step, and don’t be afraid to pause and re-read if anything is unclear.
Step 1: Preparing and Layering Your Fabrics
Precision in cutting is the foundation of a well-made sewing project. Using your ruler and rotary cutter (or sharp fabric scissors), carefully cut your materials to the specified dimensions. The main body of the potato bag will be a single large piece, which is later folded to form the bag.
- Cut Your Batting: Begin by cutting your 100% cotton batting to a precise measurement of 20 inches by 12 inches. This size is ideal for cooking multiple potatoes.
- Cut Your Main Fabrics: Next, cut both your exterior (decorative) 100% cotton fabric and your interior (lining) 100% cotton fabric to the exact same dimensions: 20 inches by 12 inches. Remember to pre-wash and iron all your cotton fabrics before cutting to prevent future shrinkage.
- Prepare the Hanging Loop Fabric: Cut a smaller piece of your exterior or a coordinating 100% cotton fabric measuring 6 inches by 2 inches. This piece will be fashioned into a convenient loop for hanging your bag.
- Layer Your Materials: Now, it’s time to assemble your layers. On a flat work surface, lay down your batting first. This forms the base.
- Add the Lining: Place your interior lining fabric directly on top of the batting, with the right side (the side you want to see on the inside of the bag) facing up.
- Position the Exterior Fabric: Finally, place your exterior fabric on top of the lining fabric, but this time with the right side facing down. You should now have a stack: Batting (bottom) > Lining (right side up) > Exterior (right side down). The “wrong” sides of the lining and exterior fabrics should be facing each other.
- Secure with Pins: Carefully align all three layers, ensuring the edges are flush. Secure the layers together by placing pins perpendicular to the edges, about an inch from the edge and a few inches apart. This will prevent shifting during sewing.
- Sew the Short Ends: Take your pinned fabric stack to the sewing machine. Using a 1/4-inch seam allowance, sew along both of the short 12-inch ends. Backstitch at the beginning and end of each seam to secure the stitches. Leave the long sides unsewn for now.
- Turn Right Side Out: Once both short ends are sewn, carefully reach into the opening (between the lining and exterior fabrics along the long unsewn sides) and pull the entire piece right side out. Gently push out the corners to make them crisp. You should now have a neat rectangle with the batting enclosed between the two cotton fabrics.
Step 2: Adding Topstitching and the Convenient Hanging Loop
With the main fabric panel turned right side out, you’ll now add a professional finish and incorporate a practical hanging loop, making your potato bag even more functional.
- Apply Topstitching to Short Sides: Press the newly turned short ends flat. Go back to your sewing machine and sew a 1/4-inch topstitch along both of these short ends. Topstitching not only provides a neat, finished look but also helps to keep the layers stable and flat, ensuring the batting doesn’t shift over time.
- Construct the Hanging Loop: Take the 6 x 2-inch fabric piece you cut earlier. Fold it in half lengthwise, with the right sides of the fabric facing each other and the raw edges aligned. Pin it securely. Sew along the long raw edge using a 1/4-inch seam allowance, creating a tube. Remember to leave a small gap (about 1-2 inches) in the middle of the seam. This gap is crucial for turning the loop right side out.
- Turn the Loop Right Side Out: Trim the seam allowance of the loop, especially at the corners, to reduce bulk. Carefully turn the fabric tube right side out through the gap you left. You can use a safety pin or a turning tool to help with this. Once turned, press the loop flat, making sure the raw edges of the opening are neatly tucked inside. You now have a finished loop.
- Prepare to Attach the Loop to the Potato Bag: Lay your main potato bag piece flat, with the exterior fabric facing up. Measure down approximately 3 inches from one of the short ends (the top edge that will become the opening of the bag). This is where your loop will be inserted.
- Position and Secure the Loop: Take your finished loop and fold it in half. Insert the raw ends of the loop (where the opening was) into the main potato bag piece, centering it at the 3-inch mark you just made. The loop should be placed between the exterior and lining fabrics, with its folded (finished) edge pointing inwards towards the center of the bag. Pin it securely in place, making sure it’s firmly held within the layers.
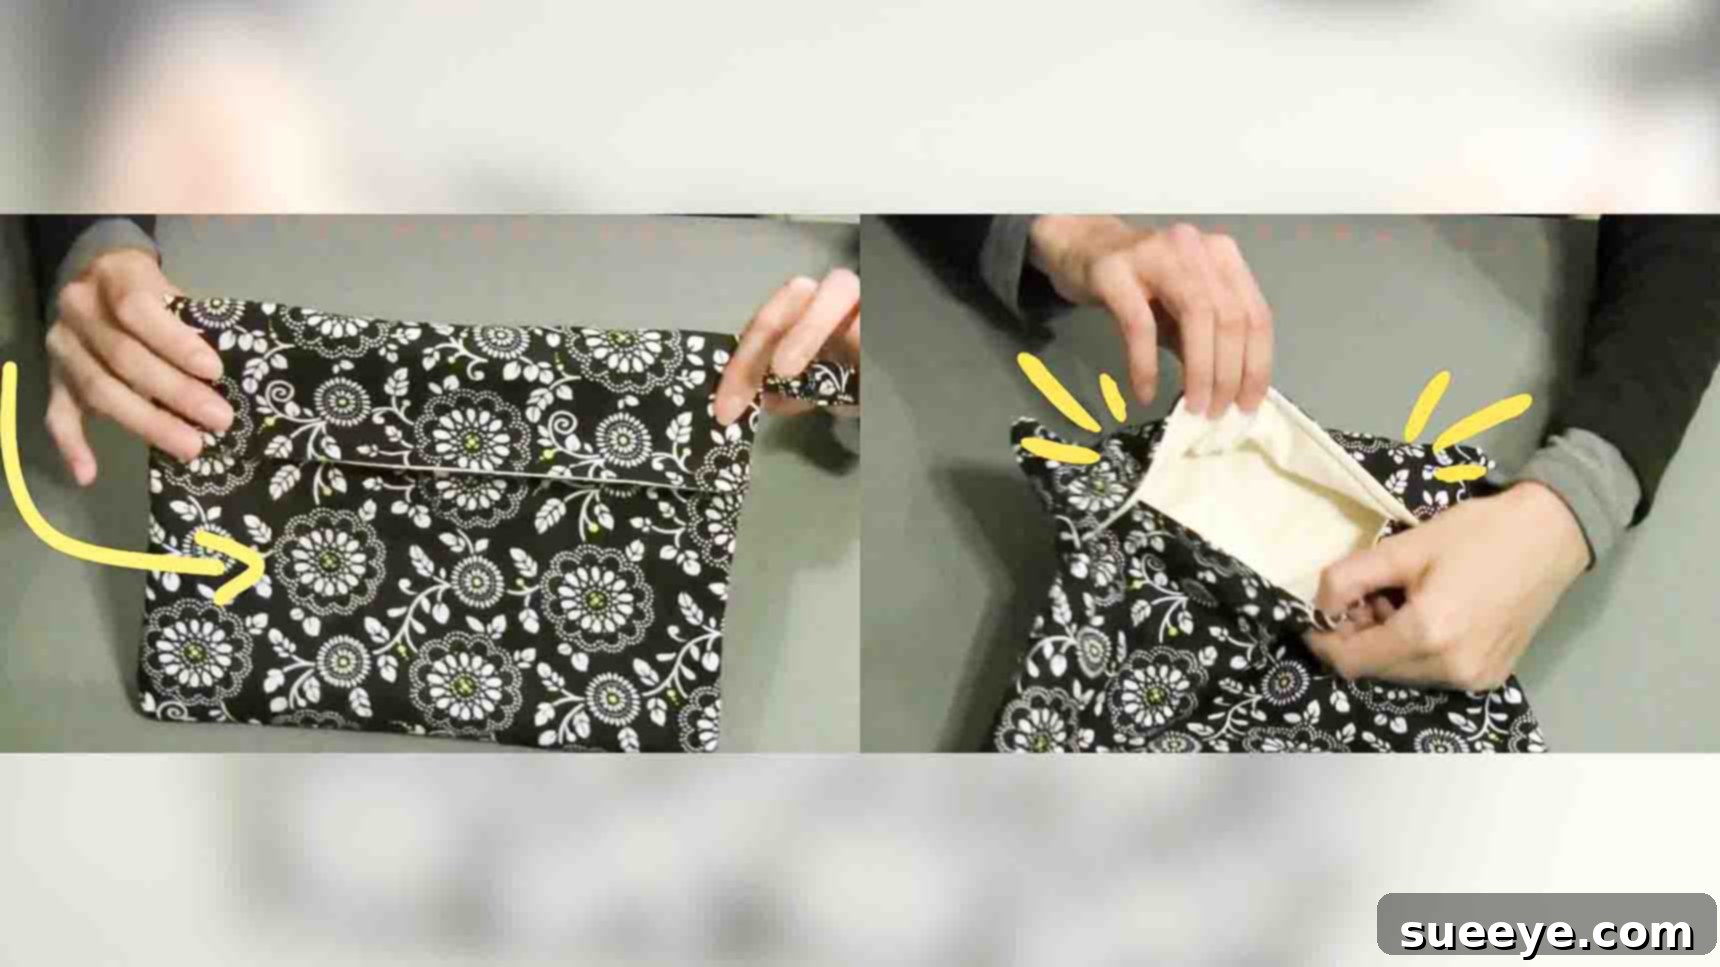
- Fold and Overlap the Bag: Now, take the entire potato bag piece and fold it in half, aligning the two short ends. The fabric will naturally form a rectangle. Next, slightly pull up one side so that it overlaps the shorter fold by about 1.2 inches. This overlap creates the opening and closure of your bag. Pin this overlap securely along the long raw edges.
- Sew the Long Sides: With the loop carefully pinned inside and the overlap secured, take the entire assembly to your sewing machine. Sew down both of the long raw sides of the folded bag using a 1/4-inch seam allowance. Start at one end, backstitch, sew all the way to the other end, and backstitch again. Be sure to catch all layers, including the loop’s ends.
- Final Turn and Reveal: Carefully trim the corners to reduce bulk. Reach inside the bag and turn it right side out. Push out the corners, and marvel at your completed microwave potato bag!
Tips for Success: Achieving the Perfect Potato Bag and Beyond
To ensure your sewing project goes smoothly and your microwave potato bag is durable and functions beautifully, keep these expert tips in mind:
- Pre-Wash Your Fabrics: Always wash and dry your 100% cotton fabrics before cutting and sewing. This preshrinks the material, preventing your finished bag from shrinking unevenly after its first wash.
- Ironing is Your Friend: Pressing your fabric flat before cutting, and pressing seams open or to one side after sewing, makes a huge difference in the neatness and professionalism of your finished product.
- Check Your Seam Allowance: A consistent 1/4-inch seam allowance is crucial for this project. Practice on scrap fabric if you’re unsure. A magnetic seam guide on your machine can be very helpful.
- Use a Longer Stitch Length: For general construction seams, a stitch length of 2.5mm to 3.0mm is usually appropriate for cotton fabrics. For topstitching, a slightly longer stitch (e.g., 3.0mm to 3.5mm) can give a more decorative and pronounced look.
- Double-Check Material Labels: We cannot stress this enough – ensure *all* materials (fabric, batting, and thread) are 100% cotton. Synthetics can melt, fuse, or even ignite in the microwave. This is a critical safety consideration.
- Test Your Machine: Before starting on your actual project, always do a quick test stitch on a scrap piece of your chosen fabric. This helps you check tension settings and ensures your machine is running smoothly.
- Take Your Time: Rushing can lead to mistakes. Sewing should be an enjoyable process. If you feel frustrated, take a break!
Caring for Your Homemade Microwave Potato Bag
To extend the life of your beautifully crafted potato bag and keep it hygienic, proper care is essential:
- Washing: Your 100% cotton microwave potato bag is fully machine washable. Wash it in cold or warm water with like colors. Avoid using bleach, which can weaken the fabric fibers.
- Drying: Tumble dry on a low setting or air dry. Remove promptly to prevent wrinkles. Iron if desired, but it’s not strictly necessary.
- Stain Removal: For stubborn potato starch or butter stains, pre-treat with a fabric stain remover before washing.
- Storage: Store your bag clean and dry in a kitchen drawer or hung by its loop in your pantry.
Beyond Baked Potatoes: Versatile Uses for Your Microwave Bag
While designed for potatoes, your new microwave bag is surprisingly versatile. Here are a few other ways you can put it to good use:
- Corn on the Cob: Cook fresh corn on the cob perfectly without boiling or grilling. Simply place husked ears in the bag, microwave for a few minutes, and enjoy tender, sweet corn.
- Sweet Potatoes: Like regular potatoes, sweet potatoes cook beautifully in the bag, retaining their moisture and natural sweetness.
- Tortillas: Warm tortillas quickly and evenly without drying them out. They’ll stay soft and pliable, perfect for tacos or fajitas.
- Bread Rolls: Reheat dinner rolls or biscuits to a warm, soft texture.
- Other Root Vegetables: Experiment with carrots, parsnips, or even small squash pieces for quick steaming.
Troubleshooting Common Sewing Issues
Even seasoned sewers encounter challenges. Here are solutions to a few common issues you might face while making your potato bag:
- Fabric Shifting While Sewing: If your layers are slipping, increase the number of pins you’re using. You can also try a walking foot on your sewing machine, which helps feed multiple layers of fabric evenly.
- Uneven Seams: This often happens when you’re not consistently guiding the fabric along your seam allowance mark. Practice drawing lines on scrap fabric and sewing perfectly straight lines to improve your consistency.
- Loop Not Securely Attached: If the loop feels loose, ensure you’ve backstitched multiple times where the loop is inserted into the main seam. You can also add an extra line of stitching across the base of the loop on the outside of the bag for added reinforcement.
- Wrinkles or Puckering: Ensure your thread tension is correct for your fabric. Also, make sure you’re not pulling or pushing the fabric through the machine; let the feed dogs do the work. Pressing seams regularly helps prevent puckering.
Conclusion: Enjoy Your Speedy Spuds!
Congratulations! You’ve successfully crafted your very own microwave potato bag. This simple yet incredibly functional sewing project not only enhances your kitchen efficiency but also provides the satisfaction of a handmade item. No more waiting an hour for baked potatoes; with your new bag, delicious, perfectly cooked spuds are just minutes away.
Whether you’re a potato aficionado or simply looking for an easy and rewarding sewing project, this DIY microwave potato bag is a fantastic choice. So, grab your potatoes, pop them in your beautiful new bag, and prepare to enjoy the quickest, fluffiest baked potatoes you’ve ever made. Don’t forget to share your creations with fellow crafters and culinary enthusiasts!