
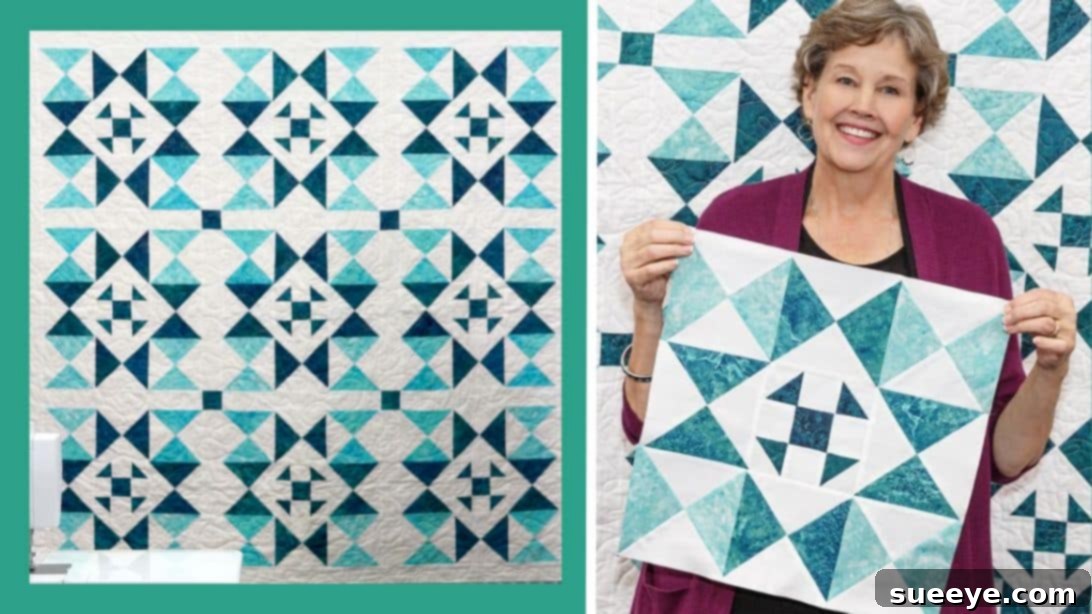
Welcome, quilting enthusiasts! Are you ready to embark on a delightful journey to create a truly captivating masterpiece? We are absolutely thrilled to share the enchanting Sunshine Shoofly Quilt pattern, a dazzling design brought to life by the creative minds at Missouri Star Quilt Company, expertly guided by the beloved Jenny Doan. This pattern is a vibrant celebration of classic quilting techniques, blending the timeless elegance of star blocks with the dynamic energy of modern fabric choices.
The Sunshine Shoofly quilt stands out with its intricate yet achievable design, promising a rewarding experience for quilters of all skill levels. At its heart, the quilt features a stunning central block, cleverly constructed from a harmonious combination of precisely cut squares and versatile half-square triangles. Radiating outwards from this core, you’ll find beautifully crafted hourglass blocks, which add a sense of movement and depth to the overall composition. The interplay of these elements, especially when paired with refreshing colors, creates a visually stunning piece that brightens any space and serves as a testament to your crafting prowess.
Whether you’re looking to challenge yourself with new techniques or simply seeking a fresh project to ignite your passion, the Sunshine Shoofly quilt offers immense satisfaction. Its unique design, combining traditional elements with a modern twist, makes it a cherished addition to any home or a heartfelt gift for loved ones. In this comprehensive guide, we’ll walk you through every step, from gathering your materials to assembling your quilt top, ensuring you have all the knowledge and confidence to bring this gorgeous pattern to life. For a visual demonstration that complements these instructions perfectly, be sure to watch the invaluable tutorial video from Missouri Star, linked above.
Essential Materials for Your Sunshine Shoofly Quilt
Before you begin your quilting adventure, gathering all necessary materials is key. Having everything laid out and ready will ensure a smooth and enjoyable crafting process. Investing in quality fabrics and precise tools will greatly enhance your quilting experience and the final outcome. Here’s a detailed list of what you’ll need to create your magnificent Sunshine Shoofly Quilt:
- 1 Pack of 10″ Print Squares (Layer Cake): These pre-cut fabric squares are perfect for adding a variety of patterns and colors to your quilt blocks, including portions of your dynamic pieced border. Choosing a coordinated collection will ensure a harmonious look.
- 1 Pack of 10″ Background Squares (Layer Cake): These will provide a consistent and contrasting backdrop for your prints, helping your designs pop and also contributing to your pieced border. A neutral color like white, cream, or light grey often works best.
- 1 Yard of Background Fabric: This additional yard of background fabric is essential for creating the sashing that elegantly separates your blocks and for the sophisticated inner border, framing your quilt design beautifully.
- 3/4 Yard of Outer Border Fabric: The outer border adds a final touch of sophistication and completes the frame of your quilt, giving it a polished and substantial look. Choose a fabric that complements your overall color scheme.
- 3/4 Yard of Binding Fabric: Binding is crucial for finishing the raw edges of your quilt, protecting it from wear, and adding another layer of decorative detail. It can be a contrasting pop of color or a subtle blend.
- 4 1/2 Yards of Backing Fabric: This generous amount of fabric will form the comfortable and often decorative reverse side of your quilt, providing warmth and stability. Consider a print that complements the front or a solid for a clean finish.
Recommended Tools for Precision Quilting
While the materials form the heart of your quilt, the right tools are your trusted companions, ensuring precision and ease throughout the construction process. Equipping yourself with these standard quilting tools will make your experience much more enjoyable and your final product more professional, helping you achieve crisp seams and perfectly square blocks:
- Sewing Machine: A reliable sewing machine equipped with a quarter-inch foot is invaluable for maintaining consistent seam allowances, which is critical in quilting.
- Rotary Cutter: For clean, precise, and quick cuts of fabric strips and squares. A 45mm or 60mm cutter is ideal.
- Self-Healing Cutting Mat: To protect your work surface and provide a stable, non-slip base for safe and accurate rotary cutting.
- Quilting Rulers (various sizes): Especially a large square ruler (e.g., 6.5″ or 12.5″) for squaring up blocks, and a long ruler (e.g., 6″ x 24″) for cutting strips. Clear acrylic rulers are highly recommended.
- Fabric Scissors: Dedicated sharp scissors for trimming threads and making other small, intricate cuts.
- Iron and Ironing Board: Absolutely essential for pressing seams flat and accurately. Proper pressing is as important as precise sewing for flat, beautiful blocks.
- Straight Pins or Fabric Clips: To hold fabric pieces together securely before sewing, preventing shifting and ensuring alignment.
- Thread: High-quality 100% cotton thread that matches or blends with your fabric colors for a seamless finish.
- Seam Ripper: For those inevitable “oops” moments – a quilter’s best friend! Choose one with a comfortable grip.
- Fabric Marker or Pencil: For marking diagonal lines on fabric, especially for half-square triangles.
Step-by-Step Guide to Creating Your Sunshine Shoofly Quilt
Now that you have all your materials and tools ready, let’s dive into the exciting process of bringing your Sunshine Shoofly Quilt to life. Remember, patience and precision in cutting and sewing, along with careful pressing, will be your allies in creating beautiful, crisp blocks that fit together perfectly.
General Quilting Tips for Success
Before we begin with the specific steps, keep these general quilting principles in mind for a smooth and satisfying experience:
- Accurate Seam Allowance: Throughout this entire project, it is paramount to maintain a consistent ¼-inch seam allowance. This consistency is the foundation for blocks to fit together correctly and for your quilt to lay flat.
- Pressing Matters: Always take the time to press your seams after each sewing step. Often, you’ll press “to the dark side” to prevent lighter fabrics from showing through. Pressing flat ensures your blocks lie smoothly, eliminates bulk, and helps with accurate subsequent cuts and joins.
- Squaring Up: After constructing each block or unit, take the extra moment to square it up to the specified dimensions using your rotary cutter and square ruler. This step cannot be overstated for achieving a professional, clean finish and ensuring all blocks are uniform.
- Chain Piecing: Where applicable, utilize chain piecing to sew multiple units consecutively without lifting your presser foot between them. This efficient technique saves time, thread, and helps maintain a consistent seam allowance.
Step 1: Constructing the Hourglass Blocks – The Foundation
Our journey begins with the creation of the dynamic hourglass blocks, which will form the outer ring of our central Shoofly design. These blocks create movement and contrast. Gather four 10-inch light print squares and four 10-inch dark print squares from your fabric packs. Precision here is key to beautifully aligned hourglass units.
- Take one 10-inch light square and place it precisely on top of a 10-inch dark square, ensuring their right sides are together and all edges are perfectly aligned.
- Sew all four sides of this layered square, maintaining a precise ¼-inch seam allowance. Stitch carefully around the entire perimeter, forming a sturdy box of stitches. Ensure your stitching is straight and even.
- Once sewn, place the stitched square on your cutting mat. Use your rotary cutter and ruler to cut it in half both vertically and horizontally. You will effectively be making four cuts that intersect in the center. This will yield four smaller 5-inch squares, each consisting of light and dark fabric sewn together at the edges.
- Carefully iron open each of these four 5-inch squares. When pressing, always direct the seam allowance towards the darker fabric. This technique helps to “hide” the seam and prevent any shadowy lines from showing through on the lighter fabric side of your finished blocks, ensuring a crisp appearance.
Step 2: Assembling the Four-Patch Units
With your four newly opened 5-inch squares from Step 1, it’s time to arrange them into a four-patch unit. This step prepares the groundwork for the magical transformation into the distinct hourglass blocks, so attention to arrangement is crucial.
- Arrange the four 5-inch squares you created in Step 1 into a 2×2 grid on your design surface. The crucial detail here is to ensure that the light and dark sections of adjacent squares are opposite each other. Imagine a checkerboard pattern where a light section in one square meets a dark section in its neighbor at the seam line. This arrangement will create the desired contrast.
- Sew these four squares together to form a larger four-patch block. First, sew the two top squares together (right sides facing). Then, sew the two bottom squares together (right sides facing). Press these seams open or towards the darker fabric, as you prefer, to reduce bulk and keep the unit flat.
- Next, sew the top row to the bottom row, carefully aligning the center seams where the two rows meet. Pinning at this intersection can be very helpful to ensure a perfect match and prevent any shifting. Press this final seam open or to one side. You now have a larger four-patch block, which is the precursor for our hourglass units.
Step 3: Creating the Hourglass Units with Diagonal Cuts
This step is where the hourglass magic truly happens! We’ll transform the four-patch blocks into four distinct hourglass units using clever diagonal cuts, revealing the intricate pattern that adds so much character to the quilt.
- Take one of your assembled four-patch blocks. Place another identical four-patch block directly on top of it, right sides together. The key here is to “stagger” the colors. This means aligning a light section on one block with a dark section on the other, creating a visually contrasting pair when viewed from the side. This ensures a balanced design in your final hourglass units.
- Sew all the way around the outside perimeter of these two layered blocks, again maintaining your consistent ¼-inch seam allowance. Ensure your stitches are even and the edges are perfectly lined up to maintain squareness.
- Once sewn, place the combined block on your cutting mat. Using your rotary cutter and a long ruler, make the first diagonal cut from one corner all the way to the opposite corner. Then, make a second diagonal cut from the remaining two corners. You will effectively cut the large block into four smaller triangular units.
- Carefully open each of these four triangular units. You will be amazed to see that you now have four beautifully formed hourglass blocks, each featuring a captivating interplay of light and dark fabrics!
- The final and most important part of this step is to square up each hourglass block. Using your square quilting ruler (preferably a 6.5-inch square ruler) and rotary cutter, carefully trim each block to a precise 6 inches. This squaring-up process is vital for ensuring all your blocks are uniform and will fit together seamlessly when assembling the quilt top, preventing any wavy edges or mismatched points.
Step 4: Crafting Perfect Half-Square Triangles (HSTs)
Next, we move to creating the half-square triangles (HSTs), which are foundational elements for the central Shoofly block. These versatile units add visual interest and help form the distinct star shape of the pattern, requiring careful measurement and cutting.
- Begin by selecting one 10-inch dark square and one 10-inch light square from your fabric packs. Place them right sides together, ensuring all edges are perfectly aligned.
- From this layered pair, use your rotary cutter and ruler to cut two strips, each precisely 2½ inches wide. You will now have two dark 2½-inch strips and two light 2½-inch strips.
- From these 2½-inch strips, cut individual 2½-inch squares. You will need four 2½-inch dark squares and four 2½-inch light squares for your HSTs.
- To create the half-square triangles, take one dark 2½-inch square and place it on top of a light 2½-inch square, right sides together.
- Using a fabric marker or pencil, draw a diagonal line from one corner to the opposite corner on the back (wrong side) of the lighter fabric. This line will serve as your precise guide.
- Sew a seam a ¼-inch away from this drawn line on both sides. You’ll essentially sew two parallel lines, one on each side of your diagonal mark.
- Once both seams are sewn, cut along the drawn diagonal line. When you open these two units, you will have two perfect half-square triangles!
- Trim off the small “dog ears” (the tiny triangles of excess fabric) at the corners. Then, press each HST open, again pressing the seam allowance towards the darker fabric to minimize bulk and show-through.
- Finally, square up each of these newly formed HSTs to a precise 2¼ inches using your square ruler. This exact measurement is crucial for the subsequent accurate assembly of the center block. Repeat this process until you have all the required HSTs.
Step 5: Building the Central Shoofly Block
Now it’s time to assemble the heart of our quilt: the central Shoofly block. This classic nine-patch block combines the HSTs you just made with solid squares to create the iconic and charming Shoofly design, a true focal point of the quilt.
- Gather one 2½-inch dark square (this will serve as your true center square) and four 2¼-inch by 2½-inch white blocks (or light background fabric rectangles) from your background fabric. Additionally, ensure you have all the half-square triangles you trimmed to 2¼ inches in the previous step.
- Arrange these components on your design wall or a flat surface. Visualize a 3×3 grid, which is the traditional layout for a nine-patch block.
- Place the single 2½-inch dark square in the very center of your 3×3 grid.
- Around this center square, arrange your half-square triangles and the light background rectangles. The typical Shoofly pattern has HSTs forming the “points” of the star, with the solid squares/rectangles filling the corner gaps and two side positions in the middle row. Ensure the dark points of your HSTs face outwards from the center dark square, forming a distinctive star pattern. Refer to the image below for precise placement.
- Sew these arranged units together into rows. First, sew the three units of the top row together (right sides facing). Then, sew the three units of the middle row together, and finally, the three units of the bottom row together. Press seams after each row is completed, alternating the direction of your pressing for easier nesting when joining the rows.
- Once the three rows are sewn, join them together to form your complete central Shoofly block. Carefully align your seams, particularly where the units meet, pinning if necessary, for a neat and perfectly matched finish. Press the final seams open or to one side to ensure the block lays perfectly flat.
Step 6: Arranging and Assembling the Quilt Top – Bringing it All Together
With your hourglass blocks and the central Shoofly block complete, it’s time for the exciting stage of arranging them into the quilt top. This is where your vision truly comes to life, and you’ll begin to see the beautiful, dynamic pattern of the Sunshine Shoofly quilt emerge.
- Lay out your finished central Shoofly block on a large, flat surface or design wall. This block will naturally become the beautiful focal point of your quilt.
- Around this central block, carefully arrange the hourglass blocks you created in Step 3. The design of the Sunshine Shoofly quilt typically features the Shoofly block surrounded by a border of hourglass blocks, creating a larger, dynamic star-like formation or a pinwheel effect, depending on their orientation. Refer closely to the provided photo (Image 2 below) or the Missouri Star tutorial for the exact placement and orientation of each hourglass block to achieve the intended captivating pattern. Pay particular attention to how the light and dark sections of the hourglass blocks interact with each other and with the central block to create a cohesive and flowing design.
- Once you are completely satisfied with your arrangement, begin sewing the blocks together in rows. Start by sewing the individual blocks within each row. Carefully align your seams and pin generously where necessary to prevent any shifting of fabric.
- Press the seams after each row is sewn. For easier nesting when joining the rows to each other, you can press the seams of alternating rows in opposite directions. This allows the seams to “lock” together, creating flatter and more accurate intersections.
- Finally, sew the assembled rows together to complete your quilt top. Again, take your time to align the intersections where the blocks meet, pinning generously to ensure everything lines up perfectly for a professional finish.
- Press the entire quilt top thoroughly, ensuring all seams are flat and smooth. This critical step prepares your quilt top for the next crucial stages: adding sashing, borders, quilting, and ultimately, binding.
Step 7: Adding Sashing and Borders for a Polished Finish
Sashing and borders are not just decorative; they play vital roles in framing your quilt, adding visual breaks between blocks, and can even help to square up your quilt if it’s slightly off. Using your background fabric for the sashing and inner border, and your dedicated border fabric for the outer frame, will create a cohesive and professional appearance.
- Prepare Sashing Strips: Carefully cut strips from your background fabric to the appropriate width and length to fit between your assembled blocks and rows. It is always best practice to measure your assembled rows and blocks directly to ensure your sashing strips are cut to the exact length needed, as slight variations can occur during piecing.
- Attach Sashing: Sew the sashing strips between your quilt blocks to create continuous rows, and then sew longer sashing strips between your assembled rows to connect them, forming a complete grid. Press seams towards the sashing to keep the bulk out of your block seams, ensuring a flat finish.
- Add the Inner Border: Measure the exact length and width of your quilt top, including the sashing. Cut your inner border strips from the background fabric according to these measurements. It’s best practice to measure the quilt top directly in the middle for both length and width, rather than relying solely on individual block measurements, to account for any slight variations. Sew the side borders first, press the seams, then attach the top and bottom borders, and press again.
- Attach the Outer Border: Repeat the precise measuring and attachment process for the outer border using your designated outer border fabric. Again, measure your quilt top carefully to ensure precise border lengths. This outer frame completes the visual design, adds stability, and gives your quilt a substantial, finished presence.
Step 8: Quilting, Batting, and Binding – The Final Touches
Congratulations, your quilt top is complete! This is a significant milestone. Now it’s time to transform it into a functional and beautiful finished quilt through the crucial processes of layering, quilting, and binding, which will bring all the elements together.
- Prepare the Quilt Sandwich: Lay your backing fabric right side down on a clean, flat surface, smoothing out any wrinkles. Tape it down or use clamps to ensure it stays taut. Place your batting evenly over the backing, ensuring it extends slightly beyond the edges of the backing. Then, carefully center your quilt top right side up over the batting, smoothing it out completely. This creates your “quilt sandwich.”
- Basting: Secure your quilt sandwich using your preferred basting method. Options include safety pins (pin basting, using pins every few inches across the quilt), spray adhesive (spray basting, ensuring even coverage), or hand-stitching (thread basting, using long stitches). Ensure all three layers are securely held together to prevent any shifting or puckering during the quilting process.
- Quilting: This is where you add the stitches that hold all three layers together and add texture, dimension, and durability to your quilt. You can choose to quilt by machine or by hand, depending on your preference and skill level.
- Machine Quilting: Options include “stitch in the ditch” (quilting precisely along existing seams for a subtle look), straight-line quilting (creating geometric patterns), or free-motion quilting (allowing for more intricate, artistic designs like stippling or loops).
- Hand Quilting: For a traditional and heirloom-quality look, hand-quilting adds a unique charm, softness, and beautiful texture. This method is more time-consuming but incredibly rewarding.
Choose a quilting design that complements the Sunshine Shoofly pattern without overwhelming its beauty.
- Trimming: Once quilted, carefully trim the excess backing and batting, squaring up all four sides of your quilt to prepare for the final step of binding. Use a long ruler and rotary cutter for straight, even edges.
- Binding: The binding is the final edge finish that neatly encases the raw edges of your quilt, providing durability, protection, and a beautiful frame.
- Cut your binding fabric into 2½-inch wide strips. Join them together using diagonal seams to create one long, continuous strip.
- Fold the binding strip in half lengthwise, wrong sides together, and press firmly to create a crisp crease.
- Attach the raw edge of the binding to the raw edge of the front of the quilt, sewing with a consistent ¼-inch seam allowance. Miter the corners for a crisp, professional-looking finish.
- Fold the binding over to the back of the quilt and secure it in place either by hand-stitching (for an invisible and refined finish) or by machine-stitching (for a quicker, more visible finish).
Take your time with binding, as it’s the last impression of your beautiful work and truly completes your quilt.
Why You’ll Love the Sunshine Shoofly Quilt Pattern
The Sunshine Shoofly quilt is more than just a collection of fabric pieces; it’s a testament to timeless design and the profound joy of creation. Its enduring appeal lies in several key aspects that make it a favorite among quilters:
- Classic Meets Contemporary: While the Shoofly block is a deeply traditional quilt block with a rich history, its combination with the dynamic hourglass units and the modern freedom of fabric selection allows for a remarkably fresh and contemporary aesthetic. Choose bright, bold prints for a truly “sunshine” feel, or opt for subtle, sophisticated tones for a more serene and elegant look.
- Skill-Building Project: This pattern is an excellent way to practice and refine several fundamental quilting techniques. It provides ample opportunity to master accurate cutting, precise piecing of both half-square triangles and hourglass blocks, and careful seam management. It’s challenging enough to be engaging for intermediate quilters but also structured in a way that beginners can confidently tackle it with good instruction.
- Versatile Design: The modular nature of the blocks means this pattern can easily be adapted to create quilts of various sizes. Whether you envision a charming baby quilt, a cozy lap quilt, a decorative wall hanging, or a grand bedspread, you can simply make more blocks or adjust the border widths to suit your specific needs and desired dimensions.
- Visually Striking: The clever arrangement of alternating light and dark fabrics within the hourglass blocks creates a captivating optical illusion, giving the quilt a dynamic, moving quality. Paired with the iconic star shape of the Shoofly center, it’s a design that truly catches the eye and draws compliments.
- A Gift from the Heart: A handmade quilt is one of the most cherished and thoughtful gifts one can give. The Sunshine Shoofly quilt, with its cheerful name and beautiful design, makes a perfect present for weddings, birthdays, baby showers, housewarmings, or simply to show someone you care with a tangible expression of your love and effort.
Your Beautiful Sunshine Shoofly Quilt Awaits!
Crafting the Sunshine Shoofly Quilt is a truly rewarding experience, culminating in a stunning piece of textile art that reflects your dedication, creativity, and growing skills. From the initial precise cuts of fabric to the final, satisfying binding stitch, each step is an opportunity to immerse yourself in the meditative joy of quilting, creating something truly unique and beautiful.
We hope this comprehensive guide, inspired by the wonderful instruction from Missouri Star and Jenny Doan, empowers you to confidently create your own magnificent Sunshine Shoofly quilt. Remember, practice makes perfect, and every stitch adds to the unique story of your quilt. Don’t be afraid to experiment with your fabric choices, as the possibilities for color and pattern combinations are endless, allowing you to personalize your quilt to your heart’s content.
Once your beautiful Sunshine Shoofly quilt is complete, we encourage you to share your creation with the world! Show off your finished project on social media, tagging Missouri Star, Jenny Doan, and fellow quilters online to inspire others with your hard work and creativity. We can’t wait to see your unique interpretation of this delightful pattern. Happy quilting!