
The holiday season often brings with it a special kind of magic—a time for connection, celebration, and expressing gratitude to the people who enrich our lives. Among these cherished traditions, exchanging gifts with our closest friends stands out as a beautiful way to show appreciation. While store-bought items are always an option, there’s something uniquely heartwarming about a handmade gift, especially when it comes from the heart. It’s a tangible symbol of the time, effort, and love you’ve invested, making it far more personal and memorable than anything mass-produced.
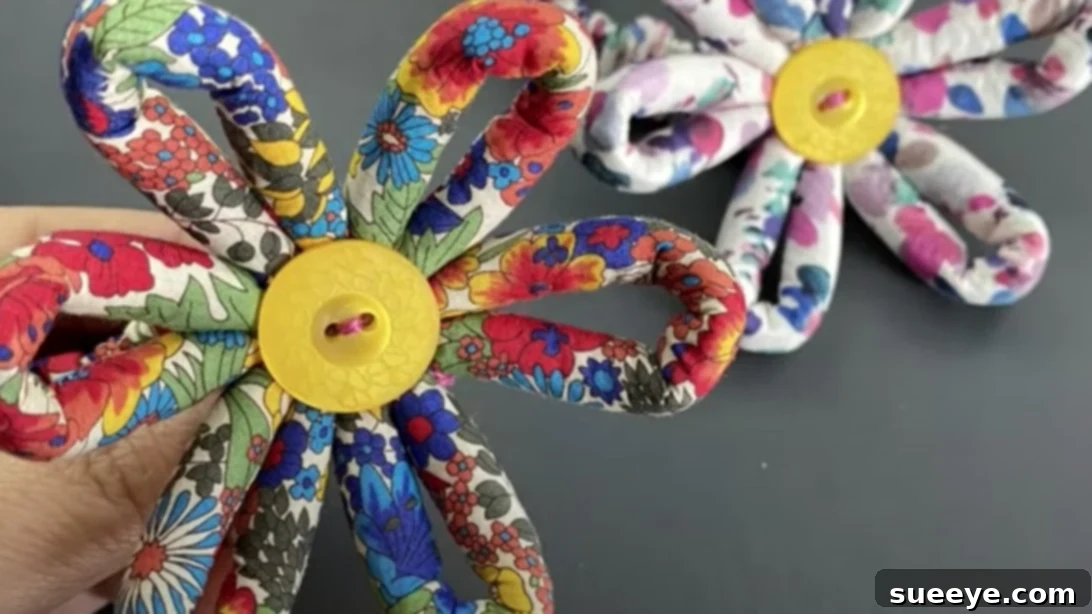
Imagine presenting your friends with a charming, custom-made accessory that not only looks beautiful but also carries the warmth of your friendship. A fabric flower scrunchie is just such an item. It’s practical, stylish, and incredibly thoughtful. Red Blossom Designs provides an excellent tutorial that teaches us how to craft these adorable fabric flower scrunchies with ease. With just a few inexpensive materials and a little bit of creativity, you can create a collection of these delightful scrunchies, transforming simple fabric into a heartfelt emblem of your enduring bonds and affection for your female friends.
This comprehensive guide will walk you through every step, ensuring that even if you’re a beginner to sewing, you can successfully create these lovely hair accessories. We’ll delve into the benefits of DIY gifts, explore material choices, provide detailed instructions, and offer tips for personalization to make your handmade scrunchies truly special.
Why Choose a DIY Fabric Flower Scrunchie as a Gift?
In a world saturated with commercial products, a handmade gift like a fabric flower scrunchie stands out. Here’s why it’s an ideal choice:
- Personal Touch: You can choose fabrics that reflect your friend’s personality, favorite colors, or even match an outfit. This level of customization is impossible with store-bought items.
- Budget-Friendly: Crafting multiple scrunchies from a small amount of fabric and basic sewing supplies is incredibly cost-effective, allowing you to create beautiful gifts without breaking the bank.
- Unique and Thoughtful: Each scrunchie will be unique, bearing the subtle marks of your craftsmanship. It tells your friend that you put thought and effort into their present.
- Eco-Conscious: If you use fabric scraps or upcycle old clothing, you’re also contributing to a more sustainable lifestyle by reducing waste.
- A Relaxing Craft: The process of sewing can be incredibly therapeutic. It’s a wonderful way to unwind and express your creativity.
Essential Materials for Your Fabric Flower Scrunchie Project
Before diving into the creative process, gathering your materials is key. The beauty of this project lies in its simplicity and the accessibility of its components. Here’s what you’ll need, along with some insights into choosing the right supplies:
- Fabric: The star of your scrunchie! You’ll need two main pieces: one for the flower and one for the scrunchie base.
- For the flower, a piece approximately 4 cm by 70 cm.
- For the scrunchie base, a piece approximately 5 cm by 50 cm.
- Fabric Choice Tip: Lightweight cotton, satin, silk, or even velvet work wonderfully. Consider patterned fabrics for a playful look or solid colors for elegance. Scraps from previous sewing projects are perfect for this! Ensure your fabric isn’t too thick, as it will be gathered.
- 20-Strand Yarn (or similar filler): This is used to give the fabric flower its volume and structure.
- Alternative: You can use a thick embroidery floss, a thin rope, or even a narrow strip of batting or felt if 20-strand yarn isn’t readily available. The goal is to create a slight “pouf” in the fabric.
- Needle and Thread: Your basic sewing toolkit essentials.
- Needle Tip: Choose a sharp, all-purpose needle.
- Thread Tip: Use a strong polyester or cotton thread that matches or complements your fabric color. Double-threading your needle can add extra strength for securing the flower petals.
- Elastic (1.2 cm wide): This forms the stretchy core of your scrunchie.
- Length Tip: Approximately 20-25 cm will be a good starting point, but you can adjust this based on the desired tightness and hair thickness of the recipient.
- Type Tip: Braided or knit elastic is suitable as it retains its stretch well. Avoid elastic that easily loses its shape.
- Button (2 cm): This serves as the decorative center of your flower and helps secure the scrunchie and flower together.
- Button Choice Tip: Select a button that complements your fabric. It can be a simple four-hole button, a decorative shank button, or even a fabric-covered button for a seamless look. The 2 cm size is a good general recommendation, but you can go slightly larger or smaller depending on your aesthetic preference.
- Scissors: Sharp fabric scissors are a must for clean cuts.
- Ruler or Measuring Tape: For accurate measurements, which are crucial for a professional finish.
- Fabric Marker or Chalk (Optional): For marking cutting lines on your fabric.
- Safety Pin or Bodkin (Optional but Recommended): Extremely helpful for threading elastic through the fabric tube.
Step-by-Step Directions: Crafting Your DIY Fabric Flower Scrunchie
Let’s begin the exciting process of transforming these materials into a beautiful, wearable piece of art. Follow these detailed instructions carefully for the best results.
Part 1: Creating the Fabric Flower
-
Prepare the First Fabric Strip:
Start by cutting a thin piece of fabric that measures 4 cm in width and 70 cm in length. Precision here is important for a consistent flower. If your fabric is prone to fraying, you might consider pre-washing and ironing it for easier handling.
-
Fold and Sew the Strip:
Fold this long fabric strip in half lengthwise, right sides together. Sew along the raw edge, creating a tube. A seam allowance of about 0.5 cm to 0.75 cm is usually sufficient. Once sewn, turn the tube right side out. A safety pin attached to one end can help you pull the fabric through.
-
Insert the Yarn:
Now, carefully insert the 20-strand yarn (or your chosen filler) inside the fabric tube. The yarn will give the subsequent “petals” of your flower a lovely, soft volume. Distribute the yarn evenly throughout the tube.
-
Cut into Flower Segments:
With the yarn inside, cut this filled fabric tube into six equal pieces, each measuring approximately 10 cm in length. These six segments will become the individual petals of your fabric flower.
-
Form the Flower Petals:
Take each of the 10 cm pieces and vertically fold it in half. You’ll now have six folded segments. Using your needle and thread, securely attach the raw ends of these folded pieces together. Work around in a circle, gathering each piece one by one onto your thread. Make sure the raw edges are aligned. Once all six pieces are on your thread, pull the thread tightly to close the circle, bringing the ends of the segments together and forming a beautiful flower shape. Stitch through the center several times to secure the form, ensuring the petals stay in place and the center is firm.
Part 2: Crafting the Scrunchie Base
-
Prepare the Scrunchie Fabric:
Cut a piece of fabric that is 5 cm wide and 50 cm long. This length provides enough fabric for a standard scrunchie that can wrap comfortably around hair.
-
Create the Scrunchie Tube:
Fold this fabric strip in half lengthwise, right sides together. Sew along the long raw edge, creating another fabric tube. A 0.75 cm to 1 cm seam allowance works well here. Once sewn, turn this tube right side out. Ironing the seam flat before turning can make this step easier and result in a neater finish.
-
Insert the Elastic:
Attach a safety pin to one end of your 1.2 cm wide elastic. Thread the elastic through the fabric tube. Be careful not to let the other end of the elastic disappear into the tube! You might want to secure the free end of the elastic to the outside of the tube with another safety pin or a clip.
-
Join the Elastic Ends:
Once the elastic has been threaded all the way through, pull both ends of the elastic out of the fabric tube by about 2 cm on each side. Overlap these elastic ends slightly and sew them together very securely. You can use a zig-zag stitch on a sewing machine or multiple tight hand stitches to ensure they won’t come apart. A strong knot can also reinforce this connection.
-
Finish the Scrunchie Tube:
Now, gently pull the fabric tube over the joined elastic ends, so the elastic is fully encased. You will have two raw fabric edges at the opening of your scrunchie. Fold in the raw edges of one side and insert the raw edge of the other side into it. Stitch these ends together neatly to create a continuous fabric ring. This might be done with a hidden stitch for a clean look, or simply by sewing securely for durability.
Part 3: Assembling the Flower and Scrunchie
-
Attach the Button to the Flower:
Take your fabric flower and place the 2 cm button precisely in its center. Using your needle and thread, sew the button onto the center of the flower. Ensure it is very secure, as this button will be key to holding the entire piece together.
-
Join the Flower and Scrunchie:
Now, bring your completed fabric flower (with the button attached) and your finished scrunchie base together. Position the flower centrally on the scrunchie. Using strong thread, sew the base of the fabric flower, through the button, and onto the fabric of the scrunchie. Stitch several times, going through all layers, to ensure a very firm attachment. You want this connection to withstand regular use. Hide any knots within the layers of the fabric for a polished appearance.
Congratulations! You have now successfully crafted a beautiful DIY fabric flower scrunchie. This delightful accessory is ready to be used by you or given as a cherished gift to your friends. Encourage them to wear these unique scrunchies proudly, and don’t forget to capture some joyful photographs as a keepsake of your crafting triumph and shared friendship!
Tips for a Perfect Handmade Scrunchie
- Precision Matters: Accurate cutting and sewing will result in a much neater and more professional-looking scrunchie. Use a ruler and mark your fabric before cutting.
- Ironing is Your Friend: Pressing your fabric at various stages, especially after sewing seams, helps create crisp lines and a polished finish.
- Strong Stitches: When securing the elastic and attaching the flower and button, use multiple, strong stitches. This will ensure your scrunchie is durable and lasts a long time.
- Thread Color: Matching your thread color closely to your fabric will make your stitches less noticeable and enhance the overall aesthetic.
- Practice Makes Perfect: If it’s your first time sewing, don’t worry if it’s not absolutely perfect. Each scrunchie you make will improve your skills.
Customization and Variations for Your Fabric Flower Scrunchie
The beauty of DIY projects lies in the endless possibilities for customization. Here are some ideas to make each scrunchie truly unique:
- Fabric Play: Experiment with different fabric combinations. Use a solid color for the scrunchie base and a contrasting pattern for the flower, or vice-versa. Textures like velvet for winter or linen for summer can also change the feel.
- Embellishments: Add small beads, sequins, or a tiny charm to the center of the flower for extra sparkle. A touch of embroidery on the petals could also add an elegant detail.
- Flower Variations: While this tutorial makes a specific flower, you could explore other fabric flower techniques. You might create a ruffled flower, a layered flower with different sized petals, or even a simple bow.
- Elastic Length: Adjust the length of the elastic to suit different hair types or desired scrunchie “fluffiness.” Shorter elastic for tighter hold, longer for a looser wrap.
- Button Choices: Don’t limit yourself to a plain button. Vintage buttons, decorative buttons with unique shapes, or even cover a button with a matching fabric for a seamless look.
Beyond the Holidays: A Gift for Any Occasion
While these fabric flower scrunchies make exceptional Christmas gifts, their versatility extends far beyond the festive season. They are perfect for birthdays, Mother’s Day, bridesmaid gifts, or simply as a thoughtful “just because” present to brighten a friend’s day. They can also be a lovely addition to craft fairs or as a small token of appreciation for teachers or colleagues.
The act of creating something with your hands, especially for someone you care about, is a deeply rewarding experience. It’s a mindful process that allows you to slow down, focus, and infuse a bit of your personality into a tangible item. When your friends wear these beautiful fabric flower scrunchies, they’ll not only be accessorizing with a stylish item but also carrying a piece of your thoughtfulness and friendship with them.
So, gather your materials, set aside some time, and embark on this delightful crafting journey. The joy you’ll find in the making, and the smiles you’ll bring to your friends’ faces, will make every stitch worthwhile. Happy crafting!