
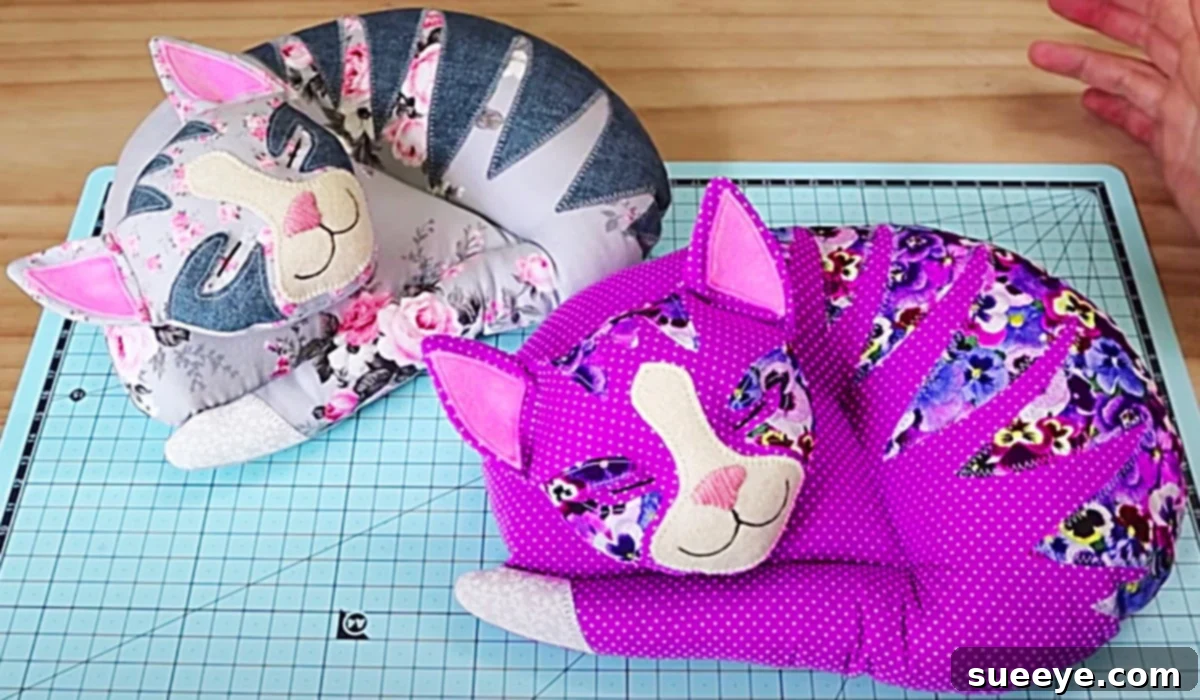
DIY Patchwork Cat With A Free Pattern: Your Next Favorite Sewing Project
There’s something uniquely rewarding about creating a beautiful handmade item, especially when it’s as adorable and charming as a patchwork cat. When I first stumbled upon the DIY patchwork cat video tutorial by Pay It Forward on YouTube, its irresistible cuteness immediately captured my attention. I knew right then and there that I had to bring this whimsical creation to life. What makes this project even more appealing is the availability of a free pattern download, meticulously designed to be incredibly easy to follow and understand, making it perfect for sewers of all skill levels. Furthermore, requiring only a handful of readily available materials, this project offers an exceptionally affordable and heartfelt gift idea for friends, family, or even as a delightful addition to your own home decor.
Beyond its aesthetic appeal, embarking on a DIY patchwork project like this offers numerous benefits. It’s a wonderful way to utilize fabric scraps you might have accumulated, promoting sustainability and adding a unique, “zero-waste” element to your crafting. Each patchwork cat you create will be one-of-a-kind, reflecting your personal choice of fabrics and colors. This article will guide you through the process, providing expanded details and tips to help you craft your own charming feline companion.
Why Choose a Patchwork Cat Project?
The beauty of patchwork lies in its ability to transform disparate pieces of fabric into a harmonious whole. For this DIY cat, patchwork isn’t just a technique; it’s an art form that gives each creation its unique character. Imagine a cuddly cat made from a collection of your favorite fabric prints – perhaps vintage florals, playful polka dots, or even meaningful remnants from old garments. This method allows for endless creativity and personalization, ensuring that no two patchwork cats are ever exactly alike. It’s an ideal project for those who love to infuse their crafts with personality and a touch of nostalgic charm. Moreover, the tactile nature of working with different fabrics adds another layer of sensory delight to the crafting experience.
Essential Materials For Your DIY Patchwork Cat:
Gathering your materials is the first exciting step in any crafting journey. For this charming patchwork cat, you’ll find that most items are standard sewing supplies, making it a budget-friendly endeavor. Quality tools and materials will not only make the process more enjoyable but also ensure a beautiful, lasting finished product.
- Free Pattern Download: The cornerstone of this project. Ensure you download and print this pattern accurately, as it provides the essential shapes and dimensions for your cat. Double-check print scaling to match any provided measurement guides.
- Fabric (according to instructions): This is where your creativity truly shines! You’ll need an assortment of cotton fabrics, typically quilting cottons work best due to their stability and ease of handling. Choose a variety of complementary prints and solids for that classic patchwork look. Scraps are perfect for this project, making it an excellent way to use up smaller pieces from your stash. Consider different textures and patterns to add visual interest to your cat.
- A Needle and Thread: For hand-sewing details, closing openings, and attaching embellishments. A good quality, all-purpose polyester thread that matches your fabric colors will be ideal for durability. Keep both hand-sewing needles (sharp, small eyes) and machine-sewing needles (appropriate for your fabric type) on hand.
- Embroidery Floss: Essential for adding your cat’s charming facial features – eyes, nose, and mouth. Black or dark brown floss is traditional, but feel free to experiment with other colors to give your cat a unique personality. Six-strand cotton floss is versatile and easy to work with.
- Felt: A small piece of felt can be used for specific details like the inner ears or a small patch, adding a contrasting texture or color. Felt is easy to cut and doesn’t fray, making it perfect for delicate additions.
- An Iron: Indispensable for pressing seams flat as you sew. Pressing after each seam ensures crisp, professional-looking results, which is particularly important in patchwork where precision is key.
- An Ironing Board: Provides a stable, heat-resistant surface for pressing your fabric and sewn pieces.
- A Cutting Mat: A self-healing cutting mat protects your work surface and provides a grid for accurate measurements and cuts.
- A Rotary Cutter: While scissors can be used, a rotary cutter combined with a ruler offers unparalleled precision and speed when cutting fabric pieces, especially for straight lines and curves, making your patchwork more accurate.
- A Fabric Pen or Chalk: For transferring pattern markings onto your fabric. Choose a pen that is easily removable or disappears over time, ensuring no permanent marks are left on your finished project.
- Stuffing (Fiberfill): Crucial for giving your cat its plush, huggable form. Polyester fiberfill is a common and excellent choice, providing a soft yet resilient fill. Make sure to have enough to stuff your cat firmly but without over-stuffing to the point of distorting its shape.
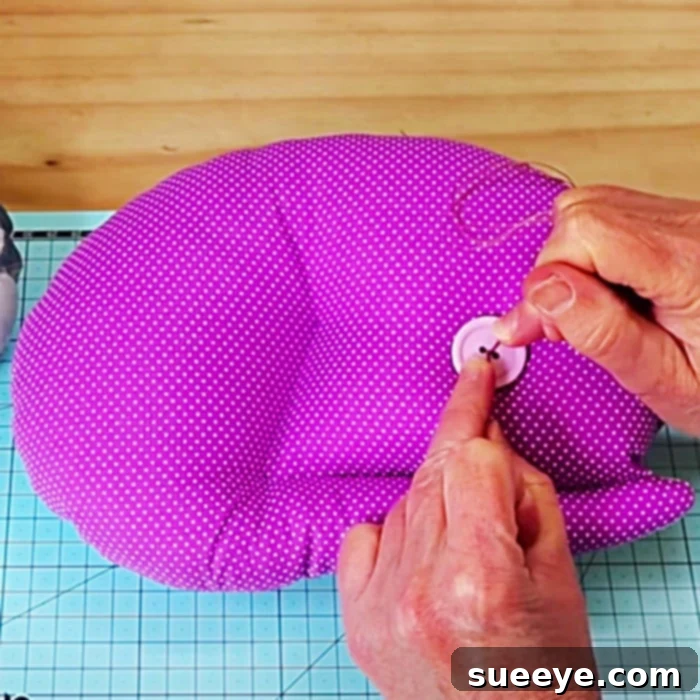
- Large Buttons (optional, for tufting): If you choose to add the tufting detail, two large, sturdy buttons will be needed for the back. These add a decorative touch and help give the cat a lovely, rounded shape.
Detailed Directions For Crafting Your Patchwork Cat:
Crafting this adorable patchwork cat is a journey of creativity and precision, made simple with the video tutorial by Pay It Forward, on YouTube. While the video will provide the visual guidance, here’s an expanded breakdown of the steps involved to ensure you create a truly charming stuffed animal.
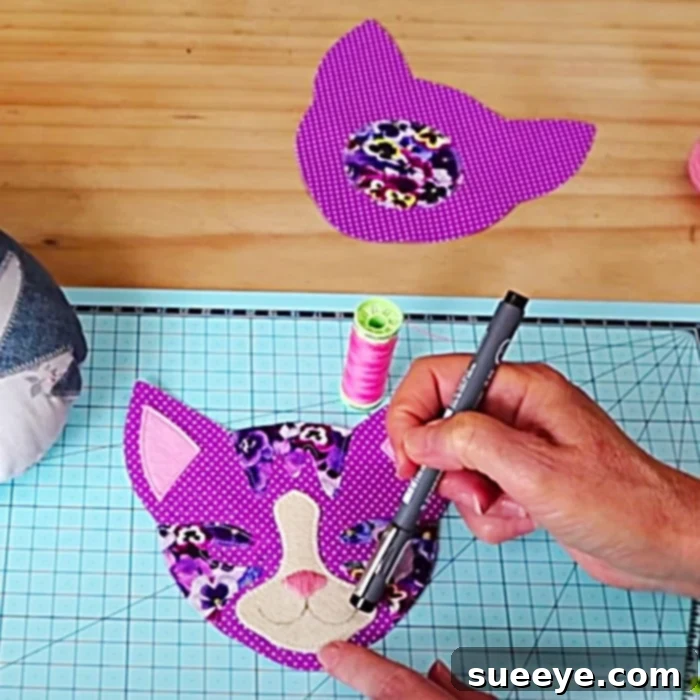
Step 1: Prepare Your Pattern Pieces
Begin by downloading and printing the free pattern. Carefully cut out all the individual paper pattern pieces. It’s often helpful to label each piece (e.g., “head,” “body,” “ear”) to avoid confusion. Pay close attention to any markings on the pattern, such as grainlines, fold lines, and especially seam allowances, which are critical for an accurate final shape.
Step 2: Fabric Selection and Cutting
This is where your patchwork vision comes to life. Select your chosen fabrics, keeping in mind how their colors and patterns will interact. Lay your pattern pieces onto the wrong side of your fabric, ensuring that the grainlines are correctly aligned. Use your fabric pen or chalk to carefully trace around each pattern piece. For a true patchwork effect, you’ll be cutting multiple pieces for each major section of the cat (e.g., several small rectangles or squares sewn together to form a larger piece for the head or body). Use your rotary cutter and cutting mat for precise, clean cuts. If you’re new to patchwork, start with larger, simpler shapes to build confidence.
Step 3: Constructing the Cat’s Body Parts
The tutorial will guide you through sewing the different body parts. This typically involves placing two fabric pieces right sides together, pinning them, and stitching along the designated seam line, usually with a 1/4 inch seam allowance. For curved seams, it’s often beneficial to clip the seam allowance (make small snips into the allowance, not through the seam) after sewing to help the fabric lie flat once turned right side out. Press all seams open or to one side as instructed – this is crucial for a professional finish and helps create a smooth shape.
- The Head: Follow the pattern to sew the various pieces that form the cat’s head. Remember to leave a small opening in one section, as indicated by the pattern, for turning the head right side out and for stuffing later.
- The Body and Tail: Assemble the body and tail pieces in a similar fashion. Again, ensure any necessary openings are left for turning and stuffing. The tail is often a simpler piece, perhaps two fabric pieces sewn together and turned.
- The Ears: The ears are typically smaller, separate pieces. Sew them, turn them right side out, and press them flat. They will usually be attached to the head later.
Step 4: Assembling and Stuffing
Once all individual components (head, body, tail, ears) are sewn and turned right side out, it’s time to bring your cat to life with stuffing. Begin by gently filling each section with polyester fiberfill. Use small tufts of stuffing and push them into all corners and curves using a chopstick or a blunt turning tool. The goal is to stuff firmly but evenly, avoiding lumps or overly dense areas. Ensure the head, body, and tail are well-filled to maintain their shape. Once adequately stuffed, carefully hand-stitch closed the openings you left using an invisible stitch, also known as a ladder stitch, for a neat finish.
Step 5: Attaching Features and Embellishments
Now for the most exciting part – adding personality! The tutorial emphasizes tufting the back with large buttons, which adds a lovely, decorative element and helps shape the cat. To do this, thread a long needle with strong embroidery floss or upholstery thread. Pass the needle through the cat’s body from one side to the other, securing a button on each side, pulling slightly to create a gentle indentation. This gives the cat a more dimensional, almost sculptural quality. For the facial features, use embroidery floss to stitch on eyes, a nose, and a mouth. Simple French knots or satin stitches work well for eyes, and a small triangle for the nose. You can also use felt pieces for the eyes and nose if you prefer a different look. Pay attention to placement to give your cat a unique expression.
Step 6: Final Touches and Assembly
Finally, attach the smaller pieces like ears and tail to the main body if they weren’t integrated earlier. Hand-stitch them securely in place using strong thread. Take a moment to gently shape your cat, ensuring all parts are positioned correctly. Trim any loose threads, and give your new feline friend a final fluff. This stuffed cat idea is so darn cute and customizable! I’ve personally started making quite a few to give as charming, heartfelt Christmas presents and birthday gifts.
Tips for a Purr-fect Patchwork Cat:
- Practice Makes Perfect: If you’re new to sewing, don’t be afraid to practice stitching on scrap fabric before working on your main pieces.
- Color Coordination: While patchwork thrives on variety, try to choose fabrics that have a unifying color or theme to maintain a cohesive look.
- Precision is Key: In patchwork, accurate cutting and consistent seam allowances are paramount. Take your time with these steps.
- Stuffing Technique: Stuff your cat gradually, checking its shape as you go. Overstuffing can distort the seams, while understuffing leaves it floppy.
- Personalize It: Add a small bell, a ribbon bow, or even a tiny embroidered initial to make your cat even more special.
Creative Variations and Gift Ideas:
The beauty of a DIY project is the freedom to personalize it. Consider making your patchwork cat in different sizes, from a small pincushion-sized kitty to a large, huggable plush toy. You could use different fabric themes – perhaps a vintage-inspired cat, a modern geometric one, or even a themed cat for a child’s bedroom (e.g., space-themed fabrics). Instead of buttons for tufting, you might use embroidered starbursts or small pompoms. These cats make exceptional gifts for baby showers, birthdays, holidays, or as a comforting companion for someone special. Imagine a cat made from pieces of baby clothes as a cherished keepsake, or one crafted from fabrics that remind you of a loved one’s favorite colors. The possibilities are truly endless, making each patchwork cat a unique expression of your care and creativity.
Conclusion: Sew Your Way to Happiness
Creating this DIY patchwork cat is more than just a sewing project; it’s an opportunity to engage in a mindful craft, unleash your creativity, and produce something genuinely heartwarming. With the free pattern and the comprehensive tutorial by Pay It Forward, you have all the resources you need to embark on this delightful journey. Whether you’re making it for yourself, as a unique piece of home decor, or as a cherished gift, this patchwork cat is sure to bring joy and a touch of handmade charm to anyone who encounters it. So, gather your materials, fire up your sewing machine, and get ready to stitch your way to a truly adorable feline friend!