
Mastering the Cathedral Stars Quilt: A Detailed Sewing Tutorial
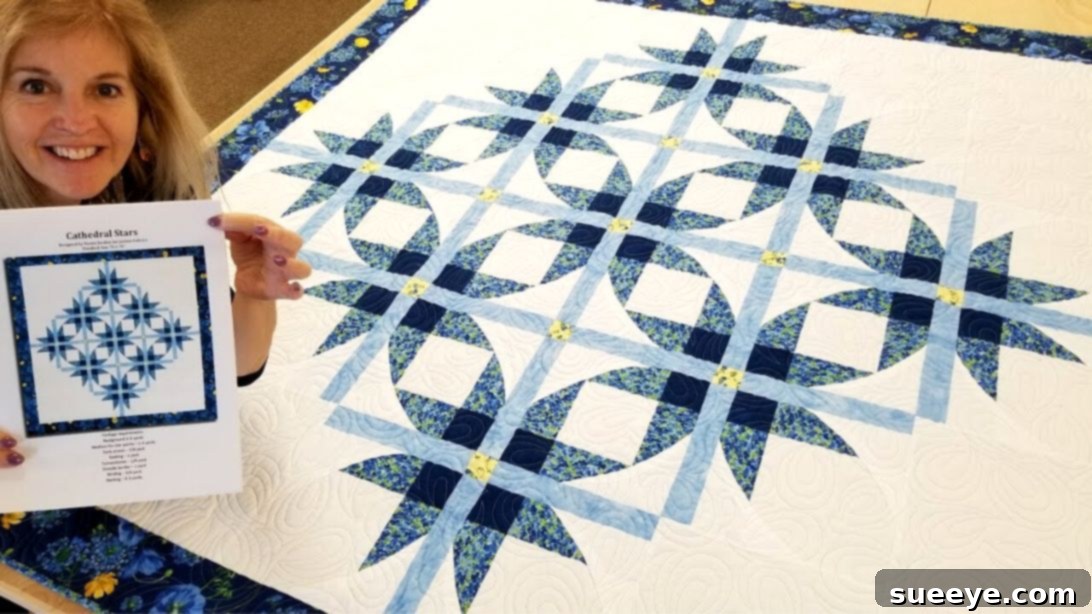
Prepare to be mesmerized by the exquisite beauty of the Cathedral Stars Quilt, a truly remarkable design brought to life by the talented folks at Jordan Fabrics. This stunning quilt is more than just a collection of fabric squares; it’s a masterpiece that blends traditional quilting techniques with an innovative “cathedral window” effect, creating a captivating three-dimensional look. If you’re searching for a quilting project that stands out from the rest, offering both a rewarding challenge and an undeniably gorgeous result, then this pattern is your perfect match. Its intricate design, featuring radiant stars set within a visually rich background, will undoubtedly become a cherished centerpiece in any home. Follow this comprehensive guide to craft your own unique version of this exceptional quilt.
The allure of the Cathedral Stars Quilt lies in its unique construction, which gives the impression of depth and complexity without requiring overly advanced techniques. Each star point seems to emerge from a soft, curved background, reminiscent of classic cathedral window designs, hence its evocative name. This quilt offers a wonderful opportunity to hone your precision cutting, accurate piecing, and careful pressing skills, all while creating a visual feast for the eyes. Whether you’re an experienced quilter looking for a fresh challenge or an adventurous beginner eager to expand your skills, this tutorial will walk you through every step, from selecting your fabrics to the final touches. Get ready to transform beautiful fabrics into a work of art!
Essential Materials and Tools for Your Cathedral Stars Quilt
Creating a quilt of this caliber requires not only your passion and patience but also a carefully selected array of fabrics and reliable tools. Precision is key in quilting, and starting with the right materials ensures a smoother process and a more beautiful outcome. Here’s everything you’ll need to embark on your Cathedral Stars Quilt journey:
Fabric Requirements:
When selecting your fabrics, consider how their colors and patterns will interact. The background fabric will set the stage, while the medium and dark accents will define the stars and unique curved elements. High-quality 100% cotton quilting fabric is recommended for best results.
- Background Fabric: 3 ¾ yards. This fabric forms the foundation of your quilt and allows your star points and accent colors to truly shine. Choose a solid, subtle print, or tone-on-tone fabric that provides good contrast without overpowering the other elements.
- Medium-Colored Fabric for Star Points: 1 ¼ yards. This will be the dominant color for your star points, bringing definition and vibrancy to the overall design. Consider a color that complements your background fabric beautifully and offers a clear distinction.
- Dark Accent Fabric: ⅜ yard. A small but impactful amount, this fabric provides a crucial pop of contrast, outlining elements and adding depth. Its darker hue will make other colors stand out and emphasize the intricate piecing.
- Sashing Fabric: 1 yard. Sashing strips are essential for separating your quilt blocks and creating a cohesive grid structure, giving the eyes a place to rest and enhancing the overall pattern. A neutral color often works best here.
- Cornerstones Fabric: ⅛ yard. These small squares connect your sashing strips, adding tiny design details and structural integrity to your quilt top. They can match the sashing or offer another small contrast.
- Outside Border Fabric: 1 yard. The border frames your quilt, providing a finished edge and adding another layer of design interest. It can either blend subtly with the quilt top or offer a striking contrast to draw the eye outward.
- Binding Fabric: ¾ yard. Binding is the final touch that encases the raw edges of your quilt, providing durability and a professional finish. Choose a fabric that harmonizes with your quilt top, perhaps echoing one of the accent colors.
- Backing Fabric: 4 ¼ yards. The backing fabric is just as important as the front, offering another opportunity for aesthetic appeal. It also provides stability for quilting. Consider a fabric that feels soft and drapes well, coordinating with your quilt’s front.
Recommended Quilting Tools:
Beyond fabrics, a well-equipped sewing station is vital for a successful quilting project. These tools will help you achieve the precision and accuracy needed for your Cathedral Stars Quilt and make the process more enjoyable:
- Sewing Machine: A reliable machine with a ¼-inch presser foot attachment is indispensable for consistent seam allowances, which are crucial for this pattern.
- Rotary Cutter: A sharp rotary cutter (45mm or 60mm) will ensure clean, straight cuts through multiple layers of fabric, saving time and improving accuracy.
- Self-Healing Cutting Mat: Protects your work surface and extends the life of your rotary blade. Invest in a large one for greater flexibility.
- Quilting Rulers: Various sizes, including a large rectangular ruler (e.g., 6″x24″) and a square ruler (e.g., 12.5″x12.5″ or 6″x6″), are essential for accurate measuring and cutting of all your fabric pieces.
- Fabric Scissors: Dedicated sharp scissors for fabric will help with smaller snips, trimming threads, and cutting around curves.
- Good Quality Thread: A strong, color-matching or neutral thread (100% cotton is often preferred for piecing) is crucial for durable seams.
- Iron and Pressing Mat: Proper pressing at each stage is paramount for flat seams and accurate block construction. A steam iron and a wool pressing mat can significantly improve your results.
- Pins or Fabric Clips: To hold fabric pieces together securely before sewing, preventing shifting and ensuring precise alignment.
- Seam Ripper: An inevitable but invaluable tool for correcting mistakes – every quilter needs one!
- Design Wall (Optional but Recommended): A flannel-covered surface to visually arrange your blocks before sewing them together. This helps you visualize the final layout and make adjustments easily.
Before you begin cutting, always pre-wash and press your fabrics to prevent shrinkage and color bleeding after the quilt is finished. This small, often overlooked, step can save you much heartache later on by ensuring fabric stability and colorfastness.
Step-by-Step Guide to Crafting Your Cathedral Stars Quilt
Now that you have all your materials and tools gathered, let’s dive into the exciting process of bringing your Cathedral Stars Quilt to life. Each step builds upon the last, so take your time and enjoy the creative journey. Accuracy in cutting and sewing will ensure your finished quilt is a true masterpiece that you’ll be proud to display.
Step 1: Precise Fabric Preparation and Cutting
The foundation of any beautiful quilt lies in accurate cutting. Take extra care during this stage to ensure all your pieces are perfectly sized, as this will significantly impact how well your blocks come together later. Remember to always use a sharp rotary blade, keep your fabric squared up, and cut on a stable, flat surface.
Background Fabric Cuts:
- Cut 2 strips, each 5 inches wide, from the width of fabric (WOF). These will form the central component for Strip Unit A.
- Cut 3 strips, each 7 ¼ inches wide, from the WOF. These are for Strip Unit B, providing a slightly wider base.
- Cut 8 strips, each 6 inches wide, from the WOF. From these, sub-cut into 48 individual 6-inch squares. These squares are crucial for creating the unique “cathedral window” folded elements.
- Cut 4 strips, each 11 inches wide, from the WOF. From these, sub-cut into 12 individual 11-inch squares. These larger squares will serve as additional background elements and spaces within your quilt layout.
Medium Print Fabric Cuts (for Star Points):
- Cut 7 strips, each 2 ¾ inches wide, from the WOF. These will be sewn onto background strips to define the star points in your strip units.
- Cut 3 strips, each 7 ¼ inches wide, from the WOF. These are also destined for strip units, specifically combining with the dark accent fabric.
Dark Accent Fabric Cuts:
- Cut 3 strips, each 2 ¾ inches wide, from the WOF. These strips will provide the key dark contrast and outline elements in Strip Unit C.
Sashing Fabric Cuts:
- Cut 3 strips, each 9 ½ inches wide, from the WOF. From these, sub-cut into 36 pieces, each measuring 2 inches by 9 ½ inches. These strips will create the structural grid that separates and frames your quilt blocks.
Cornerstones Fabric Cuts:
- Cut 1 strip, 2 inches wide, from the WOF. From this strip, sub-cut into 13 individual 2-inch squares. These small squares will be inserted at the intersections of your sashing strips.
Outside Border Fabric Cuts:
- Cut 7 strips, each 4 ¾ inches wide, from the WOF. These will form the outer frame of your quilt, providing a beautiful finish and potentially adding extra size.
Step 2: Constructing Strip Unit A
This is your first step in creating composite fabric pieces. Take one of the 5-inch wide background fabric strips you prepared. Carefully sew a 2 ¾-inch wide medium print strip onto each long side of the background strip. Ensure you use a consistent ¼-inch seam allowance throughout. Once both medium print strips are sewn, press the seam allowances meticulously towards the darker print fabric. This technique helps prevent shadowing through lighter fabrics and ensures a crisp finish. Repeat this process to create a second identical strip unit. Finally, from these two combined strips, sub-cut them into 5-inch wide by 9 ½-inch long segments. You should yield a total of 12 pieces for Strip Unit A, which will form part of your quilt blocks.
Step 3: Crafting Strip Unit B
Next, assemble Strip Unit B. Take one of the 7 ¼-inch wide background fabric strips. Sew a 2 ¾-inch wide medium print strip onto one long side of the background strip, maintaining that precise ¼-inch seam allowance. After sewing, press the seam allowances diligently towards the darker print, just as before, to ensure a flat and clean unit. Repeat this step two more times to create a total of three such strips. From these three completed strips, sub-cut them into 7 ¼-inch wide by 9 ½-inch long pieces. You will need a total of 12 pieces for Strip Unit B, which will be used in a different block configuration.
Step 4: Assembling Strip Unit C
For Strip Unit C, you will combine a medium print with a dark accent to create a high-contrast element. Take one of the 7 ¼-inch wide medium print strips. Sew a 2 ¾-inch wide dark accent strip onto one long side of the medium print, again using a consistent ¼-inch seam. Once sewn, press the seam allowances consistently towards the darker accent fabric for a clean, sharp edge. Repeat this process two more times, resulting in three completed strips. From these three strips, sub-cut them into 2 ¾-inch wide by 9 ½-inch long pieces. You will need a significant total of 36 pieces for Strip Unit C, as these are used extensively in connecting your main block units.
Step 5: Forming Quilt Blocks with Units A and C
Now, let’s start bringing these strip units together to form your first type of quilt block. Take one of your completed Strip Unit A pieces. Carefully sew one Strip Unit C onto each of its longer sides. This will create a block with the medium print on the outside, framing the darker accent and central background strip. Pay close attention to matching up raw edges and keeping your seams straight and consistent. Press your seams open or to one side as preferred for flatness, usually towards the darker fabric if not open. Repeat this assembly process 11 more times, so you have a total of 12 identical blocks of this configuration, which will feature prominently in your quilt design.
Step 6: Creating Additional Quilt Blocks with Units B and C
For your second type of quilt block, you’ll combine Unit B with Unit C. Take one of your completed Strip Unit B pieces. Sew one Strip Unit C onto one of its longer sides. This will result in a different block configuration compared to the previous step, which will be vital for the overall “star” appearance when arranged. Again, ensure your seams are precise and your edges are aligned before stitching. Press your seams for a flat finish, preparing these blocks for the next exciting stage. Repeat this process 11 more times, completing a total of 12 blocks of this particular design.
Step 7: The Signature Cathedral Window Effect
This step is where the true magic of the “Cathedral Stars” quilt comes to life, creating that unique curved, three-dimensional look reminiscent of traditional cathedral window designs. You will be working with the 6-inch background squares you cut in Step 1.
Take each of your 6-inch background squares and fold them precisely in half diagonally. Press this fold firmly with a hot iron to create a sharp crease. This crease will serve as your guide. Now, carefully place these folded triangular units onto two opposite corners of your previously assembled patchwork blocks (both the A/C blocks from Step 5 and B/C blocks from Step 6). Align the raw edges of the folded triangle with the raw edges of your patchwork block. Secure them in place with a pin or fabric clip to prevent any shifting.
Next, you will “stay stitch” these triangles onto the block. Stitch very close to the raw edge (e.g., 1/8 inch or less). This temporary stitch simply holds the triangle in place and prevents distortion before further sewing. Once stay-stitched, carefully roll back the folded edge of the triangle towards the corner. This action will create a beautiful, soft curve, revealing the fabric underneath. You want the start and stop points of this folded curved section to be approximately ¼-inch away from the raw edges of your block. This ensures that when your blocks are joined, the curves are properly integrated without being caught in the seam allowance.
Finally, topstitch along the folded edge of this curve. This not only secures the curve but also adds a lovely decorative element and definition to your “cathedral window” effect. Use a thread color that either matches the folded fabric or subtly contrasts to highlight the curve. This precise folding and stitching technique is what gives the quilt its distinctive texture and visual depth, making the star points appear to float above the background in a truly captivating manner.
Step 8: Arranging Your Quilt Blocks for a Stunning Layout
Before you begin sewing your blocks together, it is absolutely crucial to lay out your entire quilt top to visualize the final design. A design wall (a large flannel-covered surface) is ideal for this, as it allows you to easily move and adjust blocks without them falling. Begin by arranging your various completed blocks (those from Steps 5, 6, and 7), the sashing strips (2″ x 9 ½”), the cornerstones (2″ squares), and the 11-inch background squares. Experiment with different orientations, rotating blocks, and swapping positions until you achieve a harmonious and balanced pattern that perfectly highlights the “cathedral stars” effect.
Pay close attention to how the medium and dark fabrics interact to form the star shapes and how the folded curves create visual interest across the entire design. Ensure your sashing and cornerstones form a clear grid, providing structure and definition to your layout. This stage is where your artistic eye comes into play, ensuring color balance and an even distribution of pattern. Once you are satisfied with the arrangement, take a photograph as a reference before you start sewing, or number your blocks for easy reassembly. This vital step prevents mistakes and allows you to refine your design before committing to stitches, saving you from potential seam ripping later.
Step 9: Assembling the Quilt Top and Adding the Outer Border
Once your layout is finalized in Step 8, it’s time to begin sewing your blocks, sashing, and cornerstones together. Work in rows, carefully sewing each piece to the next with a consistent ¼-inch seam allowance. Press seams after each row is completed, alternating pressing directions between rows to help seams nest perfectly when joining rows together. This technique reduces bulk and helps maintain block integrity. After all your rows are sewn, join them one by one to form the complete quilt center, pressing after each join to ensure flatness and accuracy.
For the outer border, take your seven 4 ¾-inch wide border strips. Stitch them together along their short edges using diagonal seams (if desired, to reduce bulk and create a continuous look) to create one continuous, very long strip. Press these seams open to reduce bulk. Now, carefully measure your quilt top in several places (center and edges) and take the average measurement for each side. Cut your long border strip to match these measurements, adding the border to the sides first, then the top and bottom. Attach the border strips to all four sides of your quilt top, easing if necessary to prevent wavy borders. This step frames your beautiful design, adds a professional touch, and prepares the quilt for the final layers of batting and backing.
Step 10: Preparing for Quilting – Layering Your Quilt
With your magnificent quilt top complete, the next phase is to prepare it for quilting. This involves creating the “quilt sandwich,” which consists of three layers: the backing, the batting, and your quilt top. Proper layering and basting are crucial for a smooth quilting process and a beautiful finished quilt.
- Prepare the Backing: If your backing fabric isn’t wide enough (which is common for larger quilts), you’ll need to seam two or more pieces together to create a single piece that is at least 4-6 inches larger than your quilt top on all four sides. Press this backing thoroughly to remove all wrinkles.
- Prepare the Batting: Cut your batting to be slightly larger than your quilt top (about 2-4 inches larger on all sides). Batting provides warmth, loft, and helps define the texture of your quilting stitches. Choose a batting type that suits your desired warmth and drape.
- Layering: Find a large, clean, flat surface (the floor or a large table works well!). Lay your backing fabric down first, right side down, smoothing out any wrinkles. Secure it in place with painter’s tape along the edges to keep it taut and flat.
- Add Batting: Carefully lay your batting on top of the backing, centering it and smoothing it gently from the center outwards to eliminate any creases or bumps.
- Add Quilt Top: Finally, place your quilt top, right side up, on top of the batting, ensuring it is perfectly centered and smoothed out. Take your time to ensure all three layers are flat and free of wrinkles.
Once layered, the “quilt sandwich” needs to be basted. Basting temporarily holds all three layers together, preventing shifting and puckering during the quilting process. You can use safety pins (curved quilting pins are excellent for this), basting spray adhesive, or long hand-basting stitches. Ensure the layers are securely held every few inches across the entire quilt, especially in the center and around the edges, for optimal stability.
Step 11: The Art of Quilting
Quilting is the process of stitching through all three layers (quilt top, batting, and backing) to secure them together, adding texture, durability, and a unique artistic element to your project. This is where your quilt truly takes on its final form and becomes a cohesive textile art piece.
- Machine Quilting: Many quilters opt for machine quilting, either on a domestic sewing machine or a longarm quilting machine. For domestic machines, you can do “stitch-in-the-ditch” (quilting precisely along existing seam lines), straight-line quilting with a walking foot for simple, elegant designs, or free-motion quilting with a darning foot for more intricate patterns like stippling, loops, feathers, or custom motifs.
- Hand Quilting: For a more traditional and softer look, hand quilting involves making small, even stitches by hand using a special quilting needle and strong quilting thread. This method creates a lovely, heirloom quality and a unique texture.
- Choosing a Design: Consider your quilt’s pieced design. Simple straight lines can complement the geometric stars and sashing, while a meandering free-motion design can soften the overall look and add organic flow. You might also choose to outline the star shapes or fill the background areas. Practice on scraps if you’re trying a new technique. The quilting design can significantly enhance or subtly support your piecing, so choose wisely and enjoy the process!
Step 12: The Finishing Touch – Binding Your Quilt
Binding is the final step that gives your quilt a clean, professional edge and protects the raw edges from fraying. It’s often sewn on by machine and then finished by hand for a beautiful, invisible stitch, or entirely by machine for speed and durability. This step truly completes your masterpiece.
- Prepare Binding Strips: Take your ¾ yard of binding fabric. Cut it into 2 ¼-inch wide strips (or 2 ½-inch, depending on your preference for binding width and the thickness of your batting). You will need to join these strips end-to-end using diagonal seams to create one continuous piece long enough to go around the entire perimeter of your quilt, plus about 10-12 inches extra for joining. Press the long strip in half lengthwise, wrong sides together, to create a neat fold.
- Attach Binding to Quilt: With your quilt top facing up, align the raw edges of your folded binding strip with the raw edge of your quilt. Start a few inches from a corner, leaving a tail of binding. Stitch the binding to the quilt with a consistent ¼-inch seam allowance. When you reach a corner, stop ¼-inch from the edge, backstitch, clip threads, and pivot. Fold the binding up at a 45-degree angle, then fold it back down, aligning the raw edges again, and continue stitching from the very edge of the quilt. Repeat for all four corners. Join the binding tails together using a diagonal seam for a seamless, neat finish.
- Finish Binding: Flip the quilt over. Carefully wrap the folded binding strip around to the back of the quilt, ensuring the folded edge just covers your machine stitching line. You can then hand-stitch the folded edge of the binding to the backing fabric using a ladder stitch or blind stitch for an invisible and elegant finish. Alternatively, you can machine stitch it from the front, carefully “stitching in the ditch” along the seam line, which will catch the binding on the back for a quicker, yet still durable, finish.
Once your binding is complete, your Cathedral Stars Quilt is officially finished! Give it a final press, and perhaps a gentle wash to bring out the lovely crinkly texture that quilters adore. Step back and admire your stunning accomplishment – a true labor of love and a beautiful piece of textile art.
Conclusion: Your Hand-Crafted Cathedral Stars Masterpiece
Congratulations! You’ve navigated the intricate steps and creative challenges to complete your very own Cathedral Stars Quilt. From the precise cutting of individual fabric pieces to the meticulous assembly of strip units, the ingenious “cathedral window” technique, and the final touches of quilting and binding, every stitch contributes to a truly breathtaking outcome. This quilt is more than just a functional item; it’s a testament to your dedication, skill, and artistic vision. The journey of its creation is as rewarding as the magnificent finished product.
The visual depth and captivating star patterns of this design make it a standout piece, perfect for adorning a bed, draping over a sofa, or even hanging as a unique wall art. Each time you or a loved one gazes upon its intricate details and unique texture, you’ll be reminded of the joy of creation and the beauty that emerges from careful craftsmanship. We hope this detailed tutorial has empowered you to embrace the art of quilting, provided clear guidance, and perhaps inspired you to explore even more complex and beautiful patterns in the future. Enjoy your magnificent, handmade Cathedral Stars Quilt – a true legacy in fabric that will be cherished for years to come!