
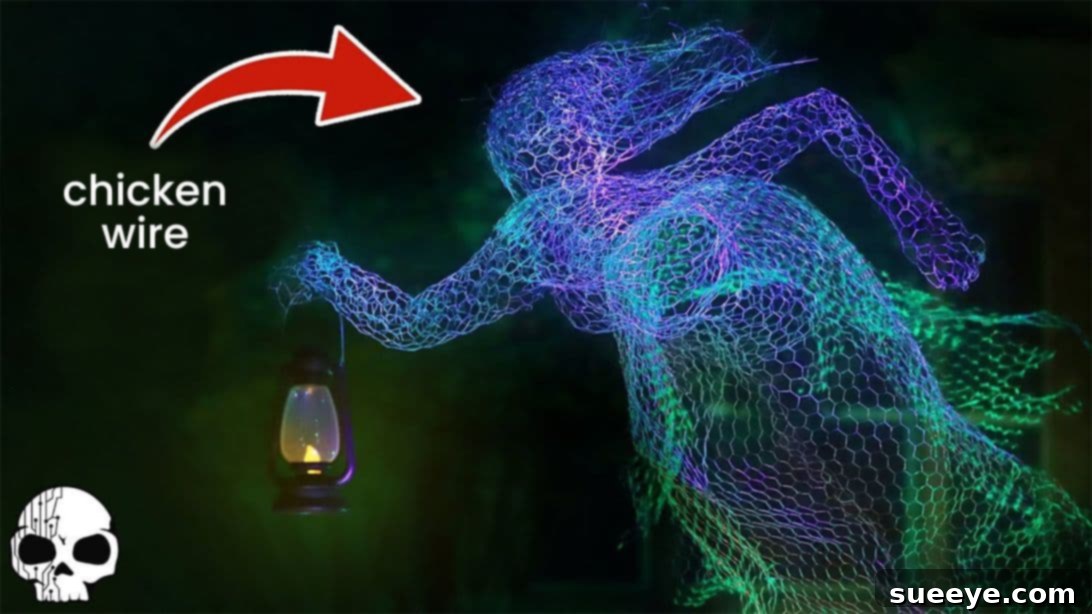
Unveiling the Eerie Elegance: Craft Your Own Glowing Chicken Wire Ghost for Halloween
Prepare to become the talk of your neighborhood this Halloween season with a truly unforgettable yard decoration: the Glowing Chicken Wire Ghost. This spectacular DIY project, inspired by the creative minds at Wicked Makers on YouTube, is more than just a decor piece; it’s a glowing masterpiece that promises to captivate and spook your guests. Imagine a spectral figure shimmering mysteriously in the twilight, casting an ethereal glow across your lawn. It’s an artistic statement that combines ingenuity with chilling charm, perfect for creating an enchanting, albeit eerie, atmosphere. Whether you’re a seasoned DIY enthusiast or looking for an impressive beginner-friendly project, this guide will help you bring your very own luminescent phantom to life.
This project offers an incredible opportunity to infuse your Halloween display with a unique, handcrafted touch. Forget generic store-bought decorations; this glowing ghost stands out, embodying the spirit of the season with its haunting beauty. Beyond its visual appeal, crafting this ghost is a rewarding experience, allowing you to sculpt a truly personalized sentinel for your front yard or backyard. You can even enhance the scene with additional elements like moss-covered gravestones, wisps of theatrical smoke, or strategically placed spotlights to complete your ghastly tableau. Dive into the full instructions below and get ready to create a truly mesmerizing outdoor Halloween decoration that will leave a lasting impression.
Why This Glowing Chicken Wire Ghost Will Be Your Favorite Halloween DIY
The allure of the Glowing Chicken Wire Ghost lies in its striking visual impact and the relatively straightforward process of bringing it to life. Unlike inflatables or static props, a chicken wire sculpture offers a dynamic, artistic quality, allowing light to pass through and create an illusion of transparency and movement. When coated with glow-in-the-dark paint, this effect is amplified, transforming a simple wire frame into a truly otherworldly apparition once night falls. This DIY project is not just about making a decoration; it’s about crafting an experience. It serves as a fantastic focal point for any Halloween yard display, drawing eyes and sparking conversations. Its robust construction also means it can be a cherished part of your Halloween traditions for years to come, enduring various weather conditions with proper care. Embrace the opportunity to channel your inner artist and craft a signature piece that reflects your personal spooky style.
Before You Begin: Safety and Preparation
Working with chicken wire requires a bit of caution to ensure a safe and enjoyable crafting experience. The edges of chicken wire can be sharp, so wearing a sturdy pair of protective gloves throughout the shaping and cutting process is paramount. These will shield your hands from cuts and scrapes. Additionally, a good quality pair of wire cutters and pliers will make manipulating the wire much easier and safer, allowing for precise cuts and secure twists. If you plan to use glow-in-the-dark spray paint, remember to work in a well-ventilated outdoor area or a spacious garage with open doors and windows. Always wear a respiratory mask to avoid inhaling paint fumes and protect your eyes with safety glasses. Lay down a drop cloth or old newspapers to protect your workspace from overspray. Taking these simple precautions will ensure your focus remains on creativity rather than potential hazards.
Materials You’ll Need for Your Ethereal Creation
Gathering your materials efficiently is the first step toward a successful DIY project. Most items can be found at local hardware stores, craft shops, or online retailers. Here’s a detailed list:
- Chicken Wire: This is the backbone of your ghost. Look for rolls that are flexible enough to shape but sturdy enough to hold its form. The amount needed will depend on the desired size of your ghost, but a standard roll should suffice for one life-sized figure.
- 100′ 18 Gauge Wire: Specifically designated for the ghost’s hair, this lighter gauge wire is pliable enough to create flowing, individual strands, giving your ghost a wispy, ethereal appearance.
- Fishing Line: An almost invisible solution for hanging your finished ghost. Choose a heavy-duty line to ensure it can support the ghost’s weight, especially if you plan to hang it outdoors where wind might be a factor.
- Glow-in-the-Dark Spray Paint: The magical ingredient that brings your ghost to life after dark. Opt for a high-quality, weather-resistant formula if your ghost will be displayed outdoors. Multiple cans might be needed for thorough coverage.
- Plastic Halloween Lantern: This adds a classic spooky touch and a central point of light, enhancing the ghost’s haunting presence. Consider one that is battery-operated for ease of placement and safety.
- Wire Cutters: Essential for precisely cutting the chicken wire and 18-gauge wire to your desired lengths and shapes.
- Pliers: Indispensable for twisting and securing wire ends, ensuring a robust and stable structure for your ghost.
- Mannequin or Body Form (optional but highly recommended): A mannequin provides a perfect armature for shaping the ghost’s body, ensuring realistic proportions and a natural posture. If unavailable, large round objects like exercise balls, pillows, or even yourself can serve as temporary forms.
- Protective Gloves: Absolutely critical for safeguarding your hands from the sharp edges of the chicken wire.
Step-by-Step Guide to Crafting Your Glowing Ghost
Now, let’s embark on the creative journey of building your spectral guardian. Each step is designed to guide you through the process, ensuring a stunning result.
Step 1: Shaping the Torso for a Lifelike Form
Begin by carefully wrapping the chicken wire around the body of your mannequin or chosen form. Start with the front, ensuring you capture the desired contours of the chest and waist. Once the front shape is established, bring the ends of the chicken wire together at the back. Using your wire cutters, trim any excess wire, then use your pliers to twist the cut ends securely, forming a seam. This will create a basic torso shape. Take your time to adjust the sides, gently molding the wire to achieve a realistic human-like figure. If you’re not using a mannequin, improvise with large round objects like exercise balls or even large pots to create the necessary curves for the bust and hips. The goal is to create a hollow yet distinct body shape that will serve as the foundation of your ghost.
Step 2: Crafting the Limbs and Head with Proportionate Detail
Once the torso is complete, proceed to shape the arms and head using the same technique. Wrap chicken wire around the mannequin’s arms and head, ensuring each piece is proportionate to the torso. Cut and twist the wire to form these individual sections, paying attention to details like shoulder width and head circumference. After each body part has taken its distinct shape, carefully cut the wire to detach them from the mannequin. Exercise caution to maintain the integrity of the sculpted forms as you remove them. You should now have separate pieces for the torso, head, and two arms, ready for assembly.
Step 3: Assembling Your Ethereal Figure and Defining Its Pose
With the individual body parts ready, it’s time to bring your ghost to life by assembling them. First, cut strips of chicken wire to close any open ends or gaps on the individual pieces. Attach these strips securely by twisting the wire ends with pliers. Next, carefully connect the head to the torso, and then each arm to the shoulders. This is where you can define your ghost’s pose. For a classic, haunting look, position one arm relatively straight, perhaps reaching out, while folding the other arm at the elbow, as if holding something or floating gracefully. Once you’re satisfied with the pose and all parts are securely attached, tie a strong piece of wire to the top of the ghost’s head or shoulders and suspend it from your ceiling or a sturdy beam. This temporary hanging will make the subsequent steps of adding the skirt and hair much easier to manage.
Step 4: Creating the Flowing Skirt for a Ghostly Drape
To give your ghost a truly ethereal and flowing appearance, create a skirt from chicken wire. Cut long strips of chicken wire, shaping them into rough triangles or irregular flag-like pieces. These irregular shapes will contribute to a more natural, flowing look rather than a rigid skirt. Attach these triangular strips around the bottom edge of the torso, using pliers to twist and secure them firmly. Allow these strips to hang down, forming the ghostly skirt. Once attached, gently bend and curve the ends of the wire strips to create a sense of movement and drapery, mimicking a flowing gown. You can vary the lengths of these strips to add more dimension and a tattered effect, enhancing the spooky aesthetic of your glowing ghost.
Step 5: Designing the Ghostly Hair for Added Realism
The hair is crucial for adding character and a sense of movement to your ghost. Take your 18-gauge wire and cut it into numerous small strands. The more strands you create, and the more varied their lengths, the fuller and more natural the hair will appear. Next, cut a rectangular piece of chicken wire that will serve as the base for the hair and attach it securely to the ghost’s head. Mold this base to create the overall shape of the hairstyle, perhaps suggesting a windswept or cascading look. Once the base is in place, begin attaching the individual wire strands to it. You can twist them, loop them, and bend them to create volume and texture, making the hair look wild, flowing, or eerily still. Experiment with different arrangements to achieve the desired ghostly coiffure.
Step 6: Applying the Eerie Glow with Spray Paint
Now for the magical transformation! Take your assembled ghost to an open, well-ventilated area, preferably outdoors. Lay down a drop cloth or old newspapers to protect the ground from overspray. With your protective gloves and mask on, begin to spray paint the entire chicken wire structure with the glow-in-the-dark paint. Apply the paint in light, even coats, keeping the can moving to avoid drips. Allow each coat to dry according to the manufacturer’s instructions before applying the next. You’ll likely need multiple coats to achieve a vibrant, lasting glow. Ensure all surfaces, including the inside of the skirt folds and the hair strands, are thoroughly covered for maximum luminous effect once darkness falls.
Step 7: Adding the Lantern and Preparing for Display
The final touch is to equip your ghost with its eerie lantern. Carefully attach the plastic Halloween lantern to one of the ghost’s hands, specifically the folded arm if you chose that pose. You can use thin wire or fishing line to secure the lantern firmly, making sure it won’t swing excessively or detach. Once the lantern is in place, attach a strong piece of fishing line to the top of your ghost – perhaps at the shoulders or head – and prepare to hang it. The beauty of fishing line is its near invisibility, giving the impression that your ghost is truly floating. Choose a prominent spot in your yard, such as a tall tree branch, a porch overhang, or a specially constructed frame. Ensure it hangs at a height that allows its glow to be fully appreciated and its spectral form to be admired by all who pass by.
Tips for Customization and Enhanced Spookiness
Your glowing chicken wire ghost is a fantastic base for further creativity. Consider these ideas to make it even more unique:
- Different Poses: Experiment with various arm and body positions to convey different emotions – perhaps a welcoming embrace, a menacing beckon, or a forlorn stoop.
- Accessories: Add small, lightweight accessories like a decaying bouquet, a rusty chain, or even small fabric scraps to create a tattered shawl for a more detailed look.
- Colored Lights: Place an LED spotlight with a color-changing bulb inside the ghost or beneath it to cast an eerie colored glow, enhancing its mysterious aura.
- Fog Machine Integration: Position a fog machine nearby to create a swirling mist around your ghost, making it appear as if it’s emerging from the ethereal realm.
- Sound Effects: Combine your visual display with subtle ghostly moans or unsettling whispers played on a loop to complete the immersive haunting experience.
- Multiple Ghosts: Create a family of ghosts in different sizes and poses for a truly grand and impactful yard display.
Troubleshooting Common DIY Challenges
While this project is relatively straightforward, you might encounter a few minor hurdles. Here are some quick solutions:
- Stiff Chicken Wire: If your chicken wire is too rigid to shape easily, try bending it over a rounded surface like a bucket or a large pipe to start its curvature. Wearing heavy-duty gloves will also give you better grip and protection.
- Wobbly Structure: If your ghost feels unstable after assembly, reinforce key joints (neck, shoulders, waist) with additional pieces of 18-gauge wire, twisting them tightly with pliers. You can also discreetly run a thicker support wire vertically inside the torso for added rigidity.
- Uneven Glow: If your glow-in-the-dark paint isn’t glowing uniformly, it likely needs more coats. Ensure each layer is thin and allowed to dry completely before applying the next. Also, ensure the ghost is exposed to strong light (sunlight or UV light) for several hours to “charge” its glow before display.
Conclusion: A Hauntingly Beautiful Masterpiece Awaits
Creating your own Glowing Chicken Wire Ghost is an incredibly satisfying and impactful DIY project for Halloween. It offers a unique blend of artistry, spookiness, and personal expression, transforming simple materials into a truly mesmerizing yard display. From the initial shaping of the chicken wire to the final ethereal glow, each step brings you closer to realizing a vision that will delight and perhaps slightly spook everyone who sees it. So, don’t shy away from this engaging challenge. Gather your materials, don your gloves, and prepare to sculpt a hauntingly beautiful masterpiece that will light up your Halloween night and leave a lasting impression. Your spectacular glowing ghost is not just a decoration; it’s a testament to your creativity, ready to become the centerpiece of your most unforgettable Halloween celebration yet!