
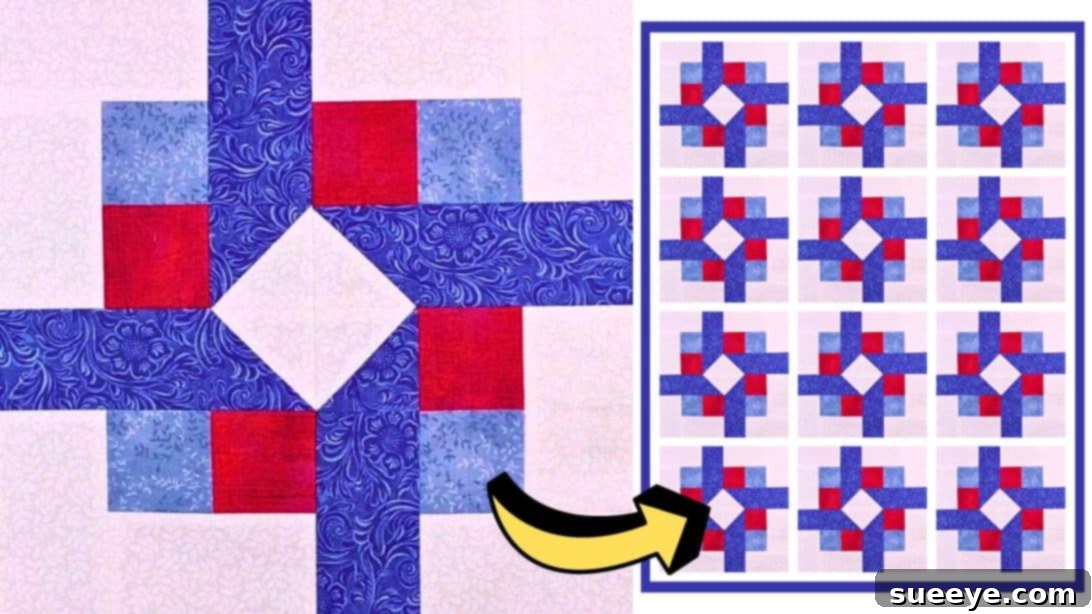
Master the Easy Spokes Quilt Block: A Free Pattern Tutorial for All Skill Levels
Embark on a delightful quilting journey with the mesmerizing Spokes Quilt Block, a design renowned for its elegant simplicity and striking visual impact. If you appreciate quilt blocks that are both neat and straightforward to construct, then you are sure to fall in love with this fantastic project presented by the talented Carol Thelen on YouTube. This tutorial is perfect for quilters of all skill levels, offering clear, concise instructions that demystify the process of creating a beautiful, intricate-looking block. With the foundational techniques mastered, you’ll gain the confidence to experiment with an endless array of fabric colors and patterns, truly making each block uniquely yours.
The Spokes Quilt Block gets its charming name from the radial design it forms when multiple units are assembled, creating a central diamond that radiates outwards like spokes on a wheel. This intricate appearance belies the surprising ease of its construction, making it an ideal choice for both seasoned quilters looking for a quick and satisfying project, and beginners eager to learn fundamental piecing skills. The beauty of this block lies in its versatility; it can stand alone as a decorative piece, be incorporated into larger quilts, or used for smaller projects like table runners, placemats, or tote bags. Dive into this project, download your free pattern, and prepare to be amazed at how quickly you can create something truly stunning!
Essential Materials for Your Spokes Quilt Block Project
Gathering the right materials before you begin is crucial for a smooth and enjoyable quilting experience. Here’s a detailed list of what you’ll need, along with some tips for selection:
- Dark Print Fabric (Main): This will form the core elements of your block. Choose a fabric with a pattern or color that you absolutely love, as it will be prominent in the final design. Opt for high-quality, 100% quilting cotton for best results.
- Contrasting Dark Print Fabric (Accent): Select a fabric that complements your main dark print but offers enough contrast to stand out. This will add depth and visual interest to your block, highlighting the “spokes” effect.
- Light Print Fabric (Accent): This fabric will help define the shapes and provide visual separation. A lighter color or subtle print will ensure your darker fabrics pop. Consider how it interacts with both dark prints.
- Background Fabric: Often a solid, light-colored fabric like white, cream, or a very subtle tone-on-tone print. The background fabric is instrumental in making the “spokes” and the central diamond truly stand out. It creates negative space that enhances the block’s design.
- Marking Pen, Pencil, or Chalk: Essential for drawing precise lines on your fabric. A heat-erasable pen or tailor’s chalk is often preferred as marks disappear cleanly.
- Ruler: A clear acrylic quilting ruler with ¼-inch and ½-inch markings is indispensable for accurate cutting and squaring up.
- Scissors or Rotary Cutter and a Cutting Mat: For precise and efficient fabric cutting. A rotary cutter with a self-healing mat is highly recommended for quilters as it ensures straight, clean cuts quickly. If using scissors, ensure they are sharp and dedicated to fabric.
- Needle and Thread: High-quality 100% cotton thread is usually preferred for quilting, matching the color of your background fabric or a neutral tone.
- Iron (for pressing): A good iron is a quilter’s best friend! Pressing seams open or to one side is critical for flat blocks and accurate piecing.
- Sewing Machine: A reliable sewing machine with a ¼-inch presser foot attachment will make piecing much easier and more consistent.
- Free Spokes Quilt Block Pattern: This downloadable pattern provides all the exact cutting dimensions and diagrams you’ll need. Make sure to click here to download the pattern before you begin.
Step-by-Step Guide to Crafting Your Spokes Quilt Block
Before you begin cutting, it’s often a good practice to pre-wash and press your fabrics to prevent shrinkage and color bleeding later on. Once your fabrics are ready, use the downloadable pattern to cut all your fabric pieces accurately. Precision in cutting is the foundation of beautiful quilting!
Step 1: Constructing Your Half-Square Triangles (HSTs)
The Half-Square Triangle (HST) is a fundamental building block in quilting, and we’ll start by creating several of these versatile units. Begin by taking your background fabric squares and drawing a diagonal line from one corner to the opposite corner on the wrong side of each square. These lines will serve as your sewing guides. Next, carefully place a background square on top of a dark print square, ensuring their right sides are facing each other and all edges are perfectly aligned. With your sewing machine, stitch a precise ¼-inch seam allowance along both sides of the marked diagonal line. This technique allows you to create two HSTs from a single fabric pairing.
Once stitched, take your sewn unit and cut it in half directly along the marked diagonal line. You will now have two triangular units. Gently open each unit and press the seams open for a flatter, less bulky finish, or press them towards the darker fabric to minimize shadow. After pressing, trim off any small “nubs” or “dog ears” at the corners. For optimal accuracy, consider squaring up your HSTs to the exact dimensions specified in your pattern using your quilting ruler and rotary cutter. Repeat this process with all remaining pairs of background and dark print squares to create a full set of perfectly pieced Half-Square Triangles.
Step 2: Assembling the Contrasting Strip Units
Now, let’s move on to creating the dynamic contrasting strip units that will form the outer elements of your Spokes block. Begin by pairing your contrasting dark print squares into twos. Take two squares, place them right sides together, ensuring all edges are aligned, and stitch them along one side with a consistent ¼-inch seam allowance. Press the seam open or to the darker fabric. This forms a small, two-patch strip. Repeat this process with the rest of your contrasting fabric pairs until you have several of these two-patch units.
Next, carefully take one of your prepared background rectangles and place it on top of one of these two-patch strip units, right sides facing and with the long edges matching perfectly. Stitch these pieces together along the long side with a ¼-inch seam. Press the seam open. This elongated unit will start to give shape to the “spokes” of your block. Repeat this step for all your contrasting strip units.
Step 3: Integrating Background Rectangles and Half-Square Triangles
Continue building upon your strip units by pressing the newly sewn seams open. Now, take another background rectangle and carefully position it along the side of the strip unit you just created, as expertly demonstrated in Carol Thelen’s video tutorial. Ensure the edges are meticulously matched before stitching them together with your consistent ¼-inch seam allowance. Once sewn, press this new seam open, ensuring your unit remains flat and precise. Proceed to apply this same technique to all your remaining strip units, creating a series of elongated, pieced segments.
The next crucial step involves attaching your Half-Square Triangle pieces to the dark print rectangles. When performing this step, pay close attention to the orientation and make sure to place the dark print fabrics of the HSTs beside the dark print fabrics of the rectangles. This careful placement is what creates the distinct visual effect of the “spokes.” Pinning these pieces before sewing can help maintain alignment. Stitch them together, then press all seams open or towards the darker fabric to ensure a smooth, neat finish. Precision in this step is key to the overall impact of your Spokes Quilt Block.
Step 4: Final Assembly of Your Spokes Quilt Block
You’re now ready for the exciting final assembly! Take the strip unit you created in the previous step and carefully sew it to the other pieced unit you’ve constructed. This combination will begin to form your complete block units. Once these connections are made, press all seams nicely and flat. Continue this process with all your remaining pieced components until you have a complete set of individual block units, each ready for final arrangement.
The magic of the Spokes Quilt Block truly comes alive in this final stage of assembly. Arrange your completed block units side by side, rotating each one meticulously until the background fabric at the center gracefully forms a striking diamond shape. This central diamond is the hallmark of the Spokes design, and careful rotation ensures its perfect symmetry. Once you are satisfied with the arrangement, begin sewing the top rows of your block together. After each row is sewn, press the seams open to maintain flatness. Repeat this process for the bottom rows. Finally, sew the top rows to the bottom rows, aligning your seams carefully. Press these final seams open, and voilà—your stunning Easy Spokes Quilt Block is complete!
Tips for a Perfect Spokes Quilt Block
Achieving a professional-looking quilt block relies on a few key practices:
- Accuracy is Paramount: Measure twice, cut once! Precise cutting of all fabric pieces is the single most important factor for accurate piecing. Even a slight discrepancy can throw off your entire block.
- Consistent Seam Allowance: Use a scant ¼-inch seam allowance throughout your project. A scant ¼-inch means stitching just a hair less than a true ¼-inch, which accounts for the fabric taken up when the thread goes through it. This small adjustment can make a big difference in the final size of your units.
- Pressing, Not Ironing: When quilting, we “press” seams, which means lifting and placing the iron, rather than sliding it. This prevents stretching and distortion of your fabric. Press after every seam to ensure flat, crisp units.
- Squaring Up: Don’t skip squaring up your Half-Square Triangles and other units to the exact dimensions specified in the pattern. This guarantees all your pieces fit together perfectly.
- Quality Tools: Invest in good quality tools—a sharp rotary cutter, a reliable ruler, and a well-maintained sewing machine—to make the process easier and more enjoyable.
- Patience and Breaks: Quilting is a meditative art. Take your time, enjoy the process, and don’t hesitate to take breaks if you feel frustrated.
Unleash Your Creativity: Fabric Choices and Project Ideas
The Spokes Quilt Block is incredibly adaptable. While this tutorial guides you through a specific color scheme, feel free to unleash your creativity with fabric choices:
- Color Palettes: Experiment with monochromatic schemes for subtle elegance, complementary colors for vibrant contrast, or analogous colors for a harmonious blend. Consider using a scrappy approach with various prints from your stash for a truly unique look.
- Fabric Scale: Mix large, medium, and small-scale prints to add visual interest. Just ensure there’s enough contrast in value (lightness/darkness) between your chosen fabrics to make the design pop.
- Project Ideas: Once you’ve mastered this block, the possibilities are endless!
- Full Quilt: Make multiple Spokes Blocks and assemble them into a stunning bed quilt.
- Baby Quilt: A smaller version makes for a thoughtful and handmade baby gift.
- Wall Hanging: One or a few blocks can create a beautiful piece of textile art for your home.
- Table Runner or Placemats: A series of blocks sewn together creates an elegant addition to your dining decor.
- Tote Bags or Cushion Covers: Incorporate a Spokes Block into practical items for a touch of handmade charm.
*All image credit belongs to Carol Thelen via YouTube. Follow and subscribe to her channel for more incredible quilting tutorials and inspiration!
Unlock Your Quilting Potential with This Easy Spokes Quilt Block Tutorial
The Easy Spokes Quilt Block is more than just a pattern; it’s an opportunity to hone your quilting skills, play with colors, and create something truly beautiful with your own hands. Carol Thelen’s tutorial provides a clear and supportive guide through each step, ensuring a rewarding experience even for those new to the craft. The satisfaction of seeing your fabric pieces transform into a cohesive and intricate design is unparalleled. Download the free pattern today, gather your favorite fabrics, and start stitching! Whether you’re making a full quilt or a small decorative item, this versatile block will undoubtedly become a favorite in your quilting repertoire. Happy quilting!