
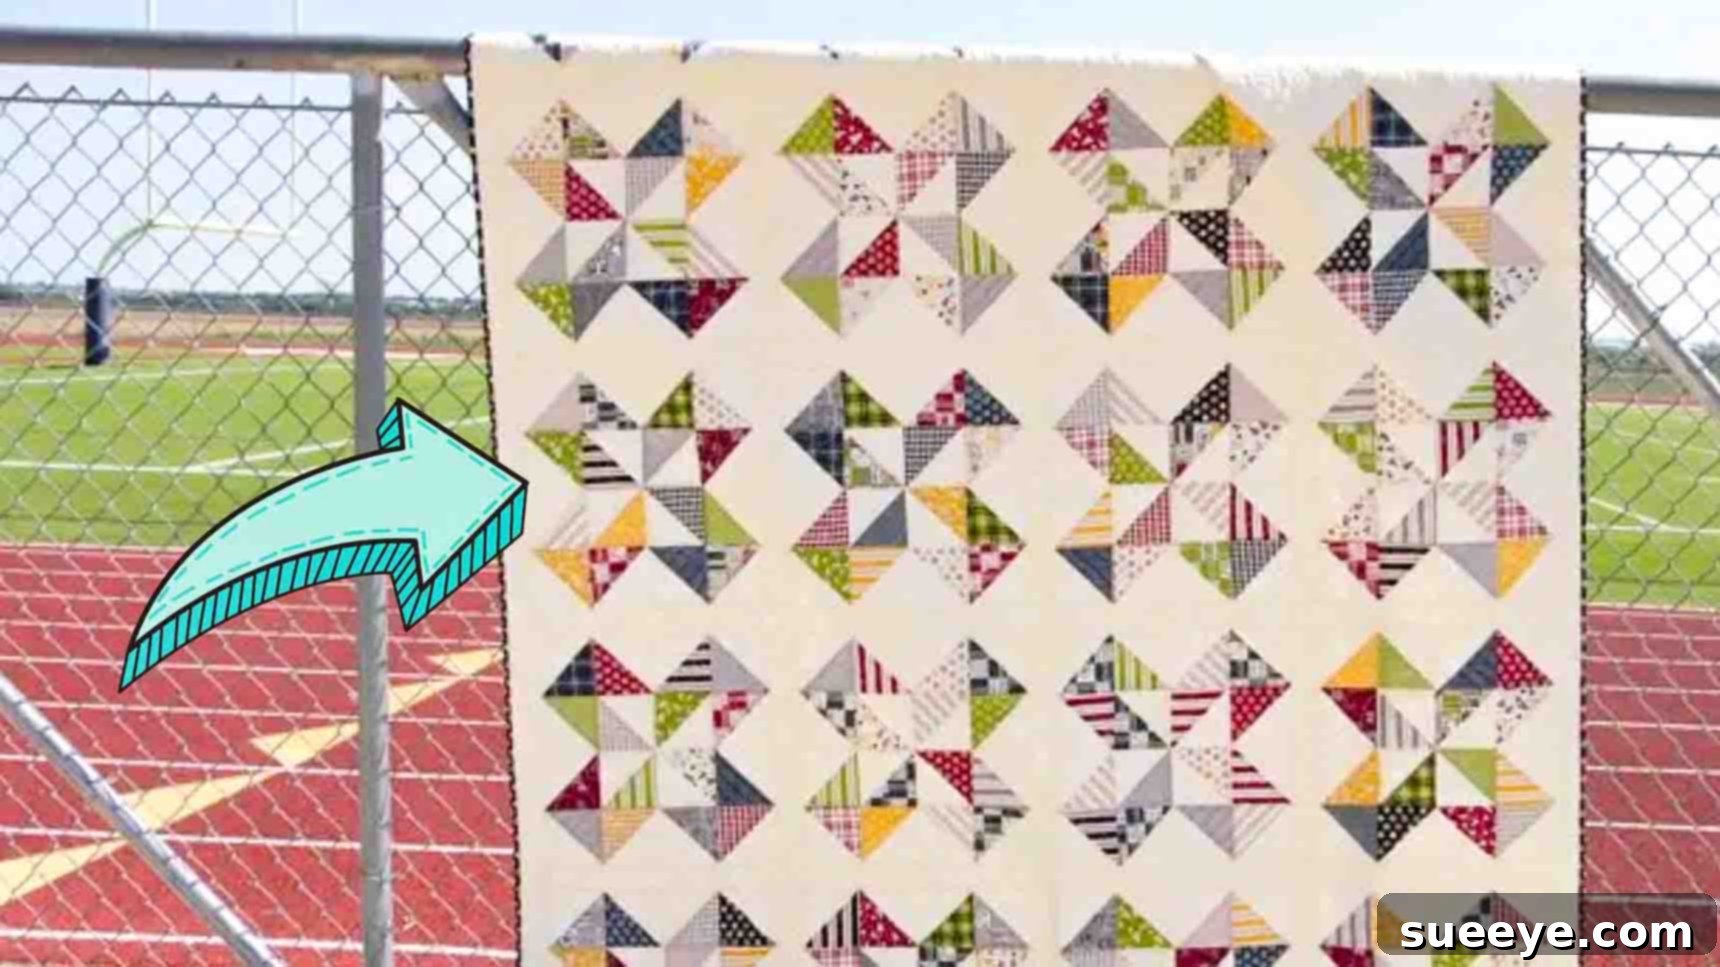
Star Cakes Quilt Pattern: A Beginner-Friendly Layer Cake Project
Are you searching for a delightful and accessible quilting project that makes the most of your beautiful fabric layer cakes? Look no further! The Star Cakes Quilt, a fantastic design brought to life by the experts at Fat Quarter Shop on YouTube, is an absolute dream for quilters of all skill levels, especially beginners. This pattern is celebrated for its stunning visual appeal, ease of construction, and the efficiency with which it transforms pre-cut fabrics into a magnificent finished quilt.
The beauty of the Star Cakes Quilt lies in its simplicity and the striking “star” effect created by cleverly arranged Half-Square Triangles (HSTs). If you’ve been hesitant to dive into quilting, or are looking for a quick yet rewarding project, this tutorial is your perfect entry point. It requires just one printed and one solid-colored layer cake, along with some yardage for sashing and borders, making it a surprisingly economical and manageable endeavor. Get ready to embark on a creative journey that promises a beautiful, handmade quilt to cherish or gift. Follow our comprehensive guide, inspired by the Fat Quarter Shop’s clear instructions, to create your own Star Cakes masterpiece.
Why Choose the Star Cakes Quilt Pattern?
The Star Cakes Quilt stands out for several compelling reasons, making it a favored choice among quilters:
- Perfect for Beginners: The construction primarily relies on Half-Square Triangles (HSTs), a fundamental quilting unit. The instructions are straightforward, focusing on precise cutting and stitching techniques that are easy to master.
- Utilizes Layer Cakes: Layer cakes are pre-cut 10-inch squares, saving you significant time on cutting. They often come in curated fabric collections, ensuring a cohesive and harmonious look for your quilt without the stress of matching fabrics. This quilt is designed to showcase the variety within a layer cake beautifully.
- Visually Stunning Design: The arrangement of HSTs creates a captivating pinwheel effect within each “star” block, leading to a dynamic and engaging overall quilt top. Despite its simplicity, the final design has a sophisticated and intricate appearance.
- Relatively Quick to Assemble: Thanks to the pre-cut fabrics and efficient block construction, you can see your quilt top come together in a shorter timeframe compared to more complex patterns. It’s a project that offers instant gratification!
- Versatile and Customizable: While the pattern uses a specific color scheme (print and solid), you can easily adapt it by choosing different fabric collections, playing with color contrasts, or even adding more variety with multiple solid colors.
Understanding Layer Cakes: Your Pre-Cut Foundation
For those new to the world of quilting, understanding fabric pre-cuts like “layer cakes” is key to appreciating this pattern’s efficiency. A layer cake consists of 42 pre-cut fabric squares, each measuring 10 inches by 10 inches. These squares are typically from a single fabric collection, offering a cohesive palette of colors and prints, all coordinated by the fabric designer. This not only saves you countless hours of measuring and cutting but also ensures that all your fabrics will perfectly complement each other, eliminating guesswork and potential color clashes.
The uniformity and curated nature of layer cakes make them an ideal starting point for many quilting projects, including the Star Cakes Quilt. They allow you to jump straight into the fun part – stitching – with confidence that your fabric choices will create a harmonious and beautiful finished product. For this project, you’ll need one layer cake primarily for its prints (Fabric A) and another for its solid colors (Fabric B), providing a lovely contrast that makes the “star” elements pop.
Gather Your Materials: What You’ll Need
Before you begin, gather all your materials to ensure a smooth and enjoyable quilting process. Precision in cutting and measuring is vital in quilting, so using quality tools and accurately cut fabrics will contribute to a professional-looking finish.
Essential Fabric Requirements:
- One Print Layer Cake (Fabric A): Approximately forty 10″ squares. This will be the patterned fabric that forms the outer points of your stars.
- One Solid Layer Cake (Fabric B): Approximately forty 10″ squares. This solid fabric will provide contrast and form the inner sections of your stars.
- Solid Yardage (Fabric C, D, E): 1 & 7/8 yards of a coordinating solid fabric. This will be used for your sashing and inner border strips, providing visual separation and framing for your quilt blocks.
- Binding Fabric (Fabric F): 7/8 yard of fabric for the binding. This fabric will finish the edges of your quilt, providing a durable and decorative border. Choose a fabric that complements your quilt top and backing.
- Backing Fabric: 5 & 5/8 yards for the quilt backing. This is the fabric that will be on the underside of your quilt. It’s an opportunity to use a fun print or a soft solid that feels good against the skin.
Other Notions and Tools:
- Rotary cutter, cutting mat, and quilting rulers (especially a 9.5″ square ruler).
- Fabric marker or pencil (for drawing diagonal lines).
- Sewing machine with a 1/4″ seam allowance foot.
- Iron and ironing board.
- Pins or fabric clips.
- Matching thread.
- Free Star Cakes Quilt Pattern (highly recommended for detailed block placement diagrams).
Detailed Cutting Instructions for Yardage:
Accuracy in cutting is paramount for a beautiful quilt. Take your time with these steps.
Cut Solid Yardage (Fabric C, D, E) into:
- 15 – 2 & 1/2″ x 16″ rectangles (Fabric C): These pieces will serve as the sashing between your quilt blocks, creating a grid-like structure.
- 8 – 2 & 1/2″ x WOF strips (Fabric D): “WOF” stands for “Width of Fabric.” These longer strips will be used for horizontal sashing and potentially inner borders, connecting your rows of blocks.
- 9 – 2 & 1/2 x WOF strips (Fabric E): These strips will form the outer borders of your quilt, framing the entire design and adding to its finished size.
Cut Binding Fabric (Fabric F) into:
- 9 – 2 & 1/2″ x WOF strips (Fabric F): These strips will be joined end-to-end to create one long strip for the quilt binding, the final edge finish.
Step-by-Step Directions: Crafting Your Star Cakes Quilt
Now that your materials are ready and cut, let’s dive into the construction of your beautiful Star Cakes Quilt. Remember to maintain a consistent 1/4-inch seam allowance throughout the entire process for the best results.
Step 1: Preparing Your Half-Square Triangles (HSTs)
Half-Square Triangles are the building blocks of this quilt, and mastering their creation is key. This method allows you to create four HSTs from a single larger square pairing, making it highly efficient.
- Pairing and Trimming: Take one 10″ square from your solid layer cake (Fabric B) and one 10″ square from your print layer cake (Fabric A). Place them right sides together, ensuring all edges are aligned perfectly. Pin securely around the perimeter to prevent shifting. Next, using your 9 & 1/2″ squared-up ruler, trim the paired squares down to a precise 9 & 1/2″ square. This step is crucial for accuracy, as it accounts for any slight variations in the original layer cake cuts.
- Marking and Stitching: With the trimmed 9 & 1/2″ square, draw a diagonal line from corner to corner across both diagonals, forming an “X” shape. A fabric marker or pencil that will disappear or wash out is recommended. Once marked, stitch a seam 1/4″ away from both sides of each drawn diagonal line. You will have four parallel stitch lines in total.
- Repeat and Sub-Cut: Repeat this pairing, marking, and stitching process for all 40 pairs of layer cake squares. This will give you 40 units, each containing four stitched diagonal lines.
- Quartering the Units: Now, take each stitched 9 & 1/2″ unit and sub-cut it into quarters. First, cut along the horizontal center, then cut along the vertical center. This will yield 160 smaller squares.
- Diagonal Cuts for HSTs: For each of these 160 smaller squares, you will now cut them on the diagonal along the remaining unstitched drawn lines. This will result in 320 Half-Square Triangles (HSTs).
- Pressing Your HSTs: Carefully press each HST. A common practice is to press seams open for a flatter block, or press them to one side (typically towards the darker fabric) to “nest” seams later. For this project, you might find pressing to one side (the solid side, for instance) is efficient for reducing bulk when joining. Ensure your HSTs are flat and crisp.
Step 2: Assembling the Star Cakes Blocks – The Pinwheel Effect
With your abundance of HSTs, it’s time to bring the “star” design to life. Each Star Cakes block is essentially a large pinwheel created from four smaller pinwheel units, resulting in a dynamic and captivating pattern.
- Layout for Pinwheel Units: For each Star Cakes block, you will need several HSTs. Begin by arranging your HSTs into a small pinwheel formation. The pattern relies on a specific arrangement where the print and solid fabrics create a swirling effect. You’ll typically arrange four HSTs to form one mini pinwheel unit. Pay close attention to the orientation of the print and solid sections to achieve the desired pinwheel.
- Sewing Pinwheel Units: Stitch two HSTs together to form a pair, pressing the seam as you go (e.g., towards the right on the top pair, and towards the left on the bottom pair, to help with seam nesting later). Then, sew these two pairs together to complete one small pinwheel unit. Press the center seam towards the bottom. Repeat this process to create all the necessary small pinwheel units for your 20 Star Cakes blocks. Each Star Cakes block will be composed of four of these pinwheel units arranged to create a larger, more intricate pinwheel or star.
- Assembling the Star Cakes Block: Now, lay out your four pinwheel units for one Star Cakes block. The arrangement is crucial here to form the larger “star” or pinwheel in the center. Refer to the free pattern for precise block placement. Once you are satisfied with the layout, stitch the units together in rows, and then join the rows.
- Pressing and Completion: After stitching the components of a Star Cakes block, press the seams. Again, alternate pressing directions (e.g., top row seams to the right, bottom row seams to the left) to allow for seams to nest when joining blocks. Stitch your center seams, then press towards the bottom. Make a total of 20 Star Cakes blocks. Double-check your block placement against the pattern to ensure consistent design.
Step 3: Bringing It All Together – Sashing and Borders
With your 20 beautiful Star Cakes blocks complete, it’s time to assemble the quilt top. Sashing adds structure and breathing room between your blocks, while borders provide a frame and help square up your quilt.
- Assembling Quilt Rows: For each row of your quilt, you will need four Star Cakes blocks and three of your 2 & 1/2″ x 16″ sashing rectangles (Fabric C). Arrange them in an alternating pattern: Block, Sashing, Block, Sashing, Block, Sashing, Block. Stitch these components together to form a complete row. Press the seams towards the sashing pieces to minimize bulk in your blocks. You will make five such rows.
- Joining Quilt Rows with Sashing: Once your five rows are assembled, it’s time to connect them. Use your 2 & 1/2″ x WOF strips (Fabric D) as horizontal sashing between the rows. Place one Fabric D strip between each assembled row, stitching them together. This will create a grid of blocks separated by sashing both horizontally and vertically. Press these seams, again, preferably towards the sashing strips.
- Attaching Side Borders: Now, take two of your 2 & 1/2″ x WOF strips (Fabric E) and trim them to the appropriate length to fit the sides of your assembled quilt center. Attach these side borders to the left and right edges of your quilt top. Press the seams towards the border fabric.
- Attaching Top and Bottom Borders: Finally, take the remaining 2 & 1/2″ x WOF strips (Fabric E), trim them to fit the top and bottom edges of your quilt. Attach these borders, and press the seams towards the border fabric. This completes your quilt top!
Tips for a Successful Star Cakes Quilt
Even for beginner-friendly projects, a few helpful tips can elevate your quilting experience and the final outcome:
- Accurate Seam Allowance: The 1/4-inch seam allowance is critical in quilting. Invest in a 1/4-inch presser foot for your sewing machine, or mark your machine bed with a guide. Consistent seams ensure your blocks will fit together perfectly.
- Pressing Matters: Pressing is not ironing. Gently press your seams as directed (either open or to one side) to create flat, crisp blocks. Avoid dragging the iron, which can distort your fabric.
- Square Up Your Blocks: After assembling your Star Cakes blocks, it’s a good practice to “square them up” to their final desired size using a rotary cutter and square ruler. This corrects any slight size discrepancies and ensures everything aligns beautifully when you join the blocks.
- Test Your Tools: Before starting on your main fabrics, do a few test cuts and stitches on scraps to ensure your rotary blade is sharp and your machine’s tension is correct.
- Don’t Rush: Quilting is a journey, not a race. Take breaks, double-check your work, and enjoy the process. Patience will be rewarded with a beautiful quilt.
- Utilize the Free Pattern: The free pattern linked in the materials section provides visual diagrams that are incredibly helpful for block assembly and layout. Keep it handy!
Finishing Your Star Cakes Quilt: Beyond the Top
While the instructions above focus on constructing the quilt top, a finished quilt also requires batting, backing, and binding. Once your quilt top is complete, you will:
- Basting: Create a quilt sandwich by layering your backing fabric (right side down), batting, and quilt top (right side up). Secure these layers together with basting pins or spray adhesive.
- Quilting: Stitch through all three layers to hold them together and add texture. You can do this on your home sewing machine, send it to a professional longarmer, or hand quilt for a traditional touch.
- Binding: Use the binding strips (Fabric F) you cut earlier to create a neat and durable edge around your quilted piece. This involves sewing the binding to the front, wrapping it around the edge, and hand-stitching or machine-stitching it to the back.
Star Cakes Shortcut Quilt Pattern Tutorial: Your Journey to a Beautiful Quilt
The Star Cakes Quilt is a testament to how simple techniques and pre-cut fabrics can combine to create something truly spectacular. Whether you’re making this quilt as a gift, for a loved one, or for yourself, the process is as rewarding as the finished product. From the initial cuts of your vibrant layer cakes to the final stitches that bring the captivating stars to life, each step is designed to be enjoyable and achievable, even for those new to quilting. Embrace the rhythm of sewing, the satisfaction of seeing your fabric pieces transform, and the joy of creating a functional work of art. We encourage you to watch the Fat Quarter Shop video tutorial for a visual guide that complements these written instructions. Happy quilting!