
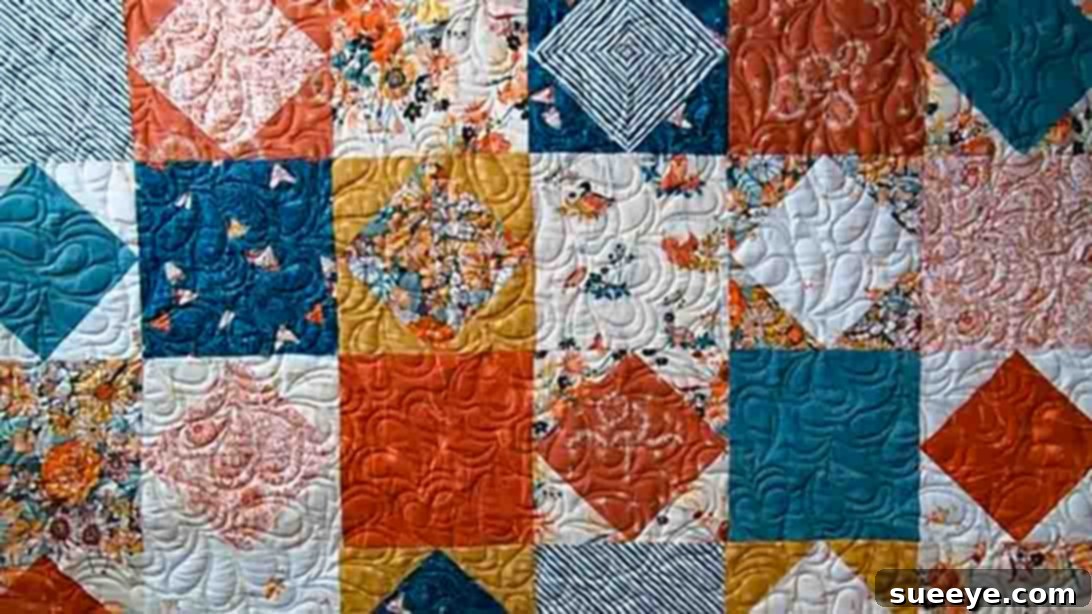
Welcome, fellow quilters, to an exciting journey into the world of creative fabric artistry! If you’re a fan of the convenience and beauty that layer cakes bring to quilting, then you are absolutely going to adore this beginner-friendly “Clustered Gems Quilt Pattern” brought to us by the talented folks at Moonkin Stitchery on YouTube. This particular quilt pattern stands out for its simplicity, speed, and stunning visual appeal, making it an ideal project for both novice quilters and seasoned crafters looking for a quick and satisfying finish. Imagine creating a beautiful, intricate-looking quilt in less than a day! This pattern makes that dream a reality, and it’s also a fantastic way to utilize those gorgeous layer cake stashes you’ve been saving.
What makes the “Clustered Gems Quilt” truly special is its ability to transform pre-cut fabrics into a dazzling display of diamond-like shapes that appear to cluster together, hence its fitting name. It’s the perfect solution when you need a thoughtful, handmade gift in a hurry, or simply when you’re yearning for a rewarding creative escape. I personally love experimenting with a vibrant mix of patterned fabrics, but the design is so elegant that it shines even with a selection of solid colors, offering a more minimalist yet equally striking aesthetic. To guide you through every stitch and seam, we’ll delve into the step-by-step instructions below. Prepare to be amazed at how easily you can bring this beautiful design to life!
RELATED: Explore another fantastic Layer Cake Quilt Pattern: The Checkered Path
Materials Needed for Your Clustered Gems Quilt (Throw Size):
Before we embark on this creative adventure, gathering the right materials is crucial for a smooth and enjoyable quilting experience. The beauty of this pattern lies in its reliance on pre-cut fabric, specifically layer cakes, which significantly reduces cutting time and ensures coordinating fabrics.
- 42 – 10″ Printed Squares: This is the core of your quilt. Layer cakes typically come with 42 pre-cut 10-inch squares, making them perfect for this project. They often feature a curated collection of fabrics from a single line, ensuring a cohesive and harmonious look, but you can also mix and match from your own stash for a truly unique quilt. The variety in prints will bring your “gems” to life.
- 1/2 Yard Binding Fabric: Binding is the final touch that frames your quilt and protects its edges. A half-yard of fabric is generally sufficient for a throw-sized quilt. Choose a fabric that either complements or contrasts with your quilt top, providing a beautiful border that ties the entire design together.
- 3 1/2 Yards Backing Fabric: The backing fabric provides the ‘other side’ of your quilt. For a throw size, 3.5 yards should give you enough to create a seamless back. You can choose a single continuous piece or piece together wider strips for a more artistic backing. Consider a soft, comfortable fabric that will make your quilt even more inviting.
- 56″ x 64″ Batting: Batting is the cozy middle layer of your quilt, providing warmth, structure, and that lovely quilted texture. A piece measuring 56″ x 64″ will give you enough excess around the edges to allow for quilting and squaring up. Various types of batting are available (cotton, polyester, blend, wool), each offering different properties in terms of drape, warmth, and washability. For beginners, a cotton or 80/20 cotton-poly blend is often recommended for its ease of handling.
-
Essential Quilting Tools (Not explicitly listed but highly recommended):
- Rotary Cutter, Mat, and Rulers: For precise and efficient fabric cutting.
- Sewing Machine: Equipped with a 1/4″ presser foot for accurate seam allowances.
- Iron and Ironing Board: For pressing seams, which is critical for flat blocks and accurate piecing.
- Fabric Scissors and Thread Snips: For general cutting and trimming.
- Pins or Fabric Clips: To hold fabric pieces together before sewing.
- Fabric Marker or Pencil: For drawing lines on fabric.
- Seam Ripper: Every quilter’s best friend – for those inevitable oops moments!
Step-by-Step Directions for Crafting Your Clustered Gems Quilt:
Now that you have all your materials ready, let’s dive into the creative process of bringing your “Clustered Gems Quilt” to life. This pattern relies heavily on creating Half-Square Triangles (HSTs), which form the foundation of our beautiful diamond blocks. Precision in cutting and sewing will ensure your quilt comes together beautifully.
Step 1: Preparing Your Fabric and Crafting Half-Square Triangles (HSTs)
The first step involves strategically cutting your layer cake squares and then transforming some of them into the versatile Half-Square Triangles that are central to this design.
To begin, take twenty-one of your 10″ printed squares. From these, you will accurately subcut each one into four smaller 5″ squares. This will yield a total of 84 five-inch squares, which will be used for the Half-Square Triangles. It’s crucial to be precise with your cuts here, as accuracy will impact the final block size.
Next, take the remaining twenty-one 10″ squares. These squares will serve as your background or contrasting elements within the quilt top. Trim each of these 10″ squares down to a precise 8 1/2″ square and set them aside. These larger squares will eventually alternate with your assembled diamond blocks to create the clustered effect.
Now, let’s focus on creating the Half-Square Triangles. You’ll work with the 5″ squares you just cut. Select two different print fabrics, taking two 5″ squares from each print. So, you’ll have four 5″ squares in total for one set of HSTs (two of print A, two of print B).
Pick one of the lighter-colored 5″ squares. On the wrong side of this fabric, use your fabric marker or pencil to draw a diagonal line from one corner to the opposite corner. This line will act as your guide for sewing.
Then, carefully layer one 5″ square from the first print (with the drawn line) and one 5″ square from the second print, right sides together. Ensure all edges are perfectly aligned. Pin them securely if needed to prevent shifting.
With your sewing machine, sew a precise 1/4″ seam allowance along both sides of the drawn diagonal line. It’s vital to maintain this consistent seam allowance for accurate results. Once you’ve sewn both lines, take your rotary cutter and mat, and cut directly along the drawn diagonal line in the middle.
You will now have two raw Half-Square Triangle units. Carefully open each unit and press the seam allowances open or to one side (usually towards the darker fabric to prevent shadowing). Pressing is a non-negotiable step in quilting; it ensures your blocks lie flat and fit together perfectly. After pressing, you will have two perfect 4 1/2″ Half-Square Triangles from each pair of 5″ squares. Repeat this process as many times as needed to create enough HSTs to form your diamond blocks – you’ll need a good number of these!
Step 2: Assembling Diamond Blocks and Constructing the Quilt Top
With your collection of perfectly pressed Half-Square Triangles, we can now move on to assembling the captivating “diamond blocks” that give this quilt its signature look, and then piecing together the entire quilt top.
To create one diamond block, you will need four of your newly made Half-Square Triangles. Arrange these four HSTs in a way that their contrasting colors form a central diamond shape. This is where the “clustered gems” truly begin to take form. Experiment with the rotation of each HST until you achieve the desired diamond pattern. Once you are satisfied with the arrangement, sew the two top HSTs together, and then sew the two bottom HSTs together, using a consistent 1/4″ seam allowance. Press these seams. Finally, sew these two rows together to complete your four-patch diamond block. Ensure your points meet accurately in the center for a crisp finish.
Repeat this process, creating as many diamond blocks as you will need for your quilt design. The number will depend on the overall size and desired layout. Take your time with each block, as their individual precision contributes to the overall beauty of the quilt.
Once you have a good number of diamond blocks prepared, it’s time to start laying out your quilt top. This is a crucial step where you visualize the entire design before committing to sewing. Find a large, flat surface—a design wall, the floor, or a spacious table—to arrange your blocks.
The pattern for the quilt top alternates between your pieced diamond blocks and the 8 1/2″ print squares you prepared in Step 1.
For the odd-numbered rows (Row 1, Row 3, Row 5, etc.):
Start with one of your 8 1/2″ print squares, followed by a diamond block. Continue this alternating sequence across the entire row: Print Square – Diamond Block – Print Square – Diamond Block, and so on.
For the even-numbered rows (Row 2, Row 4, Row 6, etc.):
You will begin with a diamond block, followed by an 8 1/2″ print square. Maintain this alternating sequence across the row: Diamond Block – Print Square – Diamond Block – Print Square, and so forth.
This alternating starting block for odd and even rows is what creates the captivating clustered “gem” effect, where the diamond blocks appear to interlock and form a cohesive pattern across the quilt. Take your time to arrange all your blocks, stepping back frequently to admire the design and ensure you’re happy with the placement of colors and patterns before sewing.
Once your layout is perfected, begin sewing the blocks together within each row. Use your accurate 1/4″ seam allowance and press seams as you go (you can press seams open or towards the larger block for ease). After all individual rows are assembled, sew those rows together, one by one, to complete the entire quilt top. Ensure that the seams at the junctions of your rows align neatly for a professional finish.
Tips for Success with Your Clustered Gems Quilt:
- Precision is Key: In quilting, accuracy in cutting and a consistent 1/4″ seam allowance are paramount. Even a slight deviation can lead to blocks that don’t fit together perfectly. Take your time, measure twice, cut once, and use a 1/4″ presser foot on your sewing machine.
- Pressing Matters: Don’t underestimate the power of a good press! Pressing seams after each join helps blocks lie flat, eliminates bulk, and makes subsequent piecing much easier. Decide if you’ll press seams open or to one side and stick with it consistently.
- Chain Piecing: To speed up the HST creation and block assembly, consider chain piecing. This involves sewing multiple units consecutively without cutting the thread in between. It saves time and thread!
- Audition Your Fabrics: Before you start cutting and sewing, lay out your layer cake squares to see how the colors and patterns interact. This allows you to make adjustments and ensure a balanced design before it’s too late.
- Design Wall or Floor Layout: For the quilt top assembly, using a design wall (a flannel-covered board or wall) or simply laying out your blocks on a clean floor allows you to visualize the entire quilt. This helps catch any misplaced blocks or undesirable color combinations before they are sewn permanently.
- Square Up HSTs: After pressing your HSTs, it’s a good practice to square them up to their final size (4.5″ in this case, if you started with 5″ squares and a 1/4″ seam). This extra step ensures all your HSTs are exactly the same size, leading to perfectly matching points when assembling your diamond blocks.
Finishing Your Quilt:
Once your beautiful quilt top is complete, the journey isn’t quite over! The next steps involve making your quilt truly usable and durable.
- Basting: This is the process of temporarily holding the three layers of your quilt (quilt top, batting, and backing) together so they don’t shift during quilting. You can baste with safety pins, spray adhesive, or even hand stitches. Ensure your backing is smooth and taut before basting.
- Quilting: This is where you stitch through all three layers to create texture, add another design element, and secure the layers permanently. For beginners, simple straight-line quilting, stitch-in-the-ditch (quilting along existing seam lines), or simple meandering patterns are great starting points. You can use your sewing machine or send it to a professional longarmer.
- Binding: The final step! Binding gives your quilt a neat, durable edge. Attach your binding fabric strips to the front of the quilt, fold them over to the back, and hand-stitch or machine-stitch them in place. This provides a beautiful frame for your “Clustered Gems” masterpiece.
The “Clustered Gems Quilt” pattern, originating from the excellent tutorials by Moonkin Stitchery, is truly a jewel among beginner-friendly projects. Its clever use of Half-Square Triangles and alternating block arrangements creates a sophisticated look with surprisingly simple construction. The inherent beauty of layer cakes shines through, making fabric selection a joy rather than a chore. Whether you’re aiming to create a cherished gift, bust through your fabric stash, or simply enjoy a day of satisfying sewing, this pattern delivers on all fronts. With the detailed steps and helpful tips provided, you’re well-equipped to create a stunning quilt that will be admired for years to come.
Embrace the Joy: Your Easy Clustered Gems Quilt Tutorial Awaits!
We hope this comprehensive guide inspires you to dive into this wonderful project. Don’t forget to visit Moonkin Stitchery’s YouTube channel for the original video tutorial, which offers invaluable visual guidance to complement these written instructions. Happy quilting, and may your “Clustered Gems” shine brightly!