
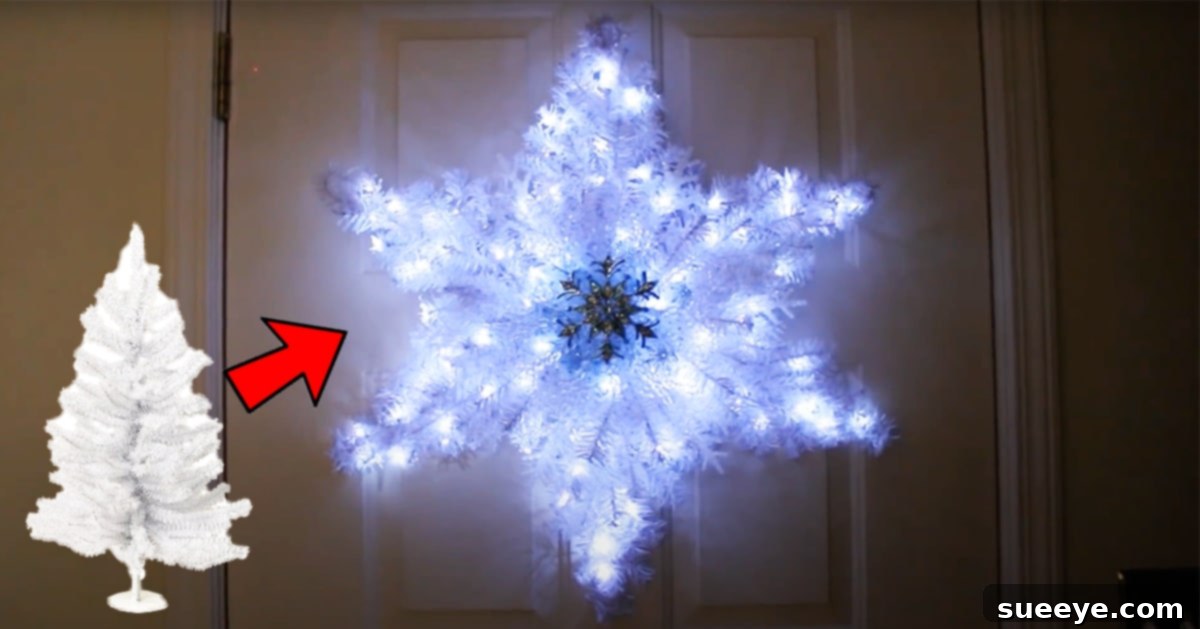
Craft a Stunning DIY Snowflake Wreath for Under $15: Your Ultimate Dollar Tree Guide
Transform your home into a winter wonderland with a breathtaking DIY snowflake wreath that looks incredibly expensive but costs next to nothing to create! Forget generic store-bought decorations; this project offers a unique, personalized touch to your holiday decor. We’re talking about a dazzling, custom-made piece that will have guests asking where you bought it, only for you to proudly declare, “I made it myself!” And the best part? It’s crafted almost entirely from affordable items sourced from your local Dollar Tree, following an ingenious method inspired by Lacee’s Space tutorial on YouTube.
In a world of mass-produced holiday items, a handmade snowflake wreath truly stands out. It’s not just a decoration; it’s a statement of creativity and resourcefulness. This guide will walk you through crafting a magnificent snowflake wreath for under $15, using mini Christmas trees—a brilliant and unexpected crafting material that yields stunning results. Prepare to be amazed by the elegance you can achieve with budget-friendly supplies!
Why Choose a DIY Dollar Tree Snowflake Wreath?
The allure of a DIY snowflake wreath, especially one made from Dollar Tree items, lies in its unparalleled blend of affordability, uniqueness, and personal satisfaction. Unlike mass-market wreaths that often lack character, a handmade wreath allows you to infuse your personality and style into your holiday decorations. Here’s why this particular craft project is a must-try for anyone looking to elevate their seasonal decor without breaking the bank:
- Unmatched Uniqueness: You won’t find this specific design in any retail store. Your wreath will be a one-of-a-kind piece, ensuring your home decor truly stands out.
- Incredible Affordability: By utilizing items from Dollar Tree, you can create a high-end looking wreath for a fraction of the cost of similar store-bought items. The total expense for materials is surprisingly low, often under $15.
- Creative Outlet: Crafting offers a wonderful way to relax and express yourself. This project is straightforward enough for beginners yet rewarding enough for seasoned crafters.
- Personalized Touch: You have complete control over the colors, ornaments, and embellishments, allowing you to tailor the wreath to perfectly match your existing holiday theme or create a brand new one.
- Impressive Results: The finished product looks far more expensive than its actual cost, making it an impressive focal point for your front door, mantel, or any wall space.
Gather Your Essentials: Supplies for Your Snowflake Masterpiece
Before diving into the creative process, ensure you have all the necessary items at hand. The beauty of this project is that most, if not all, of these supplies can be found at Dollar Tree, making it incredibly budget-friendly. Remember, some items like glue and zip ties might already be in your craft stash, further reducing your expenses.
- Hot Glue Gun and Hot Glue Sticks: Essential for quick, strong bonds, especially when attaching the mini trees.
- Foam Board: This will serve as the sturdy base for your wreath. A standard foam board from Dollar Tree is usually sufficient.
- E6000 Glue (or a strong adhesive): Provides a more permanent and durable bond, crucial for the long-term stability of your wreath.
- Zip Ties: Used to secure the mini trees together, adding extra reinforcement alongside the glues.
- Mini White Christmas Trees (approx. 6-8 depending on desired size): These are the star of the show, forming the “points” of your snowflake. Dollar Tree often carries these, especially during the holiday season.
- Assorted Ornaments: Choose small, festive ornaments that complement your snowflake theme. Silver, white, or blue tones work beautifully.
- Ribbons: Various widths and textures of ribbon can add elegance and a pop of color. Consider frosty whites, silvers, or icy blues.
- White Fairy Lights (battery operated): To give your wreath a magical, illuminated glow. Battery-operated ones are ideal for easy placement.
- Giant Snowflake Decoration: A larger central snowflake ornament will be the focal point, enhancing the overall snowflake theme.
- Smaller Snowflake Ornaments/Decorations: To fill in gaps and add intricate details across the wreath.
- Cutting Tool (craft knife or scissors): For shaping your foam board base.
- Pencil and a Round Object (bowl or small plate): For tracing a perfect circle on your foam board.
Step-by-Step Guide: Crafting Your Elegant DIY Snowflake Wreath
Now that you have all your materials, let’s embark on the exciting journey of creating your stunning snowflake wreath. Follow these detailed steps to achieve a professional-looking finish. For visual learners, remember that Lacee’s Space tutorial offers excellent visual guidance.
1. Preparing Your Mini Christmas Trees
The foundation of your snowflake wreath comes from meticulously prepared mini Christmas trees. These humble Dollar Tree items will be transformed into elegant frosty branches.
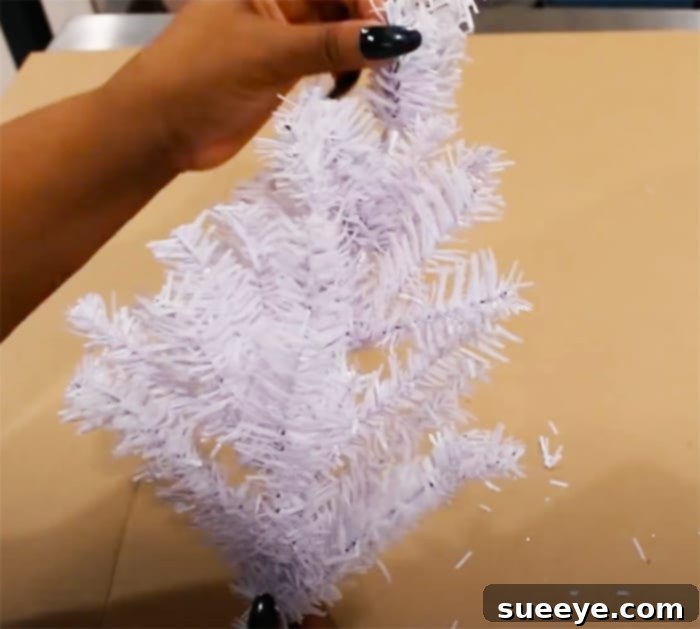
- Secure the Tree Bases: Begin by taking each mini Christmas tree. Locate the small plastic piece at the very bottom of the tree that holds the “pine” strands together. Apply a dab of hot glue to this plastic piece. This crucial step prevents the artificial pine strings from unraveling over time, ensuring your wreath remains intact and beautiful for seasons to come.
- Fluff and Position: Carefully fluff out the branches of each mini tree. The trick here is to keep the back of the tree relatively flat while directing all the “pine” needles to point upwards or outwards on one side. Imagine creating a half-sphere or a fan shape with the branches. This technique ensures that when you combine the trees, they create a full, lush effect without unnecessary bulk on the backside, which will be against your door or wall. Repeat this process for all 6-8 of your mini trees, striving for consistency in their fluffing and direction.
2. Creating the Wreath Base and Assembling the Snowflake Points
The foam board will provide the structural integrity and shape for your snowflake wreath.
- Cut Your Foam Board Base: Take your foam board and use a pencil to trace a perfect circle. A dinner plate or a medium-sized bowl works perfectly as a template. The size of this circle will determine the inner diameter of your snowflake. Once traced, carefully cut out the circle using a craft knife or sturdy scissors. This foam board circle will be the central support onto which your mini trees are attached.
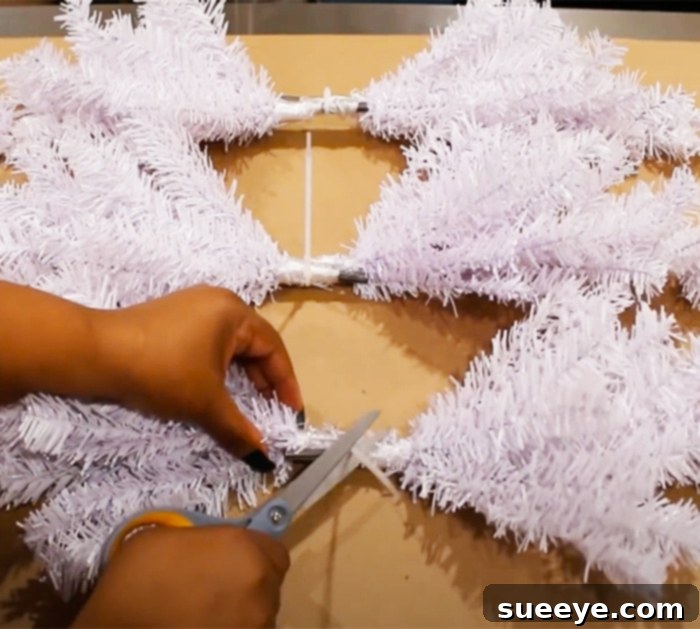
- Pair and Glue Mini Trees: Now, take two of your prepared mini trees. Align their stems side-by-side. Apply a generous amount of E6000 glue along the length of the stems where they meet, followed by dabs of hot glue. The hot glue provides an immediate hold, allowing the E6000 to cure and create a strong, lasting bond.
- Secure with Zip Ties: While the glue is still wet, wrap one or two zip ties tightly around the joined stems of the two trees. Cinch them down firmly. This mechanical fastening offers crucial reinforcement, ensuring the tree pairs remain securely bonded. Repeat this process for all your mini trees, creating 3-4 pairs of joined trees (depending on how many mini trees you started with and how many points you want your snowflake to have).
- Attach Tree Pairs to the Foam Base: Once your tree pairs are securely joined and the glue has set a bit, it’s time to attach them to your foam board circle. Arrange the pairs around the perimeter of the foam circle, with the “fluffy” sides pointing outwards, forming the points of your snowflake. The flat backs of the tree pairs should be against the foam board. Apply both E6000 and hot glue to the flat base of each tree pair where it will meet the foam board. Press firmly and hold until the hot glue sets. Ensure even spacing for a symmetrical snowflake appearance. For a six-pointed snowflake, space three pairs evenly around the circle. If you have eight trees, you could either create four pairs for an eight-pointed snowflake or add individual trees between the pairs for a fuller look.
3. Embellishing Your Snowflake Wreath
This is where your wreath truly comes to life and takes on its expensive, luxurious appearance.
- Add Fairy Lights: Carefully weave the white fairy lights through the branches of your mini trees. Secure the battery pack discreetly on the back of the foam board with a dab of hot glue or a small piece of tape. Ensure the lights are evenly distributed to create a soft, magical glow.
- Position the Giant Snowflake: Place your chosen giant snowflake decoration at the very center of your wreath, directly on the foam board circle. Secure it firmly with E6000 and hot glue. This will be the striking focal point of your design.
- Decorate with Ornaments and Ribbons: Begin adding your smaller snowflake ornaments and other chosen decorations. Distribute them strategically around the wreath, paying attention to balance and symmetry. Use hot glue to attach them securely. You can also tie small bows with your ribbons and glue them onto the branches or intertwine longer ribbons through the “pine” needles to add texture and color. Consider metallic tones (silver, gold) or frosty shades (ice blue, white) to enhance the winter wonderland aesthetic.
- Final Touches: Step back and admire your creation. Fill in any sparse areas with additional smaller ornaments or glitter. You can even spray the entire wreath lightly with a clear glitter spray for an extra sparkle. Attach a sturdy loop of ribbon or wire to the back of the foam board for easy hanging.
Tips for a Perfect DIY Snowflake Wreath
Achieving a flawless and durable snowflake wreath is easier with a few expert tips:
- Work in a Well-Ventilated Area: Especially when using E6000 glue, ensure good air circulation.
- Patience with Glue: While hot glue provides an instant bond, allow E6000 ample time to cure fully (often 24-72 hours) for maximum strength. Avoid handling the wreath too much during this curing period.
- Symmetry is Key: Regularly step back and observe your wreath from a distance to ensure ornaments and tree points are evenly spaced and balanced.
- Personalize Your Design: Don’t be afraid to experiment with different color schemes, ornament types, or additional embellishments like faux berries or frosted pinecones if they fit your theme.
- Consider Hanging Method: Before decorating too heavily, decide how you’ll hang the wreath. A sturdy wire loop or ribbon securely glued/tied to the foam board is essential.
- Dollar Tree Haul Strategy: If you plan to make multiple wreaths or want specific items, visit Dollar Tree early in the holiday season or check several locations, as stock can vary and sell out quickly.
Beyond the Basic: Customizing Your Snowflake Wreath
While the white mini tree and snowflake theme is classic, your DIY wreath can be adapted to suit any style. Consider these variations:
- Color Palette Exploration: Instead of traditional white, experiment with pastel blues and purples for a whimsical look, or deep reds and greens for a more traditional Christmas feel (though it might deviate from a pure “snowflake” theme). You could even spray paint the mini trees for a completely different base color.
- Themed Ornaments: Swap out generic ornaments for specific themes. Think tiny metallic deer and bears for a woodland winter theme, or clear acrylic icicles for an extra frosty effect.
- Adding Natural Elements: Incorporate natural elements like small pinecones, dried orange slices, or cinnamon sticks for a rustic, aromatic touch.
- Multi-Textured Ribbons: Mix satin, velvet, sheer, and glittered ribbons for a rich, layered appearance.
- Illumination Variations: While white fairy lights are enchanting, consider warm white or even cool blue LED lights for different moods. Ensure they are battery-operated for versatility.
Conclusion: Your Handmade Masterpiece Awaits!
Crafting this DIY snowflake wreath from Dollar Tree items is more than just a holiday project; it’s an opportunity to create something truly beautiful and unique for your home at an incredibly affordable price. The satisfaction of transforming simple, budget-friendly materials into a decoration that looks like a high-end boutique find is immensely rewarding. This project proves that you don’t need to spend a fortune to achieve stunning holiday decor. With a little creativity, some clever sourcing from Dollar Tree, and this detailed guide, you can easily replicate the elegance of a much more expensive wreath.
So, gather your supplies, set aside a few hours, and embark on this delightful crafting journey. Your home will thank you, and your guests will be impressed by your ingenious holiday spirit. Share your magnificent creations and inspire others to discover the joy of DIY holiday decorating!