
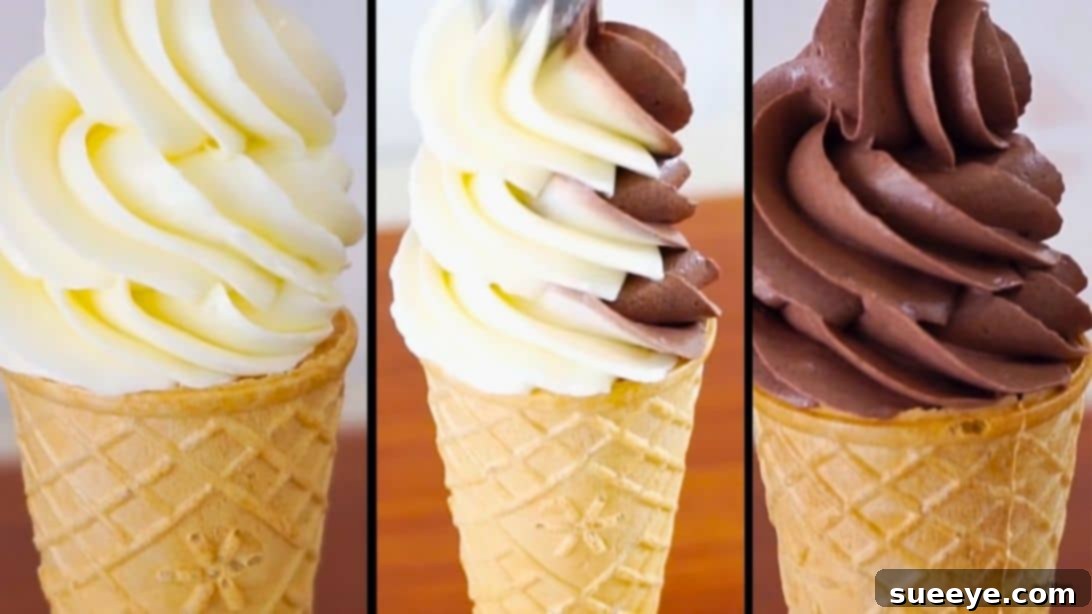
Homemade Soft Serve Ice Cream: The Ultimate No-Machine Recipe Guide
As a child, few things brought me as much joy as a swirl of soft serve ice cream. That perfectly smooth, incredibly creamy texture and delightful flavor were an instant favorite. For years, I believed such a treat could only come from a specialized machine, a luxury I didn’t possess. Imagine my delight when I stumbled upon a game-changing no-machine soft serve ice cream recipe by Emma’s Goodies!
This brilliant method completely transformed my homemade dessert game, proving that you can achieve that iconic soft serve consistency right in your own kitchen, no fancy equipment required. The result is so remarkably close to the classic soft serve I remember from my childhood—it’s truly amazing! This detailed guide will walk you through every step to recreate that magic, allowing you to indulge in incredibly smooth vanilla and rich chocolate soft serve whenever the craving strikes.
Why Make Soft Serve Ice Cream at Home Without a Machine?
The allure of homemade soft serve extends beyond simple nostalgia. Opting for a no-machine recipe offers numerous benefits:
- Simplicity: No need to invest in expensive, bulky ice cream makers that take up valuable kitchen space. This recipe relies on common kitchen tools.
- Freshness: You control the ingredients, ensuring your soft serve is free from artificial preservatives and unknown additives often found in commercial varieties.
- Customization: Once you master the base recipe, the possibilities for flavor innovation are endless. Add fruit purees, coffee, nut butters, or different extracts to create your signature treat.
- Cost-Effective: Making your own ice cream is generally more economical than frequent trips to an ice cream parlor.
- Pure Indulgence: There’s a unique satisfaction in creating such a delightful dessert from scratch, knowing exactly what goes into it.
The Science Behind No-Churn Soft Serve: Achieving Creaminess Without an Appliance
The secret to successful no-churn ice cream, and especially soft serve, lies in two key components: heavy cream and sugar. When heavy cream is whipped, air is incorporated, creating a light, airy structure that mimics the aeration process of an ice cream machine. This air prevents the formation of large ice crystals, which are the culprits behind an icy texture.
Sugar plays an equally crucial role. Beyond sweetness, sugar acts as an antifreeze, lowering the freezing point of the mixture. This prevents the base from freezing into a solid, impenetrable block and instead allows it to remain softer and scoopable, much like traditional soft serve. It helps create that desirable smooth, pliable texture. This is why it’s absolutely vital not to reduce the amount of sugar specified in this recipe; altering it will compromise the final texture, resulting in an unpleasantly hard and icy dessert.
Ingredients for Perfect Homemade Soft Serve:
Gathering high-quality ingredients is the first step towards an exceptional homemade soft serve experience. Each component plays a vital role:
- 3 cups of heavy cream: This is the foundation of your soft serve. Heavy cream, with its high-fat content (typically 36% or more), provides the richness, body, and crucial ability to whip up into a stable, airy base. This aeration is key to achieving a light, fluffy texture without churning.
- 2 cups of granulated sugar: As discussed, sugar is more than just a sweetener here. It’s a texture guardian, preventing ice crystals and ensuring your soft serve remains smooth and scoopable. Do not be tempted to reduce this amount, as it will drastically alter the final consistency.
- 2 teaspoons of vanilla extract: A classic and essential flavor enhancer for vanilla soft serve. Use pure vanilla extract for the best, most authentic taste.
- 3/4 teaspoon of salt: A small amount of salt is a secret weapon in many dessert recipes. It doesn’t make the ice cream salty but rather balances the sweetness and enhances all the other flavors, making them pop.
- 1/3 cup of unsweetened cocoa powder: For the decadent chocolate variant. Opt for a good quality unsweetened cocoa powder (natural or Dutch-processed) for rich chocolate flavor without added sugar.
Important Note on Sugar: Seriously, resist the urge to reduce the sugar content in this recipe. Its role extends far beyond merely providing sweetness; it is absolutely critical for controlling the texture of the ice cream. Without the precise amount of sugar, your mixture will simply freeze into a solid, unmanageable block rather than the creamy, pliable soft serve you’re aiming for.
Detailed Instructions: Crafting Your No-Machine Soft Serve
Step 1: Preparing the Cream Base – A Gentle Start
In a medium saucepan, combine the 3 cups of heavy cream and 2 cups of granulated sugar. Stir them together until the sugar begins to moisten and mix with the cream. Place the saucepan over very low heat. The goal here is to gently warm the mixture just enough to fully dissolve the sugar, not to boil the cream. Boiling can scald the cream, imparting an undesirable flavor and potentially affecting its ability to whip later. Stir occasionally to prevent the sugar from sticking to the bottom and to encourage even dissolution.
Step 2: Infusing Flavor – The Vanilla Touch
Once you observe that the sugar crystals have completely dissolved into the cream (you can test this by rubbing a small amount between your fingers – it should feel smooth), immediately remove the saucepan from the heat. Stir in the 2 teaspoons of vanilla extract. Adding the vanilla after removing it from the heat ensures its delicate flavor isn’t cooked off, allowing it to shine through in the final product.
Step 3: Dividing for Dual Flavors – Vanilla & Chocolate
Carefully divide the warm cream mixture evenly between two separate freezer-safe containers. Glass or sturdy plastic containers with tight-fitting lids work best. One container will serve as the base for your classic vanilla soft serve, while the other will be transformed into rich chocolate. Ensure both containers are clean and completely dry.
Step 4: Crafting the Chocolate Concentrate – A Smooth Paste
In a small, separate bowl, place the 1/3 cup of unsweetened cocoa powder. To prevent lumps in your chocolate soft serve, it’s crucial to create a smooth paste first. Add about four to five tablespoons of the warm cream mixture from one of your divided containers into the cocoa powder. Whisk vigorously until you have a thick, glossy, and completely smooth chocolate paste, free of any dry cocoa clumps.
Step 5: Blending the Chocolate Dream – Integrating the Flavor
Now, pour this smooth chocolate paste into one of the freezer-safe containers holding the cream base. Using a whisk, thoroughly combine the chocolate paste with the cream mixture until the color is uniform and there are no streaks of unmixed chocolate. This ensures a consistent and intense chocolate flavor throughout.
Step 6: The Secret to Silky Smooth Chocolate – Straining for Perfection
Even with careful mixing, sometimes tiny cocoa lumps can persist. For the smoothest chocolate soft serve possible, strain the chocolate ice cream base. Pour the entire chocolate mixture through a fine-mesh sieve or strainer into a clean bowl or back into the same freezer-safe container (after a quick rinse, if desired). Gently press any remaining chocolate paste through the sieve, discarding any stubborn cocoa powder lumps left behind. This step is a small effort that yields a significantly superior, velvety texture.
Step 7: The Chilling Game – Preparing for Whipping
Once both your vanilla and chocolate mixtures are prepared and in their respective freezer-safe containers, cover them tightly with their lids. Transfer both containers to the refrigerator and chill them for at least 2 hours. This chilling period is crucial as it allows the mixtures to get very cold, which is ideal for whipping. Cold cream whips more effectively and holds its volume better, leading to a lighter, airier soft serve.
Step 8: Whipping Wonders & Freezing for Firmness – Incorporating Air
After the chilling period, remove the containers from the fridge. Working with one mixture at a time (vanilla, then chocolate), use an electric hand mixer or a stand mixer with a whisk attachment to whip the cream base. Whip until the mixture reaches soft peaks. This means the cream should hold its shape loosely, and when you lift the whisk, the peak should gently curl over. Be careful not to overwhip, as you risk turning the cream into butter, which would ruin the soft serve texture. The whipping incorporates air, which is essential for that light, soft serve mouthfeel.
Once whipped, cover the surface of each soft serve mixture directly with a piece of parchment paper. Press the parchment paper gently onto the surface to eliminate any air pockets between the cream and the paper. This crucial step helps prevent ice crystals from forming on the surface and protects against freezer burn. Then, secure the lid tightly on each container. Place both containers in the freezer for approximately 10 to 12 hours, or preferably overnight, to allow them to set completely into that delightful soft serve consistency.
Step 9: The Grand Finale – Serving Your Homemade Masterpiece
After a good 10-12 hours in the freezer, your no-machine soft serve is ready! You can certainly enjoy it as is, scooping directly from the container. However, if you want that authentic soft serve swirl and presentation, transfer the mixture to a piping bag fitted with a large star tip. Gently squeeze the soft serve into your favorite cones or dessert cups, creating beautiful, restaurant-worthy swirls. Garnish with sprinkles, chocolate syrup, fresh fruit, or whatever toppings your heart desires!
Tips for the Best No-Machine Soft Serve Experience
- Quality Ingredients Matter: Since there are so few ingredients, the quality of each really shines through. Use fresh, high-quality heavy cream and good vanilla extract for the best flavor.
- Don’t Rush the Chill: The initial 2-hour chilling in the refrigerator is crucial for proper whipping. Cold cream whips better and faster.
- Mindful Whipping: Pay close attention when whipping in Step 8. Stop as soon as soft peaks form. Over-whipping can lead to a grainy texture or even butter.
- Prevent Ice Crystals: The parchment paper pressed directly onto the surface of the ice cream is key. It acts as a barrier against moisture and air, which cause ice crystals.
- Storage: Store your homemade soft serve in an airtight container in the freezer. While it’s best enjoyed fresh, it will keep well for up to 1-2 weeks. It might become firmer over time, so you might need to let it sit at room temperature for 5-10 minutes before serving.
- Experiment with Flavors: Once comfortable with the basic recipe, try adding other flavorings like espresso powder, almond extract, a touch of cinnamon, or even fruit purees (ensure they are very smooth and well-chilled before adding).
- For a Swirl Effect (Chocolate & Vanilla): If you want both flavors swirled in one cone, fill one side of your piping bag with vanilla and the other with chocolate.
Common Questions About Homemade Soft Serve
- Can I use milk instead of heavy cream?
- No, heavy cream is essential for this recipe. Its high-fat content is what allows it to whip up and create the necessary creamy, stable texture without an ice cream machine. Lighter creams or milk will not work.
- Why did my soft serve turn out icy?
- Icy texture is usually due to one of two reasons: either the sugar content was reduced (sugar prevents large ice crystals), or the mixture wasn’t whipped enough to incorporate sufficient air. Ensure you follow the sugar measurement precisely and whip until soft peaks are formed.
- How long does homemade soft serve last in the freezer?
- For optimal texture and flavor, it’s best consumed within 1-2 weeks. After that, it might start to develop more ice crystals and lose some of its desirable creaminess, though it will still be safe to eat.
- Can I make this recipe dairy-free?
- While this specific recipe relies heavily on dairy heavy cream, you might be able to find no-churn recipes using full-fat canned coconut cream as a substitute. However, the texture and flavor will be different from traditional soft serve.
- My soft serve is too hard straight from the freezer. What can I do?
- Homemade ice creams, especially no-churn varieties, can freeze quite firm. Simply let your soft serve sit out at room temperature for about 5 to 10 minutes before scooping or piping. This brief resting period will allow it to soften to the perfect consistency.
Conclusion: Your Homemade Soft Serve Adventure Awaits!
Who knew achieving that dream-like soft serve could be so simple, without any specialized equipment? This no-machine recipe for vanilla and chocolate soft serve, inspired by Emma’s Goodies, empowers you to create an incredibly satisfying dessert experience right in your own kitchen. From the nostalgic taste to the delightful texture, every spoonful is a testament to the magic of simple ingredients and clever techniques.
So, gather your ingredients, follow these steps with care, and prepare to impress your family and friends (or just yourself!) with this easy, delicious, and undeniably creamy homemade soft serve. Enjoy your sweet creation!
No-Machine Soft Serve Ice Cream Recipe