
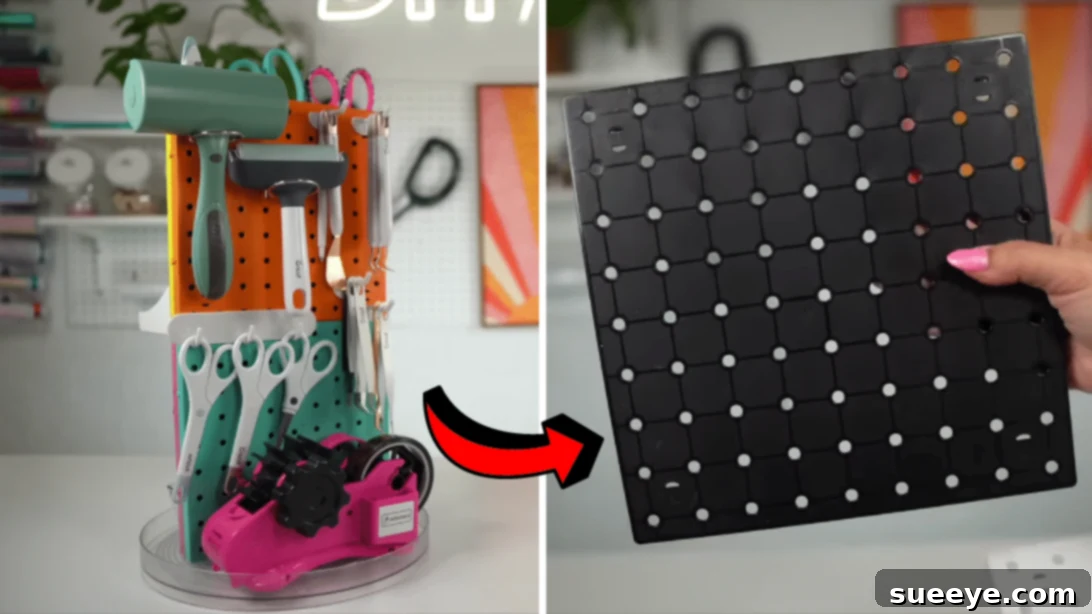
The Ultimate Dollar Tree DIY Rotating Craft Tool Organizer: Declutter Your Workspace
Are you tired of searching for misplaced scissors, lost paintbrushes, or tangled yarn? Every crafter knows the frustration of a cluttered workspace. Finding the perfect craft tool organizer can transform your creative process, bringing order and efficiency to your projects. We’ve discovered an ingenious solution that is not only highly functional but also incredibly budget-friendly and fully customizable. This DIY project will help you keep all of your essential craft supplies tidy, visible, and conveniently in one place!
What makes this organizer truly stand out is its affordability. Every single item you’ll need can be sourced from your nearest Dollar Store, proving that effective organization doesn’t have to break the bank. Beyond its cost-effectiveness, the beauty of this project lies in its adaptability. You can easily customize and accessorize your organizer to perfectly match your personal preference, craft style, and specific storage needs. Imagine a spinning caddy adorned in your favorite colors, tailored precisely to hold your unique collection of tools!
RELATED: How to Make a Cardboard Tube Organizer
This fantastic craft organizer also makes for an exceptionally thoughtful and unique handmade gift. If you have a loved one who shares your passion for crafting, imagine their delight receiving a personalized, rotating storage solution built with your own hands. It’s a gift that speaks volumes about care and understanding. Moreover, this project is remarkably straightforward and quick to complete. We’re confident you can finish it in just a short amount of time, making it an ideal weekend activity or a speedy solution to an immediate organizational need. Ready to banish the clutter and embrace a more organized crafting life? Dive into the video tutorial by DIYholic on YouTube, and let’s get crafting!
Why a Well-Organized Craft Space Matters for Your Creativity
A tidy craft space is more than just aesthetically pleasing; it’s a foundation for enhanced creativity and productivity. When your tools and supplies are neatly organized, you spend less time searching and more time creating. This reduces frustration, allows for uninterrupted workflow, and fosters a clearer mental space for ideas to flourish. Imagine instantly finding the exact color of thread or the right size of needle without digging through piles of clutter. An organized environment minimizes distractions, allowing you to fully immerse yourself in your craft and bring your imaginative visions to life more efficiently.
Beyond efficiency, proper organization also protects your valuable craft supplies. Delicate brushes, sharp tools, and vibrant fabrics are less likely to get damaged or lost when stored correctly. Furthermore, a visually appealing and orderly workspace can be a source of inspiration itself, inviting you to sit down and begin a new project. This DIY rotating craft organizer addresses many common organizational challenges, providing a centralized, accessible, and adaptable solution that truly makes a difference in your crafting journey.
Unleash Your Creativity: The Benefits of This DIY Craft Organizer
This Dollar Tree DIY Rotating Craft Tool Organizer offers a multitude of benefits that make it an indispensable addition to any crafter’s space. Its ingenious design addresses common storage woes with elegant simplicity:
- Unbeatable Cost-Effectiveness: Sourcing all materials from the Dollar Store keeps this project incredibly affordable. You can achieve high-impact organization without a significant financial investment, making it accessible to every crafter.
- Maximum Customization: From choosing your favorite spray paint colors to selecting specific pegboard accessories, every aspect of this organizer can be tailored to your unique needs and aesthetic. This isn’t a one-size-fits-all solution; it’s designed to be uniquely yours.
- Exceptional Functionality: The rotating lazy Susan base allows for 360-degree access to all your tools, eliminating the need to reach or rummage. The four-sided pegboard structure maximizes vertical storage, transforming a small footprint into ample space for a wide array of items.
- Impressive Versatility: While perfect for craft tools, this organizer’s utility extends far beyond. It can neatly store office supplies, makeup brushes, small hardware, sewing notions, or even gardening tools. Its adaptable design makes it a practical solution for various organizational challenges throughout your home.
- Inspiring & Efficient: Having all your most-used tools neatly displayed and within easy reach promotes efficiency and inspires creativity. No more stopping mid-project to hunt for an item; everything you need is right at your fingertips, allowing your creative flow to remain uninterrupted.
Materials You’ll Need for Your Budget-Friendly Craft Caddy
Gathering your materials from the Dollar Store is part of the fun! Here’s a detailed list of what you’ll need to construct your spinning craft caddy:
- 4 Pegboards: Look for the smaller, individual pegboard panels. The exact size might vary by store, but typically around 12×12 inches or similar. Ensure they are lightweight and easy to work with.
- Adhesive Rinks (Pegboard Connectors): These are usually plastic connectors designed to frame and join pegboards together. They often come with adhesive backing on some pieces, allowing you to create a sturdy, multi-panel structure.
- Pegboard Accessories: This is where you can truly customize! Stock up on various hooks, small cups, baskets, and mini shelves specifically designed to attach to pegboards. Think about the types of tools you need to store (pens, scissors, brushes, glue sticks, small fabric scraps).
- Lazy Susan: Find a small, sturdy lazy Susan base. These are typically used for kitchen organization but serve perfectly as the rotating base for your craft caddy. Ensure it can support the weight of your filled organizer.
- Super Glue (or strong adhesive): A high-strength super glue is essential for securely bonding the pegboards together and attaching them to the lazy Susan. Look for quick-drying formulas for faster assembly.
- Spray Paint (optional): If you want to add a pop of color or match your craft room decor, grab a can or two of spray paint in your desired shades. Remember to choose paints suitable for plastic or the material of your pegboards.
- Sanding Paper (Fine-grit): A small piece of fine-grit sandpaper will be used to create a slightly rough surface on smooth areas, which helps the super glue adhere more strongly and reliably.
- Clear Double-Sided Tape (heavy-duty): This tape provides immediate hold and extra reinforcement when attaching the pegboard structure to the lazy Susan, working in conjunction with the super glue for maximum stability.
Step-by-Step Guide: Building Your Rotating Pegboard Organizer
Step 1: Personalizing Your Pegboards with Color (Optional)
If you’ve opted to add a splash of color to your organizer, now is the time to prepare and paint your pegboards. Find a well-ventilated area, preferably outdoors or in a garage with open windows, and lay down a drop cloth or old newspaper to protect your work surface. Shake your spray paint can thoroughly for at least a minute. Apply thin, even coats of spray paint to each pegboard. It’s better to apply several thin coats than one thick coat, as this prevents drips and ensures a smoother, more professional finish. Allow each coat to dry completely according to the manufacturer’s instructions before applying the next. If you’re using multiple colors, ensure each color is dry to the touch before moving on to avoid smudging. Once all coats are applied, set the painted pegboards aside to dry and cure fully.
Step 2: Constructing the Pegboard Tower Frame
Now, let’s assemble the basic structure of your organizer. Take your adhesive rinks (pegboard connectors). These typically have a frame-like design that snaps onto the edges of the pegboards. Begin by applying the adhesive rinks to the corners of one pegboard, pressing firmly to secure them. These rinks will act as the structural frame for your tower. Next, carefully arrange the other three pegboards around the first, using the remaining rinks (both adhesive and non-adhesive ones) to snap them into place. Ensure that all four pegboards are properly outlined and joined together to form a square tower. The goal is to create a secure, four-sided structure that will stand upright once fully assembled. Double-check that all connections are snug and aligned.
Step 3: Securing the Four-Sided Pegboard Structure
With the rinks in place, it’s time to make the pegboard tower permanent and robust. If your rinks came with adhesive backing paper, peel it off now. Once the pegboards are roughly put together, take your sanding paper. Lightly sand down the two connecting sides of each pegboard where they meet. This creates a slightly rough surface, providing better grip for the super glue. Apply a generous, even line of super glue along the sanded edges. Carefully press the pegboards together, ensuring they are perfectly aligned to form a strong, seamless tower. Apply firm and consistent pressure for several minutes until the glue begins to set. You might use clamps or heavy objects to hold the structure together while the glue dries completely. This step is crucial for the long-term stability of your organizer.
Step 4: Attaching the Rotating Lazy Susan Base
With your pegboard tower assembled and sturdy, it’s time to prepare its rotating base. Take your lazy Susan and, using your fine-grit sanding paper, lightly sand the top surface where the pegboard tower will attach. This scuffs the surface, creating an ideal texture for the adhesive to bond effectively. Now, apply several strips of heavy-duty clear double-sided tape to the sanded top of the lazy Susan. This tape will provide an immediate, strong hold. Next, apply a generous amount of super glue directly onto the bottom edges of your pegboard tower. Carefully center the pegboard tower onto the lazy Susan, pressing down firmly. Apply continuous pressure for several minutes, allowing the super glue to bond securely with the tape and the lazy Susan surface. It’s vital that this connection is strong to ensure your organizer rotates smoothly and safely. Let it cure fully before moving on.
Step 5: Customizing and Organizing Your Craft Essentials
Now for the most exciting part: bringing your organizer to life and filling it with your beloved craft supplies! This is where your chosen pegboard accessories come into play. Experiment with different arrangements of hooks, cups, and small shelves on all four sides of your rotating tower. Place frequently used tools like scissors, rulers, and craft knives on easily accessible hooks. Use cups for pens, markers, paintbrushes, and other upright items. Small baskets or shelves can hold glue sticks, spools of thread, beads, or other small notions. Think about how you work and what items you reach for most often. The beauty of pegboards is their flexibility; you can rearrange accessories anytime your needs change. This step truly transforms a simple structure into a highly personalized and efficient craft storage solution.
Creative Customization and Versatile Uses for Your Organizer
The customization possibilities for your Dollar Tree craft tool organizer are virtually endless! Beyond spray paint, consider adding decorative elements like stencils, vinyl decals, or even covering some sections with patterned craft paper for an extra touch of personality. You could create themed organizers, for example, one specifically for sewing supplies and another for paper crafting, each decorated to reflect its purpose. Labels, either handwritten or printed, can further enhance organization and ensure everything has its designated spot.
Moreover, don’t limit this ingenious rotating caddy to just craft tools. Its versatile design makes it ideal for organizing a myriad of items around your home or office. Imagine it on a desk holding pens, paper clips, sticky notes, and small gadgets. In a bathroom, it could stylishly store makeup brushes, lotions, hair ties, and other toiletries. For a DIY enthusiast, it could keep small hardware like screws, nails, and washers neatly separated and easily accessible. Its functionality is only limited by your imagination, making it a truly adaptable and valuable organizational asset.
Maintaining Your DIY Craft Tool Organizer
To ensure your rotating craft organizer continues to serve you well for years to come, a little maintenance goes a long way. Periodically check all glue joints to ensure they remain strong and secure, especially if you frequently move the organizer or if it holds heavier items. If any connections feel loose, reapply super glue and hold firmly until set. For cleaning, simply wipe down the pegboards and accessories with a damp cloth to remove dust or craft residue. If you’ve painted your organizer, use a gentle cleaner that won’t strip the paint. As your craft supplies evolve, don’t hesitate to reconfigure the pegboard accessories to better suit your changing needs. The beauty of this modular design is its adaptability, allowing you to continually optimize your storage without starting from scratch.
*All image credit belongs to DIYholic via YouTube. Follow and subscribe to her channel for more inspiring DIY projects!
Final Thoughts on Your Craft Organization Journey
Creating this Dollar Tree DIY Rotating Craft Tool Organizer is more than just a craft project; it’s an investment in your creative well-being. By taking a small amount of time and effort, you can transform a chaotic workspace into an inspiring hub of productivity and innovation. The satisfaction of building something practical and beautiful with your own hands, especially on a budget, is incredibly rewarding. No more wasted minutes searching for tools; no more creative blocks caused by clutter. With everything neatly organized and readily accessible, you’ll find yourself embarking on new projects with greater enthusiasm and efficiency.
We encourage you to embrace this easy DIY challenge and experience the profound impact a well-organized craft space can have. Watch the full tutorial by DIYholic for a visual guide, gather your affordable supplies, and start building your ultimate craft companion today. Don’t forget to share your customized creations – we love to see how crafters personalize their organization solutions! Happy crafting, and may your workspace always be tidy and inspiring.