
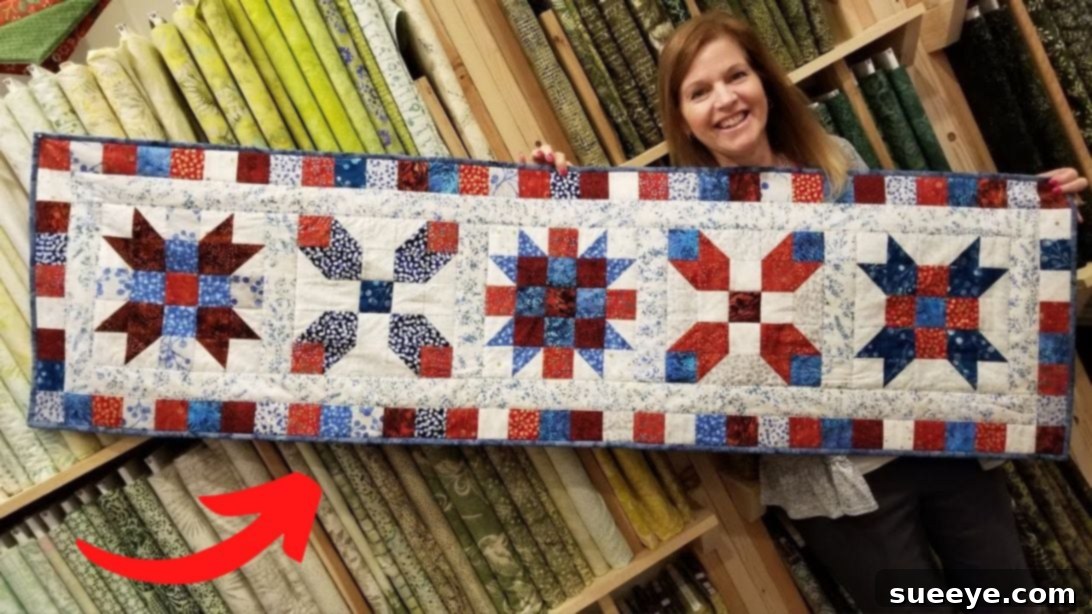
Sister’s Choice Jelly Roll Table Runner: An Easy & Elegant Quilt Project
Are you looking for an exciting new project to bring warmth and charm to your home decor? Or perhaps you have a collection of beautiful jelly roll strips just waiting to be transformed into something spectacular? Look no further! This delightful “Sister’s Choice” Jelly Roll Table Runner tutorial, inspired by the fantastic guides from Jordan Fabrics on YouTube, offers a perfect blend of simplicity and elegance. Designed to be crafted from versatile 2 1/2-inch fabric squares, this project is ideal for quilters of all skill levels, from confident beginners to seasoned enthusiasts.
Table runners are wonderfully versatile pieces that can instantly elevate any dining table, coffee table, or even a dresser. They add a touch of handmade artistry and can be customized to match any season or interior design style. The “Sister’s Choice” pattern, in particular, creates a captivating visual interest with its thoughtful arrangement of blocks, making it a truly eye-catching addition to your home. While this guide provides a fantastic starting point, don’t hesitate to explore your creativity. You can easily adapt the design, experiment with different color palettes, or even adjust the size to fit your specific needs.
This comprehensive guide will walk you through each step of the process, ensuring a smooth and enjoyable quilting journey. We’ll cover everything from precise fabric preparation to the final touches of quilting and binding. Get ready to turn those jelly roll strips into a cherished piece of functional art!
Materials You’ll Need for Your Table Runner
Gathering all your materials before you begin is a key step to ensure a seamless quilting experience. This project uses standard quilting supplies, making it accessible and straightforward.
- 20 pieces of 2 1/2″ jelly roll strips: These will form the main blocks and accent borders of your table runner. Jelly rolls are pre-cut fabric strips, typically 2.5 inches wide and 42 inches long, often coordinated in a specific fabric line. They are perfect for projects like this, saving you significant cutting time and ensuring a harmonious color scheme. You can choose a single collection for a cohesive look or mix and match strips from various collections for a more eclectic, scrappy vibe.
- 1/2 yard light background fabric: This fabric will be used for your sashing and main border, providing a beautiful contrast and framing for your blocks. A light, solid color often works best to make your patterned jelly roll strips pop, but you could also opt for a subtle print or a complementary color that ties into your jelly roll collection.
- 1/2 yard binding fabric: The binding is the finishing strip that encloses the raw edges of your quilt, giving it a polished and durable finish. Choose a fabric that complements your overall design or a contrasting color for a bold statement. Cotton quilting fabric is generally recommended for binding due to its durability and ease of handling.
- 2 yards backing fabric: This fabric will form the underside of your table runner. While it won’t be seen as much as the front, it’s still an important element. You can choose a simple solid, a large-scale print, or even piece together leftover fabric scraps for a truly unique back. Ensure your backing fabric is at least a few inches larger than your finished table runner top on all sides to allow for comfortable quilting.
- Matching thread: A good quality polyester or cotton thread that matches your dominant fabric colors will ensure your seams are strong and blend seamlessly into your design.
- Batting (approx. 20″ x 60″): This is the cozy layer in the middle of your quilt sandwich, providing warmth, structure, and that lovely quilted texture. You’ll need a piece of batting slightly larger than your table runner top to accommodate for quilting.
Essential Quilting Tools
While not explicitly listed, having the right tools makes a world of difference in quilting precision and enjoyment:
- Sewing Machine: A reliable machine is fundamental for piecing your blocks and quilting your runner.
- Rotary Cutter, Mat, and Quilting Ruler: These are indispensable for accurate and efficient fabric cutting. A 2.5-inch ruler or a square-up ruler will be particularly helpful for this project.
- Iron and Ironing Board: Pressing seams correctly is crucial for flat, precise blocks and a professional finish.
- Fabric Scissors: For any small snips or thread trimming.
- Pins or Fabric Clips: To hold fabric pieces together before sewing.
- Seam Ripper: Every quilter needs one! It’s better to unpick and redo than to live with a mistake.
Crafting Your Sister’s Choice Jelly Roll Table Runner
Before diving into the steps, remember that precision is paramount in quilting. Take your time with cutting and pressing, as these foundational steps directly impact the final appearance of your table runner. A consistent 1/4-inch seam allowance throughout the project is also critical for your blocks to come together perfectly.
Step 1: Preparing Your Fabric – Subcutting Jelly Roll Strips
Your journey begins with transforming your jelly roll strips into uniform 2 1/2-inch squares. This step requires accuracy to ensure all your pieces will fit together perfectly later on. Take one of your 2 1/2-inch jelly roll strips and lay it flat on your cutting mat. Using your rotary cutter and quilting ruler, carefully cut the strip into 2 1/2-inch squares. Repeat this process for all 20 of your jelly roll strips. Each standard 42-inch jelly roll strip typically yields 16 squares, which means you will end up with a grand total of approximately 320 pieces of 2 1/2-inch squares. Keep your squares organized, perhaps by light and dark tones or by individual strip patterns, as this will assist you in the next steps.
Step 2: Crafting Half-Square Triangles (HSTs)
Half-Square Triangles (HSTs) are fundamental building blocks in countless quilt patterns, and they add a dynamic diagonal element to our “Sister’s Choice” design. To create these, begin by selecting 8 light-colored 2 1/2-inch squares and 8 matching dark-colored 2 1/2-inch squares. These don’t have to be identical sets; you can mix and match to create variety, but ensure you have a ‘light’ and a ‘dark’ partner for each pair. On the back side (the wrong side) of each light square, use a fabric marking pen or pencil to draw a diagonal line from one corner to the opposite corner. This line will serve as your sewing guide.
Next, take one light square and place it on top of a dark square, with right sides together. Align the edges perfectly. You will then sew along the diagonal line you just drew. It’s crucial to sew directly *on* the line, not on both sides of it. This method ensures your seam allowance is accurate once cut. Repeat this process for all 8 pairs of squares, creating 8 units sewn along the diagonal.
Step 3: Trimming and Pressing Your HSTs
Once you’ve sewn along the diagonal line on all 8 units, it’s time to trim and press them into perfect Half-Square Triangles. With your rotary cutter, cut the excess fabric 1/4 inch away from the stitched line, on the side *without* the stitching. This cut will leave you with a small triangular piece of fabric. While these small triangles are often too tiny for this project, save them in a scrap bin; they can be used for future “crumb quilting” projects or miniature designs. After trimming, carefully open each half-square triangle unit. Using your iron, press the seam allowance toward the darker print fabric. This technique, known as “pressing to the dark side,” helps to reduce bulk and ensures that your seams will nest together nicely when joining blocks. Take your time with pressing to ensure your HSTs lie flat and square. Repeat for all 8 HSTs, ensuring they all measure 2 1/2 inches square once trimmed and pressed.
Step 4: Assembling Your Quilt Blocks
With your HSTs ready, it’s time to bring your blocks to life! This table runner features a 5×5 block layout, combining your HSTs with plain 2 1/2-inch squares. For each block, you will need the following components: some of your 8 half-square triangles and a selection of 17 plain 2 1/2-inch squares from your jelly roll collection. Begin by carefully laying out these pieces on a design board or a flat surface in a 5-row by 5-column grid. Experiment with the placement of your HSTs and plain squares until you achieve a design that you love. The “Sister’s Choice” pattern typically arranges the HSTs to create a specific motif, so refer to the video tutorial for the precise arrangement or feel free to create your own visually appealing layout.
Once you are happy with your block layout, begin sewing the squares together into rows. Stitch the squares in each row, one by one, using your consistent 1/4-inch seam allowance. When sewing rows, consider “chain piecing” – feeding one set of pieces after another through your machine without lifting the presser foot or clipping threads in between. This saves time and thread. After sewing each row, press the seam allowances in opposite directions for alternating rows. For example, press seams in Row 1 to the right, Row 2 to the left, Row 3 to the right, and so on. This technique allows the seams to “nest” when you join the rows, reducing bulk and helping you achieve perfect points. Finally, sew the rows together to complete your first block. Repeat this entire process to make a total of 5 identical or coordinating blocks.
Step 5: Adding Sashing and Framing Your Blocks
Sashing strips are narrow fabric strips used to separate and frame quilt blocks, adding definition and visual breathing room to your design. For the light sashing border, take your 1/2 yard of light background fabric. First, cut 5 pieces of 2 1/2-inch width-of-fabric (WOF) strips. From these WOF strips, subcut them to create 6 pieces, each measuring 10 1/2 inches long. These shorter sashing pieces will go between and at the ends of your blocks.
Now, lay out your 5 completed quilt blocks in a single row. Take one 10 1/2-inch sashing piece and sew it between each of the 5 blocks. Additionally, sew one 10 1/2-inch sashing piece to each end of the row of blocks. This creates a beautifully framed center section for your table runner. Next, take the remaining sashing strips you cut from your WOF and sew them together along their short ends to create two very long strips. These long strips will form the sashing along the long edges of your runner. Carefully attach one long sashing strip to each of the long edges of your assembled block row. Once sewn, trim any excess length from the sashing strips so they are flush with the ends of your runner. Press all seams away from the sashing strips to maintain a flat surface.
Step 6: Adding Outer Borders, Quilting, and Binding
The final borders will frame your entire table runner and provide a finished look. From your remaining 2 1/2-inch jelly roll squares, count out 31 pieces. Sew these 31 squares together, end-to-end, to create a long, colorful border strip. Attach this strip to one of the long sides of your table runner. Repeat this process for the other long side, ensuring your borders are symmetrical and evenly sewn. Next, count out 9 pieces of 2 1/2-inch squares and sew them together to form a shorter border strip. Sew this strip onto one of the short sides of your table runner. Repeat for the other short side. Carefully press all border seams flat, typically pressing them away from the center of the quilt to reduce bulk.
With your table runner top complete, it’s time for the “quilt sandwich.” Lay your backing fabric wrong side up, taping it securely to a flat surface. Center your batting on top of the backing. Finally, place your table runner top right side up on top of the batting. Smooth out any wrinkles and baste the three layers together. Basting can be done with safety pins, basting spray, or long hand stitches, ensuring all layers are held securely without shifting during quilting. Now, you’re ready to quilt! You can choose to machine quilt with a walking foot, free-motion quilt, or even hand quilt your design. Simple straight lines following the seams, or a wavy design, are popular choices for table runners. Once quilted, trim the excess batting and backing so they are flush with the edges of your table runner top.
The last step is binding. Prepare your binding strips from your 1/2 yard binding fabric. Typically, binding strips are cut 2 1/2 inches wide. Sew them together end-to-end to create one long strip. Press this strip in half lengthwise. Attach the binding to the front of your table runner, either by machine or hand, mitering the corners for a neat finish. Then, wrap the binding around to the back and hand-stitch or machine-stitch it down. This final touch will secure all layers and give your table runner a beautiful, durable edge. Congratulations, your Sister’s Choice Jelly Roll Table Runner is now complete!
Personalizing Your Table Runner: Tips for Customization
While this tutorial provides a fantastic foundation, the beauty of quilting lies in its endless possibilities for customization. Don’t be afraid to make this “Sister’s Choice” table runner uniquely yours!
- Color Palette Exploration: The original design might use a specific color scheme, but you can adapt it to any season or room decor. Imagine vibrant autumnal hues for Thanksgiving, festive reds and greens for Christmas, soft pastels for spring, or cool blues and whites for a coastal theme.
- Fabric Selection: Beyond jelly rolls, consider using fat quarters cut into 2.5-inch strips, or even diving into your scrap bin for a truly unique and eco-friendly project. Mixing solids with prints can also create striking contrasts.
- Varying Block Arrangements: Once you understand the basic block construction, try rearranging the HSTs and plain squares within your 5×5 grid to form different patterns. This simple change can give your runner a completely different feel.
- Quilting Designs: The quilting itself offers another layer of personalization. Instead of simple straight lines, you could try wavy lines, stippling, loops, or even outlining certain elements of your design (stitch-in-the-ditch).
- Size Adjustments: This tutorial creates a standard-sized table runner. However, by adjusting the number of blocks you create and the length of your sashing and border strips, you can easily make a longer runner for a grand dining table or a shorter one for an entryway console.
Caring for Your Quilted Table Runner
To ensure your beautiful handmade table runner lasts for years to come, proper care is essential. Generally, machine wash on a gentle cycle with cold water and a mild detergent. Avoid harsh chemicals or bleach. You can tumble dry on low heat or, for best results and to minimize shrinking, lay flat to dry. If needed, a warm iron can be used to smooth out any wrinkles. Remember, handmade items appreciate gentle care!
This “Sister’s Choice” Jelly Roll Table Runner is more than just a decorative item; it’s a testament to your creativity and skill. Whether you’re making it for your own home or as a thoughtful gift, it’s a project that promises satisfaction and a stunning result. Happy quilting!