
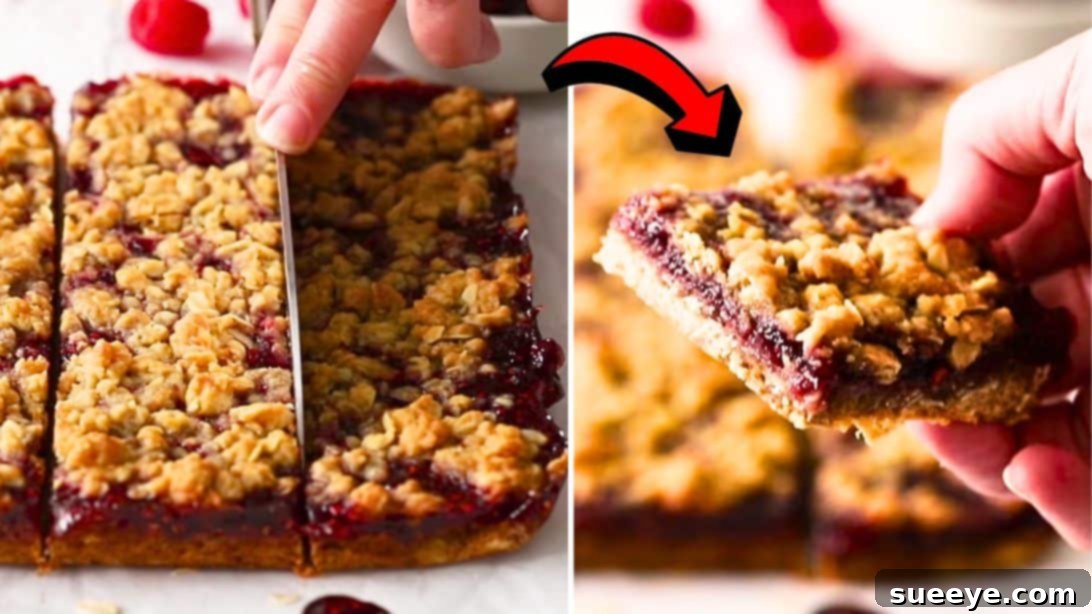
Transform your breakfast or snack time with these utterly delightful and incredibly easy Jam Oatmeal Bars! Inspired by a fantastic recipe from It’s Not Complicated Recipes on YouTube, these bars are a mouth-watering treat that perfectly blends wholesome goodness with irresistible sweetness. Forget store-bought pastries; these homemade bars are not only healthier but also bursting with flavor, making them an ideal choice for a quick breakfast on the go, a satisfying afternoon snack, or even a light dessert. Best of all, they’re incredibly simple to whip up, utilizing common pantry staples like rolled oats and your favorite jam.
Whether you’re looking to use up leftover ingredients or simply craving a delicious yet guilt-free treat, this recipe is your answer. You’ll be amazed at how easily these come together, allowing you to enjoy a freshly baked, comforting snack in just a few straightforward steps. These Jam Oatmeal Bars are truly a testament to how simple ingredients can create something extraordinary.
RELATED: Healthy Sugar-Free Apple Bread Recipe
Ready to create a batch of these delectable bars? Dive into our comprehensive written instructions below. For a visual guide, make sure to watch the full video tutorial from “It’s Not Complicated Recipes.” We’re confident that once you taste these flavorful, wholesome Jam Oatmeal Bars, they’ll quickly become a staple in your home, tempting you to make them again and again!
Wholesome Ingredients for Your Delicious Jam Oatmeal Bars
Crafting the perfect Jam Oatmeal Bar begins with selecting quality ingredients. This recipe calls for a simple list of items, most of which you likely already have in your kitchen. Each component plays a crucial role in creating the ideal texture and flavor profile, from the buttery, crumbly crust to the sweet, fruity filling.
- 1 cup of all-purpose or plain flour: This forms the base of your crumbly topping and crust. For a gluten-free alternative, a 1:1 gluten-free baking flour blend can be used.
- 1 cup of old-fashioned rolled oats: The star of the show! Rolled oats provide a wonderful chewy texture and a wealth of fiber. Ensure you use old-fashioned oats, not instant, for the best result.
- ½ tsp of sea salt: A pinch of salt enhances all the other flavors, balancing the sweetness and adding depth to the oat crust.
- ½ tsp of baking soda: This leavening agent helps create a slightly tender and airy texture in the oat mixture.
- ½ cup of butter, melted: Butter binds the oat mixture together, providing richness and a beautiful golden color. Unsalted butter is preferred, allowing you to control the salt content. For a dairy-free option, use a plant-based butter alternative.
- ⅓ cup of brown sugar: Brown sugar adds a lovely caramel-like sweetness and moisture to the crust, complementing the oats perfectly. You can adjust the amount slightly to your sweetness preference or substitute with coconut sugar for a refined sugar-free option.
- 3 tsp of vanilla extract: Vanilla adds a warm, aromatic note that elevates the overall flavor profile of the bars. Don’t skip this!
- 1 cup of raspberry jam, or any jam you prefer: The fruity heart of these bars! Raspberry jam offers a delightful tartness, but feel free to experiment with strawberry, apricot, blueberry, or even a sugar-free jam for a healthier twist.
Step-by-Step Guide: Crafting Your Perfect Jam Oatmeal Bars
Making these Jam Oatmeal Bars is a straightforward process, ideal for bakers of all skill levels. Follow these simple steps to create a batch of wholesome, delicious treats that your family will adore. Precision in each step ensures a perfect balance of textures and flavors.
Step 1: Prepare Your Baking Dish and Dry Ingredients
Begin by preheating your oven to 350°F (175°C). This ensures your oven is at the correct temperature for even baking from the moment your bars go in. Next, prepare an 8×8-inch baking dish by lining it with parchment paper. It’s helpful to leave an overhang on the sides of the paper; this creates “handles” that will make it incredibly easy to lift the finished bars out of the pan once they’ve cooled. Set this prepared pan aside. In a medium-sized mixing bowl, combine the dry ingredients: the all-purpose flour, old-fashioned rolled oats, sea salt, and baking soda. Whisk these ingredients together thoroughly until they are uniformly combined. This step ensures that the leavening and salt are evenly distributed throughout the mixture, leading to consistent texture in your bars. Once mixed, set this bowl aside as well.
Step 2: Combine Wet Ingredients and Form the Base
Now, in a separate, larger bowl, add your melted butter, vanilla extract, and brown sugar. Using a whisk or a spatula, mix these wet ingredients together until they are well incorporated and the sugar has dissolved. The mixture should be smooth and fragrant. Once combined, gradually add the reserved rolled oats mixture to the wet ingredients. Mix and fold everything together using a sturdy spatula or your hands until all the dry ingredients are moistened and evenly combined. The mixture will be crumbly, resembling coarse wet sand – this is exactly what you want for the perfect crust. Now, pour about three-quarters (3/4) of this delicious, crumbly mixture into your prepared 8×8-inch baking pan. Using the back of a spoon, your fingers, or a flat-bottomed glass, press the mixture down firmly and evenly to form a compact, solid layer at the bottom of the pan. This will be the sturdy and flavorful base of your jam oatmeal bars.
Step 3: Pre-Bake, Add Jam, and Crumb Topping
Carefully place the pan with the pressed oat base into your preheated oven. Let it bake for approximately 10 minutes. This initial bake helps to set the crust, preventing it from becoming soggy once the jam is added. After 10 minutes, remove the pan from the oven. Working quickly while the base is still warm, immediately and gently spread your chosen jam evenly over the pre-baked oat layer. A thin, consistent layer works best. Now, take the remaining one-quarter (1/4) of the oat mixture that you set aside earlier. Crumble it evenly over the jam layer, ensuring a good distribution for that classic streusel-like topping. Once the jam is covered with the crumbly oats, return the pan to the oven to continue baking.
Step 4: Final Bake, Cooling, and Serving
Continue baking the bars for an additional 10 to 15 minutes, or until the crumb topping is beautifully cooked through and has achieved a lovely light golden-brown color. Keep an eye on them to prevent over-browning. Once baked to perfection, remove the pan from the oven. The most crucial step for perfect bars is proper cooling! Let them cool completely on a wire rack on your kitchen counter for about 30 minutes. This allows the bars to set and makes them easier to cut. For even cleaner cuts and a firmer texture, transfer the pan to the refrigerator and let them chill for an additional 30 minutes to an hour. Once thoroughly cooled and firm, use the parchment paper overhangs to carefully lift the entire slab of bars out of the pan. Place them on a cutting board and slice them into your desired bar size. Now, your delightful Jam Oatmeal Bars are ready to be served and enjoyed!
Why You’ll Adore These Easy & Healthy Jam Oatmeal Bars
These Jam Oatmeal Bars aren’t just another recipe; they’re a delightful addition to your kitchen repertoire for numerous reasons. Beyond their irresistible taste, they offer a perfect blend of convenience, health benefits, and versatility that makes them a go-to choice for any occasion. Here’s why these bars will quickly become a household favorite:
- Wholesome Goodness: Packed with fiber-rich old-fashioned rolled oats, these bars offer sustained energy and contribute to digestive health. It’s a treat you can feel good about eating and serving to your family.
- Effortless Preparation: With simple steps and readily available ingredients, this recipe is incredibly easy to follow, even for novice bakers. It proves that delicious, homemade snacks don’t have to be complicated or time-consuming.
- Customizable Flavors: While raspberry jam is a classic, the beauty of this recipe lies in its adaptability. You can easily swap in your favorite fruit preserves—strawberry, apricot, mixed berry, or even sugar-free options—to create a new flavor experience every time.
- Perfect for Any Time of Day: These bars are wonderfully versatile. Enjoy them as a quick and hearty breakfast, a satisfying mid-morning snack, a pick-me-up afternoon treat, or even a healthier dessert option after dinner.
- Family-Friendly: Kids and adults alike will fall in love with the sweet, fruity flavor and the comforting texture of these bars. They’re an excellent alternative to processed snacks and a great way to incorporate more oats into your diet.
- Great for Meal Prep: Make a batch at the beginning of the week, and you’ll have delicious, pre-portioned snacks ready to grab and go. They store well, making them ideal for busy schedules.
- Economical: Using pantry staples like flour, oats, butter, and jam, these bars are a cost-effective way to enjoy homemade baked goods without breaking the bank.
Tips for Achieving Jam Oatmeal Bar Perfection
While the recipe is simple, a few expert tips can elevate your Jam Oatmeal Bars from good to absolutely outstanding. Pay attention to these details to ensure every batch is consistently delicious and perfectly textured:
- Measure Accurately: Baking is a science, and precise measurements are key. Especially for flour and oats, use the scoop-and-level method rather than packing them down, which can lead to dry or dense bars.
- Don’t Overmix the Dough: Once you add the dry ingredients to the wet, mix only until just combined. Overmixing can develop the gluten in the flour, resulting in tougher bars rather than tender, crumbly ones.
- Press the Base Firmly: When forming the bottom layer, ensure it’s pressed down very firmly and evenly into the pan. A compact base prevents the jam from seeping through and provides a sturdy foundation for your bars.
- Even Jam Spreading: Spread the jam quickly and evenly over the warm, pre-baked base. A thin, consistent layer ensures a balanced fruit flavor without overpowering the oats.
- Cool Completely: This is perhaps the most crucial tip! Allowing the bars to cool completely at room temperature, followed by a chill in the refrigerator, is essential for them to set properly. Trying to cut them while warm will result in messy, crumbly bars. Patience here will be rewarded with clean, perfect slices.
- Use Parchment Paper: Don’t skip the parchment paper with an overhang! It makes removing the entire slab of bars from the pan incredibly easy, preventing sticking and allowing for clean cuts.
- Adjust Sweetness: Taste your jam if you’re unsure of its sweetness level. If you prefer less sweet bars, you can slightly reduce the brown sugar in the oat mixture, or use a less sweet, fruit-forward jam.
Variations and Customizations: Unleash Your Creativity!
One of the best aspects of these Jam Oatmeal Bars is their incredible versatility. Once you’ve mastered the basic recipe, feel free to get creative and experiment with different flavors and additions. Here are some ideas to inspire you:
- Jam Flavors Galore:
- Classic Strawberry: A universally loved choice, offering sweet familiarity.
- Tangy Apricot: Provides a sophisticated tartness that pairs wonderfully with oats.
- Mixed Berry: A vibrant blend of flavors, often richer and more complex.
- Lemon Curd: For a zesty, bright alternative (though perhaps not strictly “jam”).
- Nutella: For an indulgent, chocolate-hazelnut twist (a completely different profile, but delicious!).
- Sugar-Free Options: If you’re mindful of sugar intake, many excellent sugar-free jams are available.
- Spice it Up:
- Add ½ teaspoon of ground cinnamon or a pinch of nutmeg to the dry oat mixture for a warm, comforting flavor, especially lovely with apple or peach jam.
- A dash of cardamom could add an exotic touch.
- Nutty Additions:
- Fold ½ cup of chopped walnuts, pecans, or almonds into the oat mixture for added crunch and healthy fats.
- Sprinkle slivered almonds or chopped pistachios on top of the crumb layer before baking for an extra flourish.
- Chocolate Lover’s Dream:
- Mix in ¼ to ½ cup of mini chocolate chips (dark, milk, or white) into the oat crumble mixture.
- A drizzle of melted chocolate over the cooled bars adds a decadent touch.
- Dried Fruit Boost:
- Chop up some dried cranberries, raisins, or apricots and add them to the oat mixture for extra chewiness and flavor.
- Gluten-Free Version:
- Substitute the all-purpose flour with a 1:1 gluten-free baking flour blend.
- Ensure you use certified gluten-free rolled oats, as regular oats can sometimes be cross-contaminated during processing.
- Vegan Friendly:
- Replace the butter with a good quality plant-based butter alternative (ensure it melts well).
- Check that your chosen jam does not contain any animal products (most jams are naturally vegan, but always good to check labels).
Storage and Serving Suggestions
Once your delightful Jam Oatmeal Bars are cooled and cut, proper storage ensures they remain fresh and delicious for days. Here’s how to best store and enjoy them:
Storage:
- Room Temperature: For short-term storage (1-2 days), place the bars in an airtight container at room temperature. This is ideal if you plan to consume them quickly.
- Refrigeration: To extend their freshness, store the bars in an airtight container in the refrigerator for up to 5-7 days. The cooler temperature helps maintain their texture and prevents the jam from spoiling.
- Freezing: These bars freeze beautifully! Once completely cooled, wrap individual bars tightly in plastic wrap, then place them in a freezer-safe bag or container. They can be frozen for up to 2-3 months. Thaw them at room temperature or warm slightly in the microwave before enjoying.
Serving Suggestions:
- Breakfast: A perfect grab-and-go breakfast with a cup of coffee or tea, offering a balanced start to your day.
- Snack Time: An ideal pick-me-up for a midday snack, satisfying sweet cravings without being overly indulgent.
- Dessert: Serve warm with a scoop of vanilla ice cream or a dollop of whipped cream for a simple yet elegant dessert.
- Lunchbox Treat: Pack them in school or work lunchboxes for a wholesome and delicious surprise.
- Picnics and Potlucks: Easily transportable and loved by all, they make a great addition to any gathering.
*All these images are credited to It’s Not Complicated Recipes via YouTube. Give her channel a visit and subscribe for more delicious and easy recipes!
Embrace the Delight of Easy-to-Make Healthy Jam Oatmeal Bars!
In conclusion, these Easy-to-Make Healthy Jam Oatmeal Bars are more than just a recipe; they are an invitation to bring wholesome, homemade goodness into your daily routine with minimal effort. Their irresistible combination of tender oats, sweet and tangy fruit jam, and a delightful crumbly texture makes them an instant hit for any meal or snack occasion. Whether you’re a seasoned baker or just starting your culinary journey, this recipe offers a foolproof path to a truly satisfying treat.
Say goodbye to overly processed snacks and embrace the simple joy of baking something fresh and nourishing right in your own kitchen. With the flexibility to customize flavors and ingredients, these Jam Oatmeal Bars are sure to become a cherished favorite, providing comfort, flavor, and health benefits in every single bite. Don’t wait – gather your ingredients and start baking these incredible bars today. Your taste buds, and your family, will thank you!