
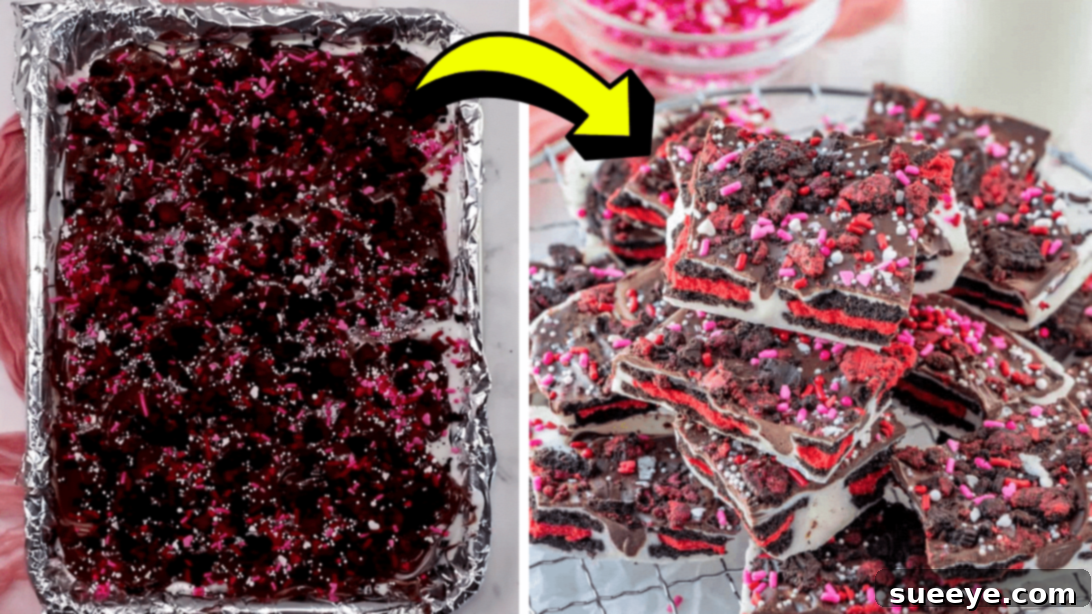
Effortless No-Bake Oreo Candy Bark: The Ultimate Easy Recipe for Parties & Gifts
Welcome to the delightful world of candy barks – where simplicity meets incredible flavor! These versatile treats are celebrated for being among the easiest and most enjoyable confections to create, often requiring just a handful of readily available ingredients. The beauty of candy bark lies in its remarkable adaptability; there’s truly no strict rulebook, allowing you to experiment with various additions and even utilize pantry leftovers. Whether you’re a seasoned baker or a complete novice, crafting a beautiful and delicious bark is well within reach, promising impressive results with minimal effort.
Today, we’re diving into a particularly irresistible version: the **Oreo Candy Bark**. This recipe is a true game-changer, especially when you need a show-stopping dessert without the fuss of traditional baking. Imagine whipping up a gourmet-looking treat that’s perfect for any occasion – from lively family gatherings and festive holiday parties to heartfelt homemade gifts for Valentine’s Day or birthdays. Its no-bake nature makes it incredibly quick, allowing for last-minute preparation without compromising on taste or stunning presentation. We’ll be guided by an inspiring and straightforward recipe from The Country Cook on YouTube, ensuring a foolproof path to bark-making success.
Forget complex techniques, extensive equipment, and lengthy ingredient lists. This Oreo bark delivers maximum impact with minimal effort, making it a favorite for both busy individuals and those simply seeking a quick and satisfying sweet fix. It’s an ideal choice for anyone who wants to impress guests or indulge in a delightful treat that’s easy to customize. Get ready to transform ordinary Oreos and chocolate into an extraordinary confection that everyone will adore. Let’s embark on this simple yet elegant no-bake adventure!
RELATED DELIGHT: Easy-to-Make Rich Oreo Cheesecake Bars
Essential Ingredients for Your Delectable Oreo Candy Bark
One of the many charms of this Oreo candy bark recipe is its remarkably minimal ingredient list. You don’t need obscure items or a fully stocked pantry – just a few key components to create something truly special. Let’s break down each essential ingredient and why it plays a crucial role in achieving the perfect balance of flavor and texture in your bark, ensuring every bite is a delightful experience.
- 30 Double-Stuf Oreo Cookies, divided: The undisputed star of our show! Double-Stuf Oreos are highly recommended for their extra cream filling, which adds an additional layer of sweetness and a richer, more satisfying texture to the bark. You’ll use most of these cookies whole for the sturdy base layer, creating delightful crunch and visual appeal. A smaller portion will be lightly crushed to provide a fantastic textural contrast and a charming finishing touch on top. Feel free to experiment with different Oreo flavors if you’re feeling adventurous – mint, peanut butter, or even seasonal varieties can introduce exciting twists and personalize your bark.
- 24-ounce package of Vanilla Candy Coating, divided: Also widely known as vanilla melting wafers, white candy melts, or almond bark. This forms the smooth, creamy foundation of your candy bark. It’s specifically designed to melt easily and set quickly, providing that characteristic “bark” texture without requiring tempering. Dividing it ensures you have enough for both the initial thin layer and the generous top coating, encasing the Oreos perfectly. For the best results, choose a high-quality candy coating that melts smoothly without becoming clumpy or grainy.
- 1½ cups of Semi-Sweet Chocolate Chips: The classic pairing with vanilla and Oreo! Semi-sweet chocolate chips add a beautiful contrasting dark color and a rich, traditional chocolate flavor that perfectly complements the sweetness of the vanilla coating and the iconic Oreos. These will be melted and artistically drizzled over the top, allowing you to create elegant swirls and adding another layer of visual appeal and sophisticated flavor. You could also opt for milk chocolate for a sweeter profile or dark chocolate for a more intense cocoa hit, depending on your personal preference.
- Festive Sprinkles: The ultimate customizable garnish! Sprinkles add a vibrant pop of color and an instant festive touch, making your bark suitable for any occasion. Choose colors that perfectly match your event – think classic red and pink for Valentine’s Day, cheerful green and red for Christmas, soft pastels for Easter, or a lively mix of bright colors for a birthday celebration. Beyond aesthetics, sprinkles add a slight, fun crunch that enhances the overall textural experience of the bark.
With these simple yet powerful ingredients in hand, you’re well on your way to creating an impressively delicious and incredibly easy no-bake treat that’s sure to disappear quickly from any platter!
Step-by-Step Guide: Crafting Your Delicious Oreo Candy Bark
Creating this irresistible Oreo candy bark is incredibly straightforward, making it an ideal project even for those new to dessert making. Follow these detailed steps precisely to ensure a perfect, professional-looking result every single time. Remember, the key to success lies in careful preparation and gentle handling of the melted coatings.
Step 1: Prepare Your Cookies and Baking Sheet
Begin by carefully handling your 30 Double-Stuf Oreo cookies. Set aside 24 of these cookies whole – these intact cookies will form the delightful and crunchy base layer of your bark. Take the remaining 6 Oreo cookies and place them into a sturdy zip-top bag or sandwich them between two sheets of parchment paper. Lightly crush them using a rolling pin, the bottom of a heavy glass, or even your hands. You’re aiming for chunky crumbs with visible pieces, not a fine dust, as these will provide a lovely textural contrast and an attractive finish on top. Set both the whole and crushed cookies aside for later use. Next, prepare a 9×13-inch baking sheet by lining it completely and smoothly with aluminum foil. This step is absolutely crucial for easy, mess-free removal of the finished bark. Lightly grease the foil with a nonstick cooking spray to prevent any sticking, ensuring the surface is perfectly ready for the candy coating. This careful preparation makes the breaking and serving process incredibly smooth and prevents frustration.
Step 2: Melt the First Batch of Vanilla Candy Coating
Now, take half of your 24-ounce package of vanilla candy coating and place it into a microwave-safe bowl. It’s important to use a bowl that can safely withstand microwave heat and is large enough to allow for thorough stirring. Heat the coating in the microwave on a high setting for approximately 45 seconds. After this initial heating, promptly remove the bowl from the microwave and stir the coating thoroughly with a rubber spatula or spoon. Even if it doesn’t appear fully melted, stirring helps distribute the heat evenly and prevents scorching. If necessary, return it to the microwave in short 15-second intervals, stirring diligently after each, until the candy coating is completely smooth, flowing, and free of any lumps. Be vigilant and avoid overheating, as this can cause the coating to seize (thicken and become unusable) or develop a grainy texture.
Step 3: Create the Oreo Base Layer
Carefully pour the thinly melted first batch of vanilla candy coating onto your precisely prepared 9×13-inch baking sheet. Using an offset spatula or the back of a spoon, spread the coating evenly across the entire foil-lined surface to form a thin, consistent layer. Work quickly but precisely, ensuring no bare spots. Immediately after spreading, meticulously arrange the 24 whole Oreo cookies in a single layer over the melted coating. Place them close together but without overlapping. Gently press each cookie down to ensure they adhere firmly to the vanilla base. This meticulous step creates a sturdy, flavorful foundation for your bark and ensures every single piece you break off has a delightful, satisfying Oreo crunch.
Step 4: Add the Top Layer and Chocolate Drizzle
Now, melt the remaining half of your vanilla candy coating using the exact same microwave method described in Step 2, ensuring it’s perfectly smooth and liquid. Once thoroughly melted, pour this second layer generously over the arranged whole Oreo cookies, spreading it evenly to completely coat and encapsulate them. This creates a seamless and visually appealing top layer. While this layer is still wet and warm, take your 1½ cups of semi-sweet chocolate chips and melt them. You can do this in a separate microwave-safe bowl in 30-second intervals, stirring until smooth, or use a traditional double boiler method for a gentler melt. Drizzle the melted semi-sweet chocolate chips artistically over the entire vanilla coating layer. Don’t stress about perfection; rustic, free-form drizzles often look the most authentic and fantastic!
Step 5: Swirl, Sprinkle, and Prepare for Chilling
Before the chocolate drizzle has a chance to set, grab a butter knife, a toothpick, or a thin skewer. Gently drag it through the melted semi-sweet chocolate and the vanilla coating to create beautiful swirls and intricate marbling patterns. This artistic step adds wonderful visual depth and subtly combines the flavors. Immediately after swirling, generously sprinkle the previously crushed Oreo cookies evenly over the entire surface of the bark. Finally, scatter your festive sprinkles over the top, ensuring a delightful scattering of color. The key is to complete this step while the coating is still wet so that all the toppings adhere properly and don’t fall off later. Once all toppings are in place, carefully transfer the entire baking sheet to your refrigerator.
Step 6: Chill, Break, and Serve!
Allow your Oreo candy bark to chill undisturbed in the refrigerator for at least 30 minutes to 1 hour. For best results and guaranteed hardness, an hour is highly recommended, or even 15-20 minutes in the freezer if you’re in a rush. The bark should be completely firm and hardened to the touch, indicating it’s fully set and ready. Once perfectly chilled, remove the baking sheet from the refrigerator. Carefully lift the entire foil-lined bark from the sheet. Gently peel away the aluminum foil from the back of the hardened candy. Place the bark on a clean cutting board and use your hands to simply break it apart into irregular, rustic chunks, or use a sharp, heavy knife for more uniform pieces. The beauty of bark is in its charmingly organic nature, so uneven pieces are part of its appeal. Arrange the delicious chunks on a serving platter and get ready for rave reviews! Enjoy this delightful, homemade treat that’s as satisfying to make as it is to eat.
Tips for Achieving Perfectly Polished Oreo Candy Bark
While this recipe is incredibly forgiving and designed for ease, a few expert tips can truly elevate your Oreo candy bark from merely good to absolutely exceptional. Paying attention to these small yet significant details will ensure a smooth process and result in a visually stunning, deliciously textured final product that impresses every time.
- Mastering the Melt: When melting your candy coating and chocolate chips, patience is truly key. Microwave in short bursts (15-30 seconds for candy coating, 30 seconds for chocolate chips), stirring thoroughly after each interval. This crucial step prevents scorching, which can lead to a lumpy, grainy, or seized texture. If you prefer a gentler approach, a double boiler method (a heatproof bowl set over a saucepan of simmering water) offers a more controlled melt, ideal for beginners. Always ensure no water or steam comes into contact with the chocolate, as this will also cause it to seize.
- Even Spreading is Essential: For a consistent bark thickness and an even distribution of cookies, always use an offset spatula or the back of a large spoon to spread both layers of vanilla candy coating. A thin, even base layer helps the whole Oreos adhere exceptionally well, and a smooth, even top layer ensures every single bite is perfectly balanced in flavor and texture.
- The Art of Swirling: To create those beautiful, intricate marbled patterns with the drizzled chocolate, it’s important to work quickly while the vanilla coating is still wet and pliable. A simple butter knife, a toothpick, or a skewer works perfectly for this task. Remember, don’t over-swirl, or the colors will blend too much and lose their distinctiveness. Just a few gentle passes are often enough to achieve a wonderfully elegant and artistic effect.
- Optimal Chill Time: Resist the urge to rush the chilling process, as this is vital for the bark’s structure. A minimum of 30 minutes is needed, but an hour in the refrigerator or even 15-20 minutes in the freezer will ensure your bark is fully hardened and set. This makes it much easier to break into clean, defined pieces without crumbling, smudging, or stickiness, resulting in a professional finish.
- Easy Release and Breaking: Lining your baking sheet completely with foil and lightly greasing it is paramount for effortless removal. Once the bark is firm, carefully lift the entire sheet of bark out of the pan using the foil as handles. Gently peel back the aluminum foil from the back of the hardened candy. For breaking, you can simply use your hands for charmingly rustic, irregular pieces, or for more uniform shapes, use a sharp, heavy knife. Always exercise caution when cutting!
- Temperature Matters: Ensure all your ingredients, especially the Oreos, are at room temperature before you begin the preparation. This helps everything come together smoothly and prevents any sudden temperature shocks that could adversely affect the melt and set of your candy coatings, leading to a superior final product.
Creative Variations & Customization: Unleash Your Inner Confectioner!
One of the most exciting and appealing aspects of candy bark is its incredible versatility. While the classic Oreo bark is undeniably delicious and a beloved favorite, this recipe serves as a fantastic, robust foundation for endless customization. Don’t be afraid to get creative, experiment, and tailor your bark to different occasions, specific flavor preferences, or even seasonal themes. Here are some inspiring ideas to help you unleash your inner confectioner and make this bark uniquely yours:
- Explore Oreo Flavors: Beyond the traditional Double-Stuf, the vibrant world of Oreos offers a rainbow of exciting possibilities! Try mint Oreos for a refreshing, cooling twist, peanut butter Oreos for a rich, nutty depth, golden Oreos for a lighter, more vanilla-centric profile, or even seasonal flavors like pumpkin spice or red velvet for a festive and unique touch. Each variation will dramatically change and enhance the overall taste experience.
- Candy Coating Colors: While classic white vanilla candy coating is always elegant, you can easily introduce a spectrum of color! Use pre-tinted candy melts (available in various shades at craft stores) to perfectly match holiday themes (e.g., vibrant green for St. Patrick’s Day, cheerful pastels for Easter, or spooky black and orange for Halloween) or any specific party aesthetics. You can even divide your vanilla coating and add a few drops of oil-based food coloring (be sure to use oil-based, as water-based food coloring will seize the chocolate) to create custom hues that truly pop.
- Add-Ins Galore: This is where the fun and creativity truly begin! Sprinkle in an array of additional toppings for extra layers of flavor and delightful textures:
- Nuts: Incorporate chopped almonds, crunchy walnuts, delicate pecans, or vibrant pistachios for added crunch, richness, and a sophisticated nutty flavor.
- Pretzels: Crushed pretzels are a game-changer, adding a wonderful salty-sweet contrast that is utterly addictive.
- Dried Fruits: Introduce chewy craisins, finely chopped apricots, or sweet dried cherries for a soft, fruity bite that brightens the flavor profile.
- Other Candies: Elevate the fun with mini M&M’s, chunks of chopped candy bars (like Snickers or Butterfinger), soft mini marshmallows, or buttery toffee bits for an explosion of different tastes.
- Coconut Flakes: Add toasted or untoasted coconut flakes for a delightful tropical flair and chewy texture.
- Cereal: A light sprinkle of your favorite crunchy cereal can add an unexpected and enjoyable texture dimension.
- Different Chocolate Types: Instead of relying solely on semi-sweet chocolate chips, consider using creamy milk chocolate for an even sweeter bark, or rich dark chocolate for a more intense, sophisticated cocoa flavor that balances the sweetness. White chocolate can also be artfully drizzled for a subtle visual contrast, or even flavored chocolates like indulgent caramel or robust espresso.
- Extracts for Flavor Boosts: A few drops of high-quality food-grade extract (such as refreshing peppermint, nutty almond, or zesty orange) can be subtly stirred into the melted candy coating or chocolate drizzle to infuse an entirely new flavor dimension. Remember to start with a tiny amount and taste as you go, as extracts can be quite potent!
- Seasonal Themes: Fully embrace seasonal celebrations by using themed sprinkles, mini candies, or even small edible decorations to perfectly align your bark with holidays and seasons. Think iconic candy corn for Halloween, festive crushed candy canes for Christmas, or tiny, charming hearts for Valentine’s Day to make your bark truly special.
The possibilities for customization are truly endless! Don’t hesitate to experiment, mix and match ingredients, and create your very own signature Oreo candy bark recipe that beautifully reflects your personal taste and boundless creativity. This bark is your canvas!
Gifting & Serving: How to Share Your Magnificent Bark
Once your beautiful Oreo candy bark is perfectly chilled, hardened, and broken into delectable pieces, it’s ready to be savored or shared. This treat is not only a delight for personal consumption but also makes an incredibly thoughtful, impressive, and deeply appreciated homemade gift. Its charm lies in its handmade quality and irresistible flavor. Here’s how to best serve and present your culinary creation, ensuring it leaves a lasting impression:
- Elegant Serving: For a party, gathering, or any special occasion, arrange the irregularly shaped chunks of bark artfully on a platter, a decorative tray, or even a tiered dessert stand. The contrasting colors, varied textures, and rustic appeal will naturally make it a captivating visual centerpiece. For a classic pairing, serve it alongside freshly brewed coffee, a comforting cup of tea, or even a tall, cold glass of milk, which perfectly complements the chocolate and Oreo flavors.
- Thoughtful Gifting: Homemade gifts carry a truly special charm and convey a personal touch that store-bought items often lack. This Oreo bark is absolutely perfect for any occasion:
- Charming Gift Bags: Place a generous handful of bark pieces into clear cellophane bags, tie them securely with a festive ribbon (matching the occasion or the bark’s colors), and add a small, personalized tag with a sweet message.
- Decorative Tins/Boxes: For a more substantial gift, carefully layer pieces of bark in a beautiful decorative tin or a sturdy gift box. Consider placing small squares of parchment paper between layers to prevent any sticking, especially if the bark is traveling or being stored for a short period. These make wonderful hostess gifts, heartfelt teacher appreciation presents, thoughtful holiday treats, or even small thank-you tokens.
- Holiday Platters: For larger, more elaborate gifts, arrange a variety of homemade treats, including your delightful bark, on a reusable holiday platter. This creates a stunning presentation that’s sure to be cherished.
It’s an ideal present for Valentine’s Day, Christmas, birthdays, anniversaries, or simply to say “thank you” or “I’m thinking of you.”
- Storage Best Practices: To maintain the optimal freshness and the satisfying crispness of your candy bark, store it in an airtight container. Keep it in a cool, dry place at room temperature for up to 1-2 weeks. If your kitchen tends to be warmer, or for slightly longer storage, you can keep it in the refrigerator. However, for the best texture and flavor experience, allow it to come to room temperature for about 10-15 minutes before serving. Freezing is also an excellent option for extended storage (up to 1-2 months); just ensure it’s extremely well-wrapped to prevent any freezer burn or absorption of odors.
- Portion Control and Presentation: The inherent beauty of bark lies in its broken, organic shapes. However, if you prefer a more uniform appearance, you can use a very sharp knife (which can be slightly heated with hot water and then thoroughly wiped dry for cleaner cuts) to cut more precise squares or rectangles. This can be especially useful for a more formal presentation or for packing pieces tightly and neatly into gift boxes.
Whether you’re treating yourself to a well-deserved sweet indulgence, delighting your family, or graciously sharing with friends and loved ones, your homemade Oreo candy bark is guaranteed to bring smiles, spark joy, and satisfy any sweet craving with its irresistible charm and flavor.
Why You’ll Adore This No-Bake Oreo Candy Bark
In conclusion, this easy no-bake Oreo candy bark recipe stands out as a true culinary gem. It perfectly embodies the spirit of effortless deliciousness, proving unequivocally that you don’t need to spend countless hours in the kitchen or possess advanced culinary skills to create a memorable and genuinely impressive dessert. From its remarkably minimal ingredient list to its straightforward, six-step preparation, every single aspect of this bark is meticulously designed for convenience, maximum enjoyment, and guaranteed success.
Whether you’re urgently seeking a quick fix for a sudden sweet craving, need a last-minute treat for an unexpected gathering, or are looking for a heartfelt, homemade gift that speaks volumes of thoughtfulness, this Oreo bark delivers on all fronts. Its delightful combination of crunchy Oreos, smooth vanilla coating, rich chocolate swirls, and vibrant, festive sprinkles creates an irresistible symphony of flavors and textures that appeals universally to all ages and palates. It’s a guaranteed crowd-pleaser that consistently earns rave reviews and requests for the recipe.
So, gather your ingredients, confidently follow these simple yet detailed steps, and prepare to delight your taste buds and those of your loved ones. This Oreo candy bark isn’t just a dessert; it’s a testament to the sheer joy and accessibility of simple, delicious no-baking! Enjoy the delightful process, and savor every magnificent, perfectly crafted piece.
*All these images are credited to The Country Cook via YouTube. Give her channel a visit and subscribe for more delightful, easy-to-follow recipes and culinary inspiration!
Easy Valentine’s Day Oreo Cookie Bark