
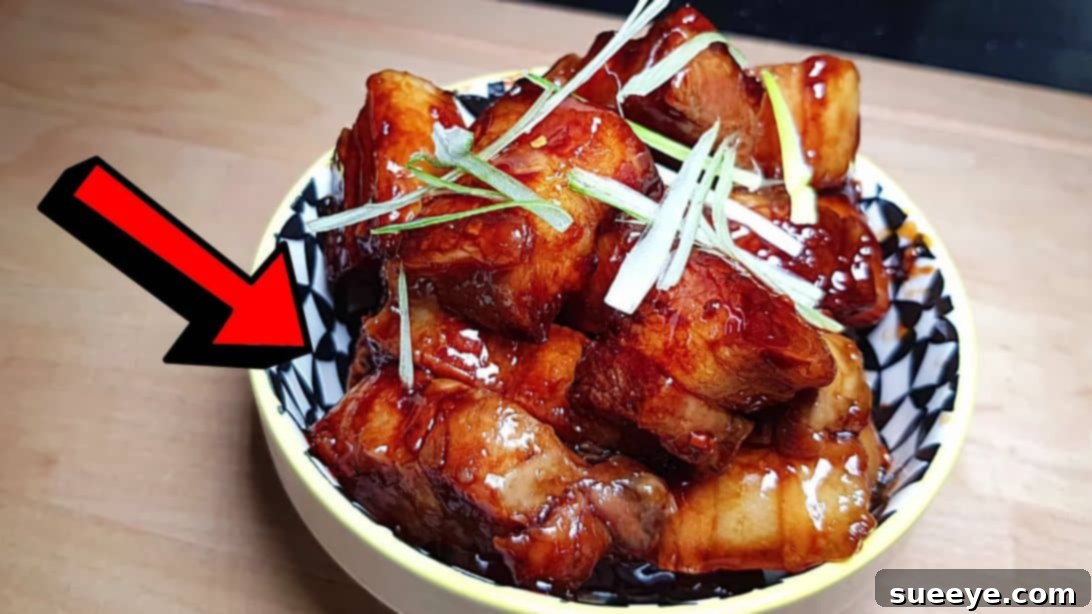
Prepare to delight your taste buds and impress your family with this sensational sticky pork belly recipe, originally inspired by the culinary genius of Can’t Cook?! on YouTube. This dish is more than just a meal; it’s an experience, transforming humble pork belly into an unforgettable feast of flavors and textures. Imagine succulent, tender pork, encased in a beautifully rendered, crispy skin, all coated in an irresistible sweet and savory glaze. We’ve tried this recipe multiple times, and each instance yields perfectly consistent, mouthwatering results that truly leave a lasting impression. Whether served alongside fluffy steamed rice, creamy mashed potatoes, or enjoyed simply on its own, this sticky pork belly is guaranteed to become a cherished addition to your weekly dinner rotation. Get ready to create a dish so good, you might just want to eat it every single day!
Mouthwatering Sticky Pork Belly: Your Ultimate Guide to a Crispy, Sweet, and Savory Dinner
Are you searching for a show-stopping dinner that’s surprisingly simple to prepare? Look no further! This comprehensive guide will walk you through crafting the most exquisite sticky pork belly, a dish renowned for its incredible depth of flavor and satisfying textures. From the initial tenderizing simmer to the final glorious glaze, we’ll ensure your journey to culinary success is both enjoyable and rewarding. Perfect for weeknights or special occasions, this recipe promises a delightful balance of sweet, savory, and umami notes that will have everyone asking for seconds.
Why This Sticky Pork Belly Recipe Will Become Your Family’s Favorite
This isn’t just another pork belly recipe; it’s a culinary triumph waiting to happen in your kitchen. Here’s why you’ll absolutely love it:
- Unrivaled Flavor Profile: Experience the perfect harmony of rich, savory pork complemented by a glossy, sticky glaze featuring the warmth of ginger, the sweetness of honey and brown sugar, and the depth of soy sauce. A touch of chili adds a subtle, exciting kick.
- Irresistible Texture Contrast: Enjoy the best of both worlds – incredibly tender, melt-in-your-mouth pork belly underneath a wonderfully crispy, golden-brown exterior. The rendering process ensures a delightful crunch in every bite.
- Surprisingly Simple to Master: Despite its gourmet appeal, this recipe breaks down the process into clear, manageable steps. Even if you’re new to cooking pork belly, you’ll find it straightforward and rewarding.
- Versatile Serving Options: Whether you prefer it as a hearty main course with rice, a flavorful accompaniment to noodles, or even as an impressive appetizer, this dish adapts beautifully to any meal setting.
- Family-Approved Deliciousness: This recipe has been tried and tested, earning rave reviews from families time and again. It’s a guaranteed crowd-pleaser that will have everyone asking for more.
Gather Your Ingredients: The Heart of Your Sticky Pork Belly
Creating this spectacular dish begins with selecting high-quality ingredients. Each component plays a vital role in building the layers of flavor and achieving that perfect sticky texture. Pay attention to fresh produce, as it significantly enhances the overall taste.
Main Ingredients:
- 500 grams (approx. 1 pound) of premium pork belly strips, rind removed. Opt for good quality pork belly with a balanced ratio of meat and fat for the best results. Removing the rind is crucial for achieving that desired crispy texture without the chewiness of the skin.
- 1 tablespoon of vegetable oil (or sesame oil for an added aromatic touch), for frying.
The Irresistible Glaze Sauce:
This sweet and savory glaze is what truly makes the pork belly “sticky” and unforgettable. Its balanced flavors are key.
- 3 tablespoons of high-quality soy sauce, for depth and umami.
- 2 tablespoons of honey, providing natural sweetness and helping achieve that beautiful caramelization.
- 1 tablespoon of brown sugar, contributing to the richness and sticky texture of the glaze.
- A thumb-sized piece of fresh ginger, finely minced. Fresh ginger adds a vibrant, aromatic warmth that elevates the flavor profile.
- 1 red chili, finely sliced (adjust to your preferred spice level). This adds a subtle heat that beautifully complements the sweetness.
Flavorful Simmering Stock:
The stock is crucial for tenderizing the pork belly and infusing it with foundational savory notes before the glazing process.
- 1.5 liters of water, forming the base of your tenderizing stock.
- 1 cube of vegetable or chicken stock. This boosts the umami and savory qualities of the simmering liquid.
- 3 to 4 slices of fresh ginger, adding another layer of aromatic warmth to the pork.
- 2 to 3 cloves of garlic, lightly crushed or sliced, to impart a fragrant, savory essence.
- 2-3 spring onions, roughly chopped, for an additional fresh, oniony note in the stock.
Step-by-Step Directions: Crafting Your Perfect Sticky Pork Belly
Follow these detailed instructions carefully to ensure your sticky pork belly turns out perfectly tender, wonderfully crispy, and gloriously glazed every single time.
Step 1: The Flavorful Simmer – Tenderizing the Pork Belly
The first step in achieving that melt-in-your-mouth tenderness is to properly simmer the pork belly in an aromatic stock. This process not only softens the meat but also infuses it with a foundational layer of flavor.
Begin by filling a sturdy pot with 1.5 liters of water and bring it to a rolling boil. Once boiling, carefully add the vegetable or chicken stock cube, the fresh ginger slices, the garlic cloves, and the roughly chopped spring onions. Stir these ingredients together until the stock cube has fully dissolved and all components are well combined, creating a fragrant simmering liquid. Gently place the pork belly strips into the pot, ensuring they are completely submerged in the stock. This is vital for even cooking and tenderization. Cover the pot with a lid, then reduce the heat to the lowest possible setting. Allow the pork belly to simmer gently for approximately 45 to 50 minutes. This slow cooking process breaks down the tough fibers, rendering the pork incredibly tender. While the pork is simmering, take this time to prepare your glaze sauce, as detailed in the next step.
Step 2: Crafting the Irresistible Glaze and the Initial Crisping Fry
As the pork belly simmers, you’ll prepare the star of the show – the sticky glaze – and set the stage for achieving that coveted crispy texture.
In a medium-sized mixing bowl, combine the vegetable or sesame oil, soy sauce, honey, brown sugar, and the freshly minced ginger. Whisk these ingredients vigorously until they are thoroughly combined and the sugar has largely dissolved, creating a smooth, aromatic glaze. Set this aside for later use. Once the pork belly has completed its simmering time, carefully remove the strips from the flavorful stock using tongs or a slotted spoon. Transfer them immediately to a plate generously lined with paper towels, then gently pat them completely dry. Thoroughly drying the pork belly is a critical step; any residual moisture will prevent the pork from crisping up effectively during frying. Next, slice each pork belly strip into uniform, small, bite-sized chunks. This increases the surface area for maximum crispiness and allows for easier eating. Place a large frying pan or skillet over medium-high heat on your stove. Once hot, carefully arrange the pork chunks in the pan, ensuring the fatty side is facing down. This allows the fat to render first, creating a beautiful crispy layer.
Step 3: Glazing to Perfection – The Grand Finale
The final stage brings everything together, transforming the crispy pork belly into a sticky, glossy masterpiece.
Once the pork chunks are arranged, cover the pan with a splatter screen to prevent oil splashes. Allow the pork chunks to fry undisturbed for about 1 to 2 minutes, or until you see a beautiful golden-brown crisp developing on the fatty side. After this initial fry, use tongs to toss the pork chunks around, allowing all sides to cook and crisp up evenly for another 1 to 2 minutes. The goal is a uniform golden-brown hue and a satisfying crispness. Carefully drain any excess rendered grease from the pan; this prevents the dish from becoming overly oily and ensures the glaze can properly adhere. Now, pour the prepared glaze sauce directly over the crispy pork chunks. Stir and toss the pork frequently, ensuring every piece is thoroughly coated in the rich, sticky sauce. Continue to cook, stirring occasionally, until most of the sauce has reduced and thickened, clinging beautifully to the pork belly pieces. The glaze should be glossy and caramelized, creating that signature “sticky” texture. Finally, finely chop some fresh spring onions. Once the pork is perfectly glazed and sticky, transfer it to a serving platter, garnish generously with the chopped spring onions for a burst of freshness and color, and serve immediately. Enjoy your incredibly delicious sticky pork belly!
Serving Suggestions: What to Pair with Sticky Pork Belly
The versatility of sticky pork belly means it pairs wonderfully with a variety of sides, allowing you to create a complete and satisfying meal. Here are some popular serving suggestions:
- Steamed White Rice: The classic pairing. The plain rice perfectly soaks up the extra glaze and complements the rich flavors of the pork.
- Creamy Mashed Potatoes: For a comforting and slightly Western twist, mashed potatoes provide a smooth counterpoint to the crispy pork.
- Stir-fried Noodles: Toss the pork belly with your favorite stir-fried noodles and vegetables for a dynamic and flavorful one-bowl meal.
- Steamed Asian Greens: Bok choy, gai lan, or asparagus lightly steamed and seasoned with a dash of soy sauce and sesame oil offer a fresh, crunchy contrast.
- Simple Green Salad: A crisp salad with a light vinaigrette can cut through the richness of the pork, providing a refreshing balance.
- As an Appetizer: Serve the bite-sized pieces with toothpicks as an irresistible starter for your next gathering.
Tips for Success: Achieving the Best Sticky Pork Belly
To ensure your sticky pork belly turns out perfectly every time, keep these expert tips in mind:
- Quality Pork Belly: Start with good quality pork belly that has a balanced layer of meat and fat. This is foundational to the dish’s flavor and texture.
- Rind Removal is Key: Ensure the rind (skin) is completely removed from the pork belly. This allows the fat to render properly and the meat to crisp up without becoming tough or chewy.
- Don’t Rush the Simmer: The 45-50 minute simmering time is crucial for tenderizing the pork belly. Resist the urge to shorten this step; patience here will be rewarded with incredibly soft meat.
- Pat Dry Thoroughly: After simmering, meticulously pat the pork belly dry with paper towels. Any moisture on the surface will prevent it from browning and crisping up in the pan.
- Render Fat Properly: When you start frying, place the pork fat-side down first. This allows the fat to slowly render out, creating a crispy layer and preventing the pork from becoming greasy.
- Mind the Heat for Glazing: Once the glaze is added, keep an eye on the heat. You want it to simmer and reduce, not burn. Stir frequently to ensure even coating and prevent sticking.
- Adjust Spice Level: The red chili adds a lovely kick. If you prefer less heat, use half a chili or omit it entirely. For more heat, feel free to add an extra one!
- Garnish for Freshness: The chopped spring onions not only add color but also a fresh, mild oniony flavor that brightens the rich dish.
Variations and Customizations for Your Sticky Pork Belly
While the original recipe is fantastic, feel free to experiment and make it your own! Here are some ideas to customize your sticky pork belly:
- Spiced Stock: Enhance the simmering stock with star anise, a cinnamon stick, or a few dried shiitake mushrooms for a deeper, more complex flavor profile.
- Garlic Lover’s Glaze: Add an extra clove or two of minced garlic to the glaze for an even richer aroma and taste.
- Different Sweeteners: While honey and brown sugar are perfect, you could experiment with maple syrup or palm sugar for subtle variations in sweetness and caramelization.
- Vegetables in the Pan: Towards the end of the glazing process, you can toss in quick-cooking vegetables like snow peas, bell peppers, or broccoli florets to cook alongside the pork, absorbing the delicious sauce.
- Sesame Seeds: A sprinkle of toasted sesame seeds as a final garnish adds a nutty flavor and appealing texture.
- Spicier Kick: For those who love heat, consider adding a dash of chili flakes or a tiny bit of Sriracha to the glaze.
Frequently Asked Questions About Sticky Pork Belly
- Q: Can I use a different cut of pork?
- A: While pork belly is ideal for its fat-to-meat ratio and crispy potential, you could try pork shoulder or butt, though the cooking time and texture will vary. It won’t achieve the same crispy fatty bits as belly, but it will still be delicious and tender.
- Q: How do I store leftovers?
- A: Store any leftover sticky pork belly in an airtight container in the refrigerator for up to 3-4 days. It reheats well.
- Q: Can I make this ahead of time?
- A: You can simmer the pork belly and prepare the glaze a day in advance. Store the cooked pork (undried) and glaze separately in the fridge. On the day of serving, dry the pork, slice, fry, and glaze as per the recipe for best results.
- Q: Why isn’t my pork belly crispy?
- A: The most common reason is not thoroughly drying the pork after simmering. Moisture prevents browning and crisping. Also, ensure your pan is hot enough and you’re not overcrowding it, which can steam rather than fry the pork.
- Q: What if I don’t have fresh ginger?
- A: Fresh ginger provides the best flavor. However, if absolutely necessary, you can use about 1/2 teaspoon of ground ginger powder for the glaze, but the aroma and pungency will be different.
Conclusion: Your New Go-To Sticky Pork Belly Recipe Awaits!
This sticky pork belly recipe is truly a culinary gem, offering a perfect balance of tender, crispy, sweet, and savory in every single bite. It’s a testament to how simple ingredients, when prepared with care and attention, can create a dish that feels incredibly gourmet and satisfying. Whether you’re a seasoned cook or just starting your culinary journey, this recipe is designed for success, promising to deliver a memorable meal that will impress everyone at your table. Don’t hesitate – gather your ingredients, follow these steps, and prepare to indulge in the best homemade sticky pork belly you’ve ever tasted. We encourage you to try it out and share your delicious results!
*All image credit for this recipe goes to Can’t Cook?! via YouTube. Be sure to follow and subscribe to her channel for more fantastic cooking inspiration and easy-to-follow recipes!