
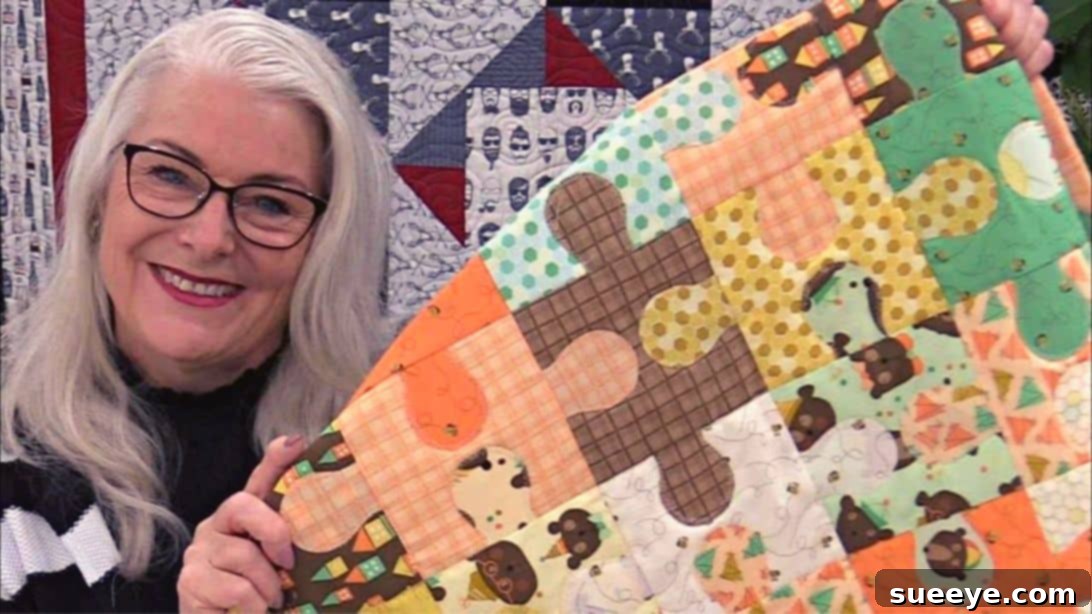
Embark on a delightful quilting journey with a project that promises both ease and stunning visual appeal: the Easy Puzzle Quilt. Inspired by the brilliant tutorial from SewVeryEasy on YouTube, this captivating design transforms simple fabric squares into a vibrant, interlocking masterpiece. Whether you’re a seasoned quilter looking for a quick and satisfying make, or a beginner eager to dive into the world of fabric artistry, this puzzle quilt offers an accessible entry point. Its ingenious design is far less complicated than it appears, making it possible to create a beautiful, personalized quilt in a surprisingly short amount of time, depending on your chosen size. Get ready to unleash your creativity, utilize your fabric stash, and produce a unique quilt that’s as fun to make as it is to admire. Follow our detailed instructions below and explore the accompanying video tutorial for comprehensive guidance.
Essential Materials for Your Puzzle Quilt
Before you begin piecing together your charming puzzle quilt, gather the following high-quality materials. Having everything ready will ensure a smooth and enjoyable crafting experience.
- 5-inch Fabric Squares: These pre-cut squares are perfect for quick quilting projects, eliminating the need for extensive cutting. You can use a coordinated fabric line for a cohesive look or a diverse collection of scraps for a truly unique and scrappy quilt. Consider the color palette carefully, as this will define the overall mood of your finished quilt.
- Heat n Bond EZ Print Lite: This fusible adhesive is key for the appliqué technique used in this quilt. It’s a lightweight, iron-on product that allows you to print your puzzle pattern directly onto it, ensuring precise shapes and easy application to your fabric. It provides a secure bond without adding bulk, making your quilt soft and pliable.
- Batting Fabric: The batting is the middle layer of your quilt, providing warmth, loft, and structure. Common choices include cotton, polyester, or blends. Cotton batting is breathable and drapes well, while polyester offers more puffiness and warmth. Choose a size appropriate for your finished quilt top, ensuring a few inches of overhang on all sides for ease of quilting.
- Border Fabric: Select a fabric that complements or contrasts with your puzzle pieces to create an attractive frame around your quilt design. The border not only adds visual appeal but also helps to stabilize and square up your quilt top, providing a professional finish.
- Marking Pen or Pencil: Essential for transferring patterns, marking quilting lines, or indicating seam allowances. Opt for a fabric-specific pen that is either air-erasable, water-soluble, or designed to vanish with heat, ensuring no permanent marks are left on your finished project.
- Scissors or Rotary Cutter and a Cutting Mat: Precision is paramount in quilting. A sharp pair of fabric scissors is vital for intricate cuts, while a rotary cutter paired with a self-healing cutting mat allows for quick, accurate cuts of straight lines and larger pieces. Choose the tool that best suits your comfort and cutting needs.
- Fabric Pins: High-quality, sharp fabric pins are indispensable for holding fabric layers together securely before sewing. Ensure they are thin enough not to distort your fabric and long enough to penetrate multiple layers.
- Needle and Thread: Select an all-purpose polyester or cotton thread that matches or complements your fabric colors. A good quality thread will prevent breakage and ensure strong, durable seams. Make sure your sewing machine needle is sharp and suitable for the type of fabric you are using (e.g., universal or quilting needle).
- Iron, for pressing: An iron is a quilter’s best friend. Consistent pressing throughout the construction process ensures flat seams, sharp corners, and a professional finish. A steam iron is often preferred for crisp results, but a dry iron works equally well.
- Sewing Machine: A basic sewing machine capable of a straight stitch is all you need for this project. Ensure it’s in good working order, with appropriate tension settings for your chosen fabrics.
- Pattern: Click here to download and print the free puzzle piece pattern. This downloadable pattern will guide you in creating the unique interlocking shapes for your quilt.
Step-by-Step Guide to Crafting Your Easy Puzzle Quilt
Follow these detailed instructions to transform your fabric squares into a charming and colorful puzzle quilt. Take your time with each step, focusing on precision for the best results.
Step 1: Preparation, Pattern Application, and Design Layout
Begin by thoughtfully planning the size of your quilt. This initial decision will dictate the number of 5-inch fabric squares you’ll need. A larger quilt will require more squares, while a smaller throw or baby quilt will use fewer. Once you have a clear vision for your quilt’s dimensions, proceed to print the free puzzle piece pattern. Cut out the individual puzzle pieces from the pattern with care. Next, take four of these paper puzzle pieces and arrange them onto one of your 5-inch fabric squares. Using your iron, fuse these four pattern pieces securely onto the fabric square with the Heat n Bond EZ Print Lite, ensuring they are evenly spaced and adhere smoothly without wrinkles. After the fusing process is complete, carefully cut out the fabric puzzle pieces along the lines of the fused pattern. Precision in this step is crucial for well-fitting puzzle elements. Now, group your newly cut fabric puzzle pieces, placing two distinct puzzle elements onto each remaining 5-inch fabric square. This pairing forms the basic building blocks of your quilt. The most exciting part of this step is deciding on your block assembly and the specific positioning of each puzzle piece. Experiment with different orientations and color combinations on a design wall or a flat surface. Play with symmetry, create a random, mosaic-like effect, or aim for a specific pattern repeat. Visualize how the pieces will interlock and how the colors will flow across your quilt top. This planning stage allows for ultimate creative expression and ensures you’ll love the final arrangement.
Step 2: Sewing, Pressing, and Finishing Your Quilt
Once you are fully satisfied with your puzzle piece arrangement and design layout, it’s time to bring your vision to life at the sewing machine. Begin by carefully sewing your puzzle blocks together. Maintain a consistent ¼-inch seam allowance throughout this process. This accuracy is vital for ensuring your blocks align perfectly and your finished quilt top lies flat. Consider using a quilting foot with a ¼-inch guide on your machine to help maintain this precision. After sewing a few blocks or rows, take them to your ironing board. Give them a nice, crisp press. Pressing your seams open or to one side (consistently) helps to reduce bulk and creates a smoother, more professional finish for your quilt top. This step is often overlooked by beginners but makes a significant difference in the final quality of your work. Once your quilt top is completely assembled and pressed, it’s time to add the border. Measure your quilt top accurately, then cut your border fabric strips to size. Attach the border around the entire perimeter of your quilt, taking care to miter the corners for a polished look if desired, or simply use straight seams for a simpler approach. This border frames your puzzle design beautifully and provides a stable edge for the next steps.
With your quilt top complete, prepare for the quilting phase. Create your “quilt sandwich” by laying your backing fabric face down on a clean, flat surface, securing it with tape. Next, place your batting fabric smoothly on top of the backing, ensuring it’s free of wrinkles. Finally, center your finished puzzle quilt top face up on top of the batting. Baste these three layers together using safety pins, basting spray, or hand-basting stitches. This step prevents shifting of the layers during the quilting process. Now, using your sewing machine, you will simultaneously appliqué the puzzle pieces to the batting and backing layers while quilting the entire piece. You can choose to “stitch in the ditch” around the edges of your puzzle pieces for a subtle effect, or you can opt for free-motion quilting to add texture and intricate designs within each puzzle piece and the surrounding areas. Experiment with simple straight lines or gentle curves to enhance the puzzle motif. This dual-purpose sewing secures your appliqué elements and adds the essential quilting that gives your project its characteristic texture and durability. Once the quilting is complete, trim any excess batting and backing fabric, square up your quilt, and prepare for the final, crucial step: binding. Create binding strips from your chosen fabric, attach them to the raw edges of your quilt, and either hand-stitch or machine-stitch the binding down to create a clean, finished edge that encases all the layers. And with that, your beautiful, easy-to-make puzzle quilt is complete and ready to be enjoyed!
Congratulations on completing your Easy Puzzle Quilt! This project is a testament to how simple techniques can yield incredibly impressive and visually rich results. Whether you’ve crafted a cozy throw for your sofa, a vibrant wall hanging, or a thoughtful gift, your handmade quilt carries a unique story and personal touch. Don’t hesitate to experiment with different fabric collections, color schemes, and quilting patterns to make each puzzle quilt truly your own. The satisfaction of turning simple squares into a functional work of art is immense, and this pattern is perfect for building confidence in your quilting skills. We extend our sincere gratitude to SewVeryEasy via YouTube for providing the inspiration and foundational video tutorial for this fantastic project. Their clear instructions and creative insights are invaluable resources for quilters of all levels. If you enjoyed this tutorial and found it helpful, we highly recommend visiting her YouTube channel and subscribing to discover many more engaging and educational quilting projects. Happy quilting!