
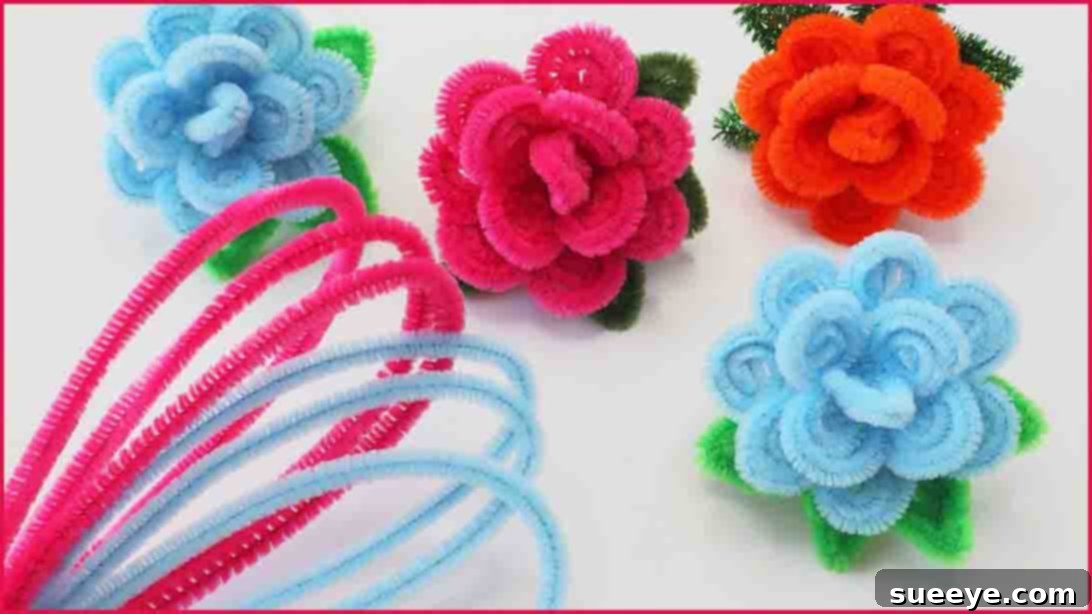
Unleash your inner artist and transform simple pipe cleaners into breathtaking roses with this comprehensive, easy-to-follow guide. Whether you’re a seasoned crafter or just starting your creative journey, this DIY pipe cleaner rose tutorial from Amazing Super Craft on YouTube offers a fun, engaging, and incredibly rewarding experience. Forget wilting flowers; these charming, handmade roses offer lasting beauty and a touch of personalized elegance to any setting. Gather your materials, clear your workspace, and prepare to express your creativity by making these adorable pipe cleaner roses today!
This craft project stands out not only for its captivating results but also for its remarkable accessibility and versatility. Pipe cleaners, also known as chenille stems, are incredibly forgiving and easy to manipulate, making this project suitable for crafters of all ages and skill levels. From vibrant reds and sunny yellows to soft pastels and elegant whites, the possibilities for color customization are truly endless. You can tailor your roses to suit any occasion, match any decor, or reflect any personal aesthetic, creating unique pieces that speak volumes.
Beyond their aesthetic appeal, crafting pipe cleaner roses offers a wonderful opportunity for shared creativity. Invite friends, family, or children to join in the fun and create a bouquet of everlasting blooms together. This tutorial will empower you to transform a handful of fuzzy wires into delicate, lifelike flowers, adding charm to your home decor or crafting heartfelt, handmade gifts for loved ones. Prepare to be inspired and delighted as we delve into the simple yet magical process of making these delightful DIY pipe cleaner roses.
RELATED: DIY Pipecleaner Lavender Flowers Tutorial
Easy DIY Pipe Cleaner Rose Tutorial: Crafting Beautiful Blooms
In this detailed, step-by-step tutorial, inspired by the wonderful craftsmanship of Amazing Super Craft, we will guide you through transforming simple pipe cleaners into a beautiful, lasting rose. Watch the video tutorial below for a visual walkthrough and then follow our enhanced instructions to master this delightful craft.
What You’ll Need to Craft Your Pipe Cleaner Roses:
One of the greatest advantages of making pipe cleaner roses is the minimal and inexpensive material list. You likely already have most of these items, or they are easily accessible at any craft store or even many dollar stores. Here’s what you’ll need to get started:
- Pipe Cleaners in Different Colors: You’ll need approximately six pipe cleaners for the rose petals and two green pipe cleaners for the stem and leaves. Experiment with various shades of red, pink, yellow, white, or even multi-colored pipe cleaners to create unique and vibrant roses. Standard 12-inch chenille stems work best for this project.
- Scissors (Optional): While not strictly necessary for this design, a pair of craft scissors can be helpful for trimming any excess or for other pipe cleaner projects.
- A Clear Workspace: Ensure you have a clean, flat surface to work on, allowing you to easily manipulate the pipe cleaners and arrange your petals.
- Creativity and Patience: These are your most important tools! Don’t be afraid to experiment with your petal shapes and arrangements to achieve your desired look.
Choosing the right colors is part of the fun! Think about who you’re making these for or where they will be displayed. Classic red signifies love, pink represents admiration, and yellow symbolizes friendship. Green pipe cleaners are essential for a realistic stem and leaves, providing a natural contrast to your vibrant bloom.
Step-by-Step Directions to Make Your Pipe Cleaner Rose:
Follow these detailed instructions to craft your stunning pipe cleaner rose. Take your time with each step, and don’t hesitate to refer back to the video if you need a visual reference.
Step 1: Forming the Rose’s Base and Initial Petals
To begin creating the beautiful heart of your rose, you’ll first need to prepare your pipe cleaners. Take six pipe cleaners of your chosen petal color (for example, blue as demonstrated in the original tutorial). Align them evenly and find the exact middle point of this bundle. Tightly twist all six pipe cleaners together at this central point. The tighter you twist, the more secure your rose base will be, providing a sturdy foundation for your petals.
Once twisted, fold the entire bundle in half, bringing the two sets of ends together. Twist the folded section just below the initial twist to secure it firmly. This action creates a central point from which all your petals will emerge. Now, gently spread out each of the twelve individual pipe cleaner ends, fanning them out like spokes on a wheel. Aim for even spacing to form a symmetrical, flower-like base. Each of these individual pipes will eventually become a petal.
Starting with one pipe cleaner, carefully roll it inwards towards the central twisted base. This rolling motion will naturally begin to form the curved shape of a petal. The key is to roll it snugly but not so tightly that it becomes stiff. Repeat this rolling process for each of the twelve pipe cleaners, always rolling them towards the center. As you complete each roll, you’ll see the distinct layered structure of your rose begin to emerge. Take your time, ensuring each “petal” has a pleasing, rounded curve. Once all twelve pipes are rolled, you will have a densely packed center.
To give your rose a more realistic and open appearance, you’ll now begin to arrange these rolled petals. Gently take one rolled petal and carefully flatten it outwards, away from the center. Then, take the next rolled petal and flatten it in the opposite direction or slightly overlapping the first. Continue this alternating pattern, gently folding and shaping each rolled pipe cleaner into a distinct, flat petal. This process creates volume and a more organic look, mimicking the way real rose petals unfurl. Finally, arrange the remaining petals, carefully positioning them in the spaces between the bottom layer of flattened petals. This creates a fuller, multi-layered bloom, adding depth and beauty to your pipe cleaner rose.
Step 2: Completing the Rose Center and Adding Leaves
Now it’s time to refine the heart of your rose and add the finishing touches that bring it to life. Unlike the other petals you’ve flattened, the very last central “petal” should not be flattened outwards. Instead, keep this final roll tight and compact, placing it snugly at the absolute center of your rose. This tight central roll creates the signature rosebud effect, giving your flower a realistic and beautifully formed core. Gently adjust the surrounding petals to frame this central bud, ensuring a harmonious and natural appearance.
With your rose bloom complete, it’s time to add the vital green elements – the stem and leaves. Grab two green pipe cleaners. Carefully wrap them together just below the base of your newly formed flower, securing them tightly around the twisted connection points of your petals. This creates a sturdy foundation for the stem and ensures your flower remains intact. You can twist them a few times to create a short, secure stem base.
Once secured, take the two free ends of the green pipe cleaners and spread them out horizontally. These will become your leaves. Starting with one side, begin to roll the pipe cleaner inwards, similar to how you formed the petals, but with a slightly looser curve. Shape it to resemble a natural leaf, perhaps with a slight point at the end. Repeat this process for the second green pipe cleaner on the opposite side, ensuring both “leaves” are symmetrically placed and shaped. This thoughtful addition of green foliage dramatically enhances the realism and overall appeal of your DIY pipe cleaner rose.
Congratulations! Your exquisite pipe cleaner rose is now finished. Take a moment to admire your beautiful creation. Each rose you make will have its own unique charm, a testament to your personal touch and creativity.
Tips for Crafting Perfect Pipe Cleaner Roses Every Time:
While the process is straightforward, a few expert tips can elevate your pipe cleaner roses from good to spectacular:
- Practice Makes Perfect: Don’t be discouraged if your first rose isn’t exactly as you envisioned. Each attempt refines your technique.
- Experiment with Tightness: The tightness of your twists and rolls significantly impacts the final look. Play around to find your preferred petal density.
- Vary Petal Sizes: For an even more natural rose, you can slightly vary the length of your initial pipe cleaners before twisting them, creating larger outer petals and smaller inner ones.
- Gentle Handling: Pipe cleaners are pliable but can kink if handled too roughly. Work with a gentle, steady hand.
- Color Blending: Try using two different shades of a color for your petals (e.g., light pink and dark pink) to create a gradient effect, adding depth and realism.
- Reference Real Roses: Look at photos of real roses to get inspiration for petal arrangement and overall shape.
Creative Variations and Applications for Your Pipe Cleaner Roses:
Once you’ve mastered the basic rose, the creative possibilities are limitless. These charming pipe cleaner flowers can be used in countless ways:
- Bouquets and Centerpieces: Arrange several roses in a small vase for a stunning, everlasting centerpiece. Combine different colors for a vibrant display.
- Handmade Gifts: A bouquet of handmade roses makes a thoughtful and personalized gift for birthdays, anniversaries, Mother’s Day, or Valentine’s Day.
- Hair Accessories: Attach a single rose to a hair clip or headband for a unique accessory.
- Brooches and Boutonnieres: Secure a rose with a safety pin to create a charming brooch or a boutonniere for special occasions.
- Party Decorations: Use them to adorn gift wraps, decorate party favors, or create whimsical garlands.
- Dollhouse Miniatures: Scale down your roses for adorable dollhouse decor.
- Mixed Media Art: Incorporate your pipe cleaner roses into larger craft projects, scrapbooks, or shadow boxes.
- Educational Tools: Use them to teach children about botany, colors, and fine motor skills.
The Joy and Benefits of Crafting Pipe Cleaner Flowers:
Engaging in crafts like making pipe cleaner roses offers a wealth of benefits beyond just a beautiful finished product:
- Boosts Creativity: Crafting encourages imaginative thinking and problem-solving.
- Enhances Fine Motor Skills: Manipulating pipe cleaners is excellent for developing dexterity and hand-eye coordination, especially beneficial for children.
- Stress Relief: The repetitive and focused nature of crafting can be incredibly calming and meditative, providing a wonderful escape from daily stressors.
- Sense of Accomplishment: Completing a project, especially one as lovely as a pipe cleaner rose, provides a strong sense of pride and achievement.
- Personalized Expression: Handmade items allow you to inject your personality and style, creating truly unique pieces.
- Budget-Friendly Decor and Gifting: Pipe cleaners are inexpensive, making this a cost-effective way to create beautiful decorations and heartfelt gifts without breaking the bank.
- Family Bonding: Crafting together is a fantastic way to spend quality time with loved ones, creating memories along with masterpieces.
Frequently Asked Questions About Making Pipe Cleaner Roses:
Here are some common questions crafters have about making pipe cleaner roses:
- Q: How many pipe cleaners do I need for one rose?
A: You’ll typically need 6 pipe cleaners for the petals and 2 green ones for the stem and leaves, totaling 8 pipe cleaners per rose. - Q: Can children make these pipe cleaner roses?
A: Absolutely! This is an excellent craft for older children (around 6+) and can be adapted for younger kids with adult supervision. It’s great for developing fine motor skills. - Q: How can I make my pipe cleaner roses look more realistic?
A: Focus on varying petal sizes, creating a tight central bud, and carefully shaping the leaves. Blending shades of the same color can also add depth. - Q: What other types of pipe cleaner flowers can I make?
A: The possibilities are endless! You can adapt techniques to make lilies, daisies, tulips, lavender, and more. Look for inspiration online for other pipe cleaner flower tutorials. - Q: How long do these pipe cleaner roses last?
A: Indefinitely! Unlike real flowers, pipe cleaner roses won’t wilt or fade, offering lasting beauty and enjoyment.
Crafting pipe cleaner roses is more than just a simple DIY project; it’s an opportunity to create something beautiful with your own hands, share joy with others, and add a touch of everlasting charm to your surroundings. With this detailed tutorial, you have all the tools and knowledge to start your journey into the wonderful world of pipe cleaner floral art. So, pick your favorite colors, let your imagination bloom, and start creating your stunning, handmade pipe cleaner roses today!