
Irresistible Carrot Patch Brownies: The Ultimate Fun & Easy Dessert Recipe
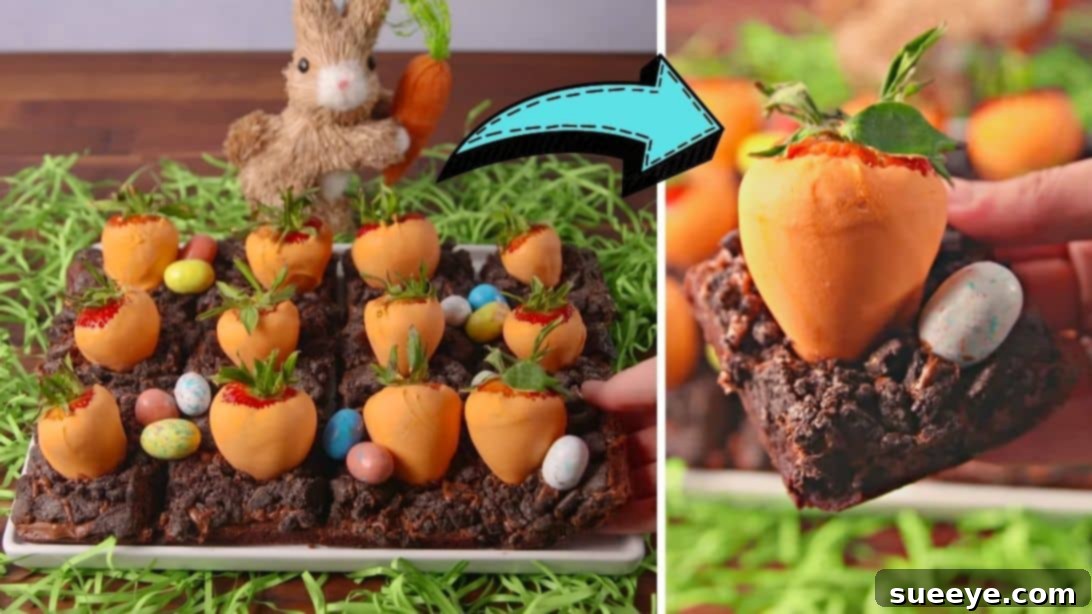
Are you searching for a dessert that’s not only incredibly delicious but also a feast for the eyes? Look no further! These adorable Carrot Patch Brownies are the perfect showstopper for any gathering, from spring celebrations and Easter brunches to birthday parties and casual get-togethers. Imagine rich, fudgy brownies topped with creamy chocolate frosting, a sprinkle of “dirt” made from crushed cookies, and the cutest “carrots” you’ve ever seen—spoiler alert, they’re not real carrots, but sweet, chocolate-dipped strawberries!
This delightful recipe offers a whimsical twist on a classic dessert, making it an instant favorite for both kids and adults. It’s surprisingly easy to create, transforming simple ingredients into a visually stunning and incredibly tasty treat. Whether you’re a seasoned baker or just starting out, our step-by-step guide, inspired by the creative culinary minds at Delish on YouTube, will help you master these charming brownies with confidence. Prepare to impress your guests and bring a smile to everyone’s face with this unique and memorable dessert!
Gather Your Delicious Ingredients
Creating these magical Carrot Patch Brownies requires a few simple components, most of which you likely already have in your pantry or can easily find at your local grocery store. For the best results, always aim for quality ingredients.
- Non-stick cooking spray: Essential for easy brownie removal.
- 1 box of brownie mix: Choose your favorite brand, along with any additional ingredients specified on the box (e.g., eggs, oil, water).
- 1½ cups of white chocolate chips: These will form the base of your vibrant orange “carrot” coating.
- 1 tbsp of coconut oil: Helps create a smooth, dippable consistency for the chocolate.
- 10 drops of orange food coloring: For that perfect carrot hue. Adjust to achieve your desired shade.
- 12 large strawberries: The stars of our “carrot patch,” ensuring they are fresh and firm.
- 1 tub of chocolate frosting: Any store-bought or homemade chocolate frosting will work perfectly as the “earth.”
- 1 package of Oreo cookies, crushed: Creates the realistic “dirt” texture on top of your brownies.
- Robin eggs candies: Optional, but they add a delightful touch of spring color and charm as garnish.
Essential Tools and Equipment
Beyond the edible components, you’ll need a few standard kitchen tools to bring these delightful brownies to life. Having these on hand will ensure a smooth and enjoyable baking process.
- 12 wooden skewers: Perfect for dipping your strawberries without making a mess.
- Parchment paper: Crucial for lining your baking pan and setting your chocolate-dipped strawberries, ensuring easy release and cleanup.
- 9×13 inches baking pan: The ideal size for baking a generous batch of brownies.
- Microwave-safe bowl: For melting your white chocolate.
- Large baking sheet: To hold the parchment paper and dipped strawberries while they set.
Step-by-Step Guide: Crafting Your Carrot Patch Brownies
Follow these detailed instructions to create your beautiful and delicious Carrot Patch Brownies. Each step is designed to be straightforward, ensuring a perfect result every time.
Step 1: Bake the Brownies and Prepare the Orange Chocolate Coating
Begin by preheating your oven to the temperature specified on your brownie mix package, typically around 350°F (175°C). While the oven heats, prepare your brownie batter according to the instructions on the box. This usually involves mixing the brownie mix with eggs, oil, and water until just combined. Be careful not to overmix, as this can lead to tougher brownies.
Next, prepare your 9×13 inch baking pan. Lightly spray the inside of the pan with non-stick cooking spray, then line it with parchment paper, leaving an overhang on the sides—this will create “handles” for easy removal of the baked brownies later. Spray the parchment paper again with cooking spray to ensure nothing sticks. Pour your prepared brownie batter evenly into the lined pan and spread it out with a spatula. Bake for approximately 28 to 30 minutes, or until a wooden toothpick inserted into the center comes out with moist crumbs, but not wet batter. Avoid overbaking to keep your brownies wonderfully fudgy. Once baked, remove the pan from the oven and let the brownies cool completely on a wire rack. Cooling is crucial before frosting to prevent melting.
While the brownies are cooling, it’s time to prepare your vibrant orange “carrot” coating. In a small, deep, microwave-safe mixing bowl, add the white chocolate chips. Microwave on high power for 1 minute, then stir well. Continue microwaving in 20-second intervals, stirring vigorously after each, until the white chocolate is completely melted and smooth. This gradual melting process helps prevent the chocolate from burning or seizing.
Step 2: Dip Strawberries, Assemble the Patch, and Serve!
Once your white chocolate is smoothly melted, add the coconut oil and a few drops of orange food coloring to the bowl. Mix thoroughly until the color is evenly distributed and you achieve a bright, appealing orange hue. Feel free to add more drops for a deeper color, if desired.
Now, prepare your strawberries. Gently wash and thoroughly dry your large strawberries. Using a wooden skewer, carefully pierce each strawberry at the center of its crown (the green leafy part). Holding the skewer, dunk each strawberry into the melted orange chocolate mixture, rotating it to ensure a complete and even coating. Allow any excess chocolate to drip back into the bowl before carefully placing the dipped strawberry onto a large baking sheet lined with parchment paper. Repeat this process for all 12 strawberries. Once all strawberries are dipped, place the baking sheet in the refrigerator for about 15-20 minutes to allow the chocolate to firm up and set completely.
While your “carrot” strawberries are chilling, retrieve your completely cooled brownie slab. Generously spread the chocolate frosting evenly over the top surface of the brownies. This layer will serve as the rich, dark soil for your carrot patch. Next, take your crushed Oreo cookies and sprinkle them liberally over the chocolate frosting, creating a realistic and delicious “dirt” effect. This adds both texture and a delightful contrast to the sweetness.
Once the chocolate-covered strawberries are firm, gently remove them from the refrigerator. Carefully arrange them on top of the frosted and “dirt”-covered brownies, positioning them like carrots growing out of a patch. For an extra touch of spring charm, scatter Robin eggs candies around the “carrots.” Finally, using a sharp knife, slice the brownie into individual squares, ensuring each piece gets a delicious “carrot” or a piece of the delightful patch. Serve immediately and watch your guests marvel at your creative masterpiece!
Tips for Perfect Carrot Patch Brownies
To ensure your Carrot Patch Brownies turn out absolutely perfect every time, consider these helpful tips:
- Don’t Overbake Your Brownies: For the ultimate fudgy texture, pull your brownies out of the oven when a toothpick still has a few moist crumbs attached. Overbaking leads to dry, cakey brownies.
- Ensure Strawberries Are Dry: Before dipping, make sure your strawberries are completely dry. Any moisture will cause the chocolate to seize or not adhere properly.
- Work Quickly with Chocolate: Melted white chocolate can thicken as it cools. If your chocolate starts to become too thick for dipping, simply microwave it for another 10-15 seconds and stir until smooth again.
- Chill for Quick Set: Refrigerating the dipped strawberries is key for a quick and firm set. This prevents the chocolate from smudging during assembly.
- Creative Garnishes: While Robin eggs are charming, feel free to get creative! You could use green candy melts for “leaves” on your carrots, or other small candies for a different touch.
- Crush Oreos Finely: For the most realistic “dirt” effect, crush your Oreos until they resemble fine crumbs. A food processor works wonderfully for this.
- Room Temperature Frosting: If using store-bought frosting, make sure it’s at room temperature for easy spreading. If it’s too cold, it will be stiff.
Why You’ll Love This Fun and Easy Dessert
These Carrot Patch Brownies are more than just a dessert; they’re an experience! Here’s why they’ll become a cherished recipe in your collection:
- Visually Stunning: The vibrant orange “carrots” popping out of dark “soil” create an irresistible and conversation-starting display.
- Incredibly Delicious: The combination of rich chocolate brownies, creamy frosting, crunchy Oreos, and fresh, sweet strawberries is a taste sensation.
- Perfect for Any Occasion: While ideal for spring and Easter, their playful nature makes them a hit at any party, potluck, or family gathering.
- Easy and Accessible: Using a brownie mix simplifies the process, making this recipe achievable for bakers of all skill levels.
- Fun to Make: It’s a fantastic project to involve children in the kitchen, especially the strawberry dipping and decorating parts!
- Customizable: Easily adapt the decorations or even the brownie base to suit your preferences or dietary needs.
We hope you enjoy making and sharing these delightful Carrot Patch Brownies. They truly are a testament to how simple ingredients and a little creativity can result in something truly magical. Don’t forget to follow and subscribe to Delish on YouTube for more fantastic and inspiring recipes!
Easy Carrot Patch Brownies Recipe
*All image credit belongs to Delish via YouTube. Follow and subscribe to their channel for more inspiring recipes!