
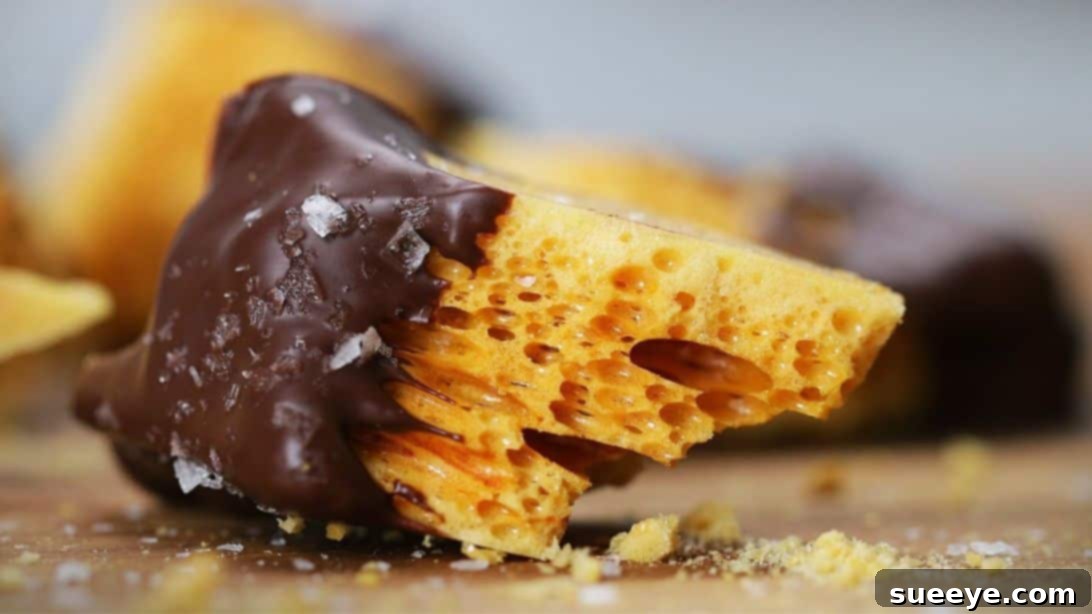
Prepare to embark on a sweet adventure with this incredibly addictive Honeycomb Toffee recipe, inspired by Tasty! Known by various names like Sponge Candy, Cinder Toffee, or Hokey Pokey, this delightful treat is celebrated worldwide for its captivating crunchy texture and perfectly balanced sweetness. Its distinctive, intricate web-like pattern truly resembles a natural beehive, giving this unique candy its charming name. Whether you choose to savor it in its pure, golden form or elevate it with an optional coating of rich melted dark chocolate and a sprinkle of flaky sea salt, this honeycomb toffee promises an unforgettable indulgence. The subtle bitterness of dark chocolate and the hint of saltiness beautifully complement the candy’s sweetness, creating a symphony of flavors that will leave you craving more.
This remarkable candy is not only a feast for the taste buds but also surprisingly simple to create, requiring just four essential ingredients: sugar, corn syrup, water, and baking soda. The magical transformation into its iconic bubbly structure occurs when baking soda is introduced to the boiling sugar mixture, creating a fascinating chemical reaction that infuses air into the candy. While the process itself is straightforward, it demands your full attention and quick action to ensure the perfect honeycomb texture. Rest assured, with a little focus, you’ll avoid any mishaps and achieve that coveted airy crunch.
Once you try this delicious treat, we’re confident you’ll find it impossible to stop at just one piece. It’s perfect for gifting, sharing, or simply enjoying as a delightful personal indulgence. Get ready to impress your friends and family with this easy-to-make, show-stopping dessert!
What is Honeycomb Toffee? A Delightful Crunchy Confection
Honeycomb toffee, also affectionately known as sponge candy, cinder toffee, or hokey pokey in various parts of the world, is a light, airy, and intensely crunchy confection made from caramelized sugar and baking soda. Its signature golden hue and a texture that literally shatters in your mouth make it a truly unique candy experience. The name “honeycomb” comes from its distinctive internal structure, filled with countless tiny air pockets that resemble a natural beehive, a direct result of the baking soda reacting with the hot sugar syrup.
While often enjoyed plain, its versatility shines when paired with other flavors. Dipping it in a luxurious layer of dark or milk chocolate provides a creamy contrast to its crispness, while a sprinkle of sea salt can enhance its complex flavors, creating a perfect sweet and salty balance. This candy is not just a treat; it’s an edible marvel that delights both the eyes and the palate. Originating from diverse culinary traditions, this treat holds a special place in the hearts of candy lovers across different cultures, each having their own cherished version and name for this delightful confection.
The Science Behind the Bubbles: How Honeycomb Toffee Gets Its Unique Texture
The secret to honeycomb toffee’s signature airy structure lies in a simple yet fascinating chemical reaction. When baking soda (sodium bicarbonate) is added to the super-heated sugar syrup, it decomposes rapidly, releasing carbon dioxide gas. This gas becomes trapped within the molten, viscous sugar mixture, creating thousands of tiny bubbles. As the candy cools and hardens, these bubbles solidify, resulting in the distinctive light, brittle, and porous texture that gives honeycomb toffee its name.
Timing is absolutely critical in this step. Adding the baking soda at precisely the right moment – when the sugar syrup reaches the “hard crack” stage (around 300°F or 149°C) – ensures that the syrup is hot enough for the baking soda to react effectively and is viscous enough to trap the gas, yet not so hot that it burns. The quick whisking disperses the baking soda evenly, allowing for a uniform, bubbly texture throughout the candy. This delicate balance of temperature, timing, and chemical reaction is what makes homemade honeycomb toffee so magical and satisfying to create. Understanding this scientific principle not only makes the process more intriguing but also helps in troubleshooting common issues, ensuring you can replicate that perfect crunchy texture every time.
Why This 4-Ingredient Honeycomb Toffee Recipe is a Must-Try
This particular honeycomb toffee recipe stands out for its incredible simplicity and high success rate, making it an ideal choice for both novice and experienced candy makers. With only four readily available ingredients, you can transform everyday pantry staples into an extraordinary confection. Its quick preparation time, combined with the dramatic visual transformation as the baking soda works its magic, adds an element of fun and excitement to your kitchen endeavors.
Beyond its ease of making, the flavor and texture are simply irresistible. The satisfying crunch followed by the melt-in-your-mouth sweetness makes it a versatile treat – perfect for satisfying a sweet craving, as an elegant after-dinner delight, or even as a unique topping for desserts like ice cream or yogurt. Plus, the option to coat it in chocolate and sea salt provides a customizable touch, allowing you to tailor it to your preferences or create impressive homemade gifts. It’s a recipe that promises delicious results with minimal fuss, making it a definite must-try for anyone looking to add a touch of homemade magic to their day. The fact that it requires so few ingredients means less shopping, less expense, and more immediate gratification!
Easy Honeycomb Toffee Ingredients
Gathering your ingredients is the first step to creating this delightful, crunchy candy. This simple recipe relies on just a few basic items you likely already have in your pantry, ensuring a fuss-free preparation experience. Quality ingredients, especially fresh baking soda, will make a noticeable difference in the final product.
- 2 cups of granulated sugar: The primary base for your toffee, providing sweetness and structure.
- 1/2 cup of light corn syrup: Essential for preventing sugar crystallization and ensuring a smooth, pliable syrup before the baking soda is added.
- 1/3 cup of water: Helps dissolve the sugar initially and allows the mixture to reach the desired temperature gradually.
- 1 tablespoon of baking soda: The star ingredient responsible for the iconic honeycomb aeration. Ensure it’s fresh for maximum fizz!
For optional coating and garnish:
While delicious on its own, adding a chocolate coating and a sprinkle of sea salt elevates this treat to another level of gourmet indulgence. The combination of rich, bitter chocolate and a hint of salt perfectly balances the toffee’s sweetness, creating a complex and satisfying flavor profile that is truly irresistible.
- 10-12 oz good quality dark chocolate (or milk/white chocolate, according to preference), melted: Choose a chocolate you genuinely enjoy eating, as its flavor will shine through.
- Flaky sea salt (such as Maldon or Himalayan pink salt), for sprinkling: A finishing touch that provides both visual appeal and a delightful savory counterpoint to the sweetness.
How to Make Honeycomb Toffee: A Step-by-Step Guide
Making honeycomb toffee is a rewarding process that requires precision and quick action. Follow these detailed steps to achieve perfect results every time, paying close attention to temperatures and timing.
Step 1: Prepare Your Workspace and Equipment
Before you even think about heating sugar, thorough preparation is crucial. Begin by lining a 9-inch square baking tray (or a similar size, about 8×8 for thicker pieces or 9×13 for thinner pieces) with parchment paper. Ensure the parchment paper extends slightly over the edges to create “handles,” making removal easier. Lightly grease the parchment paper with a neutral oil or non-stick spray, as the toffee can still adhere to ungreased parchment. This prevents the delicate toffee from sticking. Additionally, have a sturdy metal whisk and your measured 1 tablespoon of baking soda (sifted, if clumpy, to ensure even distribution) ready and within arm’s reach. Once the sugar mixture is ready, you’ll need to work very quickly, so having everything prepped beforehand is essential for success. Safety gloves and an apron are also recommended as molten sugar is extremely hot and can cause severe burns.
Step 2: Combine and Heat the Sugar Mixture
In a very large, heavy-bottomed saucepan, combine the granulated sugar, light corn syrup, and water. A large saucepan is critical because the mixture will foam and expand significantly when the baking soda is added, easily tripling in volume. Stir the ingredients gently over medium-high heat until the sugar completely dissolves. This initial stirring helps to ensure a smooth, homogenous mixture and prevents crystallization. Once the sugar has dissolved and the mixture begins to boil, stop stirring. Excessive stirring after boiling can introduce air and sugar crystals, leading to crystallization and a grainy texture in your final product.
Step 3: Reach the Hard Crack Stage
Carefully insert a candy thermometer into the boiling sugar syrup, ensuring the tip doesn’t touch the bottom of the pan to get an accurate reading. Continue to heat the mixture without stirring until it reaches precisely 300°F (149°C). This temperature is known as the “hard crack” stage, where the sugar concentration is high enough to create brittle candy. Maintaining this exact temperature is vital for the correct texture of your honeycomb toffee. Any deviation can result in sticky, chewy, or overly hard candy. Keep a watchful eye on the thermometer, and resist the temptation to stir the mixture once it’s boiling, as this can encourage crystallization. Patience and precision here will yield a perfect, crunchy toffee.
Step 4: The Magic Transformation – Add Baking Soda and Pour
As soon as the thermometer hits 300°F, immediately remove the saucepan from the heat. This is where speed and precision are paramount. Quickly add the pre-measured tablespoon of baking soda to the hot sugar syrup. Using your sturdy metal whisk, vigorously whisk the mixture for no more than 5 seconds. You will instantly notice the mixture begin to foam and expand dramatically, bubbling up and changing color to a lighter golden brown as carbon dioxide gas is released and trapped. This is the magical creation of the honeycomb structure. Do not over-whisk, as this can deflate the precious bubbles and lead to a denser toffee. Immediately pour the entire expanding mixture into your prepared parchment-lined baking pan. Resist the urge to spread it or smooth it with a spatula, as this can also damage the delicate air pockets and result in uneven texture. Simply let it flow naturally into the pan. Once poured, leave the toffee completely undisturbed in a cool, dry place for about 1 to 2 hours, or until it has fully cooled and hardened. Moving or touching it too soon can compromise its structure and cause it to collapse.
Step 5: Cool, Set, and Shatter
Once the honeycomb toffee has completely cooled and solidified, it will be brittle and easy to handle. Depending on your kitchen’s temperature and humidity, this could take anywhere from one to two hours. To check if it’s ready, gently touch the surface – it should be firm and cool. Gently lift the parchment paper to remove the entire slab of toffee from the pan. Place it on a clean, dry surface or cutting board. Using a blunt object, such as the back of a heavy knife, a small hammer, or even a rolling pin wrapped in a clean towel, carefully shatter the toffee into small, irregular pieces. Embrace the jagged edges – they are part of its rustic charm! Aim for bite-sized pieces that are easy to eat and handle. You can also carefully break it with your hands once it’s cool enough, applying gentle pressure.
Step 6: Optional Chocolate Coating and Sea Salt Finish
For an extra layer of decadence, proceed with this optional step. Add your chosen dark chocolate (or other chocolate) into a heat-proof bowl. Melt the chocolate in the microwave in 30-second intervals, stirring thoroughly after each interval, until smooth and completely melted (this usually takes 75 to 90 seconds total, depending on your microwave’s power). Be careful not to overheat the chocolate, as it can seize or burn. Alternatively, you can use a double boiler for a more controlled and gentle melting process. A double boiler involves placing the heat-proof bowl over a saucepan of simmering water, ensuring the bottom of the bowl does not touch the water.
Dip each piece of honeycomb toffee into the melted chocolate, allowing any excess to drip off before placing it on a baking tray lined with fresh parchment paper. Immediately sprinkle a pinch of flaky sea salt on top of each piece before the chocolate sets. This adds a beautiful visual and a fantastic flavor contrast, enhancing the overall gourmet appeal. Refrigerate the tray for about 15 minutes, or until the chocolate has fully set and hardened. Serve and revel in the exquisite combination of crunchy toffee, smooth chocolate, and a hint of sea salt! This step not only adds flavor but also helps to preserve the toffee by sealing it from humidity.
Expert Tips for Perfect Honeycomb Toffee Every Time
Achieving the perfect honeycomb toffee is all about precision and quick execution. Here are some expert tips to ensure your candy turns out wonderfully light and airy every time, helping you avoid common pitfalls and create a truly delightful treat:
- Prepare Ahead (Mise en Place): This cannot be stressed enough. Have all your ingredients measured, your pan lined and greased, and your whisk and baking soda ready and within arm’s reach before you even turn on the stove. Once the sugar mixture reaches temperature, you’ll have mere seconds to act, and any delay can compromise the texture.
- Use a Heavy-Bottomed Pan: A heavy-bottomed saucepan helps to distribute heat more evenly, preventing hot spots that can cause the sugar to burn in certain areas while remaining undercooked in others. This uniform heating is crucial for a consistent candy syrup.
- Invest in a Good Candy Thermometer: Accuracy is paramount. A reliable candy thermometer is your best friend for reaching the precise “hard crack” stage (300°F/149°C). Don’t guess the temperature, as even a few degrees off can lead to a sticky, overly chewy, or burnt toffee. Calibrate your thermometer occasionally by checking it in boiling water.
- Avoid Stirring After Boiling: Once the sugar mixture comes to a boil and the sugar has dissolved, resist the urge to stir it. Stirring can introduce sugar crystals back into the syrup, leading to crystallization and a grainy, undesirable texture. If crystals form on the sides of the pan, you can gently brush them down with a wet pastry brush.
- Work Quickly with Baking Soda: The moment you add the baking soda, you must whisk vigorously for only a few seconds (3-5 seconds max) to incorporate it evenly, then immediately pour. Over-whisking can cause the gas bubbles to deflate, resulting in a denser toffee. Conversely, under-whisking might lead to uneven aeration.
- Don’t Scrape the Pan: When pouring the foamy mixture into the prepared pan, avoid scraping the sides or bottom of the saucepan. Any unfoamed sugar syrup at the bottom can create a hard, dense, and potentially burnt layer at the base of your toffee, detracting from the overall light texture.
- Humidity Matters: High humidity can significantly affect how quickly sugar candy sets and how stable it remains. The toffee can absorb moisture from the air, becoming sticky. Try to make honeycomb toffee on a dry day if possible. Always store finished toffee in an airtight container to protect it from moisture.
- Safety First: Hot Sugar Burns: Molten sugar is extremely hot and can cause severe, painful burns. Keep children and pets away from the cooking area. Wear oven mitts or heat-resistant gloves when handling the hot pan and pouring the toffee. Have a bowl of ice water nearby in case of accidental splashes for immediate cooling of burns.
- Don’t Touch While Cooling: Once poured into the pan, let the toffee cool and set completely undisturbed. Moving it, poking it, or trying to remove it too soon can cause the delicate internal structure to collapse, resulting in a flat or dense candy.
Troubleshooting Common Honeycomb Toffee Issues
Even with careful preparation, sometimes things don’t go exactly as planned. Candy making can be finicky, but understanding common issues and their solutions can turn a potential disaster into a learning opportunity. Here are solutions to common problems you might encounter when making honeycomb toffee:
- My toffee isn’t bubbly/airy; it’s dense:
- Old Baking Soda: The most common culprit. Ensure your baking soda is fresh and active. Test it by adding a teaspoon to a bit of vinegar; it should fizz vigorously. If it doesn’t, replace it.
- Incorrect Temperature: The sugar syrup might not have reached the critical 300°F (149°C), or it might have been removed from heat too early. The high heat is essential for the baking soda to react effectively and for the syrup to be hot enough to form stable bubbles.
- Over-Whisking/Under-Whisking: Too much whisking can cause the newly formed gas bubbles to deflate before they can set. Conversely, too little whisking won’t distribute the baking soda evenly, leading to inconsistent aeration. Aim for a quick, vigorous 3-5 seconds of whisking.
- Pouring too slowly: If you don’t pour the mixture immediately after whisking, the bubbles can start to collapse in the saucepan before they even reach the pan. Speed is of the essence!
- My toffee is sticky or chewy:
- Didn’t Reach Hard Crack Stage: This is the most common reason for stickiness. The sugar syrup didn’t reach the full 300°F (149°C) “hard crack” stage. It needs to be cooked to that precise temperature to become brittle and hard when cooled. Using a reliable candy thermometer is crucial.
- Humidity: High humidity can cause toffee to absorb moisture from the air, making it sticky. Always store it in an airtight container as soon as it’s completely cooled to protect it from atmospheric moisture.
- My sugar burned:
- Heat Too High: The heat might have been too high, causing the sugar to scorch before it reached the correct temperature. Use medium-high heat and watch it carefully, adjusting as needed. Caramelizing sugar requires attention.
- Stirring While Boiling: As previously mentioned, stirring after the mixture begins to boil can cause sugar crystals to form on the sides of the pan, which then quickly burn due to direct heat.
- Pan Size: Using a pan that is too small can cause the sugar to heat unevenly and burn easily on the bottom. Always use a very large, heavy-bottomed saucepan.
- My toffee crystallized/is grainy:
- Stirring After Boiling: Stirring after the sugar dissolves and boils can introduce tiny sugar crystals, which act as seeds, causing the entire batch to crystallize and become grainy.
- Sugar Crystals on Pan Sides: If sugar crystals splash onto the sides of the pan above the syrup line, they can fall back in and seed crystallization. You can gently brush down the sides of the pan with a wet pastry brush during the early stages of boiling to prevent this.
Serving Suggestions and Delicious Variations
Honeycomb toffee is incredibly versatile and can be enjoyed in many ways beyond just eating it plain or chocolate-dipped. Its unique texture and sweet, caramelized flavor make it an excellent addition to various desserts and a delightful treat on its own. Here are some inspiring ideas to elevate your honeycomb experience:
- Classic Enjoyment: Simply break it into pieces and enjoy its pure, unadulterated crunch and sweetness. This is often the best way to appreciate its delicate texture.
- Chocolate-Dipped: As detailed in the recipe, a luxurious coating of dark chocolate and a sprinkle of flaky sea salt is a sublime combination, offering a delightful contrast of textures and flavors. Experiment with milk chocolate, white chocolate, or even a swirl of two types for a marbled effect and varied sweetness.
- Dessert Topping: Crumble honeycomb toffee over ice cream, frozen yogurt, puddings, or panna cotta for an instant textural upgrade and a burst of caramelized sweetness. It’s particularly fantastic on vanilla bean ice cream, chocolate mousse, or even a warm apple crumble.
- Baking Inclusion: Fold smaller, crushed pieces of honeycomb into cookie dough, brownie batter, or muffin batter for an exciting crunch and a unique flavor dimension. Imagine a honeycomb chocolate chip cookie or a brownie studded with crispy toffee!
- Drinks and Shakes: Blend crushed honeycomb into thick milkshakes or use it as a delightful, crunchy garnish for hot chocolate, specialty coffee drinks, or even cocktails for an adventurous twist.
- Cake Decoration: Use larger shards or artfully arranged smaller pieces as an impressive, sculptural garnish for cakes and cupcakes, adding height, elegance, and an unexpected crunch. It can transform a simple cake into a showstopper.
- Gifting: Package chocolate-dipped or plain honeycomb pieces in decorative bags or boxes with a festive ribbon for a thoughtful and impressive homemade gift that’s sure to delight friends, family, and colleagues.
- Spiced Honeycomb: For an adventurous twist, add a tiny pinch of chili powder, cayenne pepper, or ground ginger to the baking soda before whisking it into the hot sugar for a subtle heat that beautifully complements the sweetness and adds depth.
- Nutty Honeycomb: Before pouring the toffee into the pan, you could sprinkle a thin layer of chopped toasted nuts (like pecans, almonds, or hazelnuts) on the bottom of the parchment paper for an added layer of flavor and texture, creating a delightful nut-studded bottom.
Storage Tips for Maintaining Freshness and Crunch
To keep your homemade honeycomb toffee as fresh and crunchy as possible, proper storage is key. Because sugar candy is hygroscopic (meaning it readily absorbs moisture from the air), it can quickly become sticky, lose its characteristic snap, and eventually melt if not stored correctly. Following these tips will help extend its shelf life and preserve its delightful texture:
- Airtight Container: Always store honeycomb toffee in an absolutely airtight container at room temperature. This is the most crucial step to protect it from humidity, which is the primary enemy of crispy sugar candies.
- Cool, Dry Place: Keep the container in a cool, dry pantry or cupboard, away from direct sunlight, stoves, or other heat sources. Heat can cause the chocolate (if coated) to melt and bloom, or the toffee itself to soften and become sticky.
- Separate Layers: If you’ve made a large batch or coated your toffee in chocolate, place parchment paper or wax paper between layers in the container. This prevents the pieces from sticking to each other, especially if the chocolate coating is not completely tempered or if the room is slightly warm.
- Avoid Refrigeration (for plain toffee): While refrigerating chocolate-coated toffee briefly to set the chocolate is perfectly fine, prolonged refrigeration of plain honeycomb can introduce too much moisture. The cold air in the fridge is often humid, and when you remove the cold toffee, condensation can form, making it sticky. Only refrigerate chocolate-coated pieces if your kitchen is very warm and ensure they are in an extremely airtight container to minimize moisture exposure.
- Consume Within: For optimal freshness and crunch, aim to consume plain honeycomb toffee within 1-2 weeks. Chocolate-coated versions can last a bit longer, up to 2-3 weeks, especially if stored well, as the chocolate acts as a barrier against moisture. Beyond these times, the texture may start to degrade, though it will still be edible.
Conclusion: Your Journey to Homemade Honeycomb Toffee Delight
You’re now equipped with everything you need to create spectacular homemade honeycomb toffee. This recipe, with its simple ingredients and fascinating process, offers a rewarding experience that culminates in a truly unique and delicious treat. From the initial precise measurements to the dramatic bubbly expansion and the final satisfying shatter, each step is a testament to the magic of candy making. It’s a culinary adventure that promises both a delightful challenge and an incredibly sweet reward.
Whether you’re making it for a special occasion, as a delightful gift, or simply to satisfy your own sweet cravings, this honeycomb toffee promises an unparalleled combination of crunch and caramelized sweetness. Don’t be intimidated by the need for speed; with proper preparation, a watchful eye on the thermometer, and attention to detail, you’ll master this recipe in no time. So go ahead, gather your ingredients, and prepare to indulge in the crispy, airy perfection of your very own homemade honeycomb toffee. It’s a sweet triumph that truly makes you feel like a kitchen wizard, capable of transforming simple sugars into an extraordinary confection!
Looking for more delightful candy recipes? Explore these other fantastic homemade treats and expand your candy-making repertoire:
- RELATED: Mounds Candy Bar Cake
- 4-Ingredient Citrus Candy
- Easy 3-Ingredient Cool Whip Candy Recipe
- Easy Microwave New Orleans Praline Pecan Candy Recipe