
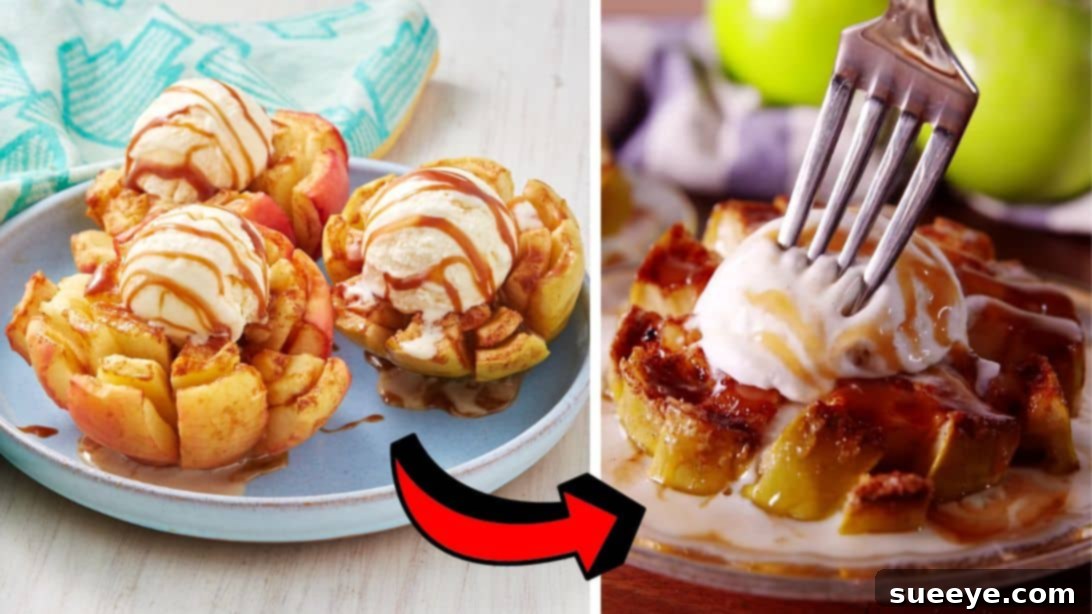
Prepare to be amazed by this utterly delightful Bloomin’ Apples recipe, a dessert sensation that’s as impressive to look at as it is to taste. If you’ve ever savored the savory crunch of a bloomin’ onion, imagine that same captivating presentation transformed into a sweet, caramelized apple delight. This isn’t just another apple dessert; it’s an experience waiting to happen, perfect for surprising your family or delighting guests. Best of all, this incredible treat is surprisingly simple to prepare, requiring minimal effort for maximum impact. In as little as 30 minutes, you can have these warm, fragrant apples ready to serve, making them an ideal last-minute dessert solution or a planned star for your next gathering. Get ready to fall in love with your new go-to apple recipe!
RELATED: Easy Apple Cheesecake Recipe
This fantastic recipe is a true lifesaver for those moments when you need a show-stopping dessert without the fuss. Whether you’re hosting a dinner party, planning a cozy family night, celebrating a special occasion, or simply craving something sweet and comforting, these Bloomin’ Apples fit the bill perfectly. They offer a unique twist on traditional baked apples, elevating them into an elegant yet approachable dessert. Join us as we explore how to create this tasty treat in just three simple steps, guided by this detailed recipe and inspired by the wonderful video tutorial from Delish on YouTube. You’re about to unlock the secret to a dessert that will earn you endless compliments!
Why Bloomin’ Apples Are Your Next Must-Try Dessert
Bloomin’ Apples stand out from other apple desserts for several compelling reasons. Firstly, their unique “blooming” presentation makes them incredibly appealing and a fantastic conversation starter at any table. Each apple is artfully sliced to fan out, creating a stunning visual that promises a delightful culinary journey. Secondly, the combination of crisp apples, warm spices, and gooey caramel creates a harmonious flavor profile that appeals to nearly everyone. The slight tartness of the green apples perfectly balances the sweetness of the caramel and the warming notes of cinnamon and brown sugar.
Furthermore, the simplicity of this recipe is unmatched. Despite its sophisticated appearance, it requires only a handful of common ingredients and straightforward steps, making it accessible even for novice bakers. It’s an excellent option for those busy days when you want a homemade dessert but are short on time. The quick baking time means you can go from prep to plate in under an hour, a convenience that’s hard to beat. This versatility extends to serving; whether enjoyed simply on its own or enhanced with ice cream and extra caramel drizzle, Bloomin’ Apples always hit the spot. They are a comforting, indulgent, and effortlessly elegant dessert choice that you’ll want to make again and again.
Essential Ingredients for Irresistible Bloomin’ Apples
Crafting the perfect Bloomin’ Apples starts with selecting quality ingredients. Each component plays a vital role in creating the delicious flavors and textures that make this dessert so special.
- 4 tablespoons of Melted Butter: Unsalted butter is generally preferred here, allowing you to control the overall sweetness. Melted butter forms the rich base of our spiced coating, ensuring the apples bake to a golden perfection and absorb all the delightful flavors. It also helps in caramelization and adds a luxurious mouthfeel.
- 1 tablespoon of Brown Sugar: Dark or light brown sugar will work equally well, adding a molasses-rich sweetness and a deeper, more complex flavor compared to white sugar. It contributes significantly to the caramel notes of the dish.
- 1 tablespoon of Granulated Sugar: Standard white granulated sugar provides a clean sweetness and helps in the crisping of the apple edges. Its fine texture blends easily with the other ingredients to create a smooth, consistent glaze.
- ½ teaspoon of Ground Cinnamon: This warm spice is a classic pairing with apples, bringing a comforting aroma and flavor that ties all the ingredients together beautifully. Ensure your cinnamon is fresh for the best aromatic impact. You can also experiment with a pinch of nutmeg or allspice for added complexity.
- 4 Green Apples: Granny Smith apples are highly recommended for this recipe. Their firm texture holds up exceptionally well during baking, preventing them from turning mushy. Their tartness provides a crucial counterpoint to the sweetness of the caramel and sugar, creating a perfectly balanced flavor profile. Ensure they are medium-sized for even baking.
- 4 Chewy Caramel Squares: Individually wrapped caramel candies, like Kraft Caramels, are ideal. Each square will soften and melt into a luscious, gooey center within the apple. Choose high-quality, soft caramels for the best melting consistency. You can use more if you like extra caramel.
- Lemon Wedge: While not explicitly added to the main mixture, a lemon wedge is a valuable tool during apple preparation. Rubbing cut apples with lemon juice can prevent browning, especially if you’re preparing them in advance.
- Ice Cream, for serving: A scoop of vanilla bean ice cream is the classic accompaniment, offering a cool, creamy contrast to the warm, baked apples. Other flavors like caramel swirl, cinnamon, or even pecan praline would also be delicious.
- Caramel Sauce, for drizzling: An extra drizzle of caramel sauce over the top enhances the richness and visual appeal, bringing an extra layer of indulgence to this already spectacular dessert. Store-bought or homemade caramel sauce both work wonderfully.
How to Make the Most Delicious Bloomin’ Apples, Step-by-Step
Creating these Bloomin’ Apples is a fun and rewarding process. Follow these detailed steps to ensure your dessert turns out perfectly every time.
Step 1: Prepare Your Oven and Flavorful Coating
Begin by preheating your oven to 375°F (190°C). This ensures the oven is at the correct temperature when your apples are ready, allowing them to bake evenly and beautifully. Next, take a medium-sized baking dish – one large enough to comfortably fit all four apples without crowding them. Lightly grease the dish with nonstick cooking spray or a thin layer of butter. This step is crucial to prevent the apples and their delicious caramel from sticking, making cleanup a breeze. Set the prepared dish aside. In a small mixing bowl, combine your melted butter, brown sugar, granulated sugar, and ground cinnamon. Use a whisk to thoroughly combine these ingredients until they are smooth and well-incorporated. The goal is to create a homogenous, aromatic mixture that will generously coat your apples, infusing them with warm, sweet, and spicy flavors. Set this mixture aside; it’s the magical glaze that will transform your apples.
Step 2: Master the Art of Blooming Your Apples
Now, it’s time to prepare your green apples. Start by thoroughly washing and cleaning them. Once clean, place each apple on a cutting board and carefully slice off the very top, creating a flat base. This makes the apple stable and easier to work with. Using a melon baller or a small spoon, meticulously scoop out the core from the center of each apple, being careful not to go all the way through to the bottom. You want to create a cavity that will hold the caramel. With your cored apple standing upright on its flat base, grab a small paring knife. This is where the “blooming” technique comes in. Make three circular cuts into the flesh of the apple, encircling the core, but do not cut all the way through the apple. These cuts should extend from the top cut surface towards the base, but stop about ½ to ¾ of an inch from the bottom. This allows the apple slices to fan out while remaining connected at the base. Gently place the apple cut-side down on your cutting board, and then make vertical slices all around the apple, similar to how you would slice a bloomin’ onion, as clearly demonstrated in the accompanying video. The key is to make these slices fairly close together but again, not cutting all the way through the bottom. This intricate cutting creates the beautiful fanned effect once baked.
Step 3: Assemble, Bake, and Serve Your Heavenly Creation
Repeat the detailed preparation steps from Step 2 for the remaining apples, ensuring each one is beautifully “bloomed.” Carefully place the prepared apples into your greased baking dish, leaving a little space between each one if possible. Now, take two chewy caramel squares and nestle them right into the center of the cored cavity of each apple. As they bake, these caramels will melt into a luscious, gooey surprise. Next, take your prepared butter and spice mixture and generously brush it all over the top and outer surfaces of each apple. Make sure to get some of the mixture between the fanned slices, coating them thoroughly to impart maximum flavor and help with browning. Once coated, transfer the baking dish to your preheated oven. Bake for approximately 30 minutes, or until the apples are tender when pierced with a fork and the caramel is bubbling and melted. The baking time can vary slightly depending on the size and variety of your apples. Keep an eye on them to prevent over-browning. Once baked to perfection, remove them from the oven. These Bloomin’ Apples are best served warm, allowing the melted caramel to be at its most divine. For the ultimate indulgence, top each warm apple with a scoop of creamy vanilla ice cream, which will melt slightly into the hot apple, creating a delightful contrast. Finish with a generous drizzle of extra caramel sauce over everything. Now, all that’s left is to savor every glorious bite! Enjoy the warm, sweet, and comforting flavors of this truly spectacular dessert.
Tips for Perfect Bloomin’ Apples Every Time
- Choose the Right Apples: While Granny Smith are recommended for their tartness and firm texture, other baking apples like Honeycrisp, Fuji, or Braeburn can also work. Just be aware that sweeter apples might require slightly less added sugar.
- Prevent Browning: As you slice the apples, they can begin to oxidize and turn brown. A quick dip or rub with lemon juice (from the lemon wedge) on the exposed flesh will help keep them looking fresh and appealing until they go into the oven.
- Don’t Overcrowd: Ensure your baking dish isn’t too crowded. Giving the apples a little space allows for better airflow and more even baking, preventing them from steaming instead of baking.
- Watch Your Caramels: If you find your caramel squares are very firm, you can soften them slightly in the microwave for a few seconds before placing them into the apples, making them easier to mold.
- Customize Your Spices: While cinnamon is essential, feel free to add a tiny pinch of nutmeg, allspice, or even a touch of ginger to your butter mixture for a more complex spice profile.
- Check for Doneness: Apples should be tender but not mushy. Insert a small paring knife into the thickest part of an apple; it should slide in with minimal resistance.
Delicious Variations to Your Bloomin’ Apples
While the classic Bloomin’ Apples recipe is a masterpiece on its own, there are many ways to customize and enhance it based on your preferences or what you have on hand.
- Nutty Crunch: Before baking, sprinkle chopped pecans, walnuts, or almonds over the apples for an added layer of texture and flavor. The nuts will toast beautifully in the oven.
- Chocolate Drizzle: Instead of, or in addition to, caramel sauce, drizzle some melted chocolate (dark, milk, or white) over the warm apples and ice cream for a richer, more decadent treat.
- Crumb Topping: Mix some oats, flour, brown sugar, and cold butter to create a simple crumble topping. Sprinkle this over the apples before baking for a delightful crunchy crust.
- Different Fillings: Experiment with other fillings in the core. A spoonful of cream cheese mixed with a little sugar and vanilla, or even a small scoop of fruit preserves, could offer a delightful surprise.
- Spiked Version: For an adult treat, add a very small splash of bourbon, rum, or apple brandy to your butter mixture before brushing, adding a sophisticated warmth.
- Salty Twist: A pinch of flaky sea salt sprinkled over the caramel drizzle just before serving can elevate the flavors, creating a tempting sweet-and-salty combination.
Frequently Asked Questions About Bloomin’ Apples
Here are some common questions you might have when making this delightful apple dessert.
Q: Can I use different types of apples?
A: Absolutely! While Granny Smith apples are recommended for their tartness and ability to hold their shape, you can experiment with other firm baking apples like Honeycrisp, Fuji, Gala, or Braeburn. Just note that sweeter apples might mean you want to slightly reduce the sugar in the butter mixture, and softer apples might bake a bit faster.
Q: Can I prepare Bloomin’ Apples ahead of time?
A: You can certainly do some prep work in advance. You can prepare the butter and spice mixture a day or two ahead and store it in the refrigerator. You can also core and slice the apples a few hours before baking. If doing so, remember to rub the cut surfaces with lemon juice to prevent browning. Assemble and bake just before serving for the best results.
Q: How do I store leftover Bloomin’ Apples?
A: If you happen to have any leftovers, allow them to cool completely. Then, store them in an airtight container in the refrigerator for up to 3-4 days. When ready to enjoy again, you can gently reheat them in the oven at a lower temperature (around 300°F/150°C) until warm, or microwave them briefly.
Q: What if I don’t have a melon baller for coring?
A: No problem! You can use a small spoon, a sharp paring knife (be very careful), or even an apple corer to remove the core. The goal is to create a clean cavity in the center for the caramel.
Q: My apples aren’t “blooming” as much as I expected. What went wrong?
A: The “blooming” effect largely depends on the depth and spacing of your cuts. Ensure your circular cuts and vertical slices go almost to the bottom of the apple but not completely through. If the cuts are too shallow, the apple won’t fan out as much. Practice makes perfect, and even if they don’t fan out perfectly, they will still taste amazing!
Q: Can I make this recipe healthier?
A: You can make minor adjustments. Reduce the amount of sugar in the butter mixture slightly. You could also use less caramel or opt for a sugar-free caramel alternative. Serving without ice cream or with a lighter, fruit-based topping would also reduce calories.
There you have it – a magnificent dessert that is as fun to make as it is to eat. These Bloomin’ Apples are guaranteed to become a household favorite, bringing warmth, comfort, and a touch of gourmet elegance to your table. Whether you’re a seasoned baker or just starting your culinary journey, this recipe offers a simple path to a truly spectacular treat. Don’t hesitate to give it a try; your taste buds will thank you!
*All these images are credited to Delish via YouTube. Give their channel a visit and subscribe for more!
Easy Bloomin’ Apples Recipe