
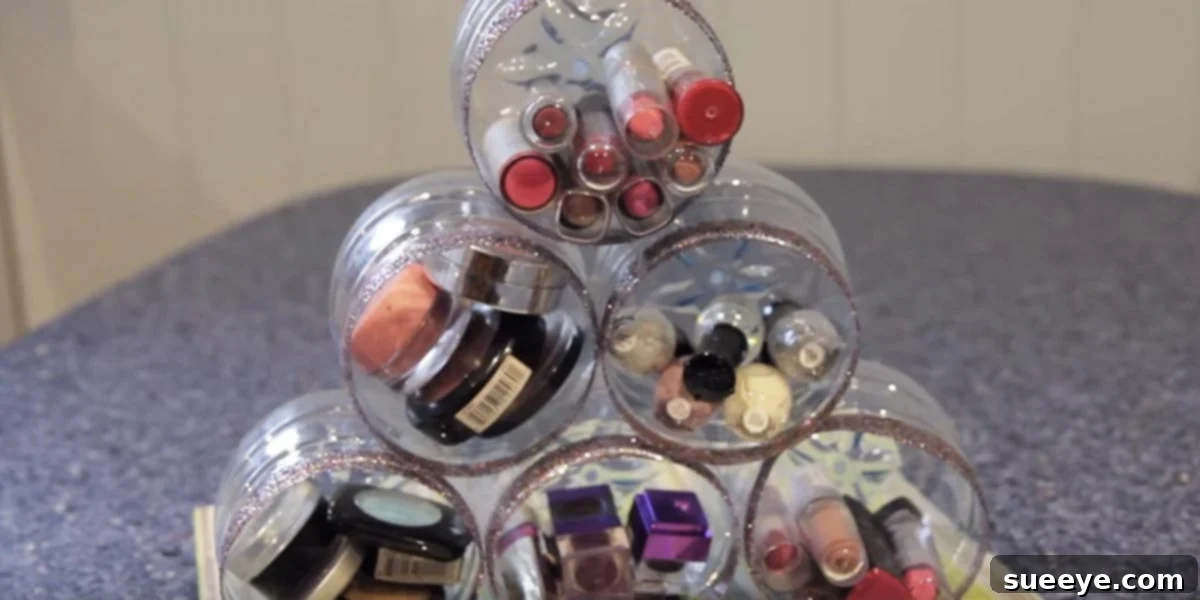
DIY Plastic Bottle Makeup Organizer: The Ultimate Guide to Clutter-Free Beauty
Are you tired of rummaging through a messy drawer filled with lipsticks, brushes, and countless small beauty essentials? Does your vanity look more like a battlefield than a serene space for self-care? If so, you’re certainly not alone. Keeping a vast and ever-growing collection of makeup and beauty tools organized is a universal challenge for enthusiasts and everyday users alike. The sheer variety of items – from delicate brushes and tiny lip glosses to bulky foundation bottles and an endless array of vibrant nail polishes – makes it almost impossible to maintain order without a dedicated, smart system. Fortunately, a brilliant and budget-friendly solution is at hand: the DIY Plastic Bottle Makeup Organizer. This simple yet incredibly effective project is not just a ‘game changer’; it’s a ‘space saver,’ a ‘sanity preserver,’ and a testament to clever repurposing that will revolutionize your beauty routine.
Why a Clutter-Free Beauty Space Matters for Your Routine and Well-being
Beyond the obvious aesthetic appeal, an organized makeup collection offers a multitude of benefits that can significantly enhance your daily routine and overall well-being. Imagine finding exactly what you need in mere seconds, rather than frustrating minutes spent digging through a chaotic pile. This newfound efficiency saves precious time, especially during busy mornings when every moment counts. Furthermore, proper storage helps preserve the quality and longevity of your cherished products. Brushes kept upright and separated dry better, maintain their shape, and are less likely to harbor bacteria, extending their lifespan and ensuring hygienic application. Lipsticks and glosses are less prone to getting squashed, contaminated, or lost when stored securely in their own dedicated compartments. A tidy, well-arranged beauty space also profoundly contributes to a sense of calm and order, transforming your makeup application from a stressful chore into a more enjoyable, mindful, and even luxurious ritual. It reduces visual clutter and mental stress, allowing you to appreciate your collection without the overwhelming feeling of disarray.
The Genius of Repurposing: Crafting Your New Makeup Organizer from Everyday Items
The core idea behind this ingenious DIY project is to transform everyday plastic bottles – items often destined for the recycling bin or, worse, a landfill – into functional, attractive, and highly customizable storage units. We’re talking about bottles from shampoo, conditioner, body lotion, dish soap, and even certain food-grade plastics. The true beauty of this approach lies in its inherent simplicity, sustainability, and affordability. Instead of spending a fortune on expensive, purpose-built organizers that may not perfectly fit your specific needs or the unique dimensions of your space, you can craft a bespoke solution using materials you already have lying around your home. This project proudly champions the essential principles of ‘reduce, reuse, recycle,’ allowing you to contribute positively to environmental conservation while simultaneously decluttering and beautifying your personal beauty arsenal. It’s a win-win situation for both your home and the planet.
Gathering Your Essentials: What You’ll Need to Get Started
Embarking on this rewarding DIY journey requires minimal supplies, many of which you likely already possess or can easily acquire at a very low cost. Preparation is key to a smooth and successful crafting experience:
- Assorted Plastic Bottles: Begin by collecting a variety of clean, empty plastic bottles of different sizes and shapes. Taller, slimmer bottles (e.g., shampoo, conditioner) are perfect for holding makeup brushes, eyeliners, and mascaras, while shorter, wider ones (e.g., lotion pumps, some food containers) can comfortably house compacts, lipsticks, nail polishes, or cotton swabs. Ensure all bottles are thoroughly washed and dried, with all labels completely removed for a clean, uniform finish.
- Strong Adhesive: A powerful, quick-drying glue is absolutely crucial for securely joining the various plastic pieces into a stable organizer. E-6000 glue is a highly popular choice among crafters for its exceptional bonding strength and versatility across different materials. Alternatively, a robust epoxy or a super glue specifically designed for plastics will also work effectively. Make sure to read the manufacturer’s instructions for application and drying times.
- Sharp Scissors or Craft Knife: For precise and clean cuts through the plastic. A heavy-duty pair of kitchen or craft scissors is often sufficient for softer plastics, but a craft knife (like an X-Acto knife) provides greater precision for intricate cuts or thicker plastics. Always exercise extreme caution when using sharp tools.
- Permanent Marker: To accurately mark your cutting lines on the bottles before you begin cutting.
- Sandpaper (optional but recommended): Fine-grit sandpaper can be used to smooth any rough or sharp edges after cutting. This step is important for both safety (preventing cuts) and aesthetics (creating a neat, professional-looking finish).
- Decorative Elements (optional): This is where your creativity truly shines! Consider materials like spray paint (ensure it’s suitable for plastic), acrylic paint, glitter, self-adhesive fabric, decorative ribbon, Washi tape, or stickers to personalize and enhance the aesthetic appeal of your organizer, making it truly unique to your style.
Your Step-by-Step Guide to Crafting a Beautiful Makeup Organizer
While a video tutorial often provides the best visual guidance, the general process for constructing this DIY organizer is quite straightforward and achievable for anyone. Follow these steps carefully to bring your vision to life:
- Clean and Prepare Your Bottles: Start by thoroughly washing all your collected plastic bottles with warm water and soap. Use a brush or sponge to ensure any residue is removed. Rinse them well and allow them to dry completely, both inside and out. Any moisture or oil residue could compromise the glue’s adhesion later. Peel off all labels for a smooth surface.
- Determine Desired Heights and Mark Cuts: Before cutting, envision what you plan to store in each compartment. Use a permanent marker to draw a clear cutting line around each bottle, indicating the desired height. Remember, taller sections are ideal for brushes and pencils, while shorter ones are perfect for lipsticks, compacts, or small pots. Varying heights will add visual interest and practical utility.
- Carefully Cut Your Bottles: With precision and caution, cut along the marked lines using your sharp scissors or craft knife. If using a craft knife, place the bottle on a protective cutting mat and work slowly and steadily, rotating the bottle as you cut. For safer, cleaner cuts, start with a small incision and then extend it around the circumference.
- Smooth Rough Edges: This critical step ensures both safety and a polished look. If the cut edges feel sharp or appear uneven, gently sand them with fine-grit sandpaper until they are smooth to the touch. This prevents accidental nicks and gives your organizer a professional finish.
- Arrange, Assemble, and Glue: This is where your organizer takes shape! Experiment with different arrangements of your cut bottle pieces. Consider how they will fit together to create a stable, cohesive, and functional organizer that maximizes your space. Once you have a layout you are happy with, apply a generous amount of your strong adhesive to the contact points between the bottles. Press them firmly together and hold until the glue begins to set. For extra stability, you might use clamps or heavy objects to hold pieces in place while the glue cures. Allow ample drying time, strictly following the glue manufacturer’s instructions, often 24 hours for full cure.
- Personalize and Decorate (Optional): Once the glue has fully cured and your organizer is stable, the fun of decorating begins! Spray paint (designed for plastic), acrylic paint, glitter, or even contact paper can transform plain plastic into a chic, personalized accessory that perfectly matches your room decor or personal style. Ensure proper ventilation if using spray paint.
Beyond Plastic Bottles: Creative Variations for Your DIY Storage
The true beauty of this organization concept lies in its remarkable adaptability. While plastic bottles are an excellent starting point due to their abundance and ease of use, you can easily extend this DIY philosophy to other household items, embracing a broader range of sustainable crafting:
- Repurposed Candle Holders: After burning down your favorite scented candles, clean out the jars thoroughly. These often come in attractive glass or ceramic designs and can be glued together in a similar fashion to create a more upscale, weighty, and elegant organizer. Their robust nature makes them ideal for heavier items or as a decorative centerpiece.
- Dollar Store Delights: Keep an astute eye out for cheap plastic containers, small spray bottles, or even miniature waste bins at dollar stores or discount retailers. These budget-friendly finds can often be cut, painted, and combined to form incredibly unique and custom storage solutions without breaking the bank. It’s amazing what a little imagination can do with inexpensive items.
- Cardboard Tubes: For a super quick, no-cost, and easily recyclable solution, consider using toilet paper or paper towel rolls. These can be cut to various heights, painted, and glued together to create temporary or lighter-duty organizers, perfect for smaller, lighter items like lip pencils, individual brushes, or small samples.
The fundamental key is to think creatively and look at everyday objects with a fresh perspective, questioning how they might be repurposed. “Whatever it takes to do this that is the cheapest way, do it!” is a mantra that truly applies here, encouraging resourcefulness and ingenuity. The profound satisfaction of creating something beautiful, functional, and truly unique from items that would otherwise be discarded is immense and incredibly rewarding.
The Eco-Friendly and Economical Choice: A Win-Win for You and the Planet
Choosing to create your own DIY plastic bottle makeup organizer isn’t just about cleverly saving space; it’s a conscious, impactful decision that benefits both your personal finances and the environment at large. By diligently repurposing plastic, you are actively participating in reducing waste and significantly lessening your environmental footprint. You’re giving ‘trash’ a valuable second life, diverting it from ending up in ever-growing landfills or tragically polluting our precious oceans and natural habitats. Moreover, the cost savings are undeniably substantial. High-end, mass-produced makeup organizers can be surprisingly expensive, and their generic designs might not even perfectly cater to the specific dimensions or unique contents of your personal collection. This hands-on DIY approach allows for complete customization at virtually no cost, demonstrating powerfully that sustainability and smart budgeting can and should go hand in hand, offering a truly responsible solution.
Maximizing Your New Organizer’s Potential: Tips for Lasting Order
Once your beautifully crafted DIY organizer is complete and ready for action, consider these practical tips to make the absolute most of its potential and maintain lasting order in your beauty space:
- Categorize Systematically: Dedicate specific compartments or sections to different types of products. For example, all lipsticks in one section, eye brushes in another, foundations and primers in a larger division. This systematic categorization makes finding items even quicker and more intuitive.
- Label (Optional but Effective): For very extensive collections or to help family members, small, neat labels on the compartments can add an extra layer of organization and clarity. Use a label maker or create pretty handwritten labels.
- Regular Decluttering: Even with the most perfect organizer, it’s always good practice to regularly go through your makeup collection, discard expired products (which can pose health risks), and thoroughly clean your makeup tools. This prevents accumulation and maintains hygiene.
- Strategic Placement: Position your finished organizer in a convenient and easily accessible spot on your vanity, dresser, or bathroom counter. Easy access encourages consistent use and helps keep your essentials neatly put away.
Transform Your Beauty Routine Today and Embrace Sustainable Style!
This DIY plastic bottle makeup organizer is far more than just a simple craft project; it’s a practical, sustainable, and empowering way to take complete control of your beauty space. It encourages you to look at everyday objects with a renewed perspective, fostering creativity, resourcefulness, and a profound commitment to eco-conscious living. The immense joy and satisfaction of seeing your formerly cluttered makeup collection neatly arranged in a custom-made organizer, knowing you created it yourself with your own hands, is truly rewarding and a source of personal pride. So, don’t let another day pass with disorganization reigning supreme on your vanity. Gather your materials, unleash your inner crafter, and transform those mundane plastic bottles into a beautiful, highly functional, and personalized storage solution. You’ll be absolutely amazed at the significant difference it makes to your daily routine and overall sense of calm!
For those who truly thrive on visual learning and need a little extra inspiration, don’t miss out on watching talented crafters like Ela Gale bring this ingenious concept to life in their detailed step-by-step tutorials. Seeing the process unfold can provide invaluable tips, tricks, and creative insights, guiding you through each stage to ensure your DIY project is not just a success, but a true masterpiece of organization.