
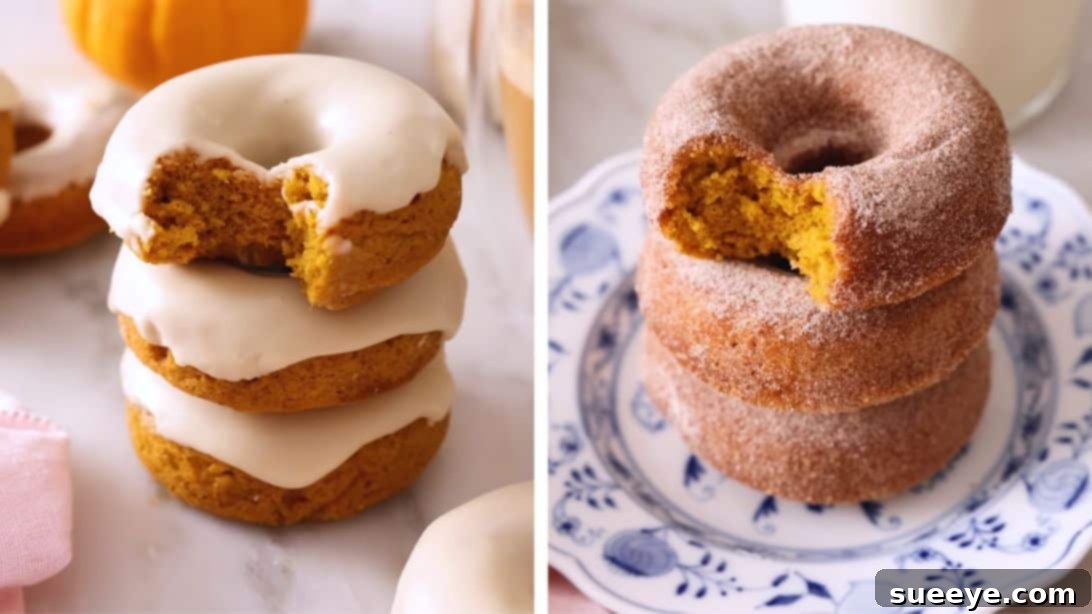
As the crisp autumn air arrives and leaves begin to transform into vibrant hues of red and gold, there’s no better way to embrace the cozy spirit of the season than with the comforting aroma of freshly baked pumpkin donuts filling your home. This incredibly simple, yet utterly delicious, baked pumpkin donut recipe promises to become a cherished fall tradition. Forget the fuss of deep-frying; these donuts are baked to golden perfection, offering a healthier, lighter alternative without sacrificing any of the rich, spiced flavor we all crave. Whether you prefer the classic warmth of a cinnamon sugar coating or the sophisticated sweetness of a maple glaze, this recipe provides both delightful options to customize your perfect fall treat. Inspired by the culinary experts at Preppy Kitchen, this guide will walk you through every step to create moist, tender, and irresistibly flavorful pumpkin donuts that are surprisingly easy to make and guaranteed to impress.
Homemade Baked Pumpkin Donuts: An Irresistible Fall Treat Recipe
There’s something truly magical about homemade baked goods, and these pumpkin donuts are no exception. They capture the essence of autumn in every bite, making them perfect for a cozy morning, an afternoon snack, or even a festive dessert for gatherings. This recipe stands out for its straightforward approach, making it accessible even for novice bakers. By baking rather than frying, we not only cut down on prep time and mess but also create a lighter donut that allows the delicate pumpkin and spice flavors to shine through. Get ready to embark on a delightful baking adventure that culminates in the most heavenly fall donuts you’ve ever tasted.
Essential Ingredients for Your Perfect Pumpkin Donuts
Crafting these delectable pumpkin donuts begins with a selection of pantry staples, each playing a crucial role in achieving that perfect texture and flavor. Using high-quality ingredients ensures the best possible outcome, transforming simple components into an extraordinary autumnal delight.
- 1 and 3/4 cups of All-Purpose Flour: The foundation of our donuts, providing structure. Ensure it’s sifted for a lighter texture.
- 1/2 teaspoon of Baking Powder: A leavening agent that helps the donuts rise and become fluffy.
- 1/4 teaspoon of Baking Soda: Works in conjunction with the pumpkin puree’s acidity to create a tender crumb and aid in rising.
- 1/4 teaspoon of Salt: A crucial flavor enhancer, balancing the sweetness and bringing out the depth of the spices.
- 2 teaspoons of Pumpkin Pie Spice: The heart of the fall flavor! This blend typically includes cinnamon, nutmeg, ginger, and cloves, delivering that quintessential pumpkin spice warmth.
- 1 cup of Pumpkin Puree: Provides moisture, a beautiful orange hue, and the signature pumpkin flavor. Make sure to use pure pumpkin puree, not pumpkin pie filling.
- 1/4 cup of Vegetable Oil: Adds richness and moisture to the donuts, contributing to their tender texture.
- 1 large Egg (room temperature): Acts as a binder, helps with structure, and contributes to the richness. Using a room temperature egg ensures it incorporates smoothly with other ingredients.
- 1/2 cup of Granulated Sugar: For sweetness and helps with browning.
- 1/2 cup of Light Brown Sugar (firmly packed): Adds a deeper, molasses-rich sweetness and contributes to the donuts’ moistness.
- 2 teaspoons of Vanilla Extract: A universal flavor enhancer that complements the pumpkin and spices beautifully.
For the Irresistible Cinnamon Sugar Topping:
For those who adore a classic, comforting finish, the cinnamon sugar topping is a timeless choice. It’s incredibly simple to prepare and adds a delightful textural contrast and aromatic sweetness to the warm donuts.
- 1/2 cup of Granulated Sugar: The base for our sweet coating.
- 1 and 1/2 teaspoon of Cinnamon or Pumpkin Pie Spice: Infuses the sugar with that warm, familiar spice profile, making each bite truly irresistible.
For the Luscious Maple Glaze:
If you prefer a rich, velvety topping that drips delicately over your donuts, the maple glaze is an absolute dream. Its sweet, earthy notes perfectly complement the pumpkin, creating a truly gourmet experience.
- 1 cup of Powdered Sugar: The essential ingredient for a smooth, pourable glaze.
- 2 tablespoons of Maple Syrup: Provides the distinctive maple flavor and adds to the glaze’s luscious consistency.
- 2 teaspoons of Milk or Water: Used to thin the glaze to the desired consistency. Start with less and add more if needed.
- Pinch of Salt: A tiny touch that magically enhances the sweetness and depth of the maple flavor.
Kitchen Tools You’ll Need
Having the right tools at hand makes the baking process smoother and more enjoyable. For these baked pumpkin donuts, you won’t need anything too specialized, but a few key items will ensure your success.
- Donut Pan: Essential for shaping your baked donuts. A standard 6-cavity pan is common, but having two can speed up the baking process.
- Large Mixing Bowls: At least two are needed for separating wet and dry ingredients initially.
- Whisk: For thoroughly combining ingredients, especially the wet components and for mixing the glaze.
- Rubber Spatula: Ideal for gently folding ingredients and scraping down the sides of bowls.
- Sifter or Fine-Mesh Sieve: Crucial for ensuring your dry ingredients are lump-free and evenly distributed.
- Piping Bag (optional, but recommended): Makes filling the donut pan wells much cleaner and easier. Alternatively, a zip-top bag with a corner snipped off works, or two spoons can be used.
- Cooling Rack: For allowing the donuts to cool evenly and for excess glaze to drip off.
- Measuring Cups and Spoons: Accurate measurements are key in baking.
Step-by-Step Instructions: Crafting Your Pumpkin Donuts
Follow these detailed instructions carefully to create light, fluffy, and perfectly spiced pumpkin donuts that will quickly become a household favorite. Precision and gentle handling are key to achieving the best texture.
Step 1: Prepare Your Dry Ingredients
In a large mixing bowl, begin by sifting together the all-purpose flour, baking powder, baking soda, salt, and pumpkin pie spice. Sifting is a critical step as it not only removes any lumps from the dry ingredients but also aerates them, contributing to a lighter, more tender donut. Once sifted, give the mixture a quick whisk to ensure all the spices and leavening agents are evenly distributed. Set this bowl aside for a moment.
Step 2: Combine the Wet Ingredients
In a separate, medium-sized bowl, measure out your wet ingredients. Add the pumpkin puree, vegetable oil, the large room temperature egg, granulated sugar, light brown sugar (ensure it’s firmly packed for accurate measurement), and vanilla extract. Using a whisk, vigorously mix these ingredients together until they are thoroughly combined and smooth. The brown sugar should dissolve, and the mixture should take on a uniform, creamy consistency. The room temperature egg is important here as it emulsifies better with the other liquids, resulting in a more cohesive batter.
Step 3: Grease Your Donut Pans
Prepare your donut pans by generously coating each well with cooking spray or butter. This step is crucial to prevent the donuts from sticking and ensures they release cleanly once baked. If you’re using butter, make sure to get into all the crevices. A well-greased pan will give your donuts a beautiful, even finish.
Step 4: Gently Mix Wet and Dry
Now it’s time to bring the two mixtures together. Pour the wet ingredients from the second bowl into the large bowl containing your dry ingredients. Using a rubber spatula or a wooden spoon, gently fold the ingredients together. Mix only until just combined. The key here is to avoid overmixing, as this can develop the gluten in the flour too much, leading to tough, dense donuts. A few small lumps are perfectly acceptable and preferable to an overmixed batter.
Step 5: Fill the Donut Molds
For the cleanest and most even distribution of batter, transfer your donut batter into a piping bag. If you don’t have a piping bag, a large zip-top bag with one corner snipped off will work just as well. Alternatively, you can carefully spoon the batter into the donut pan wells. Fill each well approximately two-thirds of the way up. This allows room for the donuts to rise without overflowing, ensuring they maintain their classic donut shape.
Step 6: Bake to Golden Perfection
Preheat your oven to 350 degrees F (175 degrees C). Once heated, carefully place the filled donut pans into the oven. Bake for approximately 10-12 minutes. Baking times can vary slightly depending on your oven, so keep an eye on them. The donuts are done when they are lightly golden around the edges, and when gently touched, they spring back. You can also insert a wooden skewer or toothpick into the center of a donut; if it comes out clean, they are ready. Avoid overbaking, as this can lead to dry donuts.
Step 7: Apply Your Favorite Topping
While the donuts are baking, prepare your chosen topping. For the cinnamon sugar coating, simply combine the granulated sugar and cinnamon (or pumpkin pie spice) in a shallow bowl. For the maple glaze, whisk together the powdered sugar, maple syrup, milk (or water), and a pinch of salt in a separate bowl until you achieve a smooth, thick, yet pourable consistency. If the glaze is too thick, add a tiny bit more milk; if too thin, add a little more powdered sugar.
Once the donuts are out of the oven, allow them to cool in the pan for just a minute or two before carefully transferring them to a wire rack. For the cinnamon sugar topping, while the donuts are still warm (but not piping hot), immediately drop them into the cinnamon sugar mixture and gently toss to coat all sides. The warmth helps the sugar adhere. For the maple glaze, let the donuts cool completely on a wire rack. Once cooled, spoon the glaze generously over each donut, allowing any excess to drip back into the bowl or onto a tray placed underneath the cooling rack. Let the glaze set for a few minutes before serving. Enjoy your delicious homemade pumpkin donuts!
Pro Tips for the Best Pumpkin Donuts
Even with an easy recipe, a few expert tips can elevate your baking and ensure consistently perfect results every time. Keep these pointers in mind for your pumpkin donut endeavors:
- Do Not Overmix the Batter: This is perhaps the most crucial rule for tender baked goods. Mix only until the wet and dry ingredients are just combined. Overmixing develops gluten, leading to tough, chewy donuts instead of light and fluffy ones.
- Use Pure Pumpkin Puree: Always double-check your can to ensure you’re using 100% pumpkin puree, not pumpkin pie filling, which contains added spices and sugar that will alter the recipe.
- Room Temperature Ingredients: Ensure your egg is at room temperature. This allows it to emulsify better with the other ingredients, creating a smoother, more uniform batter and a better final texture.
- Don’t Overfill the Donut Pan: Filling the wells about two-thirds full prevents overflow and helps maintain the classic donut shape. An overfilled pan can result in misshapen donuts.
- Cool on a Wire Rack: Once baked, transfer the donuts to a wire rack after a minute or two in the pan. This prevents the bottoms from becoming soggy due to trapped steam.
- Apply Cinnamon Sugar Warm: If opting for the cinnamon sugar topping, roll the donuts in the mixture while they are still warm (but not scorching hot). The residual heat helps the sugar adhere perfectly.
- Cool Completely for Glaze: For the maple glaze, ensure the donuts are completely cool before applying. If glazed while warm, the glaze will melt and absorb rather than setting into a nice coating.
Delicious Variations to Explore
While these pumpkin donuts are perfect as is, you can always experiment with slight variations to suit your taste or occasion. Get creative and make them uniquely yours!
- Spice It Up: Enhance the pumpkin pie spice with a pinch of extra nutmeg or ground ginger for a more pronounced warmth. A tiny dash of black pepper can also surprisingly deepen the spice profile.
- Cream Cheese Glaze: Instead of maple, try a decadent cream cheese glaze. Mix softened cream cheese, powdered sugar, a splash of milk, and vanilla extract until smooth.
- Chocolate Chip Pumpkin Donuts: Fold 1/2 cup of mini chocolate chips into the batter before filling the donut pans for a delightful chocolatey twist.
- Streusel Topping: Before baking, sprinkle a simple streusel topping (flour, brown sugar, cold butter, and a pinch of cinnamon rubbed together) over the batter for added crunch and flavor.
- Nutty Crunch: After glazing, sprinkle finely chopped pecans or walnuts on top of the still-wet glaze for an extra layer of texture and flavor.
Frequently Asked Questions (FAQs)
Here are some common questions about making baked pumpkin donuts, along with helpful answers to ensure your baking success.
- Q: Can I use fresh pumpkin instead of canned puree?
A: Yes, you can! If using fresh pumpkin, make sure to roast it until very tender, then puree it until smooth. Drain any excess moisture to achieve a consistency similar to canned puree. - Q: Can I fry these donuts instead of baking them?
A: This recipe is specifically formulated for baked donuts. The batter consistency might be too thin for frying, and the result would likely be very different. For fried donuts, it’s best to use a recipe designed for frying. - Q: How long do these pumpkin donuts last, and how should I store them?
A: These baked pumpkin donuts are best enjoyed fresh on the day they are made. You can store them in an airtight container at room temperature for up to 2-3 days. If they have a glaze, they might get a bit sticky after the first day. - Q: Can I freeze these donuts?
A: Yes, you can freeze the unglazed donuts for up to 1 month. Allow them to cool completely, then place them in an airtight freezer bag or container. Thaw at room temperature and then apply your desired topping. - Q: What if I don’t have a donut pan?
A: While a donut pan is ideal for the classic shape, you can bake the batter in a muffin tin to make pumpkin donut holes or mini muffins. Adjust the baking time accordingly; they will likely bake faster.
Enjoy Your Homemade Fall Treat!
There you have it – a comprehensive guide to baking the most delightful and easy pumpkin donuts, perfect for celebrating the beautiful fall season. From the moment the warm, spiced aroma fills your kitchen to the first tender bite, these donuts are a true embodiment of autumn comfort. Whether you share them with family and friends, bring them to a festive gathering, or simply enjoy them with a hot cup of coffee or cider, these homemade treats are guaranteed to bring smiles and warmth. So, tie on your apron, gather your ingredients, and get ready to create a memorable fall baking experience. Happy baking!