
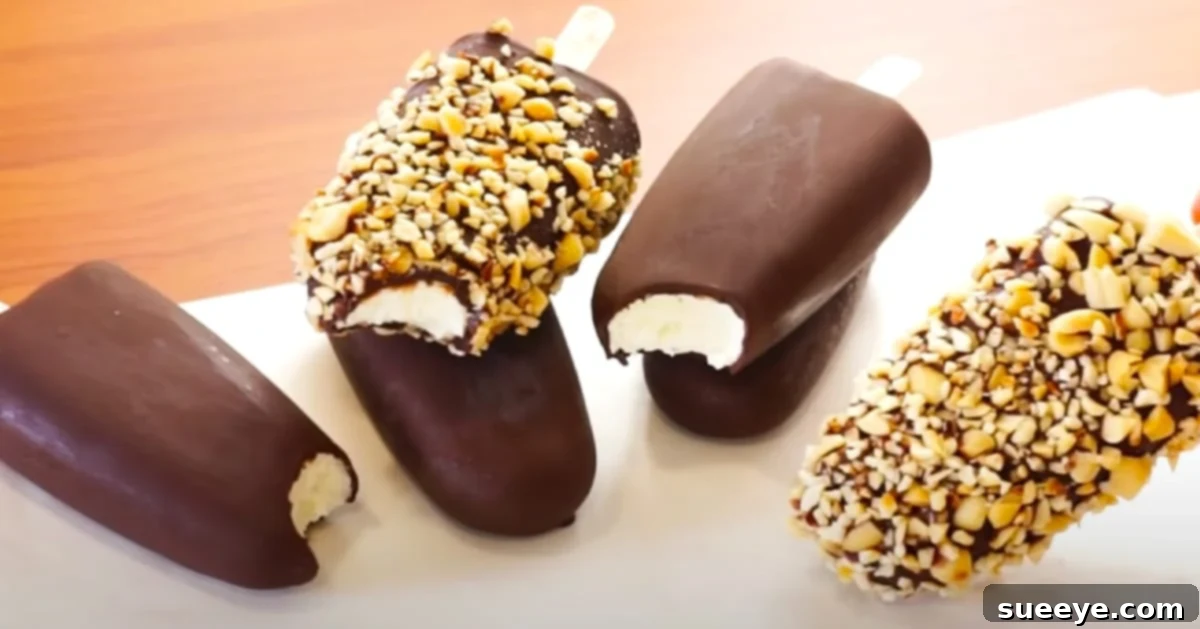
Mastering Homemade 3-Ingredient Chocolate Ice Cream Bars
There’s something uniquely satisfying about a classic chocolate-covered ice cream bar. The crisp snap of the chocolate shell giving way to a creamy, smooth vanilla ice cream core is a timeless delight. While store-bought options are plentiful, creating your own homemade ice cream bars brings an extra layer of enjoyment and customization. If you’re someone who appreciates simple, yet incredibly rewarding recipes, you’re in for a treat. This comprehensive guide will walk you through crafting your very own delectable chocolate ice cream bars using just a handful of essential ingredients, inspired by the ingenious methods popularized by Emma’s Goodies.
Many of us are drawn to the kitchen, eager to create delicious treats, but not all of us have endless hours to spend on elaborate culinary projects. That’s precisely where quick, no-fuss recipes become invaluable. Emma’s Goodies has truly mastered the art of developing tutorials that require minimal ingredients and time, making gourmet-quality treats accessible to everyone. Whether you’re a busy parent looking for a fun activity with your kids, a student with limited kitchen resources, or simply someone who loves instant gratification in the kitchen, these types of recipes are an absolute game-changer. They brilliantly prove that you don’t need a lengthy ingredient list, specialized equipment, or complex techniques to achieve incredibly delicious and impressive results. This particular recipe for chocolate-covered vanilla ice cream bars perfectly exemplifies this philosophy, allowing you to whip up a batch of delectable frozen delights in a surprisingly short amount of active preparation time, making it an ideal choice for any dessert craving.
Forget the complicated machinery or the extensive list of ingredients often associated with traditional homemade ice cream. We’re going back to basics, focusing on achieving maximum flavor and the perfect texture with minimal fuss. The beauty of this easy ice cream bar recipe lies in its elegant simplicity and the readily available nature of its core components. The result? A remarkably rich, velvety smooth vanilla ice cream encased in a luscious, fast-setting chocolate shell that rivals any premium store-bought version. Plus, you have the added satisfaction and peace of mind of knowing exactly what went into your treat, making it a healthier and more personalized option for your family. Get ready to transform a few staple pantry items into an unforgettable dessert that will surely become a family favorite, perfect for warm summer days, celebratory occasions, or simply whenever you crave a frozen indulgence that’s both easy to make and incredibly satisfying.
Essential Ingredients for Your Homemade Ice Cream Bars
Crafting these delightful no-churn chocolate ice cream bars requires only a few key components. The secret to their incredible taste, creamy texture, and the signature snap of the shell lies in the quality of these ingredients and how they interact. Here’s a detailed look at everything you’ll need to gather before you start:
For the Creamy Vanilla Ice Cream Base:
- 500g Heavy Cream (approximately 2 cups + 2 tbsp): This is the absolute foundation of your rich and incredibly creamy ice cream. Heavy cream, often referred to as whipping cream, boasts a high-fat content (typically 36% or more), which is absolutely crucial for achieving that smooth, luxurious texture without the need for an ice cream maker. When vigorously whipped, it incorporates air, creating a light yet decadently rich base that freezes beautifully.
- 350g (12.5 ounces) Sweetened Condensed Milk OR 150g Fine Sugar (¾ cup): This ingredient serves two vital purposes: it provides the perfect amount of sweetness and significantly contributes to the ice cream’s remarkably smooth and scoopable consistency. Sweetened condensed milk is essentially cow’s milk with most of its water removed and a large amount of sugar added, resulting in a thick, syrupy liquid that doesn’t crystallize easily when frozen. If opting for fine sugar instead, ensure it dissolves completely to prevent a grainy or gritty texture in your final product. Using sweetened condensed milk is generally highly recommended for the creamiest, most reliable no-churn result, as its unique properties make it ideal for this method, providing a superior texture and unparalleled ease.
- 1 ½ tsp Vanilla Extract: A crucial and indispensable flavoring agent. Pure vanilla extract enhances the overall sweetness of the ice cream and provides that classic, comforting, and universally loved vanilla flavor that pairs absolutely perfectly with chocolate. Don’t skimp on quality here; a good quality vanilla extract (preferably pure rather than imitation) makes a noticeable and significant difference in the depth of flavor.
- ⅛ tsp Salt: A tiny pinch of salt might seem counterintuitive in a sweet dessert recipe, but it is an incredibly effective flavor enhancer. It cleverly balances the intense sweetness, making both the vanilla and chocolate flavors pop and preventing the ice cream from tasting overly sugary or one-dimensional. This small addition truly elevates the entire flavor profile.
For the Signature Chocolate Shell:
- 300g Sweetened Chocolate (11 ounces): This is the undeniable star of the show for the outer coating. You have the flexibility to use semi-sweet, dark, or milk chocolate, depending entirely on your personal preference and how sweet or bitter you like your chocolate. Using a high-quality chocolate will yield the best flavor and ensure a smoother, more consistent melt. Chocolate chips, baking bars, or even a good quality chocolate block can be used; just make sure to chop it finely for even melting.
- 3 tbsp Coconut Oil: This is the magic ingredient that creates the much-desired “magic shell” effect. When melted and combined with chocolate, coconut oil lowers the melting point of the chocolate, allowing it to harden almost instantly and incredibly crisply when it comes into contact with the extremely cold ice cream. It also contributes to a wonderfully satisfying crisp snap and a subtle, pleasant tropical aroma that complements the other flavors beautifully.
- Chopped Salted Peanuts (Optional): For those who absolutely love a bit of crunch and a delightful savory contrast! Finely chopped salted peanuts add a fantastic textural element and a delicious salty-sweet flavor profile that complements both the chocolate and vanilla beautifully. Feel free to substitute with other nuts like roasted almonds, pecans, or walnuts, or simply skip them entirely if you prefer a perfectly smooth, unadorned chocolate shell.
Step-by-Step Guide to Crafting Your Delicious Ice Cream Bars
Creating these delightful homemade chocolate ice cream bars is a surprisingly straightforward process, broken down into two main, manageable phases: first, preparing the incredibly creamy vanilla ice cream base, and then, crafting the irresistible, fast-setting chocolate shell. Follow these detailed steps carefully for perfect results every single time, ensuring you end up with restaurant-quality frozen treats right in your own kitchen.
Phase 1: Preparing the No-Churn Vanilla Ice Cream Base
- Whip the Heavy Cream to Soft Peaks: In a large, preferably chilled mixing bowl, carefully pour the heavy cream. Using an electric mixer (either a handheld mixer or a stand mixer fitted with a whisk attachment) on medium-high speed, begin to whip the cream until it just starts to form soft peaks. This means that when you lift the beater, the cream holds its shape but the very tip of the peak gently curls over. Be cautious not to over-whip at this initial stage, as you’ll continue mixing it further.
- Incorporate Sweeteners and Flavoring: If you are using sweetened condensed milk, gently fold it into the whipped cream along with the vanilla extract and the pinch of salt. Mix carefully until the mixture is just combined and appears smooth and uniform. If you are opting for fine sugar instead, it’s best to ensure it’s fully dissolved first; you can achieve this by warming a very small amount of cream (taken from your total 500g) and dissolving the sugar in it before folding this mixture into the main whipped cream base, then add the vanilla and salt. The key here is to achieve a homogenous mixture without inadvertently deflating too much of the air you’ve incorporated into the cream.
- Achieve Stiff Peaks for Optimal Texture: Continue to whip the mixture (if using condensed milk, this will now be easier) or gently fold until the entire cream mixture forms stiff peaks. Stiff peaks are characterized by standing straight up firmly when the beater is lifted from the bowl. This crucial step ensures that your finished ice cream will be wonderfully light, airy, and maintain its structure when frozen, avoiding an overly dense or icy texture.
- Prepare for Freezing – Molds or Pan:
- Using Ice Cream Molds: If you are fortunate enough to have dedicated ice cream bar molds, carefully spoon or pipe the prepared ice cream mixture into each individual cavity. Ensure that each mold is filled evenly to guarantee uniform bar sizes. Neatly insert the ice cream sticks into the designated slots at the base of each mold.
- Using a Square Pan (Excellent Alternative): If you don’t possess specific ice cream molds, you can still make excellent ice cream bars! Line a square or rectangular baking pan (an 8×8 or 9×9 inch pan works very well for this) with parchment paper, ensuring you leave a generous overhang on the sides. This overhang will act as convenient “handles” for easy lifting later. Pour the ice cream mixture into the prepared pan and gently smooth the top surface with a spatula or the back of a spoon. Freeze the pan for approximately 1-2 hours, or until the ice cream becomes semi-firm but not fully solid. At this point, gently insert wooden ice cream sticks into the desired bar shapes and spacing. This partial freezing allows the ice cream to freeze securely around the sticks, ensuring they don’t fall out later.
- Freeze Thoroughly for Solid Bars: Place the filled molds or the prepared pan into the freezer and allow them to freeze for a minimum of 4-6 hours, or preferably overnight, until the ice cream is completely solid and firm throughout. This extended freezing time is absolutely crucial for the bars to hold their shape perfectly and to ensure that the chocolate shell sets instantly and crisply when applied later.
Phase 2: Creating the Perfect Chocolate Shell and Dipping
- Melt the Chocolate and Coconut Oil: In a microwave-safe bowl, combine the sweetened chocolate (which should be chopped into small, uniform pieces for the most even melting) and the coconut oil. Heat this mixture in short 30-second intervals, ensuring you stir it very well after each interval, until the mixture is completely smooth, glossy, and entirely melted with no lumps remaining. Alternatively, for more controlled melting, you can use a double boiler method. This prevents scorching the chocolate and ensures a perfectly smooth consistency.
- Prepare the Dipping Station for Efficiency: Carefully transfer the warm, melted chocolate mixture into a tall, narrow glass or a sturdy measuring cup. The height and narrowness of the container are paramount, as it allows you to fully submerge the entire ice cream bars, ensuring an even and complete coating. If you have decided to incorporate chopped peanuts for added texture, stir them into the chocolate mixture now, ensuring they are well distributed.
- Prepare the Frozen Ice Cream Bars: Once your ice cream bars are completely frozen solid and rock-hard, carefully remove them from their molds. If you opted for the pan method, use the parchment paper overhang to lift the frozen block, then use a sharp, hot knife (run under hot water and dried) to cut them into your desired bar shapes. Have them ready and waiting on a parchment-lined baking tray or plate near your dipping station. Work quickly at this stage, as the bars will begin to soften once they are out of the freezer.
- Dip and Coat for the Perfect Shell: Holding an ice cream bar firmly by its stick, swiftly and confidently dip it into the melted chocolate mixture. Submerge it completely or to your desired coating level. Lift the bar out and allow any excess chocolate to drip off for just a few seconds, gently tapping the stick against the edge of the glass. The extreme coldness of the ice cream will cause the chocolate to harden almost instantly, forming that signature, wonderfully crisp shell.
- Add Optional Toppings Immediately: If you plan on adding any additional toppings (such as colorful sprinkles, more chopped nuts that weren’t mixed into the chocolate, or even a dash of sea salt flakes), sprinkle them onto the freshly dipped bar immediately after dipping, and before the chocolate shell has a chance to fully set. The slight tackiness of the hardening chocolate will help them adhere perfectly.
- Final Freeze for Optimal Enjoyment: Place the freshly coated ice cream bars back onto a clean parchment-lined tray and return them to the freezer for another 15-30 minutes. This final freeze ensures that the chocolate shell is fully set and firm, and that the ice cream itself is perfectly solid and ready for maximum enjoyment.
Tips for Success, Customization, and Perfect Homemade Ice Cream Bars Every Time
- Quality of Ingredients Matters: While this is a simple recipe, using good quality heavy cream and chocolate will significantly impact the final taste, richness, and overall texture of your homemade ice cream bars. Invest a little extra for a truly premium result.
- Temperature is Your Best Friend: Always ensure your heavy cream is thoroughly chilled before whipping; this is paramount for achieving maximum volume and lightness. Similarly, the ice cream bars must be absolutely frozen solid before dipping into the chocolate to ensure the chocolate sets quickly and forms that wonderfully crisp, thin shell.
- Explore Chocolate Alternatives: Feel free to experiment with different types of chocolate for your shell. White chocolate, a blend of milk and dark, or even a pure dark chocolate can offer unique and exciting flavor profiles. For a fun twist, you could even add a drop of food coloring specifically designed for chocolate to white chocolate for vibrant, colorful bars.
- Creative Flavor Variations for the Base: Don’t limit yourself strictly to vanilla! You can easily infuse your heavy cream with other extracts like peppermint extract for a holiday treat, almond extract for a nutty twist, a touch of orange zest, or even a bit of strong coffee concentrate for a delightful mocha ice cream base.
- Beyond Peanuts: Innovative Toppings: Beyond chopped peanuts, consider a sprinkle of flaky sea salt on the chocolate for a gourmet touch, shredded coconut, mini chocolate chips, crushed cookies (like Oreos), or even a delicate drizzle of caramel sauce or white chocolate for an extra layer of indulgence and visual appeal.
- Smart Storage Solutions: To keep your finished homemade ice cream bars fresh and prevent them from sticking together, store them in an airtight container in the freezer. It’s a good practice to separate layers with sheets of parchment paper. When stored correctly, they will remain delicious for several weeks.
- Troubleshooting Common Issues: If you find your chocolate isn’t setting quickly or crisply, it’s highly likely that your ice cream bars were not cold enough. Pop them back into the freezer for another hour or two. If the melted chocolate mixture seems too thick for dipping, add a tiny bit more coconut oil (start with just ½ teaspoon) and re-melt gently until it reaches the desired fluid consistency.
Overall, this fantastic recipe provides an accessible, enjoyable, and incredibly rewarding way to bring the pure joy of homemade ice cream bars right into your home. They are not only incredibly delicious and satisfying but also a fun and memorable project to undertake, especially when shared with children. Imagine the sheer delight and excitement on their faces as they help create and then eagerly devour these customized, cold, and refreshing frozen treats! From the unbelievably creamy vanilla core to the satisfying and iconic snap of the chocolate shell, every single bite is a true testament to the simplicity, elegance, and sheer deliciousness of this 3-ingredient wonder. So, gather your simple ingredients, clear a generous space in your freezer, and prepare to embark on a delightful culinary adventure that promises abundant sweet rewards. Enjoy the entire process, savor every single homemade, chocolate-covered masterpiece, and relish in the joy of creating something truly special!