
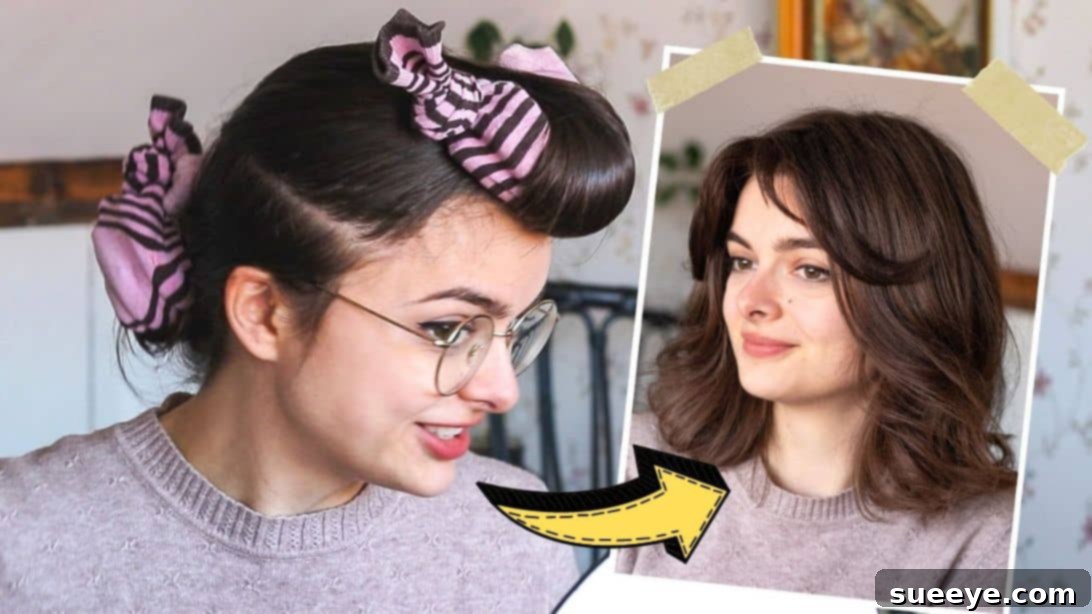
Transforming short hair into a cascade of beautiful, voluminous curls can often feel like a daunting task. Many struggle with achieving lasting styles without resorting to heat tools that can cause significant damage over time. If you’re seeking an effortless, damage-free method to achieve bouncy, defined curls for your short hair, you’ve come to the right place. This comprehensive guide, inspired by the ingenious techniques shared by Loepsie on YouTube, will walk you through an incredible heatless curling method that promises stunning results. Say goodbye to frizz and heat damage, and hello to healthy, vibrant curls that look professionally done, all with minimal effort and readily available materials.
This innovative heatless curling technique is not only quick to set up – often taking just a few minutes – but also delivers impressive, long-lasting curls. Whether you leave the curlers in for a couple of hours or overnight, you’ll wake up to or unveil a gorgeous hairstyle that boasts exceptional volume, natural bounce, and a beautiful curl pattern. It’s the perfect solution for busy mornings, special occasions, or simply adding a touch of elegance to your everyday look, all while protecting the integrity of your precious short hair.
Why Choose Heatless Curls for Short Hair?
The appeal of heatless curling methods, especially for those with shorter hair, extends far beyond mere convenience. High temperatures from curling irons, wands, and straighteners can strip your hair of its natural moisture, leading to dryness, brittleness, split ends, and even breakage. For short hair, which often requires more frequent styling to maintain a desired look, this damage can accumulate quickly, hindering hair growth and overall health.
Opting for a heatless approach means you’re actively preserving your hair’s natural strength and shine. This method allows your hair to gently form curls without being subjected to thermal stress, resulting in softer, healthier, and more resilient strands. Furthermore, heatless curling is incredibly versatile; it can be adapted for various curl intensities, from soft waves to tight ringlets, simply by adjusting the setting time and technique. It’s also incredibly cost-effective, leveraging simple household items and affordable styling products rather than expensive, specialized tools. Embrace this gentle yet powerful styling technique to maintain your hair’s vitality while still achieving the beautiful, voluminous curls you desire.
Essential Materials for Perfect Heatless Curls
Gathering the right tools is the first step towards achieving magnificent heatless curls. The beauty of this method lies in its simplicity and the accessibility of its materials. Here’s a detailed look at what you’ll need and why each item is crucial for success:
- Flexi Rods: These bendable foam rods are the stars of the show. Their flexible core allows you to easily roll and secure sections of hair, and they come in various diameters to create different curl sizes – smaller rods for tighter curls, larger ones for looser waves. For short hair, a medium to small size is generally recommended to ensure enough wraps for a good curl.
- Socks (Crew or Ankle Length): Ordinary socks play a vital, inventive role in this method. When stuffed with flexi rods, they provide an extra layer of cushioning, making the curlers more comfortable to wear, especially overnight. More importantly, they help to create a smoother, more uniform curl by distributing the hair evenly around the rod and protecting it from direct friction. Choose clean, soft socks without tight elastic bands that could leave marks on your hair.
- Sea Salt Spray: This product is key for adding texture and grip to your hair, making it easier for the curls to form and hold. Sea salt spray gives your hair a natural, ‘beachy’ feel, enhancing its ability to retain the curl shape. It also adds a subtle hold without making your hair stiff, providing a foundational texture that heatless methods thrive on.
- Setting Lotion or Mousse: A good setting lotion or mousse is indispensable for ensuring your curls last. These products provide a flexible hold that helps lock the curl pattern in place once the hair dries. They can also add shine, reduce frizz, and enhance the overall definition of your curls. Look for a lightweight formula that won’t weigh down your short hair.
- Hairbrush or Comb: Essential for detangling and smoothing your hair before and during the curling process. A smooth, tangle-free base is crucial for creating uniform curls and preventing frizz. A wide-tooth comb can be particularly helpful for distributing products evenly without causing breakage.
- Hair Clips (Optional but Recommended): Useful for sectioning your hair neatly. Clean sections lead to more consistent and defined curls.
- Spray Bottle with Water (Optional): If your hair dries too quickly, a light misting can help maintain the ideal dampness for setting curls.
Step-by-Step Directions for Gorgeous Heatless Curls
Follow these detailed steps to achieve bouncy, beautiful heatless curls on your short hair, transforming your look with ease and without heat damage.
Step 1: Prepare Your Hair and Tools
Begin with clean, slightly damp hair. Hair that is about 70-80% dry is ideal for heatless curling, as it allows the curls to set properly as it dries completely. If your hair is too wet, it will take too long to dry and might not hold the curl; if it’s too dry, the curls won’t form effectively. Spray your entire head of hair liberally with sea salt spray. Ensure even distribution, focusing from the roots to the ends. This will give your hair the necessary texture and grip, creating a solid foundation for the curls to hold. While your hair air-dries slightly, prepare your curling tools. Take your flexi rods and insert a handful (usually 2-3, depending on the sock size and desired curl quantity per sock) into each sock. Set these custom sock-flexi rod tools aside. Next, divide your hair into manageable sections. For short hair, splitting it into a top and a bottom section is a good starting point. Clip the bottom section neatly out of the way, then thoroughly brush the top part of your hair forward, ensuring it’s completely detangled and smooth.
Step 2: Rolling the Top Section
Once the top section of your hair is brushed forward and smooth, apply a generous amount of setting lotion or mousse. Work the product through the hair from root to tip, making sure it’s evenly distributed. Continue brushing the hair forward to ensure it remains smooth and gathered neatly. Now, take one of your prepared socks stuffed with flexi rods. Starting at the very ends of the brushed-forward top section of your hair, place the sock underneath and begin to roll the sock inward, towards your scalp. The key is to tuck the ends of your hair securely into the sock as you start rolling. This ensures that the ends are neatly curled and prevents awkward kinks. Roll the sock upwards, maintaining consistent tension, until it reaches your scalp. Ensure the hair is wrapped smoothly around the sock, avoiding any tangles or creases. Once at the scalp, gently twist the ends of the sock together and pinch them securely to hold the rolled hair in place. The flexi rods inside will help maintain the sock’s shape and hold your hair firmly.
Step 3: Completing the Bottom Section and Setting
With the top section securely rolled, spray a little more setting lotion or mousse over the rolled hair to enhance its hold. Now, unclip the bottom section of your hair. Repeat the exact same process you followed for the top section: brush the hair forward, apply setting lotion or mousse thoroughly, and gather it neatly. Take another sock stuffed with flexi rods and begin rolling the bottom section of hair inward, starting from the ends and tucking them securely into the sock. Roll all the way up to the scalp, maintaining even tension, then twist the sock and pinch it firmly to secure it. Depending on the thickness of your hair and the desired curl definition, you may need to create smaller sections within the bottom part, using additional sock-flexi rod tools. The goal is to ensure all your hair is neatly rolled and secured. Once all sections are rolled, give your entire head a final, light mist of setting lotion to ensure maximum hold and longevity for your curls.
Step 4: The Waiting Game and Unveiling Your Curls
This is where patience pays off. Leave the sock curlers in your hair for at least 4 hours, or ideally, overnight for the most defined and long-lasting results. The longer you leave them in, especially as your hair completely air-dries within the curlers, the better the curl memory will be. For optimal comfort during overnight wear, ensure the socks are not too tight against your scalp and consider sleeping on a silk pillowcase to minimize friction and frizz. Once the desired time has passed, it’s time for the big reveal! Slowly and gently untwist the socks and carefully remove them from your hair. Take your time with this step to avoid disturbing the newly formed curls or causing any frizz. As you remove each sock, the curls will spring into shape. Do not brush your hair immediately after removal. Instead, gently separate the curls with your fingers to achieve your desired look. If you prefer a softer, more voluminous wave, you can lightly brush through your hair with a wide-tooth comb or a soft-bristle brush, being careful not to overdo it, which could lead to frizz. Finish with a light spritz of flexible-hold hairspray for extra staying power, and perhaps a drop of hair oil on the ends for added shine and smoothness.
Pro Tips for Flawless Heatless Curls on Short Hair
Achieving salon-quality heatless curls on short hair requires a bit of practice and some insider tips. Here’s how to ensure your curls are always on point:
- Optimal Dampness is Key: Never curl soaking wet hair, as it will take too long to dry and likely won’t hold the curl. Conversely, bone-dry hair won’t absorb the curl pattern effectively. Aim for about 70-80% dry, slightly damp hair for best results.
- Sectioning Matters: Neat, even sections are fundamental for uniform curls. Irregular sections can lead to uneven curl patterns and can be harder to roll. Use clips to keep sections separated while you work.
- Product Application: Don’t skimp on the sea salt spray and setting lotion. These products are crucial for texture, hold, and frizz control. Apply them evenly from roots to ends before rolling.
- Consistent Tension: As you roll your hair around the sock and flexi rod, maintain consistent tension. This ensures the curl is tight and evenly formed from root to tip.
- Comfort for Overnight Wear: If you’re leaving the curlers in overnight, ensure they are not too tight on your scalp. Experiment with looser twists on the socks to find a comfortable balance between hold and comfort. Sleeping on a satin or silk pillowcase can also reduce friction and make sleeping with curlers more pleasant.
- Gentle Unveiling: The moment of truth requires delicacy. Slowly unwinding the socks rather than pulling them out will prevent frizz and help the curls stay intact.
- Hands-Off Styling: After removing the curlers, resist the urge to immediately brush your hair. Use your fingers to gently separate the curls for a more natural look and to maintain volume. A very light, wide-tooth comb can be used if you prefer a softer wave, but avoid aggressive brushing.
- Lock It In: A final mist of a flexible-hold hairspray can help set your curls and protect them from humidity, ensuring they last all day. For added shine and to tame any flyaways, a touch of lightweight hair oil on the ends works wonders.
By incorporating these tips into your routine, you’ll master the art of heatless curling, enjoying beautiful, healthy, and perfectly styled short hair every time.
Conclusion: Embrace the Beauty of Heatless Styling
This heatless curling method is a game-changer for anyone with short hair looking for a simple, effective, and damage-free way to achieve stunning curls. By leveraging the power of basic materials like flexi rods and socks, combined with essential styling products, you can unlock a world of voluminous, bouncy, and long-lasting hairstyles. Not only does this technique protect your hair from the harsh effects of heat, but it also offers incredible convenience, allowing you to set your style and go about your day (or night!) while your curls magically form. We highly recommend watching Loepsie’s tutorial on YouTube for a visual demonstration that complements these detailed steps. Give this method a try, and prepare to be amazed by the beautiful results and the newfound health of your short hair. Say goodbye to heat damage and hello to gorgeous, natural curls!
All images are credited to Loepsie via YouTube. Give her channel a visit and subscribe for more amazing tutorials!