
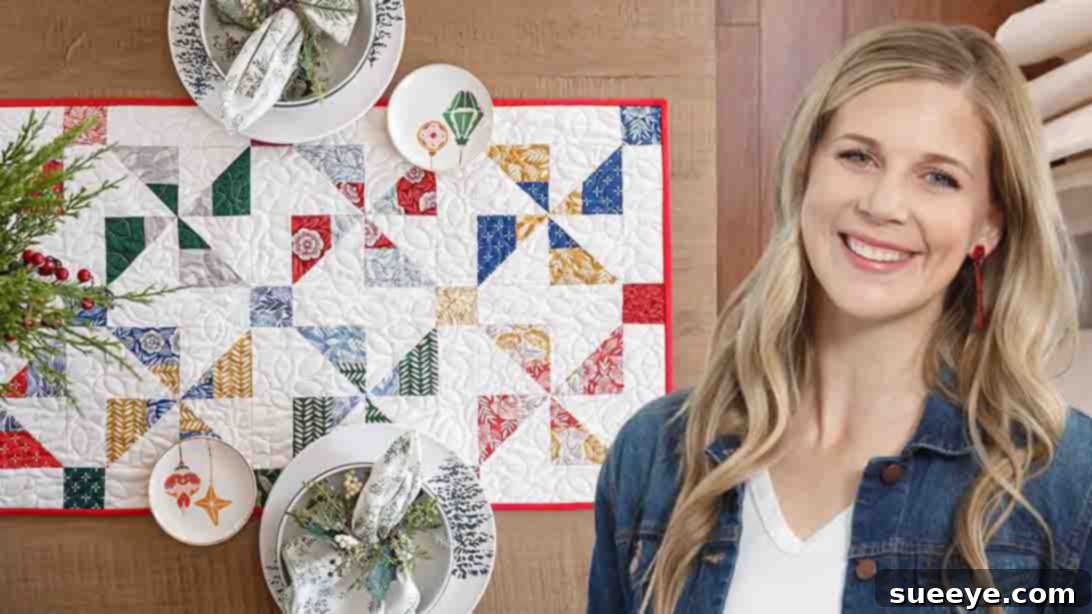
Are you searching for a delightful and manageable quilting project that delivers stunning results without overwhelming you? Look no further! This quick and easy Pinwheel Charms Table Runner from the experts at Missouri Star Quilt Company is the perfect solution. Whether you’re a seasoned quilter needing a creative palate cleanser or a beginner eager to dive into the world of fabric, this project promises satisfaction. It’s an ideal way to add a personalized touch to your home decor or craft a thoughtful, handmade gift for someone special.
Forget the daunting commitment of large quilts; this beautiful quilted table runner comes together with surprising speed and simplicity. Its captivating double pinwheel design, which might appear intricate at first glance, is remarkably straightforward to create, making it incredibly beginner-friendly. Our comprehensive guide, inspired by Missouri Star’s excellent tutorial, will walk you through every step of constructing this charming table accent. Not only is it a fantastic opportunity to hone your quilting skills, but it’s also perfect for utilizing those lovely charm packs you’ve been saving!
Charm packs, typically featuring forty-two 5-inch squares of coordinating fabrics, are a quilter’s dream for projects like this. They eliminate the need for extensive fabric cutting, allowing you to jump straight into the fun part: sewing! We believe this project will quickly become one of your go-to patterns for its elegance, ease, and adaptability. Get ready to transform your dining table, coffee table, or entryway console with a touch of handmade artistry. For a visual demonstration and additional tips, we highly recommend watching the full video tutorial from Missouri Star. You’re just a few steps away from creating a stunning centerpiece!
RELATED: Discover another fantastic project with the Scrap Buster Table Runner with Jenny Doan.
Materials Needed for Your Pinwheel Table Runner
Gathering your materials is the first exciting step in any quilting journey. For this beautiful Pinwheel Charms Table Runner, you’ll find that the supply list is straightforward, making it perfect for both new and experienced quilters alike. Here’s what you’ll need to get started:
- 1 Charm Pack (42 – 5-inch squares): These pre-cut fabric bundles are a quilter’s best friend, offering a curated selection of coordinating fabrics that simplify the design process. Choose a pack with colors and patterns that speak to your style and complement your home decor.
- 1/2 Yard Background Fabric: This fabric will provide the contrast needed to make your pinwheel blocks truly pop. Opt for a solid or subtle print that harmonizes with your charm pack selections. This will be used for the sashing and cornerstones, creating a cohesive frame for your blocks.
- 1/2 Yard Binding Fabric: The binding is the finishing touch that frames your quilt and protects its edges. Select a fabric that either matches one of the colors in your charm pack or provides a striking contrast.
- 1 3/4 Yards Backing Fabric (or Wide Back): The backing fabric is essential for the underside of your table runner. You can use a standard width fabric (typically 42-44 inches wide) and piece it together if needed, or opt for a wide back fabric (usually 108 inches wide) for a seamless finish. Choose a fabric that feels soft and complements the front design.
- Batting (Approx. 20″ x 60″): A piece of batting, slightly larger than your intended table runner size, will give your project its warmth, texture, and traditional quilted feel. Cotton, blend, or wool batting are popular choices.
- Basic Quilting Supplies: While not listed in the original, these are crucial for any quilting project:
- Sewing machine with a 1/4-inch piecing foot
- Rotary cutter, mat, and quilting rulers (especially a square-up ruler)
- Fabric scissors
- Thread (matching or neutral color)
- Iron and ironing board
- Fabric clips or pins
- Seam ripper (just in case!)
Having all these items ready before you begin will ensure a smooth and enjoyable crafting experience. Let’s get ready to transform these beautiful fabrics into a stunning table runner!
Step-by-Step Guide: Crafting Your Pinwheel Table Runner
Step 1: Creating Your Half-Square Triangle (HST) Units
This initial step focuses on crafting the fundamental units that will form your dynamic pinwheel blocks. Precision here is key for a polished final look, so take your time and enjoy the process!
- Select Your Fabric Pairs: From your charm pack, choose two 5-inch squares that offer a pleasing contrast. Consider how these colors will interact when combined; a light and a dark, or two distinct colors, often work best to highlight the pinwheel effect.
- Prepare for Sewing: Place these two selected 5-inch squares right sides together, ensuring all edges are perfectly aligned.
- Sew the First Seams: Using your sewing machine, stitch a precise 1/4-inch seam along two opposite sides of the stacked squares. Maintaining a consistent 1/4-inch seam allowance is crucial for accurate block construction.
- Cut into Strip Sets: With your two seams sewn, use your rotary cutter and ruler to cut the fabric piece exactly in half, perpendicular to the sewn seams. This will yield two “strip sets,” each still connected at the ends where you didn’t sew.
- Press and Trim: Carefully press open these strip sets. It’s generally recommended to press seams toward the darker fabric to prevent shadowing, but for this project, pressing open will help reduce bulk. Once pressed flat, trim each piece down to a precise 4 1/2-inch square. You now have two identical 4 1/2-inch units.
- Add Background Squares: Now, take your background fabric and cut several 4 1/2-inch squares from it. For each of the 4 1/2-inch units you just created, you’ll pair it with one of these new background squares.
- Mark and Sew: On the wrong side of each 4 1/2-inch background square, use a fabric marker or pencil to draw a diagonal line from one corner to the opposite corner.
- Create Half-Square Triangles (HSTs): Place a marked background square right sides together with one of your trimmed 4 1/2-inch strip sets. Ensure the edges align perfectly. Sew a 1/4-inch seam on both sides of the drawn diagonal line.
- Cut and Press HSTs: After sewing, carefully cut directly on the drawn line. This action will yield two half-square triangle (HST) units from each pair. Press these HSTs open, again pressing seams towards the darker fabric or open to reduce bulk.
- Square Up Your HSTs: To ensure your pinwheel blocks are perfect, use your square-up ruler to trim each HST unit down to exactly 4 inches. Align the 45-degree line of your ruler with the diagonal seam of the HST for precise squaring. You will need a total of 28 of these 4-inch HST units for the table runner (assuming 7 blocks per row, 2 rows, and each block uses 4 HSTs).
Step 2: Assembling Your Pinwheel Blocks and Table Runner Top
With your precisely trimmed Half-Square Triangle (HST) units ready, it’s time to bring them together to form the captivating pinwheel design and then construct the full table runner top.
- Forming the Pinwheel Block: Take four of your 4-inch HST units. Arrange them on your design wall or a flat surface to form a pinwheel pattern. Orient each HST so that the background fabric triangles are facing outwards or inwards, creating the spinning effect. The darker points of the HSTs should meet at the center to form a distinct pinwheel.
- Sewing into a Four-Patch: Once you are satisfied with your layout, sew the HSTs together into two rows of two. First, sew the two units in the top row together, then sew the two units in the bottom row together. Press the seams in opposite directions for these rows (e.g., top row seam to the left, bottom row seam to the right). This technique, known as “nesting seams,” helps the points align perfectly when you join the rows.
- Joining the Rows: Now, carefully align the two rows you just created, nesting the center seams. Sew these two rows together to complete your first Pinwheel Block. Press the final seam open or to one side. Your finished block should measure approximately 7 1/2 inches square.
- Repeat for All Blocks: Continue creating pinwheel blocks until you have enough for your table runner. For a standard size as shown in the tutorial, you will need a total of 14 pinwheel blocks (two rows of seven blocks each).
- Prepare Sashing Strips: From your background fabric, cut several 2 1/2-inch by 7 1/2-inch sashing strips. These strips will frame your pinwheel blocks and add visual separation and elegance to your design. You’ll also need 2 1/2-inch square pieces for the cornerstones.
- Assemble the First Row: Lay out your first row of seven pinwheel blocks. Begin and end this row with a 2 1/2-inch x 7 1/2-inch sashing strip. Place sashing strips in between each pinwheel block as well. Sew these units together carefully, maintaining your 1/4-inch seam allowance.
- Add Cornerstones: For the ends of the sashing strips that separate the two rows (and possibly the very ends of the runner, depending on your layout), you’ll add 2 1/2-inch square cornerstones. The tutorial implies cornerstones at “both ends of each sashing strip,” which usually means between horizontal sashing and vertical sashing, or at the ends of rows. For a simple two-row runner, these cornerstones will likely be used in a central connecting strip between the two main block rows, creating a lattice effect.
- Assemble the Second Row: Repeat the process for your second row of seven pinwheel blocks, using sashing strips as you did for the first row.
- Join the Rows: Once both rows are assembled, sew them together. If you’ve incorporated a central sashing strip with cornerstones, this will be the joining point. Ensure all seams align beautifully. Press the entire table runner top thoroughly and evenly. Your table runner top is now complete and ready for the next stages of quilting!
Bringing Your Quilted Table Runner to Life: Quilting and Binding
Once your table runner top is pieced together, the next crucial steps involve layering, quilting, and binding – processes that transform your fabric masterpiece into a durable, textured, and truly finished piece.
Quilting Your Table Runner
Quilting is what gives your table runner its characteristic texture, strength, and drape. It involves stitching through all three layers: the top, the batting, and the backing.
- Prepare the Quilt Sandwich:
- Backing: Lay your backing fabric right side down on a clean, flat surface (like a large table or the floor), smoothing out any wrinkles. Secure it with painter’s tape to keep it taut.
- Batting: Place your batting layer smoothly on top of the backing. Ensure it is centered and free of wrinkles or creases.
- Quilt Top: Finally, place your pieced table runner top right side up on top of the batting, centering it carefully.
- Basting: This step secures the three layers together, preventing shifting during quilting. You can use:
- Safety Pins: Use curved safety pins, placed every few inches across the entire surface.
- Basting Spray: A temporary adhesive spray specifically designed for quilting, offering a quick and even hold.
- Long Stitches: Hand-basting with long, running stitches can also be effective.
Whichever method you choose, ensure all layers are smooth and free of puckers.
- Choose Your Quilting Design:
- Straight Line Quilting: A simple yet elegant choice, using your walking foot to sew straight lines, either parallel to the seams or diagonally across the blocks. This is very beginner-friendly.
- Stipple Quilting: A free-motion quilting design where you create a continuous, meandering line that doesn’t cross itself. It adds texture and softness.
- “Quilt in the Ditch”: Stitching directly into the seams of your pieced blocks, which helps to define the individual elements of your design.
For a table runner, consider a design that complements the pinwheel pattern without overpowering it.
- Quilt Your Runner: Using your sewing machine (with a walking foot for straight lines, or a free-motion quilting foot for free-motion designs), carefully stitch your chosen pattern across the entire quilt sandwich. Start from the center and work your way outwards to prevent fabric distortion.
Attaching the Binding
Binding provides a neat, durable edge for your table runner, giving it a professional finish.
- Prepare Binding Strips: From your 1/2 yard of binding fabric, cut several 2 1/2-inch wide strips. For a table runner, you’ll typically need to join these strips end-to-end to create one continuous strip long enough to go around the entire perimeter of your runner, plus an extra 10-12 inches for joining.
- Attach Binding to Front: With right sides together, align the raw edge of your binding strip with the raw edge of your table runner. Start about 10-12 inches from one corner. Sew the binding to the runner with a 1/4-inch seam, mitering the corners (stopping 1/4 inch from the corner, pivoting, and restarting).
- Join Binding Ends: When you’ve almost gone all the way around, stop a few inches before your starting point. Trim the binding ends and join them with a diagonal seam so that the binding forms a perfect loop. Finish sewing the binding to the runner.
- Fold and Finish: Fold the binding over to the back of the table runner, encasing the raw edges. You can hand-stitch the binding in place for an invisible finish or machine-stitch it for speed and durability. Ensure your corners are neatly mitered on the back as well.
Personalizing and Caring for Your Handmade Table Runner
Tips for Personalization and Variations
One of the joys of quilting is the ability to customize your creations. Here are some ideas to make your Pinwheel Charms Table Runner uniquely yours:
- Color Palette: Experiment with different color combinations. Use bright, cheerful fabrics for a spring runner, warm tones for autumn, or festive prints for holidays. A monochromatic scheme can create a sophisticated look, while a rainbow of colors brings playful energy.
- Size Adjustments: Easily adapt the size of your table runner. Make it longer or shorter by adding or removing pinwheel blocks and adjusting the length of your sashing strips. You could even create placemats or a larger quilt by expanding the block count!
- Fabric Choice: While charm packs are convenient, you can also cut your own 5-inch squares from your fabric stash, allowing for even greater control over the design. Consider mixing fabric textures for added interest.
- Quilting Designs: Don’t shy away from trying more complex quilting designs if you’re feeling adventurous. Custom free-motion quilting can add incredible texture and artistry.
Caring for Your Quilted Table Runner
To ensure your beautiful handmade table runner lasts for years to come, proper care is essential:
- Washing: For the first wash, consider a color catcher to prevent any dye bleeding. Wash on a gentle cycle with cold water and a mild detergent. Avoid harsh chemicals or bleach.
- Drying: Tumble dry on low heat or, ideally, lay flat to dry to prevent shrinking and maintain the shape. Remove promptly from the dryer to minimize wrinkles.
- Ironing: If needed, iron on a medium setting, using steam sparingly. Always iron on the back to protect the top fabric and quilting stitches.
- Storage: Store your table runner flat or rolled to prevent creases. If folding, refold periodically along different lines to avoid permanent creases.
Conclusion: Your Beautiful Pinwheel Table Runner Awaits!
Creating this Pinwheel Charms Table Runner is a truly rewarding experience. From selecting your favorite charm pack to seeing the intricate pinwheel pattern emerge, each step is designed to be enjoyable and achievable. This project not only allows you to craft a stunning piece of home decor but also helps you build essential quilting skills.
Whether displayed on your dining table, a console, or gifted to a loved one, your handmade table runner will be a testament to your creativity and craftsmanship. We encourage you to try this project and discover the joy of quilting. Don’t forget to visit the Missouri Star Quilt Company YouTube channel for the original video tutorial, which provides excellent visual guidance.
Happy quilting, and we can’t wait to see your beautiful creations!