
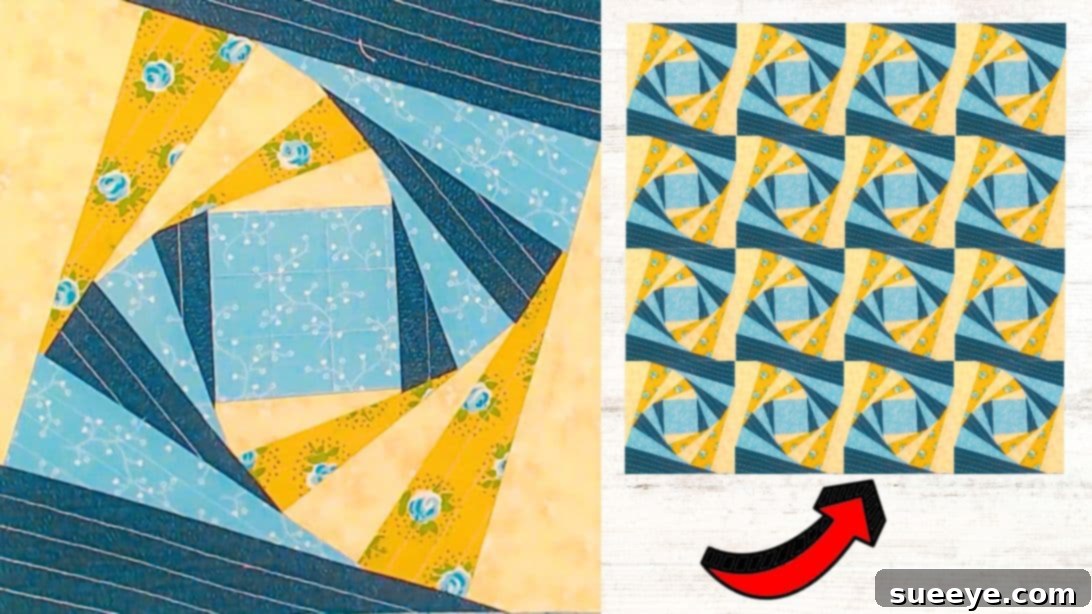
Master the Twisted Log Cabin Quilt Block: A Step-by-Step Guide for Stunning Quilts
The timeless charm of a traditional log cabin quilt block is undeniable, but what if you could add an intriguing dynamic twist? Introducing the Twisted Log Cabin Quilt Block – a captivating variation that creates a mesmerizing optical illusion, making your quilting projects truly stand out. This unique design, brilliantly showcased by Julie A. Bolduc on YouTube, transforms simple fabric strips into a block that seems to shift and move before your very eyes. It’s a surprisingly straightforward technique that yields incredibly sophisticated results, making it an ideal challenge for beginner quilters eager to expand their skills, as well as seasoned crafters looking for a fresh take on a classic. Get ready to embark on a fun and rewarding quilting journey as we guide you through each step of creating this fascinating quilt block. By the end, you’ll not only have a beautiful block but also a deeper understanding of precision piecing and visual design.
Why the Twisted Log Cabin Stands Out
The traditional log cabin quilt block is celebrated for its simplicity, allowing quilters to explore endless color combinations and create striking patterns when multiple blocks are joined. The “twisted” version takes this a step further by introducing an asymmetry in the strip placement, which tricks the eye into perceiving movement or depth. This clever adaptation gives your quilt a modern edge while retaining the cozy, comforting feel of its traditional counterpart. It’s a fantastic way to experiment with value (light vs. dark fabrics) and print scale, as the interplay of these elements greatly enhances the illusion. Whether you’re planning a full quilt, a unique wall hanging, or a set of decorative placemats, the Twisted Log Cabin offers versatility and visual appeal that will impress.
Essential Materials for Your Twisted Log Cabin Project
Before diving into the piecing process, gathering the right tools and materials is crucial for a smooth and enjoyable quilting experience. Precision is paramount in quilting, especially when working with designs that rely on optical illusions, so investing in good quality supplies will make a significant difference in your final product.
- Fabric: You’ll need at least 8 different colors and prints. The magic of the twisted log cabin often comes from the contrast and careful placement of these fabrics. Consider a mix of light, medium, and dark values, or experiment with a vibrant gradient. High-quality quilting cotton is recommended for its ease of cutting, sewing, and durability. Always refer to your pattern for specific yardage requirements for each color.
- Batting Fabric: This is the middle layer of your quilt sandwich, providing warmth, loft, and that characteristic quilted texture. Options include cotton, polyester, wool, or blends, each offering different qualities. For a block tutorial, batting is usually needed if you plan to quilt the block individually before assembling into a larger piece, or if you’re making a small finished item like a potholder.
- Cotton Sewing Thread: Choose a strong, fine-gauge 100% cotton thread that matches your dominant fabric colors or a neutral shade (like light grey or beige) that blends well. High-quality thread prevents breakage and ensures durable seams.
- Needle: A sharp universal or quilting machine needle (size 80/12 or 90/14) is ideal for piercing multiple layers of fabric smoothly. Replace your needle frequently for optimal results.
- Washable Liquid Glue & Glue Stick: These are fantastic tools for temporarily holding fabric pieces in place, especially small ones or those that need precise alignment, reducing the need for excessive pinning. Ensure they are specifically labeled as “washable” for quilting.
- Marking Pen, Pencil, or Chalk: Essential for transferring pattern lines, drawing quilting designs, or marking cutting guides. Ensure your chosen marker is washable or erasable and visible on your fabrics.
- Scissors or Rotary Cutter and a Cutting Mat: While sharp fabric scissors are always useful, a rotary cutter with a self-healing cutting mat is invaluable for fast, accurate, and consistent cutting of fabric strips, which is fundamental for log cabin blocks.
- Ruler: A clear acrylic quilting ruler with precise measurements is indispensable for accurate cutting and trimming. A good 6″x24″ or 6″x12″ ruler is a great starting point.
- Iron & Ironing Board: Crucial for pressing seams flat. Pressing (lifting and placing the iron) rather than ironing (gliding the iron) prevents stretching and distortion of your fabric. This step is key to achieving flat, accurate blocks.
- Sewing Machine: Any basic sewing machine capable of a straight stitch will work perfectly. Ensure it’s clean, oiled, and in good working order.
- Pattern: This is your blueprint! You can download the specific pattern here for the Twisted Log Cabin Quilt Block. It provides all the necessary measurements and diagrams for cutting and assembly.
Step-by-Step Directions to Create Your Twisted Log Cabin Block
Now that you have all your materials ready, let’s bring this captivating quilt block to life! Remember, patience and precision are your best friends in quilting. For a visual guide to complement these instructions, be sure to watch Julie A. Bolduc’s helpful video tutorial on YouTube.
Step 1: Preparation and the Center Square
Begin by downloading and printing the pattern for the Twisted Log Cabin Quilt Block. This pattern is your essential guide, providing specific dimensions for each fabric piece required. Once you have the pattern, it’s time to select your fabrics. For the ‘twisted’ effect to be most pronounced, think about how your 8 different colors and prints will interact. You might choose to arrange them from lightest to darkest, or alternate warm and cool tones, or even play with contrasting patterns like solids and florals.
Carefully cut all your fabric pieces according to the sizes specified in the pattern. Accuracy here is vital, as even slight variations can throw off the alignment of your finished block. Use your rotary cutter and ruler on a cutting mat for the cleanest, most precise cuts. Once cut, lay out your fabric strips and the center square exactly as instructed in the pattern diagram. This preliminary layout helps you visualize the finished block and ensures that the ‘twist’ effect will materialize correctly. It’s often helpful to take a photo of your layout before you start sewing to use as a reference. Now, focus on the central square. If the pattern calls for a pieced center (e.g., two half-square triangles), sew those pieces together with a consistent 1/4-inch seam allowance. Then, attach the very first small strip to one side of this center square, right sides together. Sew with a consistent 1/4-inch seam, and press the seam open or to one side as per your preference (or the pattern’s recommendation). Trim off any excess fabric around the edges to maintain a perfectly square starting unit.
Step 2: Building the Twist with Sequential Strip Addition
With your central unit established, you’ll now begin the classic log cabin construction method, but with the specific “twisted” sequence. This involves adding strips sequentially around the growing center, always rotating the block to add a strip to an adjacent side. The key to the ‘twist’ lies in the order and length of these strips as dictated by your pattern.
Start by stitching the smallest outer strips to the centerpiece. For a traditional log cabin, strips are added in a clockwise or counter-clockwise fashion. The twisted version often alters the length and placement of these “logs” to create its unique visual effect. Always place the new strip right sides together with the edge of your growing block. Stitch carefully with a consistent 1/4-inch seam allowance. After each strip is sewn, take it to your ironing board. Press the newly sewn seam flatly. This step is critical for a crisp, professional finish and for ensuring your block lays flat. You may press seams open or to one side, but be consistent throughout your block. Once pressed, you might need to trim off any excess batting or fabric around the edges, especially if your pattern calls for squaring up at intermediate steps. This helps maintain the block’s intended dimensions and prevents bulk.
Continue this process, adding the next strips one by one. Each new strip will be sewn to the exposed edge of the previous round. Always make sure to line up the raw edges precisely before stitching. Use your washable glue stick or liquid glue for tricky alignments if needed. After stitching each strip, press it flat and trim any excess. Repeat these steps, working your way outwards, adding each piece according to the pattern’s diagram. The optical illusion will gradually emerge as you build up the layers of logs. Maintain your 1/4-inch seam allowance rigorously, as this consistency is fundamental to the block’s final appearance and overall squareness.
Step 3: The Final Touch and Perfecting Your Block
Once you have stitched every piece together as directed by the pattern, your Twisted Log Cabin Quilt Block is complete! The final step involves a thorough pressing and squaring up. Take your finished block to the ironing board and give it a good press, ensuring all seams are flat and the block lies perfectly smooth. Then, using your quilting ruler and rotary cutter, carefully square up your block to the pattern’s specified final dimensions. This trimming ensures all sides are straight and all corners are at perfect 90-degree angles, which is critical for joining multiple blocks together seamlessly into a larger quilt.
Step back and admire your handiwork. You’ll notice the captivating optical illusion that makes this block so special. The arrangement of the fabric strips creates a visual depth and movement that is truly engaging. This attention to detail in cutting, stitching, and pressing is what elevates a good quilt block to a great one.
Congratulations on completing your Twisted Log Cabin Quilt Block! This project is not just about making a beautiful piece; it’s about mastering precision, understanding fabric dynamics, and enjoying the creative process of quilting. You’ve now added a unique and visually striking block to your quilting repertoire.
Tips for Success and Creative Variations
To ensure your Twisted Log Cabin blocks are consistently stunning, consider these expert tips:
- Consistent Seam Allowance: A perfect 1/4-inch seam allowance throughout is non-negotiable for accurate piecing. Use a quarter-inch foot on your sewing machine if available.
- Pressing is Key: Always press after each seam. This helps the block lie flat and accurately, making subsequent steps easier and more precise.
- Fabric Selection: The “twist” effect is enhanced by strong contrast between adjacent strips. Experiment with combining solids and prints, or varying light, medium, and dark values.
- Chain Piecing: If you’re making multiple blocks, consider chain piecing to save time. This involves sewing all similar seams consecutively without cutting the thread between units, then snipping them apart later.
- Squaring Up: Don’t skip squaring up your block at the end. This ensures all blocks are the same size and will fit together perfectly when assembling your quilt top.
- Experiment with Scale: Once you’ve mastered the standard size, try scaling the pattern up or down to create different sized blocks for various projects.
- Explore Color Palettes: Don’t limit yourself to traditional color schemes. Try a monochromatic palette for a subtle twist, or a rainbow spectrum for a vibrant, energetic look.
Final Thoughts on Your Twisted Log Cabin Journey
Creating a Twisted Log Cabin Quilt Block is a truly satisfying experience. The combination of classic quilting techniques with an innovative visual trick results in a block that’s both challenging and incredibly rewarding. We hope this detailed guide, inspired by Julie A. Bolduc’s excellent tutorial, empowers you to confidently tackle this project and fall in love with the art of quilting even more.
If you enjoyed making this quilt block, we highly recommend exploring Julie A. Bolduc’s YouTube channel for more inspiring video tutorials and creative quilting ideas. Her clear instructions and innovative designs are a fantastic resource for quilters of all levels. Happy quilting!
*Many thanks to Julie A. Bolduc via YouTube for all the images and inspiration used in this guide. If you love this quilt project, then you’ll surely love her other video tutorials too, so give her channel a visit and subscribe!