
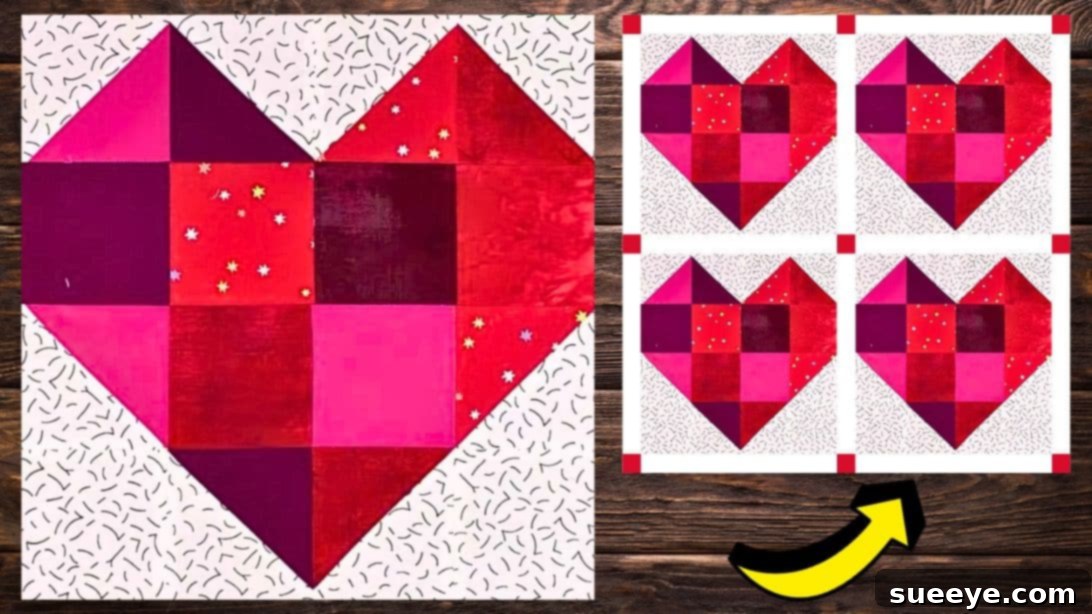
How to Make a Beautiful & Easy Patchwork Heart Quilt Block
Are you searching for a delightful and straightforward quilt block pattern that can be completed in no time? Look no further! This comprehensive guide will walk you through creating an adorable patchwork heart quilt block, inspired by the fantastic video tutorial from Carol Thelen on YouTube. This charming design is perfect for quilters of all skill levels, especially beginners, and offers a wonderful opportunity to use up your treasured fabric scraps. Imagine creating multiple versions in an array of captivating color combinations, adding a personal touch to every stitch. To master this lovely project, continue reading the detailed instructions below, and be sure to watch Carol’s video for a visual walkthrough. The steps are incredibly simple to follow, ensuring you’ll achieve a perfect finish on your very first attempt. Let’s get sewing and enjoy the creative process!
Why the Patchwork Heart Quilt Block is a Must-Try
The patchwork heart quilt block holds a special place in the quilting world. Its universal symbol of love and warmth makes it an ideal choice for gifting, decorating, or simply adding a touch of affection to your home. This particular design is celebrated for its simplicity and the impressive visual impact it creates. Whether you’re crafting a full-sized quilt, a cozy throw, a decorative cushion cover, or a unique wall hanging, these heart blocks will infuse your project with character and charm.
- Beginner-Friendly: With its simple construction, this block is an excellent entry point for new quilters to learn essential techniques like half-square triangles (HSTs) and precise piecing.
- Scrap-Busting Power: Got a collection of leftover fabric scraps? This project is your perfect solution! It encourages creative use of varied prints and colors, reducing waste and giving new life to forgotten textiles.
- Versatile Design: The heart motif can be adapted to any season or occasion. Use vibrant reds and pinks for Valentine’s Day, pastels for a baby quilt, or autumnal tones for a cozy fall theme.
- Quick to Assemble: Designed for speed, you’ll be amazed at how quickly you can piece together several blocks, making it ideal for creating larger projects without feeling overwhelmed.
Embrace the joy of crafting something beautiful with your own hands. The satisfaction of seeing your fabric pieces transform into a lovely heart design is truly rewarding.
Essential Materials for Your Patchwork Heart Quilt Block
Before diving into the exciting world of piecing, gather all your necessary supplies. Having everything ready ensures a smooth and enjoyable crafting experience. Here’s a detailed list of what you’ll need:
- Background Fabric: Choose a solid or subtle print fabric that will make your heart design truly pop. Light colors often work best to highlight the intricate patchwork of the heart itself. Consider a good quality quilting cotton for durability and ease of handling.
- Assorted Print Fabric: This is where your creativity shines! Select a variety of print fabrics for the heart shape. These can be coordinated colors, contrasting patterns, or a delightful mix from your scrap bin. Aim for fabrics that complement each other but also provide enough contrast to define the heart’s shape.
- Marking Pen, Pencil, or Chalk: Essential for transferring pattern lines onto your fabric. Ensure your chosen marker is easily visible on your fabric colors and, ideally, washable or erasable.
- Ruler: A clear acrylic quilting ruler with precise measurements is indispensable for accurate cutting and squaring up your blocks. Look for one with clear grid lines.
- Scissors or Rotary Cutter and a Cutting Mat: For precise and efficient fabric cutting. A rotary cutter paired with a self-healing cutting mat is highly recommended for speed and accuracy, especially when cutting multiple layers or long strips. Sharp scissors are great for smaller adjustments.
- Needle and Thread: High-quality cotton thread that matches your fabric or is a neutral color (like white or light grey) will blend seamlessly. Ensure your needle is sharp and suitable for quilting cotton.
- Iron, for pressing: A well-heated iron is crucial for setting seams, flattening fabric, and achieving crisp, professional-looking blocks. Pressing as you go makes a significant difference in the final outcome of your quilt.
- Sewing Machine: A reliable sewing machine with a straight stitch capability is key. Make sure it’s in good working order and has a fresh needle.
- Pattern: (Click here to download the complimentary pattern) Downloading and printing this pattern will provide you with the exact measurements and templates needed for accurate cutting and assembly.
Gathering these tools beforehand will help you focus entirely on the creative process, making your quilting journey much more enjoyable and productive.
Step-by-Step Guide: Crafting Your Patchwork Heart Quilt Block
Now that you have all your materials ready, let’s begin the exciting process of bringing your patchwork heart to life. Precision is key in quilting, so take your time with each step, especially with cutting and pressing. Remember to refer to the visual aid provided by Carol Thelen’s video and the downloadable pattern as you work.
Step 1: Prepare Your Fabric and Cut Pattern Pieces
Begin by downloading and printing the provided pattern. Carefully cut out all the fabric pieces according to the pattern’s specifications. Accuracy here is paramount, as it directly impacts how well your pieces fit together. For this design, you’ll be creating half-square triangles (HSTs). Lay out one background fabric square and one print fabric square with their right sides facing each other. Ensure all edges are perfectly lined up. Using your marking pen or pencil, draw a diagonal line from one corner to the opposite corner on the wrong side of the lighter fabric.
Step 2: Stitching Your Half-Square Triangles (HSTs)
With the right sides still together, sew a seam a quarter-inch away from both sides of the diagonal line you just drew. This technique allows you to create two HSTs from one set of squares. Once sewn, cut along the diagonal line, separating the two stitched units. Open each unit, and you’ll have two half-square triangles. Press the seams open carefully. Pressing seams open helps to reduce bulk, creating a flatter and more precise block. Trim off any “nubs” or dog ears that extend beyond the square, squaring up your HSTs to the measurement specified in the pattern. Repeat this process for all your half-square triangle pieces until you have the required number for your block.
Step 3: Arranging Your Quilt Block Layout
Once all your HSTs are complete and squared up, it’s time for the exciting visual stage! Lay out all your finished half-square triangles and any solid squares you might have (as per the pattern) onto your design wall or a flat surface. Refer closely to the diagram in Carol Thelen’s pattern to guide your arrangement. This step is crucial for visualizing the heart shape and ensuring all components are in their correct positions. Feel free to swap the print squares around until you are completely satisfied with the overall appearance and color balance of your heart block. Take your time to experiment with different placements; this is where your artistic vision truly comes into play.
Step 4: Stitching the Rows Together
After finalizing your layout, begin stitching the pieces together, working row by row. Start with the top row, then the second, and so on. For each row, sew the individual squares or HSTs together using a consistent quarter-inch seam allowance. As you complete each seam, immediately press it open. This consistent pressing not only flattens your work but also helps to ensure your rows will align perfectly when you join them. Pressing prevents bulk and contributes to a professional, smooth finish. Continue this process until all the pieces within each row are securely sewn.
Step 5: Joining the Rows to Form the Block
With all your rows now individually pieced and pressed, it’s time to join them to form the complete patchwork heart block. Carefully align the first row with the second, making sure your seams match up precisely. Pin generously, especially at the seam intersections, to prevent any shifting. Stitch the rows together with your quarter-inch seam allowance. Again, press the newly formed seam open. Continue adding the remaining rows one by one, pressing each seam open after stitching. Once all rows are joined, give your finished block one final, good press. Step back and admire your beautiful, handmade patchwork heart quilt block!
Expert Tips for a Flawless Patchwork Heart Quilt Block
Achieving a professional-looking quilt block is all about attention to detail. Here are some invaluable tips to enhance your quilting experience and ensure stunning results:
- Consistent Seam Allowance: A perfect quarter-inch seam allowance is the cornerstone of accurate piecing. Use a quilting foot or mark your machine bed to ensure consistency. Even a slight variation can cause blocks to misalign.
- Pressing Matters: Don’t underestimate the power of proper pressing. Pressing seams open (as recommended for this pattern) helps distribute bulk evenly and creates flat, sharp blocks. Always press, don’t iron (which can stretch fabric).
- Starch Your Fabric: Applying a light starch or fabric sizing before cutting can make your fabric stiffer and easier to handle, reducing fraying and stretching. This leads to more precise cuts and stitches.
- Chain Piecing: For efficiency, especially when making multiple HSTs, try chain piecing. Sew multiple units one after another without lifting the presser foot or cutting the thread in between. This saves time and thread.
- Check Alignment Frequently: Before sewing rows or blocks together, take a moment to double-check their alignment. Pinning at seam intersections can help ensure points meet perfectly.
- Trim Accurately: Use a good quality ruler and rotary cutter to trim your HSTs and squares to the exact specified size. A square-up ruler can be very helpful here.
- Take Your Time: Quilting is a journey, not a race. Enjoy the process, and don’t rush. Small mistakes are part of learning, but patience prevents many of them.
Unleash Your Creativity: Variations and Design Ideas
While the basic patchwork heart block is charming on its own, there are endless ways to personalize it and make it uniquely yours:
- Color Play: Experiment with different color palettes. Create a gradient heart using shades of a single color, or a rainbow heart with a variety of bright hues. A monochromatic theme can offer a sophisticated look, while contrasting colors can make the heart pop vibrantly.
- Fabric Choices: Don’t limit yourself to traditional quilting cottons. Explore batiks for a textured look, flannel for a cozy feel, or even upcycled denim for a rustic touch (though be mindful of fabric weight differences).
- Block Arrangement: Once you have several heart blocks, think about how you’ll arrange them. You could alternate them with solid background blocks, create a checkerboard pattern, or set them on point for a dynamic layout.
- Beyond the Quilt: These versatile heart blocks aren’t just for quilts! They can be incorporated into a variety of projects:
- Cushion Covers: A single heart block makes a lovely decorative pillow.
- Tote Bags: Add a heartfelt touch to a handmade tote.
- Table Runners or Placemats: Perfect for adding a warm accent to your dining area.
- Wall Hangings: Frame a series of heart blocks for charming wall art.
- Appliqué Embellishments: Use a smaller version of the block as an appliqué on clothing or other fabric items.
Let your imagination guide you. Each heart you create will carry a piece of your unique style and passion for quilting.
Your Beautiful Patchwork Heart Quilt Block Awaits!
Congratulations on embarking on this delightful quilting adventure! The patchwork heart quilt block is a timeless design that offers both simplicity and profound satisfaction. Whether you’re a seasoned quilter or just starting your journey, this project provides a wonderful opportunity to hone your skills, experiment with fabrics, and create something truly special. We hope these detailed instructions, combined with Carol Thelen’s excellent video tutorial, have empowered you to confidently create your own beautiful heart blocks.
A special thank you to Carol Thelen via YouTube for providing the inspiration and all the wonderful images used in this tutorial. Her clear instructions make quilting accessible and enjoyable for everyone. If you enjoyed this quilt project idea, we highly recommend visiting her channel and subscribing for more fantastic quilting insights and creative inspiration. Happy quilting!