
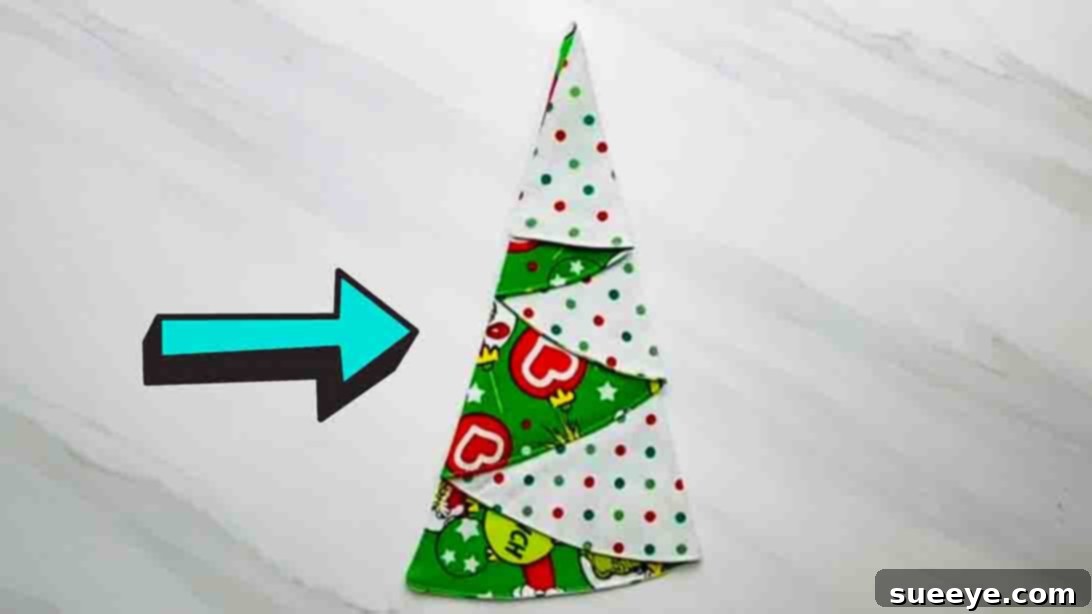
Create Stunning DIY Reusable Christmas Tree Fabric Napkins for Your Holiday Table
The festive season is synonymous with heartwarming gatherings, delicious meals, and beautifully decorated homes. Central to any memorable holiday dinner is a thoughtfully set table, and what better way to add a touch of personal charm and sustainable elegance than with a set of gorgeous, handmade table napkins? If you’re looking to infuse your holiday celebrations with a unique, DIY spirit, this delightful project to create reusable Christmas tree fabric napkins, inspired by the creative minds at Aloha Sewing Company, is absolutely perfect for you.
Imagine your holiday table adorned with these charming, festive napkins, shaped like miniature Christmas trees. Not only do they add an irresistible visual appeal, but they also embody a commitment to sustainability, allowing you to reduce waste from disposable options. The best part? These durable fabric napkins can be brought out and enjoyed year after year, becoming a cherished part of your family’s holiday traditions.
RELATED: How To Sew A Reversible Christmas Tree Napkin
This project is designed to be super quick and easy, making it an ideal choice for sewing beginners. Even if you’ve never touched a sewing machine before, our detailed guide, building upon Aloha Sewing Company’s clear instructions, will walk you through every step. So, gather your materials, embrace your inner crafter, and get ready to create something truly special for your home. Let’s transform simple fabric into beautiful, reusable holiday decor!
Why Choose DIY Reusable Fabric Napkins for Your Holidays?
Beyond their undeniable charm, crafting your own reusable fabric napkins offers a multitude of benefits that align with both aesthetic appeal and responsible living:
Embrace Sustainability and Eco-Friendliness
In an age where environmental consciousness is paramount, opting for reusable fabric napkins is a simple yet impactful way to reduce your ecological footprint. Each fabric napkin you sew means one less paper napkin ending up in a landfill. This small change contributes to a greener holiday season, demonstrating your commitment to sustainable practices while still enjoying festive luxury.
Cost-Effectiveness in the Long Run
While there’s an initial investment in fabric and sewing supplies, reusable napkins prove to be far more economical over time. Instead of repeatedly purchasing disposable napkins for every gathering, your handmade fabric creations will serve you for countless seasons, saving you money that can be allocated to other holiday delights.
Unleash Your Creativity and Personal Style
One of the greatest joys of DIY projects is the ability to infuse your personal style into every creation. With this project, you’re not limited to store-bought designs. You can select fabrics that perfectly match your existing holiday decor, choose patterns that reflect your unique taste, or even create a different set for each festive occasion. These napkins aren’t just functional; they’re an extension of your creative expression.
Thoughtful and Unique Handmade Gifts
Looking for a heartfelt gift that stands out? A set of handmade Christmas tree fabric napkins makes an exceptional present for hosts, friends, or family members. It’s a gift that speaks volumes of your effort and care, offering both beauty and utility that will be appreciated for years to come. Customize them with specific colors or patterns to make them even more special.
Essential Materials and Tools for Your Napkin Project
Before diving into the sewing process, ensure you have all your materials ready. Having everything organized will make the crafting experience much smoother and more enjoyable. Here’s what you’ll need to create your delightful Christmas tree napkins:
- Sewing Pattern: For precise cutting and shaping, a dedicated pattern is indispensable. You can find the exact pattern used in this tutorial by clicking here. This ensures your napkins achieve the perfect Christmas tree silhouette.
- Christmas-Themed Fabrics: Select two complementary fabrics that embody the holiday spirit. Cotton is an excellent choice for napkins due to its absorbency, durability, and ease of sewing. Look for festive prints like holly, snowflakes, reindeer, or classic plaids in reds, greens, and golds. You’ll need enough fabric to cut the required half-circle pieces according to your pattern.
- Sharp Fabric Scissors: A good pair of fabric scissors is crucial for clean, precise cuts. Avoid using these scissors for paper or other materials, as it will dull the blades and make cutting fabric difficult.
- Pins or Fabric Clips: These are essential for holding your fabric pieces securely together before and during sewing, preventing shifting and ensuring accurate seams. Clips are particularly useful for thicker fabrics or for avoiding pinholes in delicate materials.
- Fabric Marking Pen or Chalk: You’ll need a tool that can make clear, temporary marks on your fabric for drawing guidelines and transfering pattern markings. A disappearing fabric pen or tailor’s chalk works wonderfully.
- Matching All-Purpose Thread: Choose a high-quality polyester all-purpose thread that either matches your fabric color perfectly or provides a subtle contrast, depending on your desired aesthetic.
- Sewing Machine: While not explicitly listed in the original, a sewing machine will make this project quick and enjoyable. Ensure your machine is threaded correctly and functioning smoothly.
- Iron and Ironing Board: Pressing is a critical step in sewing, especially for achieving crisp edges and professional-looking finishes. Have your iron and ironing board ready for frequent use.
Step-by-Step Guide: Crafting Your Festive Christmas Tree Napkin
Now that you have all your materials, let’s dive into the sewing process. Follow these detailed instructions to bring your reusable Christmas tree fabric napkins to life.
Step 1: Preparing and Assembling the Napkin Base
Begin by carefully cutting out two half-circle fabric pieces using your chosen pattern. Precision in cutting will lead to a more professional finish. Once cut, take your two fabric pieces and place them together with their “right sides” facing each other. The right sides are the patterned or finished sides of your fabric that will be visible when the napkin is complete.
Align the edges meticulously and secure them in place using your pins or fabric clips. Place them every few inches along the curved edge to prevent any shifting while sewing. Now, using your sewing machine, stitch all the way around the curved edge of the half-circle. Maintain a consistent 1/4-inch seam allowance throughout your stitching. This small, precise seam allowance is key to the final shape and size of your napkin. As you sew, remember to leave a two to three-inch gap unstitched at the very bottom of the straight edge of the half-circle. This opening is crucial for turning your fabric right side out later.
After you’ve finished sewing the seam, carefully trim the excess fabric around the curved seam allowance, especially at the two corners where the curve meets the straight edge. Clipping these corners (cutting diagonally across the corner, close to the stitching but without cutting through it) and making small notches along the curved edge will help the fabric lie flat and prevent bulk once turned. This ensures a smooth, crisp curve for your napkin. Now, reach through the unstitched gap and gently flip the entire fabric piece right side out. Take your time with this step, pushing out all the seams and curves so they are fully extended. Use a point turner or a blunt tool (like a chopstick) to gently push out the corners and curves from the inside, ensuring they are as crisp as possible.
Once turned, take the raw edges of the fabric within the gap and fold them inward, aligning them with the sewn seam. Iron this entire edge flat, ensuring that the folded-in edges of the gap are perfectly flushed and create a neat, continuous line with the rest of the seam. This pressing step is essential for a professional finish and will make closing the gap much easier later.
Next, it’s time to mark the guide for your first fold. Find the 5-inch mark from the left side of the straight edge of your half-circle (the side opposite the curved seam). Use your fabric marking pen or chalk to mark this point. From this 5-inch mark, draw a straight line perpendicular to the straight edge, extending towards the curve. This line will serve as your first reference point for folding and stitching.
Now, carefully fold the fabric along the line you just drew, creating a temporary crease. Open it back up. Starting at this newly formed fold line, begin stitching around the entire half-circle, close to the edge (an eighth of an inch is usually sufficient for a topstitch). When your stitching reaches the point where you started the topstitch along the fold line, continue stitching all the way along the straight line you drew earlier. This stitch line will secure the initial fold and prepare the napkin for its distinctive Christmas tree shape.
Step 2: Shaping the Iconic Christmas Tree Napkin
With the initial stitching complete, the next steps focus on folding and pressing to create the recognizable Christmas tree shape. This part requires patience and precise ironing to achieve crisp, defined lines.
First, take your stitched fabric and fold it firmly along the stitch line you just made in the previous step. Iron this fold flat with a hot iron, pressing firmly to create a sharp, lasting crease. This crease will be one of the foundational elements of your tree shape.
Next, identify the top left corner of the folded fabric. Bring this corner down towards the center, creating an angled fold. The key here is to ensure that the portion you’ve folded down is equivalent in length or proportion to the fabric that remains “hanging off” below it. This balance is important for the symmetry of your Christmas tree. Once you’re satisfied with the alignment, press this fold firmly with your iron to set the crease smoothly.
Following this, take the “hanging part” – the fabric that extends below your last fold – and fold it inward, right on top of the previously folded section. This creates another layer and further defines the tree’s silhouette. Again, use your iron to press this new fold, ensuring it is flat and the crease is sharp. Repeated pressing at each stage is crucial for achieving a professional, well-defined final product.
Once this fold is pressed, carefully flip the entire fabric piece over to the other side. You will now see the reverse side of your developing Christmas tree. Feel for the edge or fold line of the fabric underneath. Based on this, make another fold, pressing it down to create a crisp crease. This fold helps to further shape the base or trunk area of the tree. Iron it thoroughly to ensure the crease is well-established.
Finally, flip the fabric over once more. You should now have one remaining part of the fabric that needs to be folded. Take this final section and fold it back, completing the layering and shaping process for your Christmas tree napkin. Iron this last fold extremely well, applying good pressure and heat. This final press is vital for making sure all the creases stay firmly in place, giving your Christmas tree napkin its finished, structured appearance. Take a step back and admire your beautifully folded, festive creation!
Tips for a Flawless Finish and Sewing Success
Achieving a professional-looking finish for your DIY napkins is incredibly rewarding. Here are some extra tips to help you succeed, especially if you’re a beginner:
- Pressing is Paramount: Do not underestimate the power of a good iron. Pressing after every major seam or fold will make your work look significantly neater and crisper. It “trains” the fabric and ensures sharp creases.
- Consistent Seam Allowance: Strive for a consistent 1/4-inch seam allowance. This directly impacts the final size and shape of your napkin. Use the guides on your sewing machine plate.
- Trim Threads As You Go: Get into the habit of trimming loose threads after each seam. This prevents tangles and keeps your workspace tidy, contributing to a cleaner finished product.
- Use Good Quality Thread: Invest in decent quality polyester thread. It’s strong and less likely to break, making your sewing experience smoother and your finished product more durable.
- Slow and Steady Wins the Race: Don’t rush your sewing. Take your time, especially on curves and when making precise folds. If you’re struggling, slow down your machine or even use the hand wheel for delicate sections.
- Practice Makes Perfect: If you’re new to sewing, consider practicing straight lines and curves on scrap fabric before working on your actual napkin pieces.
- Read Instructions Fully: Always read through all the steps before you start sewing. This helps you visualize the entire process and anticipate potential challenges.
Care and Longevity of Your Reusable Fabric Napkins
To ensure your beautiful Christmas tree fabric napkins remain vibrant and last for many holiday seasons to come, proper care is essential. Fabric napkins are designed for durability, and a simple routine will keep them looking their best:
- Washing: After each use, especially if they have food stains, pre-treat any noticeable spots. Then, machine wash your napkins in cold or warm water on a gentle cycle. Hot water can sometimes set stains or cause colors to fade prematurely.
- Detergent: Use a mild laundry detergent. Avoid harsh bleaches unless absolutely necessary for white fabrics, as they can weaken fibers and alter colors.
- Drying: For best results and to minimize wrinkles, air dry your napkins by laying them flat or hanging them. If you prefer to use a dryer, select a low heat setting and remove them while slightly damp to prevent excessive wrinkling.
- Ironing: To achieve that crisp, fresh look for your table setting, iron your napkins while they are still slightly damp or use a spray bottle to dampen them. A warm iron will typically suffice for cotton fabrics, smoothing out any creases and restoring their pristine appearance.
- Storage: Once clean, dry, and ironed, fold your napkins neatly and store them in a dry, clean place until your next festive gathering. Consider placing them in a breathable fabric bag to protect them from dust.
Beyond Christmas: Customizing Your Napkins for Every Occasion
While these napkins are wonderfully festive for Christmas, the underlying sewing technique can be adapted to create beautiful table linens for any season or celebration. Here are a few ideas to spark your creativity:
- Seasonal Themes: Swap out the Christmas-themed fabric for patterns suitable for other holidays. Think pastel florals for Easter, autumn leaves for Thanksgiving, or patriotic stars and stripes for the Fourth of July.
- Everyday Elegance: Use solid colors or subtle patterns for everyday dining. A set of well-made fabric napkins elevates even a casual meal.
- Personalized Touches: Consider adding a small embroidered initial, a delicate appliqué, or a unique decorative stitch along the edges to personalize your napkins further. This also makes them fantastic, bespoke gifts.
- Varying Sizes: While this pattern is designed for a napkin, you could experiment with scaling it up (or down, if you’re an advanced sewer) for placemats or smaller coasters, creating a cohesive table set.
Your Handmade Holiday Masterpiece Awaits!
There’s immense satisfaction in creating something beautiful and functional with your own hands. These DIY reusable Christmas tree fabric napkins are more than just table decor; they are a testament to your creativity, your commitment to sustainability, and your desire to make your holiday gatherings truly special.
We hope this detailed tutorial has empowered you to embark on this delightful sewing adventure. Whether you’re a seasoned crafter or picking up a needle for the first time, you’ll find joy in the process and pride in the finished product. Imagine the smiles these charming, handmade napkins will bring to your family and guests around the holiday table.
Don’t wait! Gather your materials, follow these steps, and start sewing your own set of memorable Christmas tree fabric napkins today. Share your creations with us and inspire others to embrace the warmth and charm of handmade holiday decor. Happy sewing, and happy holidays!