
Mastering the Diamond Layered Lattice Quilt Block: A Beginner-Friendly Guide
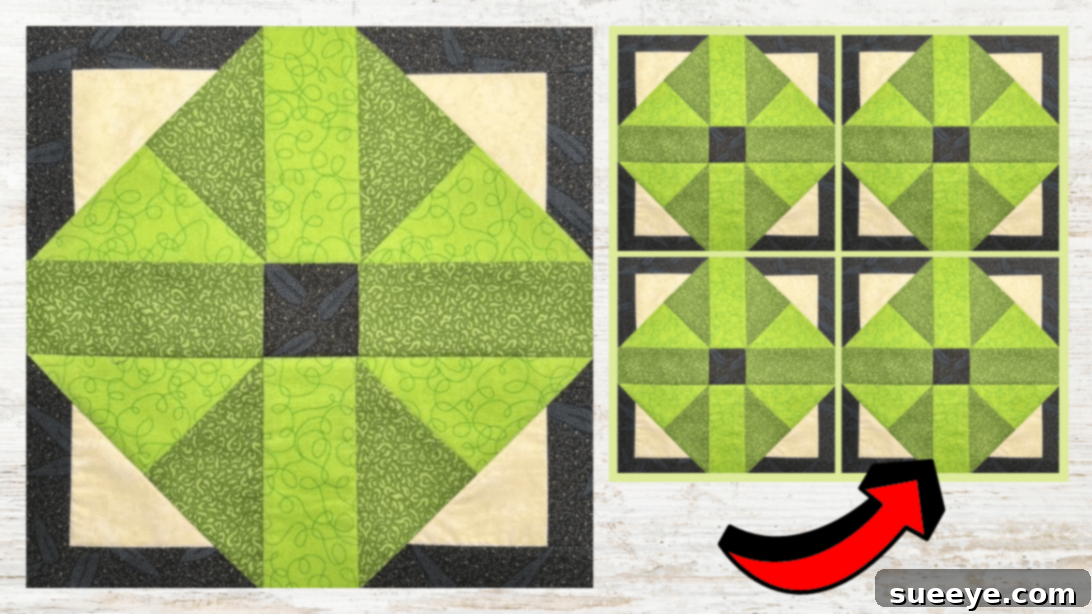
Embark on a delightful quilting journey this weekend by creating the exquisite Diamond Layered Lattice Quilt Block. This captivating design, masterfully presented by Tulip Square on YouTube, offers a stunning visual effect with its interwoven layers and striking diamond shapes. What makes this project truly special is its accessibility: even if you’re new to the world of quilting, you’ll find these steps incredibly straightforward, allowing you to achieve a professional-looking result on your very first attempt.
Quilting is more than just sewing fabric; it’s an art form that allows you to express creativity, comfort, and warmth. The Diamond Layered Lattice pattern is a fantastic choice for expanding your skills, introducing you to fundamental techniques like creating half-square triangles and assembling units with precision. Its versatile nature means it can be adapted to countless color schemes and fabric prints, ensuring that your finished block will be uniquely yours. Whether you envision a vibrant, playful design or a sophisticated, monochromatic masterpiece, this block will serve as a beautiful foundation.
This comprehensive guide will walk you through each step, from selecting your fabrics to the final pressing. We’ll provide detailed instructions and valuable tips to ensure your project is a resounding success. For a complete visual walkthrough, we highly recommend watching the accompanying video tutorial by Tulip Square, linked above, which offers invaluable insights and demonstrations.
Essential Materials for Your Diamond Layered Lattice Quilt Block Project
Gathering the right tools and materials is the first step towards a successful quilting project. Quality supplies not only make the process more enjoyable but also contribute significantly to the final appearance and longevity of your quilt block. Here’s a detailed list of what you’ll need:
- Print Fabric: Choose a main fabric with an interesting pattern or color that will form a significant part of your diamond lattice design. Consider how its pattern will interact when cut and stitched.
- Coordinating Print Fabric: Select a fabric that harmonizes with your main print. This could be a lighter shade, a complementary color, or a subtle pattern that enhances without overpowering the main print.
- Dark Print Fabric: A darker fabric will provide contrast and help define the lattice effect, making your diamonds truly pop. Ensure it has enough depth to stand out against your other chosen fabrics.
- Background Fabric: This fabric typically provides a neutral backdrop, allowing your diamond and lattice elements to shine. Solid colors or very subtle tone-on-tone prints work best here, creating visual rest for the eye.
- Marking Pen, Pencil, or Chalk: Essential for drawing precise lines on your fabric. Choose one that is easily visible on your fabric colors and washable or erasable.
- Ruler: A clear acrylic quilting ruler with precise measurements is indispensable for accurate cutting and marking. Look for one with ¼-inch and ½-inch markings.
- Scissors or Rotary Cutter and a Cutting Mat: While scissors are fine for small cuts, a rotary cutter and self-healing cutting mat are highly recommended for quilters. They allow for faster, more accurate cuts, especially when dealing with multiple layers of fabric.
- Needle and Thread: High-quality polyester or cotton thread that matches your fabric colors, along with suitable sewing machine needles, will ensure durable seams.
- Sewing Machine: A reliable sewing machine with a ¼-inch presser foot is ideal for maintaining consistent seam allowances, which is crucial in quilting.
- Pattern: The specific cutting instructions and dimensions for this block are vital. You can download the pattern directly from Tulip Square’s website. (Click here to download the pattern)
Preparing Your Fabrics for Quilting Success
Before you even pick up your rotary cutter, proper fabric preparation is key to ensuring your finished quilt block is accurate and lies flat. This step is often overlooked by beginners but is fundamental for professional results.
Pre-Washing Your Fabrics
Many quilters pre-wash their fabrics to prevent shrinkage and color bleeding after the quilt is finished. Different fabric types and dyes can react differently to water, and pre-washing ensures that any potential shrinkage occurs before you cut and sew your pieces together. Always follow fabric care instructions, and iron your fabrics thoroughly after washing and drying to remove any wrinkles. If you choose not to pre-wash, be aware that your finished quilt may shrink slightly when washed, potentially creating a desired crinkled effect, but this also carries the risk of uneven shrinkage or color transfer.
Pressing and Starching
After your fabrics are clean and dry, press them meticulously. A well-pressed fabric is easier to cut accurately and sew precisely. For an extra crisp finish, consider using a fabric starch or sizing. Starching gives the fabric more body, making it less prone to stretching and distortion during cutting and piecing. This is particularly helpful for smaller pieces or bias cuts, ensuring your points remain sharp and your edges straight. Always press, don’t iron (glide), to avoid distorting the fabric grain.
How to Construct the Diamond Layered Lattice Quilt Block: Step-by-Step Tutorial
Now that your materials are ready and your fabrics are perfectly prepped, let’s dive into creating this beautiful quilt block. Precision is your best friend in quilting, so take your time with each step.
Step 1: Accurate Cutting and Initial Pairing
Begin by downloading the pattern from Tulip Square’s website. Carefully follow the cutting instructions provided in the pattern. Accuracy at this stage is paramount, as even slight discrepancies can lead to distorted blocks later on. Use your rotary cutter and ruler with precision, ensuring all your fabric pieces are cut to the exact specified dimensions. For instance, if the pattern calls for 6.5-inch squares, measure and cut them exactly. Once cut, take two of the largest squares – one from your print fabric and one from your coordinating print fabric. Place them right sides together, aligning all edges perfectly. This careful stacking prepares them for the creation of Half-Square Triangles (HSTs), a fundamental building block in many quilt designs.
Step 2: Crafting Half-Square Triangles (HSTs)
With your two stacked squares (right sides together), use your marking pen, pencil, or chalk and a ruler to draw a diagonal line from one corner to the opposite corner on the wrong side of the top fabric. This line will serve as your cutting guide. Now, using your sewing machine, stitch a seam ¼ inch away from this marked line on *both* sides of the line. Ensure your stitches are consistent and straight. Once stitched, carefully cut the two squares apart along the diagonal line you drew. You will now have two raw HST units. Press the seams open or to one side (the darker fabric is often preferred for pressing towards) to reduce bulk and ensure your blocks lie flat. Finally, trim any small “nubs” or dog ears that extend beyond the square, and square up your HST units to the size specified in the pattern. Squaring up is a critical step that ensures all your HSTs are uniform, leading to precise block assembly.
Step 3: Assembling the Central Background Unit
This step involves creating the foundational ‘frame’ for your diamond lattice. Take your background square and lay it flat on your work surface. Next, position two small dark fabric strips along opposite sides of the background square. These strips will frame the central square. Stitch them into place using a consistent ¼-inch seam allowance. After stitching, press your seams open or towards the darker fabric. Now, take the two longer dark fabric strips and place them on the remaining unstitched top and bottom sides of the central unit. Stitch these longer strips, completing the framed block unit. Press all seams as you go, ensuring a flat, crisp unit. This meticulous pressing prevents bulk and makes subsequent steps much easier.
Step 4: Combining Units for the Lattice Effect
Now it’s time to bring together the half-square triangles and the framed units to create the layered effect. Take one of the completed background-framed units from Step 3 and one of your HST units from Step 2. Place them right sides together. This step is crucial for achieving the diamond layered look. On the back of one of the units (typically the HST, but check the pattern), draw a diagonal line from corner to corner. Ensure this new diagonal line runs *opposite* to the seam line of your half-square triangle. This opposing diagonal is what creates the dynamic, layered visual. Stitch ¼ inch away from this newly drawn line on both sides, just as you did in Step 2. This technique, often referred to as “snowballing” or “corner-to-corner,” is fundamental to creating intricate quilt designs.
Step 5: Completing the Diamond Layered Units and Final Assembly
After stitching in Step 4, cut along the marked diagonal line. You will now have two new block units that beautifully showcase the diamond layered lattice effect. Carefully press these units open, once again ensuring flat, even seams. Repeat Steps 4 and 5 until you have a total of four identical diamond layered units. These four units will form the complete Diamond Layered Lattice Quilt Block. Now, arrange these four units on your work surface, following the layout demonstrated in the video tutorial by Tulip Square. Pay close attention to the orientation of each unit to ensure the lattice design flows correctly. There may be sashing pieces involved in connecting these four units; if so, refer to the pattern for precise placement and dimensions. Stitch the units together one at a time, carefully matching seams and points. As you stitch each section, pause to press your seams. Pressing after each seam helps in achieving perfect alignment and a professional finish for your final quilt block. When all four units are sewn together, give the entire block a final, thorough press. Square up your finished Diamond Layered Lattice Quilt Block to its final dimensions, trimming any excess fabric to ensure it’s perfectly symmetrical and ready for incorporation into a larger quilt project.
Tips for Quilting Success: Elevating Your Craft
Quilting is a skill that improves with practice, but a few key tips can significantly enhance your experience and the quality of your finished projects.
Consistent Seam Allowance
The ¼-inch seam allowance is the cornerstone of quilting. Invest in a ¼-inch presser foot for your sewing machine, or mark your machine’s throat plate with a guide. Practicing sewing consistent ¼-inch seams on scrap fabric will build muscle memory and ensure your blocks piece together accurately.
Pressing vs. Ironing
Always press your fabric, don’t iron it. Ironing involves gliding the iron across the fabric, which can stretch and distort the grain. Pressing means lifting the iron and placing it down, holding it briefly, and then lifting it again. This motion sets the seams without distorting the fabric. Pressing after every few seams also helps to keep your project flat and manageable.
Squaring Up Blocks
As mentioned, squaring up units and final blocks is crucial. A good quilting ruler and a rotating mat can make this task much easier. Even if your initial cuts or seams are slightly off, squaring up allows you to trim your blocks to their perfect final size, ensuring they fit together beautifully in your larger quilt layout.
Chain Piecing
To save time and thread, especially when making many identical units, try chain piecing. Sew multiple units consecutively without cutting the thread between them. This creates a “chain” of fabric pieces that can be cut apart and pressed later. It’s a fantastic technique for efficiency.
Creative Variations and Project Ideas
The Diamond Layered Lattice Quilt Block is incredibly versatile. Once you’ve mastered the basic construction, you can explore various ways to customize it and incorporate it into different projects.
Color Palette Experimentation
Experiment with different color schemes. Use analogous colors for a serene look, complementary colors for a vibrant pop, or a scrappy mix for a playful, eclectic feel. Try using different textures of fabric, such as linen blends or even wool, for added depth, ensuring they are compatible for washing and care.
Scale and Layout
Adjusting the scale of the block by changing the initial fabric square sizes can dramatically alter its appearance. A larger block might be perfect for a quick throw pillow, while smaller blocks can create an intricate full-sized quilt. Consider how you arrange multiple blocks: setting them straight, on-point, or alternating them with solid squares or other block designs can create entirely new visual effects.
Beyond the Quilt
This beautiful block isn’t just for quilts! Imagine it as the centerpiece of a decorative throw pillow, a striking panel in a tote bag, a unique table runner, or even a framed piece of textile art. Its geometric appeal makes it suitable for many home decor items.
*All image credit belongs to Tulip Square via YouTube. We encourage you to follow and subscribe to her channel for more inspiring quilting tutorials and creative projects!
Embark on Your Quilting Adventure Today!
Creating the Diamond Layered Lattice Quilt Block is a deeply rewarding experience, offering both a creative outlet and a tangible beautiful result. This detailed tutorial, combined with Tulip Square’s excellent video guidance, provides everything you need to confidently tackle this project, regardless of your current skill level. You’ll not only learn to construct a visually stunning block but also reinforce fundamental quilting techniques that will serve you well in all your future fabric endeavors. So, choose your favorite fabrics, set up your sewing machine, and prepare to bring this gorgeous design to life. Happy quilting!