
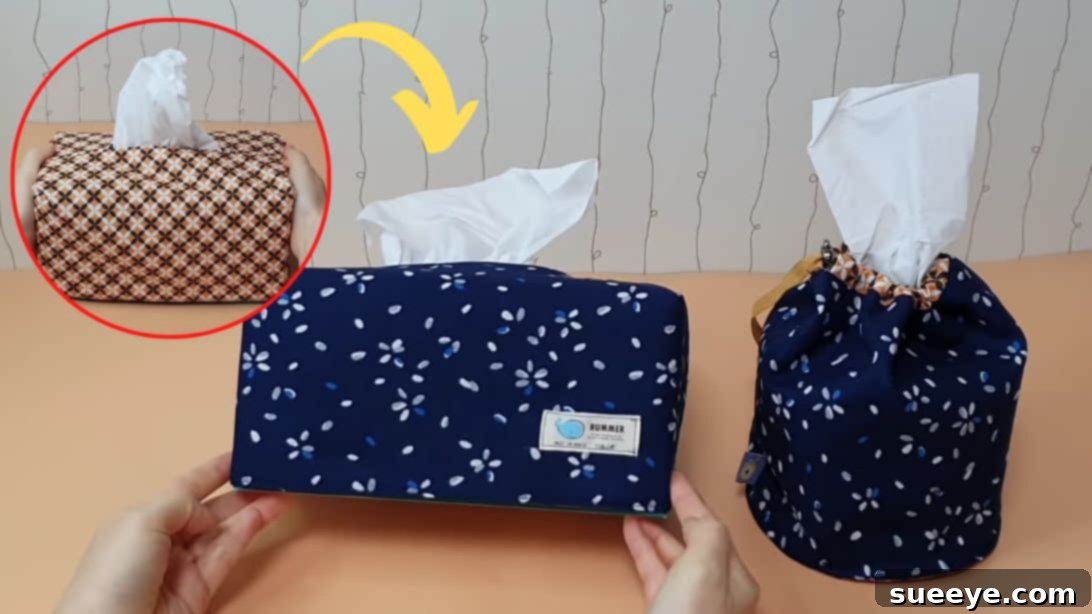
Sew an Easy Reversible Fabric Tissue Box Cover: A Step-by-Step DIY Guide
Transform mundane tissue boxes into stylish home decor pieces with this delightful and simple sewing project. Created by Tendersmile Handmade on YouTube, this reversible fabric tissue box cover offers a fantastic opportunity to personalize your living space or craft thoughtful gifts for friends and family. Its unique reversible design means you get two distinct looks in one, allowing you to easily refresh your decor with a simple flip. Whether you’re a seasoned sewer or just starting, this guide provides clear, concise instructions to help you create a beautiful and functional fabric cover that adds a touch of elegance to any room.
Why Craft Your Own Fabric Tissue Box Cover?
Beyond the simple joy of creating something with your own hands, a DIY fabric tissue box cover offers numerous benefits:
- Personalized Home Decor: Choose fabrics that perfectly match your interior design aesthetic, seasonal themes, or personal preferences, instantly elevating the look of any room.
- Eco-Friendly Choice: Reduce waste by opting for reusable fabric covers instead of constantly buying disposable decorative tissue boxes.
- Cost-Effective: Save money in the long run by purchasing plain, economical tissue boxes and dressing them up with your handmade covers.
- Perfect Handmade Gifts: A custom-made tissue box cover makes a thoughtful and practical gift for housewarmings, birthdays, or holidays.
- Beginner-Friendly Project: This project is ideal for those new to sewing, offering a chance to practice basic skills like measuring, cutting, straight stitching, and pressing.
- Versatility with Reversible Design: Enjoy the flexibility of two distinct patterns or colors, allowing you to change your decor without creating a new cover.
Essential Materials You’ll Need
Gathering all your materials before you begin ensures a smooth and enjoyable sewing process. Here’s a detailed list of what you’ll need to create your reversible fabric tissue box cover:
Fabric Requirements:
Choosing the right fabric is crucial for both aesthetics and durability. Quilting cottons are often recommended for their ease of use, wide variety of prints, and stability. You’ll need two types of fabric for the outer and lining layers to achieve the reversible effect.
- Outer Fabric: Two pieces, each measuring approximately 15 by 7.9 inches. These pieces will form the primary exterior of your tissue box cover.
- Lining Fabric: Two pieces, each measuring approximately 15 by 7.9 inches. These will make up the interior of your cover and the reverse side when flipped.
- Interfacing Fabric: A crucial element for adding structure and stability to your fabric pieces. Choose a lightweight fusible interfacing that is suitable for cotton fabrics. You’ll need enough to cover all four main fabric pieces (both outer and lining).
Other Supplies for Your Sewing Project:
Having the right tools at hand will make each step more precise and efficient.
- Ruler: A clear acrylic ruler is highly recommended for accurate measuring and cutting.
- Scissors or Rotary Cutter and Cutting Mat: A rotary cutter with a self-healing mat offers precision and speed, especially for straight lines. Sharp fabric scissors are also essential for smaller cuts and trimming.
- Marking Pen or Chalk: Fabric-specific pens or chalk are invaluable for marking stitching lines, midpoints, and other important guides directly onto your fabric without leaving permanent marks.
- Fabric Pins and Clips: Pins are classic for holding fabric layers together, while sewing clips (like wonder clips) are excellent for thicker fabrics or when you want to avoid pinholes.
- Needle and Thread: All-purpose polyester thread is suitable for most sewing projects. Choose a color that matches or complements your chosen fabrics.
- Iron, for pressing: An iron is non-negotiable for professional-looking results. Pressing seams open and flat is key to a crisp finish.
- Sewing Machine: A standard sewing machine with a straight stitch capability is all you need for this project. Ensure it’s in good working order and threaded correctly.
Step-by-Step Guide to Crafting Your Reversible Tissue Box Cover
Follow these detailed instructions to sew your beautiful and functional reversible fabric tissue box cover. Remember to take your time with each step, especially with measuring and pressing, as these contribute significantly to a professional finish.
Step 1: Preparing Your Fabric Pieces and Initial Stitching
Accurate preparation is the foundation of any successful sewing project. This first step involves cutting your fabric, applying interfacing, and making the initial stitches that form the opening for the tissues.
- Measure and Cut Your Fabric: Begin by carefully measuring the dimensions of your standard tissue box. While the provided measurements (15 by 7.9 inches) are a good starting point for a common tissue box size, it’s always best to customize if your box is different. Remember to add a consistent seam allowance of approximately 0.4 inches (or 1 cm) all around each piece for both the outer and lining fabrics. Cut all four fabric pieces (two outer, two lining) to your precise dimensions.
- Apply Interfacing: For added structure and durability, press the fusible interfacing onto the wrong side of all your outer and lining fabric pieces according to the interfacing manufacturer’s instructions. This step gives the fabric more body and helps the cover maintain its shape.
- Prepare for Label (Optional) and Corner Marking: If you plan to add a small label, sew it onto one of the outer fabric pieces now. Next, measure the bottom corners of all fabric pieces (both outer and lining) with a 3.5-inch by 1.6-inch template or markings. These measurements will guide you in creating the box-like structure later.
- Find Midpoints and Mark: Fold each of your main fabric pieces in half lengthwise, right sides together, and gently press the fold or mark the midpoint with a pin or fabric pen. This midpoint will serve as a crucial reference for aligning your pieces and determining the central opening.
- Initial Top Seam Stitching for the Opening: Lay the two outer fabric pieces together with their right sides facing, carefully aligning the midpoints you just marked. From the midpoint, measure out approximately 2.3 inches (or 6 cm) on each side, marking these points. This creates a total opening length of about 4.7 inches (or 12 cm). Sew the top edge of these two outer pieces together, starting from one marked point and stopping precisely at the other marked point, leaving the central section open. Repeat this exact process for the two lining fabric pieces.
- Press Seams and Topstitch: Carefully press the seams open on both the outer and lining fabric pieces. Then, flip the fabric so the right sides are facing up. Mark two parallel lines: one slightly above and one slightly below the original stitched seam line in the center. Topstitch along these two new lines. This topstitching not only reinforces the opening but also gives it a neat, professional finish and helps the fabric lie flat.
Step 2: Assembling the Box Structure and Finishing Touches
Now that the top opening is complete, it’s time to give your cover its three-dimensional box shape and join the outer and lining fabrics.
- Sew the Side Seams: With the right sides still facing, fold the fabric down so that the two raw short ends meet. Align these edges carefully and secure them with fabric clips or pins. Stitch along this short side with your 0.4-inch (1 cm) seam allowance. Press the seams open for a clean finish. Repeat this for both the outer and lining fabric units.
- Create the Boxed Corners: This step gives the tissue box cover its necessary depth. Take one corner where you previously marked the 3.5″ x 1.6″ dimensions. Gently pull the fabric layers apart and flatten the corner so that the side seam aligns perfectly with the bottom fold (or the marked line). This creates a triangular shape. Pin or clip this corner in place. Stitch across the marked line. Repeat this for all four corners of the outer fabric piece and all four corners of the lining fabric piece. This forms the essential “box” shape.
- Prepare Outer Piece and Insert Lining: Turn the outer fabric piece right side out. It should now resemble a fabric box. Next, take your lining fabric piece (which is still wrong side out) and carefully insert it into the right-side-out outer fabric piece. Ensure that the right sides of both the outer and lining fabrics are now facing each other, and all raw edges around the bottom opening are perfectly aligned. Pin or clip them securely all the way around the perimeter, leaving a small gap (about 3-4 inches) unstitched at the bottom edge. This gap is crucial for turning the cover right side out.
- Stitch the Bottom Edge and Turn: Stitch all around the bottom edge where you’ve pinned, using your 0.4-inch (1 cm) seam allowance. Remember to leave that turning gap. Once stitched, carefully reach through the unstitched gap and gently pull the entire fabric cover right side out. Take your time to push out all the corners nicely with a point turner or a blunt object to ensure they are crisp and well-defined.
- Final Pressing and Topstitching: Give the entire piece a good press with your iron, paying special attention to flattening the bottom edge and smoothing out any wrinkles. Finally, topstitch around the entire bottom edge. This not only closes the turning gap neatly but also adds a professional, decorative touch and reinforces the seam.
Your reversible fabric tissue box cover is now complete! Simply slide it over your tissue box to instantly elevate your home decor. For those interested in creating a matching napkin cover, refer to the video tutorial by Tendersmile Handmade for comprehensive instructions.
Tips for a Professional Finish
- Pressing is Your Best Friend: Never underestimate the power of an iron. Pressing after every seam will make your project look crisp, professional, and much easier to work with.
- Accurate Seam Allowances: Consistently sewing with the correct seam allowance ensures your pieces fit together perfectly and your final dimensions are accurate.
- Choose Quality Fabrics: While any fabric can work, high-quality quilting cottons are easier to sew, press well, and hold their shape, resulting in a more durable and attractive cover.
- Match Your Thread: Using thread that closely matches your fabric color helps stitches blend in and creates a more polished look.
- Don’t Rush: Take your time with each step, especially when measuring, cutting, and aligning fabrics. Rushing can lead to errors that are time-consuming to fix.
Customization Ideas to Make It Your Own
Once you’ve mastered the basic reversible tissue box cover, unleash your creativity with these customization ideas:
- Fabric Play: Experiment with contrasting patterns, solid colors, or even different fabric textures for the outer and lining sides.
- Embroidery or Appliqué: Add a monogram, a decorative motif, or a small appliqué to one side of the cover for a unique touch.
- Ribbon or Trim: Incorporate decorative ribbon, piping, or lace along the top opening or bottom edge for added flair.
- Seasonal Themes: Create covers for different seasons or holidays, switching them out as your decor changes.
- Different Box Sizes: Adapt the pattern measurements to fit various tissue box shapes and sizes, from tall rectangular boxes to square ones.
Care and Maintenance of Your Fabric Tissue Box Cover
To ensure your beautiful handmade cover lasts for years to come, proper care is essential:
- Machine Washable: Most cotton fabric covers can be machine washed on a gentle cycle with cold water. Avoid hot water, which can cause fabric shrinkage or color fading.
- Mild Detergent: Use a mild, color-safe detergent to protect the fabric’s colors and integrity.
- Air Dry or Low Tumble: For best results, air dry your cover by laying it flat or hanging it. If using a dryer, tumble dry on a low setting to prevent excessive shrinking and wrinkling.
- Iron as Needed: A quick press with a warm iron after washing will help restore its crisp shape and smooth out any wrinkles.
Unleash Your Inner Crafter!
Crafting your own reversible fabric tissue box cover is a rewarding experience that combines practicality with personal style. This simple yet effective sewing project offers endless possibilities for customization and makes a wonderful addition to any home. We hope this detailed guide empowers you to create not just one, but many beautiful covers! Don’t forget to share your creations and inspire others in the sewing community. Happy stitching!
*All image credit belongs to Tendersmile Handmade via YouTube. Follow and subscribe to her channel for more inspiring DIY projects!