
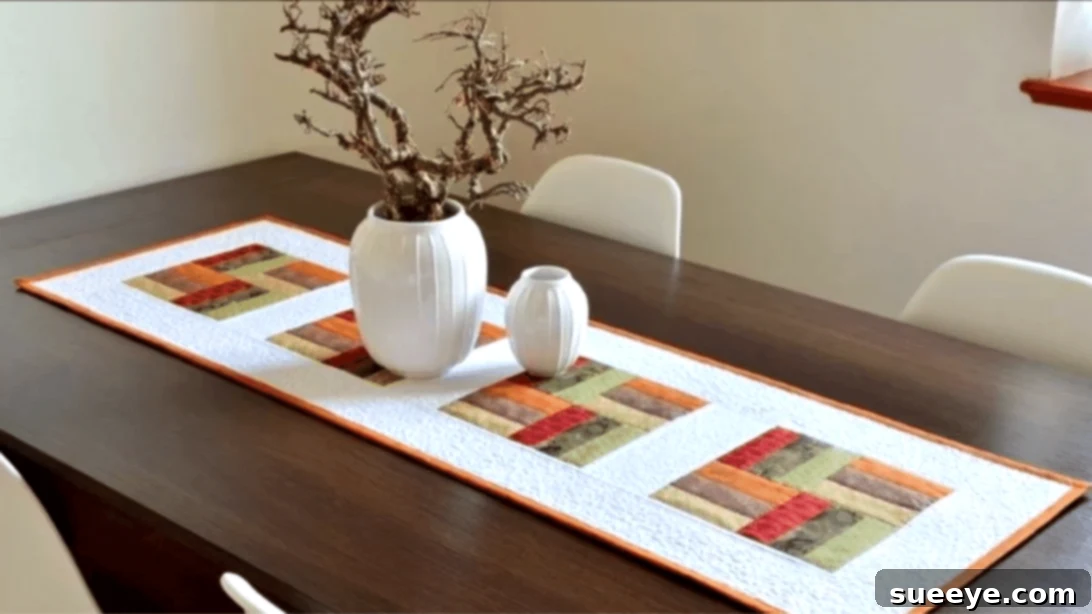
Create a Stunning Quilted Table Runner: A Step-by-Step Guide for Beginners
Elevate your dining experience and infuse your home with personalized charm by crafting a beautiful quilted table runner. More than just a simple decoration, a well-chosen table runner can instantly transform any ordinary table into a captivating focal point, reflecting your unique style and adding warmth to your space. If you’re seeking a rewarding sewing project that combines creative expression with practical utility, then making your own quilted table runner is an exceptional choice. This comprehensive guide will meticulously walk you through every stage of the process, from carefully selecting your fabrics to applying the final finishing stitches, ensuring you create a piece you’ll be incredibly proud to display for years to come.
This specific design, brilliantly demonstrated by the talented Liza Decor on YouTube, showcases a stunning patchwork pattern that is surprisingly approachable for sewists of all skill levels, including those new to quilting. Liza Decor’s video tutorial provides invaluable visual instructions, perfectly complementing the detailed written steps outlined below. Prepare to immerse yourself in an exciting new sewing adventure and discover the immense satisfaction of creating a bespoke quilted table runner that flawlessly embodies your personal aesthetic!
Why Embark on a DIY Quilted Table Runner Project?
Handmade items possess an unparalleled ability to infuse warmth, character, and a sense of history into any living space. Crafting your own quilted table runner offers a multitude of compelling benefits:
- Uniquely Personalized Style: Gain complete creative control over your decor. Select fabrics that perfectly complement your existing home aesthetic, seasonal themes, or specific celebratory occasions. Unlike mass-produced items, your runner will be a truly one-of-a-kind creation.
- Cost-Effective Home Decor: Often, the process of creating your own home decor can be significantly more economical than purchasing high-quality, handcrafted pieces from boutiques, especially if you wisely utilize fabric scraps from previous projects or take advantage of fabric sales.
- Valuable Skill Development: This project serves as an excellent opportunity to practice and refine fundamental sewing and quilting techniques. You’ll gain proficiency in accurate fabric cutting, maintaining consistent seam allowances, proper seam pressing, precise block assembly, and effective binding methods.
- A Thoughtful and Cherished Gift: A handmade quilted table runner makes an extraordinarily heartfelt and deeply cherished gift. It’s perfect for commemorating weddings, housewarmings, birthdays, holidays, or any special milestone, demonstrating a personal touch that store-bought items simply cannot match.
- A Relaxing Creative Outlet: Embrace the therapeutic and calming process of working with diverse fabrics, harmonizing colors, and arranging intricate patterns. Experience the profound joy of transforming simple raw materials into a beautiful, functional, and enduring work of art that enhances your home.
Essential Materials You’ll Need:
To ensure a seamless and thoroughly enjoyable crafting experience, it’s highly recommended to gather all your necessary materials before you begin. Here’s a detailed and expanded list of what you’ll require for this exquisite quilted table runner project:
- Rotary Cutter: This is an indispensable tool for achieving precise, clean, and efficient fabric cuts, which is absolutely crucial in quilting. Ensure your rotary cutter is fitted with a sharp blade for optimal results and to prevent fabric snagging.
- Fabric Ruler (Quilting Ruler): A robust, clear acrylic ruler with clear measurement markings is vital for guiding your rotary cutter and ensuring accurate dimensions. A ruler measuring at least 6×24 inches offers versatility for various cutting tasks.
- Self-Healing Cutting Mat: Protect both your work surface and the delicate blade of your rotary cutter by investing in a good quality self-healing mat. It provides a stable, forgiving surface for cutting.
- 6 Fabrics with Different Colors and Patterns: These fabrics form the vibrant heart of your patchwork design. Opt for a coordinated palette of high-quality quilting cottons. Aim for a balanced mix of solids, subtle small prints, and more prominent larger prints to create compelling visual interest and depth. It is strongly recommended to pre-wash all your fabrics to prevent any potential shrinkage or undesirable color bleeding after the runner is completed and washed.
- Cotton White Fabric (for Accent and Borders): A solid white or an understated off-white cotton fabric will provide a crisp, clean contrast that truly allows your intricate patchwork designs to stand out and pop. Ensure this fabric is also a high-quality quilting cotton for consistency.
- Backing Fabric: You will need a single piece of fabric for the back of your table runner. This piece should be slightly larger than your finished table runner top – ideally, 2 to 3 inches larger on all four sides – to accommodate any shifting during the quilting process.
- Batting Fabric: This is the soft, insulating layer sandwiched between your quilt top and backing, providing loft, structure, and a tactile feel. Choose a batting type specifically suited for machine quilting, such as 100% cotton, a cotton-polyester blend, or bamboo. Similar to the backing, it should be slightly larger than your finished runner top.
- Fabric for Edge Lining (Binding Fabric): This material will be used to create a neat, durable, and professional finish around all the raw edges of your table runner. You’ll typically need strips that are 2.5 inches wide. When sewn together end-to-end, these strips must be long enough to encircle the entire perimeter of your runner, plus an additional 10-12 inches for seamless joining.
- Sewing Machine: A reliable sewing machine equipped with a consistent straight stitch function is fundamental for this project.
- Matching Thread: Select a high-quality polyester or cotton thread that either blends seamlessly with your chosen fabrics or opt for a versatile neutral color like white, cream, or light grey.
- Fabric Scissors or Snips: Essential for precise trimming of threads and for making any smaller, intricate fabric cuts.
- Iron and Ironing Board: Absolutely crucial for pressing seams flat, ensuring your patchwork blocks lie perfectly smooth, and achieving a professional, crisp finish throughout the project.
- Pins or Fabric Clips: These tools are invaluable for securely holding fabric pieces together before and during sewing, preventing shifting and ensuring accurate alignment.
Optimizing Your Fabric Choices for a Stunning Quilted Table Runner
The visual appeal and overall success of your quilted table runner are heavily influenced by your fabric selections. Take your time with this crucial step! Here are some expert tips to guide you in choosing the perfect palette and prints:
- Define Your Theme and Color Palette: Before purchasing, decide on an overarching theme (e.g., seasonal, modern minimalist, traditional country) or a specific color palette (e.g., cool blues and greens, warm autumnal reds and oranges, vibrant jewel tones, or sophisticated neutrals). Utilizing a color wheel can be incredibly helpful for creating harmonious combinations.
- Embrace Variety in Prints: Strive for a thoughtful mix of large-scale prints, delicate small-scale prints, and solid fabrics. This diverse assortment adds essential visual depth and prevents the overall design from appearing either too busy and overwhelming or too bland and uninspired.
- Prioritize Contrast: Ensure there’s adequate contrast between your selected fabrics. Sufficient contrast allows each pattern and color to distinctly stand out, making your overall design clear, dynamic, and engaging. The solid white accent fabric specified in this tutorial is an excellent example of how to effectively introduce contrast.
- Invest in Quality: Always opt for good quality quilting cottons. These fabrics are significantly easier to work with, exhibit less fraying, and are designed to withstand the test of time, repeated washings, and general wear, ensuring your runner remains beautiful.
- The Importance of Pre-Washing: Make it a habit to pre-wash all your fabrics, particularly if they are of different colors. This crucial step prevents any potential dye bleeding that could ruin your project and pre-shrinks the fabrics, ensuring your finished runner maintains its intended shape and color integrity after future washings.
Step-by-Step Tutorial: Crafting Your Quilted Table Runner
Follow these meticulously detailed instructions to successfully create your beautiful patchwork quilted table runner. Remember that working carefully and precisely at each stage will yield the most professional and satisfying results!
Step 1: Precise Preparation of Your Fabric Strips
Begin by using your rotary cutter and quilting ruler to accurately cut two pieces of 2-inch wide strips from each of your six carefully chosen decorative fabrics. The exact length of these strips will correspond to the width of your fabric, typically ranging from 42 to 44 inches from selvage to selvage. Upon completion of this step, you will have a total of 12 individual strips. From this collection, you will then assemble two distinct sets. Each set will be composed of three different designs of strips. Since you have two identical pieces of each fabric design, you will effectively create four unique bundles, with each bundle containing three strips (for example, Fabric A, B, C for the first bundle; Fabric D, E, F for the second; and then duplicate bundles of these combinations). Achieving precision in this initial cutting phase is absolutely critical for the overall professional appearance of your finished table runner.
Step 2: Expert Assembly of the Strip Sets
Take one of your three-strip bundles (e.g., the combination of Fabric A, B, and C) and carefully align the strips along one long edge. Ensure that the right sides of the fabric are facing each other. Using your sewing machine, stitch these strips together lengthwise, maintaining a consistent 1/4-inch seam allowance throughout. Repeat this precise process for all four of your unique three-strip bundles. Once each bundle is sewn, it is imperative to press your seams. You can choose to press them open (spreading the seam allowance flat on both sides of the seam) or press them consistently to one side (folding both seam allowances in the same direction). Consistency in your pressing method is key to making your blocks lie perfectly flat and preventing undesirable bulk, which can distort your finished project.
Step 3: Accurately Cutting Your Patchwork Squares
With your four strip sets now sewn and meticulously pressed, the next step involves cutting them into individual patchwork units. Using your rotary cutter and quilting ruler, carefully measure and cut each sewn strip set into 5-inch wide squares. The number of 5-inch squares you can obtain from each strip set will depend on its original length. For instance, if your sewn strip set measures approximately 42 inches in length, you should be able to yield 8 complete 5-inch squares (42 inches divided by 5 inches equals 8.4, so 8 full squares). Ensure you cut enough of these patchwork squares for the subsequent assembly steps.
Step 4: Constructing Larger Patchwork Blocks
From the collection of 5-inch squares you meticulously cut in the previous step, select two squares of each distinct pattern or strip combination you’ve created (for example, if you have ‘ABC’ strip sets and ‘DEF’ strip sets, you would choose two ‘ABC’ squares and two ‘DEF’ squares). Arrange these four squares into a larger, cohesive square formation. The critical design element here is to assemble them with alternating directions of the fabric strips within each individual 5-inch square. For instance, if the strips in one square run horizontally, strategically position an adjacent square so its strips run vertically, or in another contrasting direction. This thoughtful arrangement creates a dynamic, visually captivating pattern within your larger blocks. Pin the right sides of these four squares together securely and sew them with a consistent 1/4-inch seam allowance to form a larger, unified block. Press your seams carefully to ensure flatness and accuracy. Repeat this precise process until all your remaining 5-inch squares are utilized and transformed into these larger, assembled patchwork blocks. You should now have several of these impressive patchwork blocks, prepared and ready for the next significant stage of your table runner assembly.
Step 5: Artfully Incorporating White Accent Fabric
Now, let’s introduce the striking contrast of the white fabric to beautifully frame your intricate patchwork. Begin by cutting several 4-inch wide strips from your chosen white cotton fabric. For three of your recently assembled larger patchwork blocks, you will carefully sew one of these white strips to a single side of each block. It is crucial to ensure that you consistently sew the white fabric onto the *same side* of each of these three selected blocks (for instance, always attach it to the right side of the block, or consistently to the bottom side). After sewing, trim any excess white fabric precisely using your rotary cutter to achieve a perfectly clean edge. Once these three blocks have their white accent strips attached, carefully sew them together in a continuous row. For the remaining patchwork blocks, which are destined to form the ends of your table runner, you must not sew white rectangular pieces onto them. This deliberate distinction in design helps to create a visually appealing and balanced central section flanked by elegant, unbordered patchwork ends.
Step 6: Skillfully Adding the Borders to Your Table Runner Top
Your table runner top is truly beginning to take on its impressive final form! Now it’s time to apply the crucial outer borders. Cut two pieces of your white cotton fabric, each meticulously measuring approximately 4 inches wide by 45 inches long (or precisely the measured length of your assembled table runner top at this stage). Sew one of these long white strips to each of the long sides of your table runner top, ensuring that the right sides of the fabrics are facing each other and maintaining a consistent 1/4-inch seam allowance. After sewing, neatly trim away any excess fabric. Next, if you have additional 4-inch wide white fabric remaining, or if you need to cut new pieces to size, measure and cut two strips that will perfectly fit the top and bottom (the shorter ends) of your table runner. Sew these border strips onto the respective ends, again with right sides together and a 1/4-inch seam allowance. Carefully trim any remaining excess. These thoughtfully applied borders will provide a beautiful, crisp frame for your elaborate patchwork design and lend your runner a truly professional and finished aesthetic.
Step 7: The Art of Quilting and Flawless Finishing
This pivotal step is where your table runner truly transforms into a “quilted” masterpiece! Begin by laying your backing fabric flat on a clean, spacious surface, ensuring the wrong side is facing up and all wrinkles are meticulously smoothed out. Carefully place your batting fabric directly on top of the backing, centering it precisely, and again, smooth out any creases. Finally, position your fully assembled table runner top on top of the batting, right side up, making sure it is also perfectly centered and free of wrinkles. This arrangement creates what is known as your “quilt sandwich.” Secure these three critical layers together by carefully basting them. You can employ various basting methods: using safety pins (special quilting pins with curved backs are ideal), applying basting spray, or even utilizing long, loose hand stitches. The primary objective of basting is to prevent any shifting or puckering of the layers while you proceed with the quilting.
Once your quilt sandwich is securely basted, it’s time to quilt! Using your sewing machine, you will perform a “top stitch” or quilting stitch. This stitch penetrates all three layers – the top, batting, and backing – permanently holding them together. You have several creative options for your quilting pattern: you can choose a simple yet effective “stitch in the ditch” (sewing precisely along the existing seam lines of your patchwork), straight lines running either parallel or diagonally, or if you’re feeling more adventurous, explore free-motion quilting designs. The key is to distribute your quilting stitches evenly across the entire surface of the runner for structural integrity and aesthetic balance. After completing your quilting, meticulously trim away any excess backing and batting fabric so that it is perfectly flush with the edges of your table runner top.
Finally, it’s time for the binding – the “edge lining” mentioned in your materials list. Take your prepared binding strips (the 2.5-inch wide strips that you’ve sewn end-to-end to create one continuous long strip). Attach the binding to the front of your table runner, carefully aligning the raw edges of the binding with the raw edges of the runner, and sew with a 1/4-inch seam. Once sewn, fold the binding over to the back of the runner, press it neatly with an iron, and then either hand-stitch or machine-stitch it down. This final step creates a clean, durable, and professional finish for all the edges of your exquisite, handmade quilted table runner.
Expert Tips for Perfect Quilting and a Beautiful Finish
To ensure your quilted table runner achieves the highest quality and durability, keep these expert tips in mind:
- Maintain a Consistent Seam Allowance: In quilting, a precise 1/4-inch seam allowance is the industry standard. Practice consistently maintaining this measurement for accurate block construction and seamless joins.
- Master the Art of Pressing: When quilting, you “press” (lift and carefully place the iron down) rather than “iron” (slide the iron back and forth). Pressing prevents fabric distortion and ensures your blocks lie perfectly flat.
- Utilize Sharp Tools: Always work with a sharp rotary cutter blade for clean, crisp cuts and ensure your sewing machine has a fresh, appropriate needle for smooth, skipped-stitch-free stitching.
- Basting is Non-Negotiable: Never skip or skimp on the basting process. Thorough basting is critical for preventing puckering, shifting, and uneven layers during the actual quilting phase.
- Embrace Patience: Quilting is an inherently meditative and creative process. Allow yourself to fully enjoy each step, work at a comfortable pace, and resist the temptation to rush, as patience yields superior results.
Caring for Your Handmade Quilted Table Runner
To ensure your beautiful quilted table runner remains vibrant and structurally sound for many years of enjoyment, proper care is absolutely essential:
- Washing Instructions: If you’ve used pre-washed cotton fabrics, your runner can typically be machine washed on a gentle cycle using cold water and a mild, color-safe detergent. For added protection, consider placing it in a large mesh laundry bag before washing.
- Drying Procedures: For best results, tumble dry on a very low heat setting or, ideally, lay your runner flat to air dry. Gently reshape it while it is still damp to maintain its form. Avoid using high heat, which can cause significant shrinkage or potential damage to your fabrics and batting.
- Ironing Guidelines: If your runner requires ironing to remove any wrinkles, use a medium heat setting with steam. Always test a small, inconspicuous area first.
- Optimal Storage: To prevent unwanted creases or stress on your quilting stitches, store your table runner flat or gently rolled. Avoid folding it sharply for extended periods.
Customizing Your Quilted Table Runner Design
Once you’ve confidently mastered this tutorial and created your first table runner, consider these inspiring ideas to make your subsequent projects even more uniquely yours:
- Tailoring Size Adjustments: Easily modify the number of patchwork blocks or alter the width of the border strips to create a runner that is perfectly proportioned for any table size.
- Creative Fabric Play: Experiment boldly with diverse color schemes, explore different fabric textures (such as luxurious linen blends or shimmering metallics), or incorporate whimsical novelty prints that reflect your personality.
- Exploring Quilting Patterns: Move beyond simple straight lines! Investigate options like stippling, intricate loops, or various free-motion quilting designs to introduce additional texture and captivating visual interest.
- Adding Embellishments: Enhance your runner with decorative hand or machine stitching, carefully placed beads, or charming small appliqués for an extra touch of personalized flair (always ensure any embellishments are washable if intended for practical use).
- Designing a Reversible Runner: Maximize versatility by making your runner reversible! Use a completely different design or coordinating fabric on the backing, effectively giving you two distinct looks in one beautiful piece.
Conclusion: Your Handmade Masterpiece Awaits!
Congratulations! You have now acquired the knowledge and skills necessary to create a truly stunning quilted table runner that will undoubtedly elevate your home decor and serve as a testament to your crafting prowess. This project is not merely a fantastic avenue for expressing your innate creativity but also provides you with a beautiful, highly functional, and durable piece that can be cherished and enjoyed for many years to come. Whether you choose to lovingly gift it to a dear friend or family member, or proudly adorn your own dining table, the profound satisfaction derived from creating a handmade item is truly unmatched. We wholeheartedly encourage you to share your finished project with the crafting community and inspire others to embark on their own exciting creative journeys!