
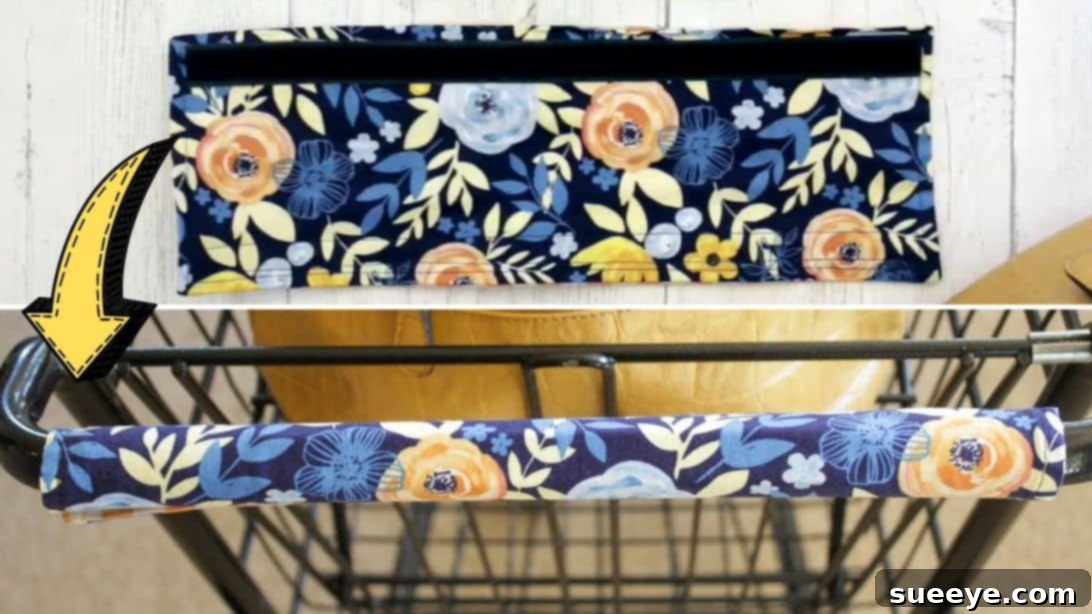
DIY Washable Shopping Cart Handle Cover: Sew It Yourself for Hygiene and Comfort
In today’s world, prioritizing hygiene and personal comfort while out and about has become more important than ever. Public spaces, including grocery stores, often harbor countless germs, and shopping cart handles are no exception. Fortunately, a simple and effective solution is within reach for anyone with a basic sewing machine: a washable shopping cart handle cover. This brilliant sewing project idea, originally shared by eHow on YouTube, is incredibly simple, straightforward, and quick to make. Even absolute beginners to sewing can tackle this project with confidence and achieve perfect results on their very first attempt.
Imagine the peace of mind knowing that every time you head to the store, you can effortlessly slip a clean, personal cover over the shopping cart handle. This DIY solution is not only a fantastic way to boost your hygiene but also incredibly practical. Since it’s fully washable, you can reuse it countless times, making it an eco-friendly alternative to disposable wipes or constantly sanitizing your hands. You’ll be surprised how quickly you can create one (or several!) of these handy covers. Dive into this step-by-step tutorial now and discover the joy of crafting a useful item that enhances your everyday life.
Why Sew a Washable Shopping Cart Handle Cover?
Beyond the obvious hygiene benefits, there are numerous compelling reasons to invest a little time into creating your own reusable shopping cart handle cover:
- Enhanced Hygiene: Public shopping carts are touched by hundreds of hands daily, making them breeding grounds for bacteria and viruses. A personal, washable cover acts as a protective barrier, reducing your exposure to germs.
- Increased Comfort: Many cart handles are made of cold metal or hard plastic, which can be uncomfortable to grip, especially during longer shopping trips. A fabric cover provides a softer, warmer, and more pleasant surface.
- Eco-Friendly Choice: By using a reusable fabric cover, you reduce the need for single-use disinfecting wipes or paper towels, contributing to less waste and a greener planet.
- Personal Style: This project offers a wonderful opportunity to express your personal style. Choose fabrics with fun patterns, vibrant colors, or elegant designs that reflect your taste.
- Beginner-Friendly Project: It’s an excellent project for new sewers to practice basic skills like cutting, straight stitching, turning, and topstitching. The small size makes it less intimidating than larger garments or home decor items.
- Quick and Economical: You can whip up a cover in under an hour, often using fabric scraps you already have on hand, making it a highly cost-effective and time-efficient DIY solution.
- Perfect Gift Idea: Handmade cart handle covers make thoughtful and practical gifts for friends and family, especially new parents or those who frequently shop.
Materials for Your Shopping Cart Handle Cover
Gathering your supplies is the first exciting step in any sewing project. For this simple cart handle cover, you’ll need just a few basic items, many of which you might already have in your sewing kit:
- Main fabric: Choose a durable, washable fabric like cotton, canvas, or even a sturdy linen blend. This will be the outer, visible part of your cover, so pick a print or color you love!
- Lining fabric: A lighter-weight cotton or similar fabric works well for the lining. It adds structure and a clean finish. It can be a coordinating solid or a subtle pattern.
- Scissors or rotary cutter and a cutting mat: A rotary cutter offers precision and speed, especially for straight lines, but sharp fabric scissors will work just as well.
- Ruler: A clear quilting ruler is ideal for accurate measuring and cutting.
- Marking pen or chalk: Essential for transferring measurements and marking sewing lines onto your fabric.
- Fabric pins or clips: To hold your fabric pieces together securely while you sew.
- Hook-and-loop fastener or velcro: This is crucial for attaching and detaching your cover from the cart handle. Ensure you have both the ‘hook’ and ‘loop’ sides.
- Needle and thread: For any hand-sewing touch-ups, although most of this project will be machine-sewn. Choose thread that matches or complements your fabric.
- Iron, for pressing: An iron is your best friend in sewing, ensuring crisp seams and a professional finish. Don’t skip this step!
- Sewing machine: Any basic sewing machine capable of a straight stitch will be perfect for this project.
Step-by-Step Directions: Sewing Your Cart Handle Cover
Follow these detailed instructions to create your own washable shopping cart handle cover. Take your time, especially if you’re a beginner, and enjoy the process of bringing your fabric to life!
Step 1: Prepare, Cut, and Assemble Your Fabric
The foundation of a successful sewing project lies in precise preparation and cutting. First, decide on the ideal size for your cart handle cover. Standard shopping carts often have different handle dimensions. If you’re aiming to create a cover for a larger, more robust cart, a measurement of approximately 20cm x 6cm (roughly 7.8 x 2.3 inches) is a good starting point for the finished, folded size. For smaller carts or perhaps even a child’s stroller, a more compact size of 15cm x 6cm (approximately 5.9 x 2.3 inches) might be more suitable. Remember, these are finished dimensions, so you’ll need to cut larger pieces to account for seam allowances. To determine the fabric rectangle size, you’ll effectively need to double the width and add seam allowances. For instance, for a 6cm finished width, you’ll cut approximately 15cm to 16cm in total width to allow for folding and seam allowance.
Once you’ve settled on your desired dimensions, carefully cut one piece from your main fabric and one identical piece from your lining fabric. Accuracy here is key for a neat finish. Lay the two fabric pieces together, ensuring their “right sides” (the sides you want to be visible on the finished product) are facing each other. This is crucial for the turning step later. Align the edges perfectly, then secure them in place all around with fabric pins or clips. Place pins generously, especially if you’re a beginner, to prevent shifting while sewing.
Now, take your pinned fabric to the sewing machine. You will sew along all four edges with a consistent ½ inch (about 1.25 cm) seam allowance. As you stitch, make sure to leave an unsewn opening of approximately 5 inches (about 12.5 cm) along one of the longer sides. This gap is vital for turning your project right side out. After sewing, carefully trim off the excess fabric from the corners diagonally, getting close to the stitching line but being very careful not to cut through it. This ‘notching’ or ‘clipping’ of the corners will reduce bulk and allow the corners to turn out sharp and neat.
Step 2: Turn, Press, Topstitch, and Attach Fasteners
Once your sewing is complete, it’s time to bring your cover to its final shape. Reach inside the opening you left along the side and carefully pull the entire fabric piece right side out. Take your time with this step, gently pushing out all the corners with a turning tool or a blunt object (like a chopstick) to ensure they are crisp and well-defined. After turning, pay close attention to the raw edges of the opening. Carefully tuck these seam allowances inward, aligning them with the finished seam line, so they are flush and neat.
Now, take your iron and give the entire piece a thorough press. This step is incredibly important for a professional-looking finish. Pressing helps to flatten the seams, define the edges, and remove any wrinkles, giving your cover a crisp, finished appearance. Pay extra attention to pressing the opening flat and smooth. Once pressed, secure the opening with a few pins. You will now topstitch around the entire perimeter of the cover. This topstitching serves multiple purposes: it secures the opening permanently closed, adds durability to the seams, and gives a clean, decorative finish to your project. Use a ½ inch seam allowance for your topstitch, maintaining an even distance from the edge all the way around.
The final crucial step is attaching the hook-and-loop fastener (Velcro). Separate the two sides of your fastener. Take one side (e.g., the ‘hook’ side) and place it along one of the bottom edges of what will be the main fabric side of your cover. Stitch this piece firmly in place. Now, flip your cover over to what will be the lining fabric side. Take the other side of your hook-and-loop fastener (e.g., the ‘loop’ side) and place it along the opposite edge, on the *top* of the lining fabric. The trick here is to ensure that when you wrap your cover around a cart handle, these two pieces of Velcro will perfectly meet and align to secure the cover. Double-check this alignment before sewing. Stitch this second piece of Velcro securely in place. And just like that, you’re done! Your very own washable, reusable, and comfortable shopping cart handle cover is ready for its debut.
Tips for Success and Customization
To make your shopping cart handle cover truly your own and ensure its longevity, consider these additional tips:
- Fabric Selection: Opt for pre-washed and pressed fabrics to prevent shrinking and ensure accurate cutting. Cotton quilting fabrics are excellent choices due to their durability, washability, and vast array of patterns.
- Adding Padding: For extra comfort, you can add a thin layer of batting or fusible fleece between your main and lining fabrics before sewing. This will make the cover softer and slightly more cushioned.
- Personalization: Consider embroidering your initials, a small design, or attaching a decorative patch to your main fabric before assembling. This makes your cover uniquely yours and easier to spot.
- Gift Giving: These covers make fantastic, thoughtful, and practical gifts. Consider making a set in different fabrics or themes for various occasions or recipients.
- Care Instructions: Since the primary purpose is hygiene, regular washing is key. Most cotton covers can be machine-washed on a gentle cycle with like colors and tumble-dried on low, or air-dried to extend their life.
- Troubleshooting: If your seams aren’t perfectly straight, don’t worry! Practice makes perfect. For uneven corners after turning, a point turner can help get those crisp edges.
- Experiment with Sizing: Measure the handles of other items you frequently use, like stroller bars, bicycle handlebars, or even gym equipment, to create custom covers for various needs.
Final Thoughts on Your Easy Sew Project
Creating your own washable shopping cart handle cover is a rewarding project that combines practicality with the satisfaction of DIY crafting. It’s a simple sewing endeavor that yields a highly functional item, perfect for anyone looking to add a touch of personal hygiene and comfort to their shopping routine. This project not only offers a fantastic way to protect yourself from germs but also promotes sustainability by encouraging reuse.
We hope this expanded tutorial has provided you with all the details and encouragement you need to embark on this easy sewing journey. With just a few basic materials and a little time, you can have a collection of these versatile covers ready for every shopping trip. Don’t hesitate to experiment with different fabrics and personalize your creations. Happy sewing!
*All image credit belongs to eHow via YouTube. Follow and subscribe to their channel for more inspiring and easy-to-follow DIY tutorials!